Note: Pat Smith is a long-time tech advisor for Inliners International. His career includes stints as a mechanic/machinist, automotive instructor, and engine builder. Pat is the crew chief for Dyson Racing, reigning Grand-Am Sports racing champions.
261 Street Engine Build
By Pat Smith
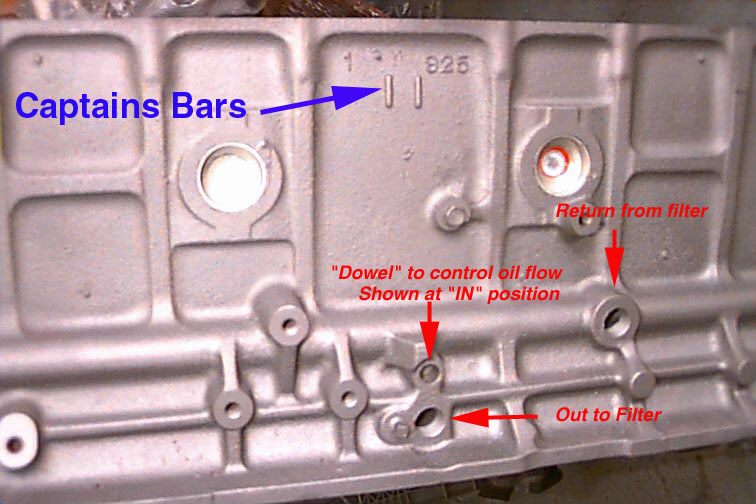
Block: The 261 was introduced in 1954 and was used in Chevrolets "big" trucks and school buses. They can be identified by "Captains Bars" (II) cast in the block above the starter and top center on the driver’s side of the block. The block is similar to the 235 except for the bore, which is now 3.750" (up from 3.5625") and the wrist pin size, which has been enlarged to .927". Almost all other 235 parts are interchangeable!
On the later blocks there are provisions, on the driver’s side to plumb a full flow / full pressure, remote oil filter (use at least ½" line). Earlier blocks use the 216/235 "by-pass" oil filter, which steals oil pressure, and filters a very small percentage of the oil. In addition, some of the earlier blocks had no oil passage through the lifter bores, so the use of hydraulic lifters is precluded.
Modifications: Normal block stripping and cleaning apply. You have to remove the pan in order to remove the two lower screws, which hold on the timing cover. When apart these holes can be tapped from the outside and bolts installed. The bore can be increased to 3.875 (278 Cu. In.) with fair safety. And, in an emergency, in the case of saving a block, can go another .020" to .030". I like to go .110", which leaves a margin of safety and 276 cu. in. Rings used will be Buick V6 + .060".
The top of the block should be milled a minimum amount, just enough to flatten the surface. If possible, find someone who will mill parallel to the crank's centerline. The machinist will have to shim the rear bearing bore, as it is a different size then the front.
The 4 main bearings are all different sizes, which precludes align honing and promotes a very expensive line-boring job. NEITHER IS NECESSARY on a street engine, unless a bearing has been spun.
BEWARE: These engines did not have tangs on the upper bearings, so it is almost impossible to tell which direction the center caps should go back on!! Mark the caps and adjoining block surface, before you disassemble. Refer to the bearing section for determining bearing sizes and grinding the crank.
Pistons: All of the above over-bores depend on very expensive custom pistons. I like JE forged, cam ground pistons. Ross is a slightly cheaper alternative. If you are looking for an even cheaper alternative, stock replacement pistons are available in .030, .060 and .080" oversize. You will be stuck however with odd size, expensive, replacement rings. These are available only in cast iron or chrome!
Tom Langdon (Stovebolt Engine Co.) has devised a combination using GMC rods and Buick V6 pistons. I prefer flat top pistons for street use. You may or may not have to cut valve pockets.
If you are using GMC rods; be sure you tell the piston manufacturer the width of the small end of the rod. It is wider than the 261 rod. Also, that you will need pin retaining clips, and that the compression height will have to be 1.840"
All street pistons should be flat top design, as compression with the 848 head will be right around 9 to 1, which is about perfect for today's regular fuel. Of course you will want to buy high-octane fuel, but paying the price gets pretty old after a short time. To enjoy your rod, you have to use it!
Piston to intake valve clearance is a sometimes thing. Because of cam timing, lift, rod length and head milling, you may or may not have a problem. You’ll have to do a trial engine assembly, and check the clearance. You may have to pull the pistons for valve relief cutting. More details will be included later.
Connecting rods: Stock rods can be used. They are the same as 235 except for the .927" pin. Caution: These rods are easily twisted when disassembling. Place a rod, which will fit through the pin, into a vise and hold the assembly with that device when the pinch bolt is tightened or loosened.
A longer rod can be used to good advantage. The easiest, although not the lightest, is to use a late GMC 270 or early GMC 302 rod. It is a 7" rod compared to the 261 length of 6.810". The best forging number will be a 2135419 as this uses a .990" pin. These are also free floating pins.
The rod has to be modified by turning the "big end", equally on both sides, to the 261 width of 1.240" and then rebalanced. GMC rod bearings will have to be used.
The GMC has a wide "small end", be sure to tell any piston manufacturer the width.
Rings: Any custom pistons should be ordered in a standard, common bore size, that way quality, moly piston rings can be ordered. 3.750" (+. 030", +. 060"), 3.800" (+. 030", +. 060") and 3.875" (+ .030") are all possibilities. These are Chevy V8 or Buick V6 sizes. They all use a modern 5/64, 5/64, 3/16 ring package. Cast iron, chrome and molly rings are available.
Stock, replacement, overbore pistons will be limited to an expensive, very wide, ring package in cast iron and chrome ring styles only.
The bore must be finished with the right stone grit for the piston rings chosen.
Crankshaft: The stock crank is a forged unit, but it is old. It should be hot tanked and magnafluxed. If it has to be turned, the throws can be indexed, so that they are right on the money as far as location. It will of course have to be rebalanced. Balancing, by the way is not done as a V8, i.e. with bob weights, inline cranks are balanced all alone, or possibly with the flywheel and harmonic balancer in place.
One more modification should be made. Drill and tap the crank snout for a ½ X 20 balancer retaining bolt from a big block Chevy. V8. This will help install the balancer without damage and retain the balancer if you get carried away with the RPMs.
Harmonic Balancer: A 3 groove 292 Chevy 6 balancer, part #10141202 makes an excellent, and improved, replacement for the not so good 261 unit. It should have the rear groove turned off and it’s snout shortened slightly. There was an article on this in an earlier 12 Port News. Or for a Stamped, legal size envelope, I can send you a photocopy.
Bearing clearances: Do not get carried away with these. Stock clearances of .0015 to .003" work well. I shoot for a median of .002" for street use. Truthfully, unless you do it right, or unless you have main bearings with adjustment shims, you will have trouble getting the clearances on the mains down to that figure!
The right way to do it: Clean your block and main caps, clean and magnaflux your crank. Measure and decide to what size your crank needs to be ground. Buy the main bearings in that size and install them in the empty block. Torque the main bearing caps with a light oil on the threads. Measure the ID of the installed bearings and record it. Subtract the .002" you want for oil clearance and you will have the sizes for the crank grinder to match! If your crank grinder won’t grind to the specified clearances, take your business elsewhere!
Rear oil seal: These engines were never equipped, from the factory, with a
neoprene, lip type seal. They used rope seals. If you have shimmed main bearing
caps, use the rope seal. If you have no shim stack under the main caps, you can
use the neoprene lip seal. Personally, I use the rope seal as the engines were
designed for. Don't forget to grind the seal surface on the crankshaft on the
crankshaft to remove nicks, burrs, grooving and corrosion.
PROBLEM; because OSHA or some other big brother agency has decided we should not have asbestos around, there are no good rope seals being manufactured! They new ones are made of fiberglass and don’t seal! Find an original NOS seal*.
Something to watch: Oil pans from junkyard engines have had water sitting in them. After hot tanking and glass beading, they can become porous. Look carefully, or you will, as I did, blame the puddle of oil on an innocent rear main seal!
Oiling system: A new, stock replacement, oil pump will work fine. Shim the oil pressure relief spring about .060". The pump should be a NAPA or TRW, WITH A GASKET UNDER THE PUMP COVER. This is especially important if you are using hydraulic lifters, as any air in the oiling system will cause the lifters to tick, as air is compressible. Seal all the joints on the pickup for the same reason.
When you install the pump in the block, tighten the pointed bolt snug AND THEN BACK IT OFF ½ TURN. Hold it from turning and tighten the lock nut. The pump should wiggle in the block clamp, slightly.
I like to go through the adapters on the oil pump tubes. I open them up with the next size drill and taper the holes with a countersink to smooth the flow.
Oil Filters: If you have a late 261 with the ½" pipe thread holes on the left side, great! These engines have a full pressure full flow oil filter system. What that means is that 100% of the oil from the pump goes through the filter before it enters the engine. Maybe! Over the lower hole, you will see a boss with a dowel in the middle. If the dowel is out flush with the block, there will be a passage opened between the oil pump outlet and the main oil galley. If the dowel has been pushed in, all the oil has to go through the filter first. I don’t think I would try to move the dowel either in, or out. I would be afraid of breaking the block.
Earlier engines had no filter, or a by-pass filter. These took oil, under pressure, from the main oil galley, sent it through the filter and then dumped it back in the pan!! Better than no oil filter, barely. It lowers the oil pressure and filters only a small percentage of the oil. Use a ¼" line to keep the oil pressure as high as it should be.
Timing gears: The 235 used fiber timing gears for silence. The 261 truck engines used an aluminum set. I recommend using the stronger aluminum set. You must heat the aluminum gear to get it on the cam without damage. The best way is in a bowl of oil in a furnace. Read the directions!
Behind the large camshaft gear is a thrust plate to retain the cam. The thrust plate is not interchangeable with the 250/292 style engines. They are a different thickness.
These gears have woodruff keys to locate them on the block and crank. Offset keys are available from Mr. Gasket and all the cam manufacturers for degreeing in the cam.
I have NEVER had a 6cyl cam degree in, using the factory marks! You must degree in your new cam.
Camshaft: For street use, you will be happiest with a cam having an advertised duration of about 260° intake and 260° to 270° of exhaust duration. That will be about 210° to 212° Intake and 218° to 220° exhaust duration at .050" lift. Lift should be about .450". Small? Yes. Why? Lousy rocker geometry will cause rapid guide wear and you will have less problems with piston to intake valve clearance. Yes, going more will help power but this is a street engine remember. Long life and reasonable fuel mileage are important .
Cam cores are becoming increasingly hard to come buy. If you have a cast iron cam, good. It can be suitably reground. Crane, Howard and Iskenderian will regrind
your core. Competition Cams still has cores, you must specify a Chevrolet "Blue Flame" six.
Recommendations: Isky solid lifter #C4, Crane Hydraulic #H-210/2934-2S-10, Comp Cams Hydraulic #260-7/268-6 H10. These I have used and was quite happy with. There are others. All these cams were installed 4° advanced.
Rocker arms: There are no commercially made rockers that I know of. A few custom-made items, but they are few and far between and EXPENSIVE. There are actually 4 different style of rockers on that shaft! Mark them well before disassembly.
A good valve train kit can be assembled from replacement parts that will work quite well with the above cams.
Lifters: On a cast iron cam, YOU MUST USE a lifter from a ’56 to ’62 solid lifter truck engine, either 235 or 261. Hydraulics should be from the same years 235 passenger car. DO NOT use the "tulip top" lifters which the books call for in the earlier truck engines. These are for stock cams and steel cams only.
Pushrods: 5/16 tubular replacement pushrods from Sealed Power are far superior to the stock, ¼" solid, rods. They must be from the same engines as the lifters were ordered for. They will probably be 10 5/8" long.
Valve springs: Sissels automotive can supply you with really good springs and retainers. Isky can also supply springs and retainers. Comp cams and Crane seem not to have anything for this engine. Buick 455 springs, Sealed Power #VS715 work well.
Valve Spring retainers: Use the stock 235 / 261 spring retainers (without the rotators) with the Buick springs.
Valve spring keys: Use heavy-duty keys of the stock angle with the Buick springs and stock retainers. Use keys from Sissell or Isky with their parts.
Valve seals: The stock "O" ring seals are notoriously bad. Use a good umbrella type seal.
Cylinder Head: All ’54 – ’62 235 / 261 heads seem to be the same as far as ports go. The differences are in the volume of the combustion chamber. Because of the strange design of the combustion chamber and the location of the intake valve, the deck clearance is quite large. Compression is hard to come buy, so you will want the smallest combustion chamber available. The head with the smallest combustion
chambers are the ones which contain "848" as the last three casting numbers. These were production heads on ’58 – ’62 235 engines and they were listed as having 8 ¼ to 1 compression.
Head milling: Up to .125" can be milled off this head. Of course you will then have to cut valve pockets in the piston and sink the intake valve into the head. A better method would be to mill .030" to .060" maximum off the head. This head, milled .030" and installed on a, .110" over-bored, 261 will give you just a touch over 9 to 1 compression. Just about right for today’s pump gas.
Valves: The only larger production valve is the intake valve from a ’50 – ’52 Powerglide 235. They are 1.94" diameter and are still available from TRW. For a street engine, a stainless steel valve from a 265 – 400 Chevy V8 can be used. They come in 1.500" and 1.600". Either may be used. If you use the 1.600, the combustion chamber will require some grinding to un-shroud the valve. Of course that enlarges the chamber volume and lowers the compression. I recommend installing a hard exhaust seat.
Porting and polishing: Are beyond my expertise. The bowls under the valves must be opened up and smoothed, but beyond that I would send my head out to be done by a professional. Bill Jenkins used to say; "There isn’t 25 horsepower in the assembly of a short block, but the headwork will cost you hundreds if done wrong."
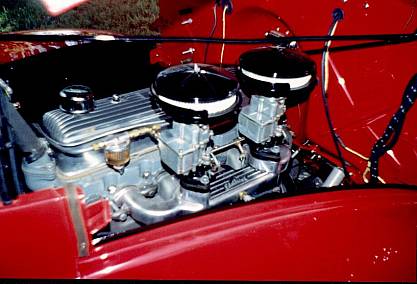
Intake manifolds: Are a very personal thing. Some like the ease of one 4 brl. While others like five 97s on a Howard log. Whatever you choose will take some tinkering. Current thoughts are either two progressive 2 brls or one 4 brl. I think by now you all know the importance of heating the intake manifold. Clifford has redesigned his 4 brl manifolds for water heat at the encouragement of Tom Langdon (Hisself). That was a giant leap towards efficiency.
Headers: Fentons have such nostalgic class that I don’t know why you would run any thing else. Add to that, the facts of no warpage, better sealing, and less noise in the front seat. However, tubular headers are lighter and more efficient. They will eke out a few more horsepower.
After discussing and experimenting with exhaust systems for sound quality, the following conclusion was reached; The farther forward your muffler is, the more tailpipe you will have behind them and the car will rap more with better the tone! I ended up with 30" glass packs and long tailpipes J .
Ignition: Dual points are almost useless on a 6 cyl. Engine. Use a Mallory Unilite electronic adapted from a 250, or a mini HEI from Stovebolt engine company. Whichever you choose, it should be one with a vacuum advance.
Sources:
Langdon’s Stovebolt Engine Co.
47950 Robin St
Utica, MI 48317
Fax/Phone (810) 739-9601
E-mail theboss@stoveboltengineco.com
Sissell’s Automotive (Mike Kirby)
1463 Virginia Ave.
Baldwin Park CA 91706
(626) 960-1090
Patrick’s Antique Cars & Trucks
PO Box 10648
Casa Grande, AZ 85230
(520) 836-1117
www.patricksantiquecars.com