I was suffering from: a long
warm-up period, hesitation on light acceleration, poor fuel mileage and percolation during
very hot days. As you would guess the answer was multi faceted. Many small
cures leading to an overall healthy condition.
The first was to get the
manifold warm. Droplets of gas you don't need, a homogenized mixture of air/fuel you
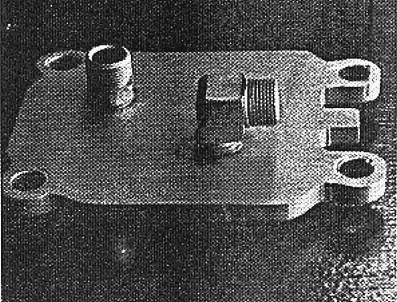
do. If you always wondered what those pipe plugs in your Fentons were, they are
there to run heat to your intake via copper tubing hooked up to a plate as shown Figures H
& I. And I'm here to tell you that helped a lot.
Nest major problem was the
percolation. The stock Bakelite spacers, found on most cars was installed to
insulate the carbs from the hot manifold. I had to lengthen the carbs from the hot
manifold. I had to lengthen the throttle linkage but that was a small price to pay.
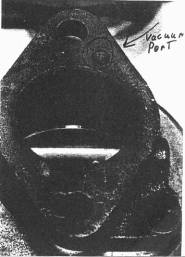
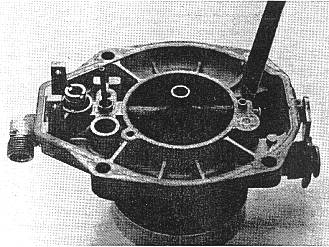
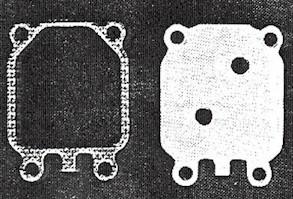
NOTE be sure to use the gaskets which are slotted to provide vacuum to shut off the
full power circuit. This port, which must be left exposed, can be seen on the base
of the carburetor in Fig. A.
I have to admit that was all I
did the first year the car was so much better I drove the rest of the summer. BUT...
The nest year I got little more
critical. The hesitation, although improved, was still there and the mileage was
nothing to write home about. The cure is in tuning the various circuits of the carb
to provide the proper, or at least close to the proper air/fuel ratios. This is all
necessary because with multiple carbs you are decreasing the vacuum signal to each carb.
What that means is you have to make it easier to pull fuel out. You have to
enrich the mixture by removing restrictions.
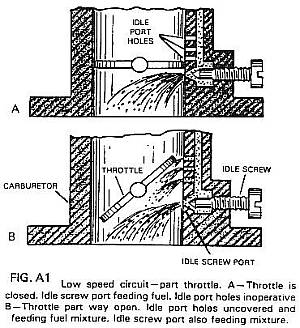
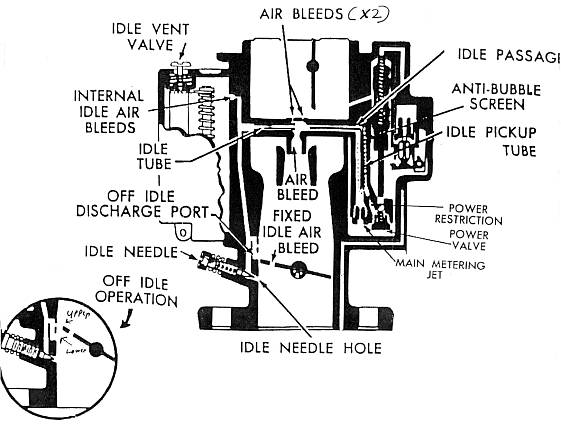
The main circuits you need to
modify are the 1) "Off idle" or part throttle which is usually
incorporated into the idle circuit see figures A and A1 I also see diagram.) 2)
The high speed circuit which is controlled by the main jet; and the 3) High
speed, full power circuit (power valve) which enriches the mixture under low vacuum (heavy
load or acceleration). If you are running jets larger than the low 50s you are
probably getting poor mileage. You are probably running them because the car ran
better. What you are actually doing is covering up the problem!
So lets start:
If they haven't been rebuilt start there. Better yet start by rounding up a few old
Rochesters for parts. They are all over just look. When everything is soaked
clean start matching parts.
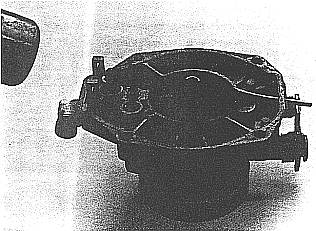
1. Look at all your jet stands (letter D in Fig. B, also Fig. C) you will see a
small passage running between the power valve opening and the main jet opening. This
controls the air/fuel mixture for the full power (power valve) circuit. This was
small on 216 and early 235 carbs but was enlarged considerably on later carbs. I
didn't have anything small enough to measure these holes so I just installed the later,
larger ones. What this gives you is a richer mixture under acceleration so that you
can run a leaner main jet for normal cruising. More mileage, same power when you
need it. Good trade off Ay!
2. All the power valve springs should be the same (letter F in Fig. B). No I
don't know how to measure a spring that light but if the wire diameter is the same and
they have the same free length and the same number of coils it is the same.
3. The power valve pistons should be the same (letter E Fig. B). This may be
somewhat difficult as there were many different styles. I finally found one which I
could turn down to match another!
4. Be sure the check ball for the powervalve (letter C Fig. B) is the smaller one
in the kit otherwise it will hang up and leave the power valve always open. The same
thing will happen if you transpose spring B with ball C.
5. The U shaped accelerator pump linkages should also have the same configuration.
So that all pumps work in unison. Don't make the mistake of lengthening the
linkage as that doesn't allow the accel. pump to operate until the throttles are already
partially opened. Bring the longer ones down to the shortest length.
6. The last match should be the jets. Try starting with around a 51 jet.
Use factory jets or drill them all. A mix match of factory and drilled jets
will not work properly as they will not flow the same.
7. Put the carbs together with the floats set to factory specs. If you don't
have neoprene needle and seat assemblies go get some.
8. Drive the car and note where the shortcomings are. Be sure to drive the
car quietly as well as jumping on it. I suspect your hesitation will be worse,
especially under easy acceleration (like trying to keep the headers quiet while John Law
is watching!).
9. Now for the fun. Take off the tops and remove all fragile parts.
Flip the top upside down and with a small punch knock out the small lead plug on the
linkage side of the carb. See Fig. D
10. With a small knife blade work out the small aluminum plug located just behind
the lead plug. See Fig. E
11. Start with your smallest number drill and try pushing it through the
restriction located under the alum. plug. Go up one drill size at a time until you
find the largest that will go into the restriction. See Fig. F. In my carbs
that was a .070" drill. Now take the very next drill size larger, place it in a
pin vise (cheap), and drill out the restriction. See Fig. G. Go far enough so
that you see the end of the drill in the center vent hole. Put everything back
together and drive it again. You may or may not see an improvement. If not, or
if its not enough, go through it all again with the next size bigger drill bit. Keep
going until the hesitation is fixed. I ended up using a .078" which worked
quite well on my duals and on another triple set up. Both were 261 engines.
Remember this effects only the off idle under gentile acceleration. It also enriches
the idle mixture so that a needle adjustment will be necessary.
I am happy to report that with the
modifications above I have great power, the engine is extremely smooth and I am getting 20
MPG. The jets are #50s. The car weighs 3300 lbs. and has a 3.55 gear.