Nothing can be more frustrating or confusing than
trying to find a short in you car's electrical system.
Especially when it's not enough to blow a fuse but
still drains your battery! Obviously, if you
find a blown fuse, replace it, turn the key on, and
the fuse blows immediately you've found the circuit
within your car's electrical system that the short is
in. However, if the draw does not create enough
current to blow a fuse, than we have to find out which
circuit it's in to fix it. Before I get
started, my intention in this Tech Tip is not to teach
Electrical Systems and Electronics. Instead, I
just hope that this article will give anybody a
systematic approach to finding a short. So lets
get started...
| First, lets
make sure that you have a short!
Electrical systems have a specific route for
electricity to travel along and any change from
this route causes problems. If electricity
can find an easier route it will always take it.
So lets find out if the electricity in your car
is finding a ground sooner than it's suppose
to... What we're going to do is take a
test light and attach the clip end to the
negative battery cable and put the tip on the
negative battery post. Then we're
going to remove the |

|
| negative
battery cable making sure we don't touch the
test light. Now we haven't broken the
electrical connection here. All we're
doing is letting the current, if any, flow out
of the negative battery post, through our test
light to see if it illuminates, and continue on
along the negative battery cable to the short.
Word of caution, If you're attempting this on a
computer controlled car it is very important not
to break the connection of the test light to the
negative battery post. |
By not
breaking the connection, the computer will maintain
its learned driving strategy in the Keep Alive Memory
(KAM). It will also ensure your computer will
not have to go to factory baseline and relearn
controlling your car's engine for maximum fuel economy
and performance. While we're on the subjects of
computer control, module equipped cars have a small
parasitic drain caused by the modules' KAM. This
is normal and module or modules can draw 10-21
milliamps (mA) with the key off. However...
If you
have a parasitic draw that is in the milliamp range
and is beyond normal specs, you will have to use an
Amp Probe for a Digital Volt Ohm Meter (DVOM) to
diagnose this and the method below may not work due to
the very low current draw. But let's get back to
those major shorts that give us all those headaches...
Oh! by
the way, a DVOM can be used in place of a test light.
Just ensure your leads are in the proper connections
to measure Amps. Using this tool will not only
tell you if you have a current draw when you're not
suppose to, but will also tell you how many Amps are
being drawn.
Okay,
you've confirmed you have a short, now how do you find
it? The first and easiest test is disconnect the
alternator and see if the test light goes out or the
DVOM display changes. Often old or worn out
alternators ground themselves internally causing a
short. If it does you've found your short and
repair or replace the the alternator or appropiate
components. If the test light remains lit or the
amperage on the DVOM does not change, you have to try
and start isolating which circuit within your car's
wiring has the short. This can be done by
pulling fuses one at a time. A fuse is nothing
more than system protection. All the current
that flows through a circuit must go through the fuse.
By pulling a fuse we've created an open and current
can no longer flow. Continue doing this until
the light goes out or the DVOM display changes showing
no current draw. Once you've found the circuit
that has the short you must find where in that circuit
the short is located. It's always best to take
the least intrusive method to diagnose. Besides,
who wants to tear out the dash or remove the interior
just to trace a wire. So this is where a simple
tool you can make comes in very handy...
|
When electricity flows through a wire it creates
magnetism. We're going to use this
magnetism to find our short! Many tool
vendors and auto parts stores sell short
detectors. The one in my tool box is from
MAC. It's convenient for me because it
also has an audible alarm which I can hear in a
noisy shop environment. I'm pretty sure
NAPA sells one also. The tool to the right
consists of a 10 Amp circuit breaker with
buzzer, wire leads, clips, and a compass.
But for our purposes we're going to make our own
which I believe is better than the ones you can
buy outright.
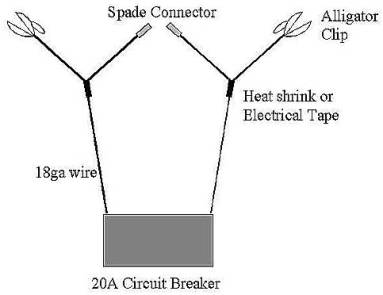
To
make our short detector, we'll need the
following items:
- 1 x 20 Amp circuit
breaker
- 2 x alligator clips
- 2 x spade
connectors
- 2 x 2 foot pieces
of 18ga wire
- 4 x 1 foot
pieces of 18ga wire
- 1 x magnetic
compass of any type
*modify length of wires to meet
your needs*
|
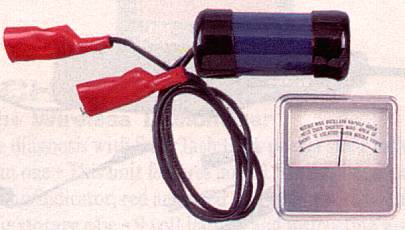
MAC's ET251 SHORT
CIRCUIT FINDER. Quickly locates
short circuits in all 12v automotive electrical
systems. Eliminates the need to remove
upholstery and floor coverings. Operates
through metal posts, panels, and other
obstructions. Simple hooking to affected
fuse posts; induction-type needle indicator
pinpoints shorts. Packaged in high impact
plastic box; schematic included
|
|
(Not
To Scale)
|
Connect the pieces together as
shown. This should allow you to hook your
tool up in place of a fuse no matter what type
of fuses your car uses. The reason I
recommend a 20 Amp circuit breaker instead of a
10 Amp one is it allows current to flow longer
and thus building more magnetism. This is
important especially if the wire that the short
is in is buried under items like the carpet,
rocker cover, door panel, pillars, etc.
The more magnetism we can build the easier it
will be to pick it up with our compass. |
At this
point it helps to know how the wiring loom or wires
run for the circuit that has the short. A
schematic is very helpful here especially if it has
component locations. If you cannot find one or
your vehicle is older you will have to trace the
wire(s) from the fuse on...but this is not that hard
and you'll see why. The reason we want to know
which way the wire is going from the fuse box is
because we're going to use the magnetism that is built
buy the electricity along that wire to locate the
short. Place your tool into your fuse box or
where you pulled the burnt fuse from instead of the
fuse and turn the key on to the RUN position.
Now what's going to happen is electricity is going to
flow to the short. Because we have a circuit
breaker in there instead of a fuse we're allowing
magnetism to build along the wire. As the
current flows through the circuit breaker it starts to
heat up (careful the tool may get very hot). The
bi-metal strip inside the circuit breaker will
eventually bend away from the contact breaking the
circuit and creating and open before any damage can be
done. This is always associated with an audible
"CLICK" from the circuit breaker. With
an open, no current can flow through the circuit
breaker and the shorted circuit. With no current
flowing, the bi-metal strips cools very quickly and
reforms itself back to it's original shape and touches
the contact allowing current to flow and once again
creating magnetism.
We're
going to use this magnetism and our compass to locate
the short. Here is how the this works...
A wire (conductor) will build magnetism. A
short will not. So we put our compass along the
wire or wire loom and the current flowing through the
wire is building magnetism. This magnetism will
draw the north seeking arrow on the compass towards it
(one way or another). We leave our compass in
place until we hear the "CLICK" from the
circuit breaker. When the circuit breaker opens
the magnetism will be lost and the north seeking arrow
of the compass will deflect back towards the magnetic
pole of the earth momentarily. This deflection
is important! Because once we get to our short
there will be very little or no deflection at all.
So after each click and deflection we move the
compass about 6-12 inches along the wire, wait, and
watch for the needle to deflect as the circuit breaker
opens and closes. We continue doing this until
we come to a portion of the wire where the needle is
not being drawn towards the wire (weak or no
magnetism) and there's no deflection of the compass
needle when the circuit breaker opens.
Congratulations! you've found the area where the short
is located. However, you still have not found
the short, but at least you know where to dig in.
Expose that portion of the wire and locate the short
in the wire. Here's a hint - if there's a bunch
of wires there, shorts create heat. So look for
the hot wire, hot metal, or hot component. Then
look for any wire or component that may be broken,
cracked, smashed, exposed, or punctured.
Now that
you've found the short, repair it by splicing in a new
piece of wire, fixing, or replacing the shorted
component. You can cut & solder, use a
butt contector, or electrical tape if you have
nothing else. At one time automobile
manufactures only recommend solder, however, the
quality of butt connectors are so good today that many
allow this type of repair. Now that you have the
short out of your system verify your repair, replace
the fuse if necessary, and pat yourself on the back
for a job well done.
That's
all there's to it folks. Go for it!
-
6NHeat |