Hey, I thought I'd start my build thread. You all have taught me a whole lot over the past six months and now the plan is coming together. I'll pull the engine in October with hope to have it running sometime around the first of the year, give or take a month. My goal is 200+ HP for street use with a similar feel to a good SUV.
Here's what's on the plan.
Engine
230 -> 250 upgrade
Tom Lowe lump ported head, big valves, moderate CAM
(likely) 0.40 over forged aluminum flat-top pistons
Tom Langdon exhaust headers
Considering Vintage Air A/C add on
(already done)
Holley 4BBL, 390 CFM
Offenhauser intake
New HEI
Drive train
Powerglide to 200r4 upgrade
3.08 to 3.73 rear end (unlikely to be this winter)
I've found a machine shop and am gathering parts. Outstanding questions and decisions
1) CAM: exactly which one? A moderate one. TLowe's got a good one Hy-Torq. 206 degrees duration @ .050 lift, .495 lift at valve, 110 lobe separation. Tom mentioned the Langdon's marine camshaft and a few others, I think the Comp CAM 52/252, Lift .440/.440. Tom recommended getting closer to .500 lift to match the head.
2) Exhaust: single or dual? Catalytic convertor: what brand and how? (yes, I'll really put one in. it's about the smell that gets into the house.)
3) 200r4: I have a lead on a transmission shop. Found the PG->4 Speed conversion kit. Need to decide on the torque converter.
Many more questions to come, just a start.
Mark
Dual exhaust sounds really good.
It will cost more & add more weight.
Most will mistake it for a V-8 when idling.
Torque converter, a good brand one, 2400-2600 stall with lock-up.
Don't listen to the nae Sayers by saying 2400-2600 is too loose.
A good quality one will act just a like a low stall converter, until you get on it hard.
At that time of getting on it hard, the RPM's will go up & act like a higher stall converter & really help with acceleration.
Having that type stall on your converter will really wake up the 0-60 MPH, 0-60 FT & still knock down good mileage because of the lock-up converter.
My Moms stock 1999 3.8 Liter Olds Intrigue torque converter has a stock brake stall of 2600 RPM, flash stall is actually higher.
Works just like a low stall converter & still get great mileage.
Now, that being said, if you do not want being focused on acceleration all that much, minimum stall of 2100-2200 RPM range @ the absolute minimum.
I just recently replaced my stock 1400 stall converter to a stock Corvette converter "2100" stall & I am really glad I did, it made a big difference in how my Silverado accelerates & did not affect the mileage one bit.
Just for reference my Truck has a 4L60E trans with the lousy first to second gear spacing. It is horrible how the RPMs just drop so low when shifting into second gear & my engine puts out 350 ft lbs of torque "Crankshaft rating" It's a long labor just to get through 2nd gear.

You mentioned about a catalytic converter, I asked about getting one for my 69 Camaro (does not require smog check)from an Ebay member to install & he stated he cannot sell to Ca. residents, & here I am thinking about cleaning up my emissions from my Camaro for the same reasons you want one, the smell.
This is the one I want to get for my 4" single exhaust.
http://www.ebay.com/itm/MBS-100-CPSI-5-B...=item5d506d0a9aJust remember, adding a catalytic converter is like adding a muffler, so IMO, I would get a straight through designed muffler along with your catalytic converter.
That is all for now.

In for the build. Sounds fun!
Glad to see your making a plan.
I also like the idea of a 200R4. Only a few bad things about them. Made for just a few years in the 80's, most were behind really low HP engines(weak). GM did build some up for the Buick GN's. The one shop I recommend is The Real Art Carr.
http://cpttransmission.com/ I also like a 1800 stall. Your not making a racer, but a great driver.
I prefer the single exh. Bring 2 pipes from the engine and join them somewhere under the driver, a BIG muffler and a 2.5 tailpipe. I have a big muffler on mine and it is still louder than I want it to be. Easier to pipe under a car also. Mine can make enough noise to make a kid cry.

Thanks for all the great tips and pictures!
I've talked with Tom Lowe, he'll build a lump port head for me. I've requested what he normally does for rocker arms and such. It'll be a few months before it's ready. I haven't done much comparison of cams. Tom Lowe's Hy-Tork street vs Tom Langdon's marine CAM. I think Tom L's CAM wins.
Recommendations for how to paint it? Thoughts? I know some use a rattle can. What's your experience? The machine shop is not nicely humidity controlled. I was thinking maybe I should pint the head I take it to the machinist.
MBHD & tlowe: My friend's Dual Exhaust looks really good. I keep meaning to call "MufflerKing" to see if they do custom mufflers. The advent of stainless steel and there's not many muffler shops around any more.
For the transmission and torque converter, I'll call cpttransmission and have a chat.
It's going to be a month before I start dismantling the engine, I was thinking of buying some flex tubing and a Y pipe converter to get the Langdon headers on and running. I think I've got a vacuum leak on the intake, so it gives me the opportunity to try to correct that.
TJ: yes, it's going to be fun!
Fall arrived about a month early in the PNW. Hope to get some more rides in before the rains really hit. Getting the windshield seals replaced this coming week.
Mark
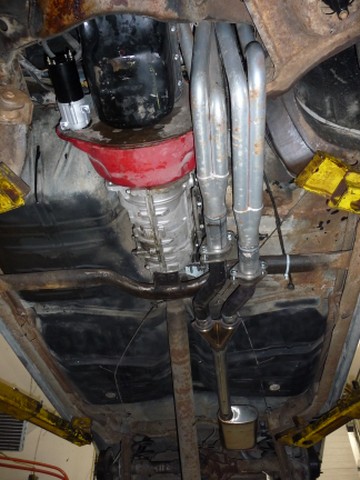
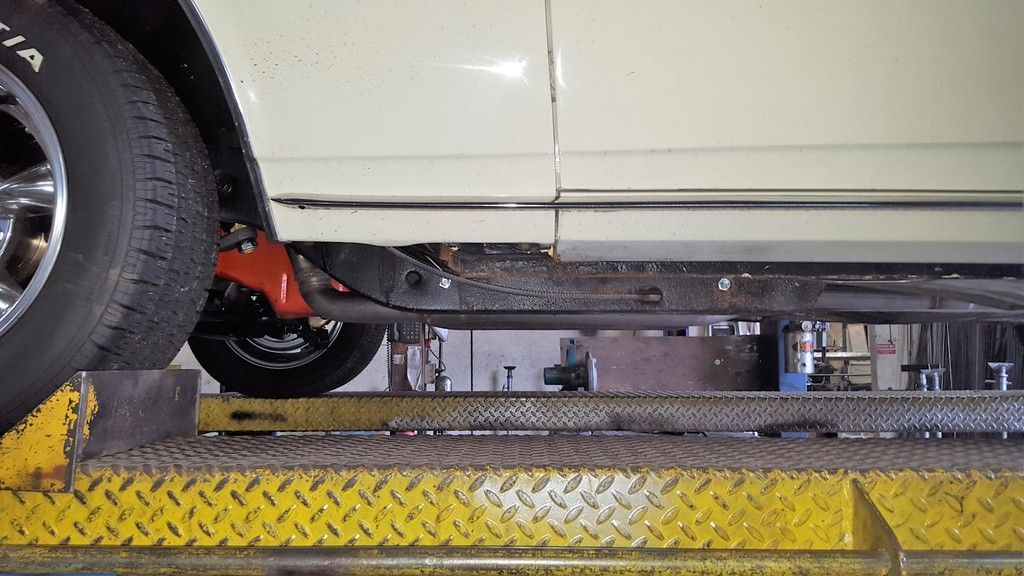
This weekend the conversion to headers begins. Doing this now before pulling the engine because of the doubt of the state of muffler (maybe it's obstructing a bit).
Talked with Muffler King guy today. I'm going stick with my plan to bring the two headers into a Y pipe, catalytic converter, the quietest muffler that will fit and bring the pipe out the driver side. I don't like the transverse muffler setup as it appears to heat the gas tank just a bit (maybe it's leaking).
He thought 2-2.25" for the final size, but he may not have run into a lump port head. I plan to stick with 2.5" unless somebody convinces me otherwise.
I've misplaced my notes from when I talked to Tom Langdon. They're here somewhere. Do you know what size and type of pipe attaches to the header? It looks like 2".
I'll be running my heater hoses directly to the water cooling for the time being since I'm pulling the engine in another month or so. No need for heat this time of year. Is there anything special I'll need to do to the Offy intake other than install the plate with a good gasket?
Thanks!
Mark
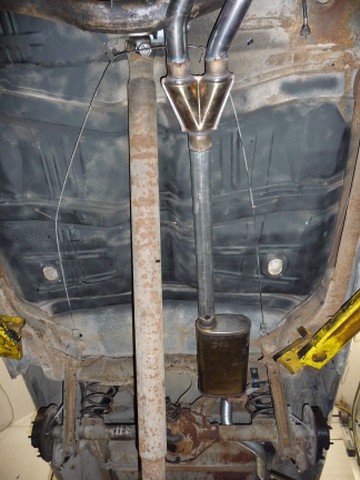
I went Langdon headers,2.5" down, 2.5"x2.5" Y, single 2.5" Flowmaster 44 muffler, and 2.5" dump.
It's a great way to go. I did the math and it's the perfect size for a hopped up 250.
I used VHT paint on mine. Has held up wonderfully so far.....probably cause I haven't even driven it yet!!! LOL

I used VHT paint on mine. Has held up wonderfully so far.....probably cause I haven't even driven it yet!!! LOL
Mine has held up great for a couple thousand miles. VHT engine paint with clear coat.
I bought the ceramic coated headers. The Langdon instructions say if you're painting, warm up the headers to bake off moisture. Paint and then dry in an outdoor grill.
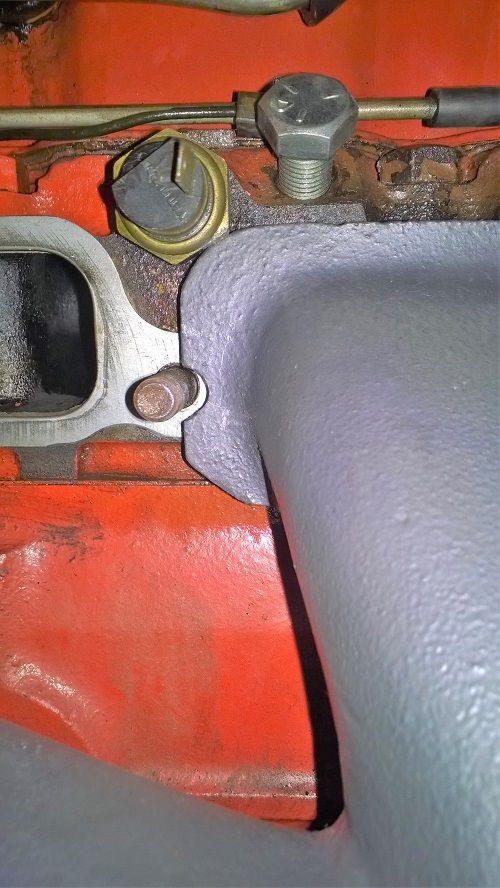
Sooooo, I need to cut off part of the intake (half of the part that goes around the studs in the head) to fit the headers. How did you cut yours off? Grinder? Dremel tool?
Thanks,
Mark
I bought the ceramic coated headers. The Langdon instructions say if you're painting, warm up the headers to bake off moisture. Paint and then dry in an outdoor grill.
Sooooo, I need to cut off part of the intake (half of the part that goes around the studs in the head) to fit the headers. How did you cut yours off? Grinder? Dremel tool?
Thanks,
Mark
I used a grinder. I did the intake vs the headers because it's aluminum and easier to cut. I suppose you can use a saw as well.
I also ground the header around the temp sensor. Just a bit off the ear took care of that. Langdon recommends relocating it to the thermostat neck (there's a boss there already. Just needs to be drilled and tapped) but I haven't had any problems. The temp does occaisionally read 10-15 degrees high when I'm sitting but I've hit the t-stat housing with a temp gun and found that I'm at a steady 185 so I ignore any readings under 200.
Never had it go over 200.
Did a dry fit of the headers, hoping to get the car to the muffler shop Tuesday. Doesn't look like I'll make it.
Header hits on the thermostat. I need to grind about 1/8" off the corner of the header.
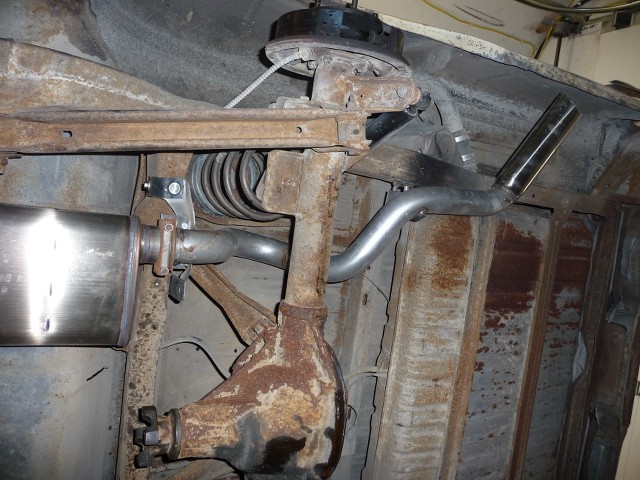
Now comes the issue. The exhaust clamp for the original intake is intended to mount quite a ways out. The intake has an "ear", but the new headers do not have the same "ear". I just need a couple more of those short clamps, eh? I looked at a few websites, found mounting studs, but none of those little clamps. Not interested in scouring junkyards; the L6's are long gone. What did you do to cover this? Where do you find clamps?
I pull the clamps from spare engines. You can also make them. Be sure to form a bridge that can distribute the load equally, even if the 2 opposing sides are unequal in height.
I used washers. Doesn't look the best but it worked fine.
I had the same issues.
1) Grind down the header to clear the temp sensor. Just a bit will do.
2) Cut down the bridge so it clamps to the flange rather than the step.
3) Every bridge will have to be ground on one side. The two flanges are different thicknesses. I had to do it as well. Measure the flange thicknesses and grind down one side the amount different. It'll tilt a bit to help take up slack. Washers are fine and all but the bridge can be made to work better if you grind it.
4) Don't use studs that are too long on the front bridge if you have power steering. If the stud is too long you'll run into interference issues with the steering pump bracket and pump.
5) Get a can of VHT and re-shoot it when you're done. Follow the bake-in procedure on the can and it'll hold up very well.
Use the small clamp and Use it on the same flange Height as the Header NOT the intake. You should have much better luck. Iran a offey and Headers Used all small clamps. NO Problems
Thanks for the tips! I think I'll try washers for the very short term. Probably two washers or is that too thick to conform to the slightly different thicknesses.
I'm scheduling the engine pull for 11/21. I just need the car to run well enough to get it to the muffler shop and back. If it runs okay, a few more runs too. Between now and then I can get two more small clamps.
It'll take a few weeks to get back at it.
Any inliners out there in Tokyo?
Mark
I think yer assistant should be an announcer. LOL
Motor sounds good!
That looks familiar...

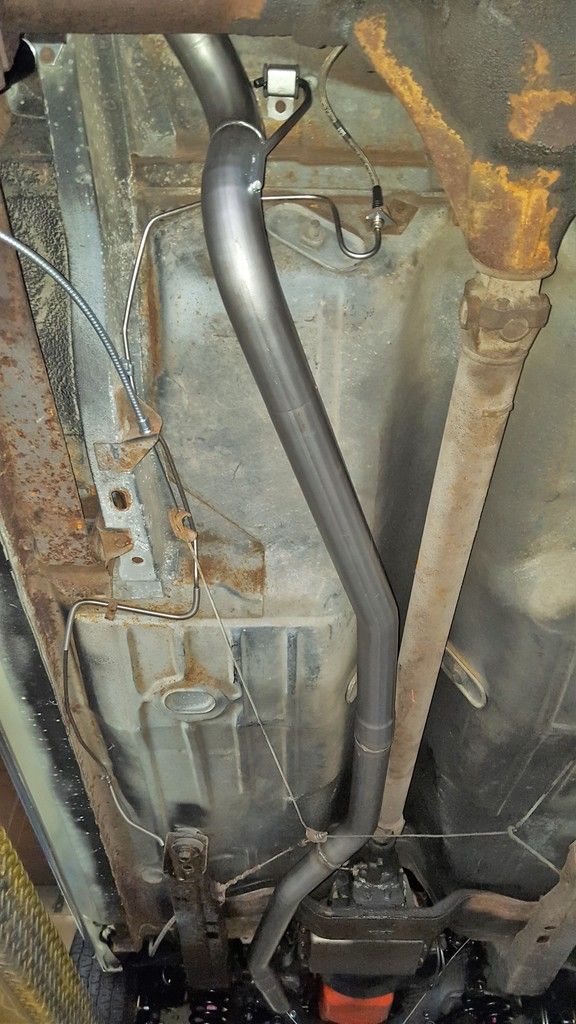
You want to install a breather rather than just a loose hose into your valve cover. You're sucking in unfiltered air into your valve train. Get a push-in type. You can see mine above.
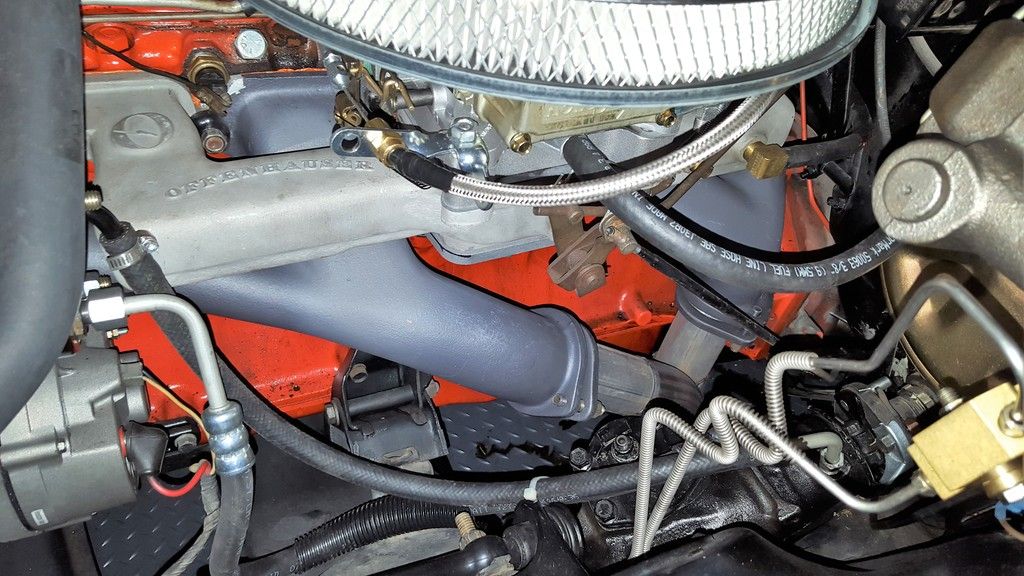
Also if you want to heat your intake here's pics of my setup if you want to use it as a reference.

Note the T at the heater core. I tried plastic. It didn't work. Went with brass from Lowes.
Another pic of the hoses going to the bottom of the intake:

Bottom of the intake.
I took a 3/16" steel plate, cut it, drilled out holes for the mounting bolts, drilled and tapped NPT threads for the fittings, screwed them in, ground them flat on the side mated to the intake, used a piece of 1/8" rubber to make a gasket (Lowes again. In the plumbing section. They're sold in 6" x 6" sheets), a little RTV, some pipe clamps and viola! Looks good from the top and doesn't leak a single drip. Took a couple rounds to get it to seal up though.
Hi GBauer, thanks again for the pictures, I'll be printing them out.
I bought the backing plate from Langdon, it came with nice brass fittings. Unfortunately, I've got one pointed straight into a pipe (doh!). I was looking for the muffler shop to help fix that up. Or I just wait, the engine's coming out in 4 weeks anyways.
I'm a bit back to square one. The muffler shop I was going to use has a bad reputation, so I've found a new place to go that's unfortunately a lot further away. It's a header shop (Stan's Headers).
I don't know, but I may need to bring my exhaust system with me. What did you do for your exhaust? Bend your own? I found Waldron's exhaust, and that's it. So far nobody else sells for the L6. It's a 3-4 week lead time to buy, but they bend up their own pipes and will bend whatever size I want.
Thanks,
Mark
Stan's would certainly do a nice job. Doing it online sounds like a waste of time and money.
I ran open headers to the exhaust shop. If you do this I recommend ear plugs.
After paying AAA membership for all these years, I have never used my AAA tow, so am planning on them taking it to Stans for me.
The water connections hasn't been working out. When i drive home with a cold intake, what effect should I count on? It will run, correct?
It'll run. Many people don't run the heat at all. Some, like me, who live in a cold climate need it.
I say drive it with open headers. Damn the noise laws!
It'll run. Many people don't run the heat at all. Some, like me, who live in a cold climate need it.
I say drive it with open headers. Damn the noise laws!
It would be fun, but work is also very stressful. Losing 5 hours total means that much more behind i get. It's roughly an hour one way.
New stainless exhaust from Stan's is now on the car. Very high quality work, fully welded. Beautiful rumble at idle, not super loud on the highway. I went with 2.5" stainless pipes, a single in-dual out stock muffler for a v8. No catalytic converter after all.
There's a big vibration at certain RPM and car speed that I'll need to take it back for. I went with more stock hidden output, but after looking at it, I think have a chrome tips straight out the back is the way to go. When I get it back in, i'll have that done too. The rumblings seem to bring out more rattles under the dash.
It feels like a touch more power, I'll do my 0-60 this afternoon, but the engine still runs like cr*p.
I suspected previous muffler having a leak, my gas tank would have positive pressure after driving. I drove this 45 minutes, got gas and zero excess pressure. Whew, maybe the other was a disaster waiting to happen.
Pipes go into the "Y" before making the bend. He had a hard time getting the custom "Y" just right, had to tack it into place on the car, take it to the bench for the final welding.
Y-pipe bottom view
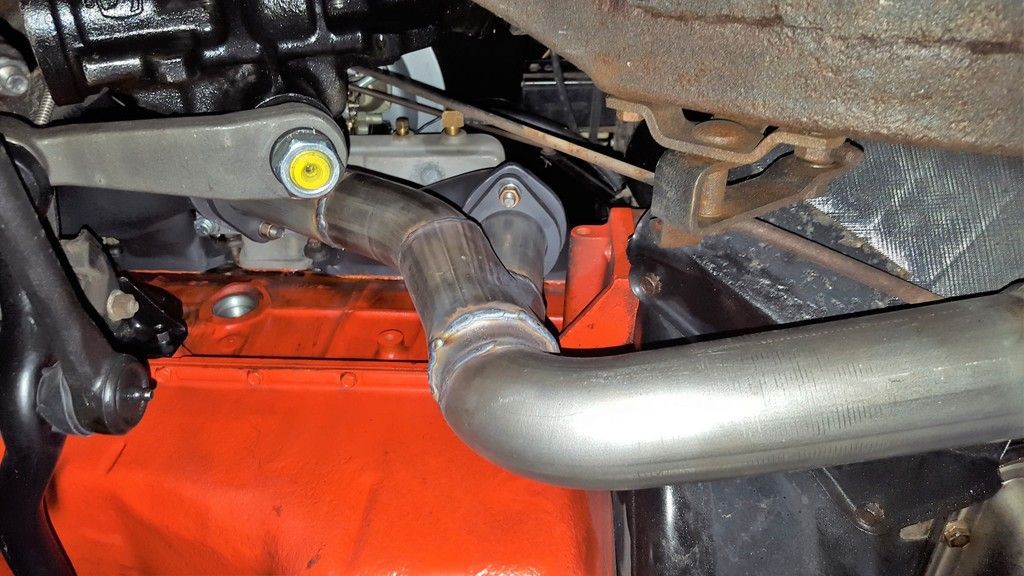
Very even profile, the exhaust hardly hangs lower than anything else in the car. I think this is tucked in tighter than the previous exhaust.
Tucked in nicely, no restrictions with driveshaft.
Pipes coming out the back. I didn't get a good picture of the muffler itself, but it was a lot of bends. Something a mechanical engineer would love!

That exhaust is beautiful. Do you know the part number of the muffler? Jay6155
are you running the exhaust into the 2 side of a 1 to2 muffler, isn't that backwards?
are you running the exhaust into the 2 side of a 1 to2 muffler, isn't that backwards?
That exhaust is beautiful. Do you know the part number of the muffler? Jay6155
Thanks, I called the guy today, all he knows is it's a GM30, his internal part number, purchased from a warehouse by somebody else. It's made in USA. He thought maybe Walker, but their specs don't match.
Correction: 2.5" input, 2.25" exhaust. 20" long.
Good eye on the dual side/single side. Turns out the in/out are correct. Guaranteed by the different inlet/outlet sizes that I just learned about today. I found some mufflers on the flowmaster website (18", not 20") that had a similar config where the inlet and one exhaust are on the same side. It looks like this is a standard transverse application versus a front-to-back configuration.
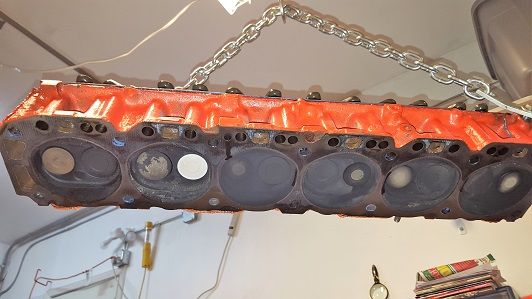
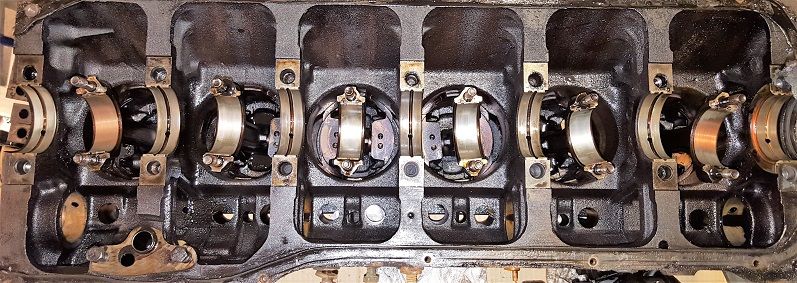
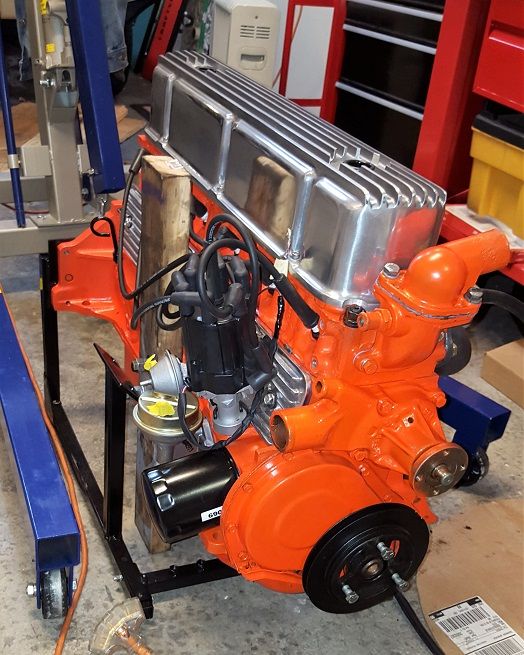
Alright, back on the build thread. I picked up a used 250 engine from a 77-78. The engine had not too many miles back been rebuilt, so it saves me the work of getting my '250 overhauled (I hope). I'm going to take the tin from my existing 230 since it's beautiful and with a touch of rust.
I could use suggestions on how to clean the carbon out and the water jackets.
The engine barely fit with the lift in the back of my Chevy. I ditched the integrated head.

Reflections and lighting make it hard to see. You can see the honing/boring hash marks on the sidewall indicating the engine is not that far from the rebuild. There's plenty of carbon on the top of the piston and the upper ring of the cylinder. I oiled everything up for now, but will need to clean it all really good. I'm hoping not to have to remove the pistons to do that. Suggestions?

The car was a manual. There was some rust on this. I'm putting in an automatic so will probably steel wool it. The ring gear looks great, didn't see any chewing at all so maybe it was replaced.

Some water left in the engine, wow, look at that brown rusty water. Yikes!

This one's really hard to see inside the jacket. There's some residue and build-up, but not really that bad considering the brown water. The only thing I can think of beyond hot tanking is to put a head back on the engine (to minimize risk of water getting where it's not supposed to be), pop out the freeze plugs, remove the water pump and run pressure washer in it. Thoughts?

Alrighty, we're on our way!
Corrosion!
Got much of the carbon off the top with solvent and a toothbrush. Theres a ridge on the cylinders, but its smooth like the ridge was there before the overhaul and the honing smoothed it out. Thats okay.
Problem, theres corrosion in the cylinders. Its not that bad if youre looking for a cheap way to get the car running. But worse than what I really want.
Cyl 1, chunk on side but its smooth. Should be okay.
Cyl 2&3, small speckle spots. Slight corrosion in the honing lines when you look at it right. Not a problem.
Cyl 4&5, none that I could see
Cyl 6, this one concerns me, theres a big portion when the piston is bottom dead center. Its rough to the fingers. It goes below the top of the piston so Id need to pull the pistons at a minimum to steel wool smooth out the corrosion.
This engine has moved to backup status in the event existing engine can't be used (unlikely). I could pull the crank, but with the labor, I might as well buy a reconditioned crank from rockauto and get a set of bearings with it.
Cylinder6 - the worst one

Cylinder1 - odd spot

Got the CAM out tonight. Gear looks to be metal, bronzish look, but doesn't look like composite. I think the lobes are fine to me. One journal(?) where a bearing is has a circular line, another some corrosion, but neither look like showstoppers. The lifters seem okay too. From the looks of this, the crank looks to be low-risk to use in the build for my 230->250 conversion.
I'm not versed, actually the first camshaft removal by myself, if anybody sees anything, please do not hesitate to speak up.
Lifters

Note the dark spot from previous corrosion on the journal.

There's a line on the journal. When I think back to my youth and what the CAM for my old '52 International looked like, this is nothing.

That actually looks pretty good.
For about $100 or less a new stock cam and lifters can be had. I would at least do that and have a fresh cam with no wear and new lifters. Not a whole lot more gets a comp cams 240 or 252. If I were going to run either engine that is the least I would do. The stock 250 cam (either one) is bigger than the stock 230 cam. Some people have had good luck with the Mercruser cam but I don't know how much they cost. Just a thought. Jay 6155
For about $100 or less a new stock cam and lifters can be had. I would at least do that and have a fresh cam with no wear and new lifters. Not a whole lot more gets a comp cams 240 or 252. If I were going to run either engine that is the least I would do. The stock 250 cam (either one) is bigger than the stock 230 cam. Some people have had good luck with the Mercruser cam but I don't know how much they cost. Just a thought. Jay 6155
Thanks, I'll replace the CAM. Going all in with pistons and lump port head. I've decided to look at this engine for parts; i'll use the crankshaft for certain and the block if the one I pull out of the car is shot. I'll give a few more details on the other thread. It's a shame that I don't have an application for a stock 250. I'd buy a new crank if somebody could use this engine. I'll suggest that in the other thread.
Get the better cam. Be aware, however, that you'll also need springs. From experience buy 2 sets of O-rings too.
Cam I bought:
http://www.compcams.com/Company/CC/cam-specs/Details.aspx?csid=60&sb=2Springs:
http://www.compperformancegroupstores.co...uct_Code=981-12Seals (pic is not correct. They're actually more of an O-Ring)
http://www.compperformancegroupstores.co...uct_Code=501-12I'll take pics of mine tonight when I do the next cylinder. Last night was just a struggle to get it done. Now that I understand how things go together I'll take good pics for you.
New springs are a LOT better. Dual coils instead of the stock single coil. No problems fitting stock head.
From what I saw on Comp the upgraded cams are the same price as the stock cam. The only extra money you'll be spending is on the new springs and O-rings. Total should be right at $200. Not bad considering it's all new and good quality. Money well spent in my opinion.
....or you can wait a few more days until I can drive mine and I'll tell you if you should go bigger on the cam. If I were you I'd wait and let this other guy be the guinea pig.
The engine is out of the car and on a stand. Hopefully I can get a couple of hours tomorrow to pull the head and CAM and have a look on the inside.
FYI It took 6 hours to get the engine out.
Exciting times.
Mark
I wish I had just pulled mine. It was a PITA working in there without the engine pulled.
Don't get the cam I got. Go more aggressive. Mine is just a hair more than stock. It runs so smooth even at idle that it's hard to tell it's cammed.
Also might want to invest in a 2 piece timing gear cover. Wishing I did for 2 reasons: 1) swap would be a good hour less if I did it again and 2) that thicker aluminium would probably quiet down the aluminum cam gear.
I'd go with this cam if I did it over:
http://www.compperformancegroupstores.com/store/merchant.mvc?Screen=PROD&Store_Code=CC&Product_Code=61-246-4&Category_Code=CHEV466Cam194
Gbauer, That is a very big cam for street use. The cam in my wagon is 214 dur and .524 lift
The one you have shown is 230 dur and .536 lift
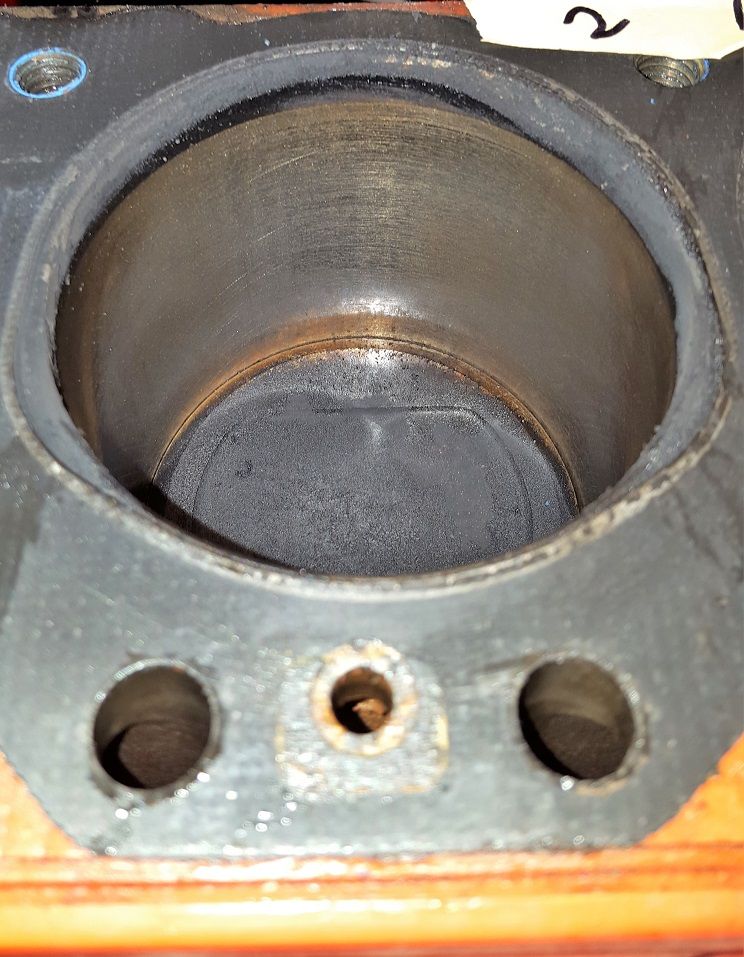
This engine has been recently rebuilt! It looks to be in really good shape for an engine to be used for an overhaul makeover. You can see the honing marks in the cylinders and there are *zero* ridges. I'd put 3500 miles on it. The water jacket is pretty clean. The headbolts came out with a threadlocker on them. I am really happy with the state of this engine!
Now the ugly. There is in every cylinder what looks like a rust patina in the honing ridges. It is uniform, unlike my spare engine from the other thread. I don't know if this thing was rusted out and then given a superficial hone to get running or if the four years in the unheated barn in Wisconsin added the corrosion. Whatever it may be, I suspect it's the cause of the low compression. As far as old cars go, it would probably get better over time as the rings wear down the cylinder wall, but hey, she's getting a bore.
Inside the water jacket, through the holes, looks to have just a small amount of deposits, pretty good shape.
Houston, we have a problem. This is an indication, I believe, of what's causing the backfiring. Whether or not it's the valve or camshaft, I do not know. I'll bet you've seen this before. Is this what one would call a "burned valve" on cylinder #5? Note that #6 is brown, not ringed with carbon. Across the cylinders, they're pretty non-uniform across the cylinders.
Did your lifters show uneven lifting like mine?
Here's a pic of mine:

See how the wear marks are at different heights? That was my dead giveaway that the cam was wiped.
Hey Gbauer, thanks for reposting the pictures. I didn't understand before, but now I see it clearly. Just to check, I went back and looked at the lifters on the spare engine and found one (cyl 1 intake) that had nearly half the brown marking of all the others.
Back on my original engine. Cylinder 5 intake there's a funny sheen that's part way up with the brown going low. It may be that there's an issue with the intake on the CAM which would indicate why it's getting worse, although I don't understand how that would make the exhaust valve run hot nor how it would create backfires.
It seems most likely to be a problem with the head and not the CAM. The perfect solution is to put in a more aggressive CAM.
The harmonic balancer is right on. I had to advance the timing to 20 BTDC to prevent constant backfiring through the carb.
Below are the two lifters on the left from cyl 5&6 intake. On the right are the first four lifters from my spare engine.
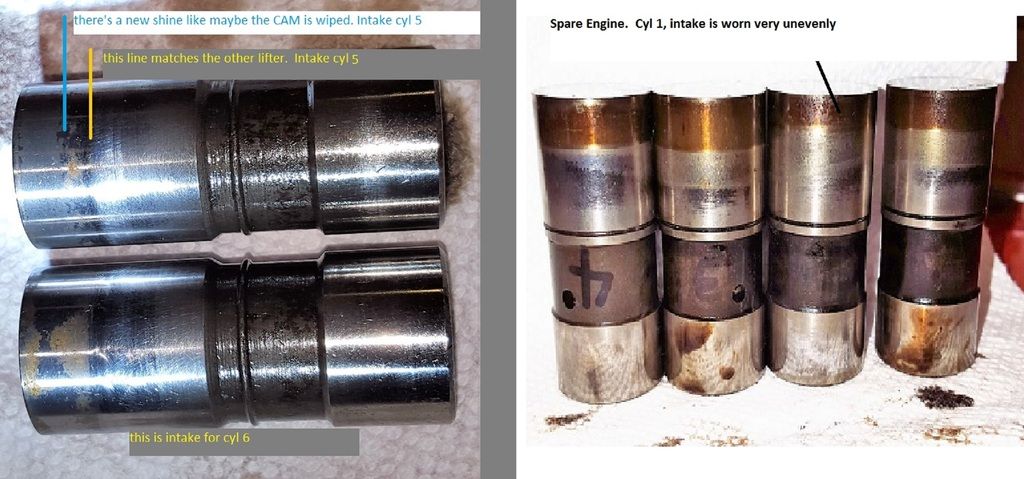
Don't know about the first pic but that second one looks just like my #6 lifter looked. I know it had been misfiring in the #6 since the day I bought the car but it definitely got worse over time for me.
This engine has been recently rebuilt! It looks to be in really good shape for an engine to be used for an overhaul makeover. You can see the honing marks in the cylinders and there are *zero* ridges. I'd put 3500 miles on it. The water jacket is pretty clean. The headbolts came out with a threadlocker on them. I am really happy with the state of this engine!
Now the ugly. There is in every cylinder what looks like a rust patina in the honing ridges. It is uniform, unlike my spare engine from the other thread. I don't know if this thing was rusted out and then given a superficial hone to get running or if the four years in the unheated barn in Wisconsin added the corrosion. Whatever it may be, I suspect it's the cause of the low compression. As far as old cars go, it would probably get better over time as the rings wear down the cylinder wall, but hey, she's getting a bore.
I did a few web searches on rings not seating as these just don't look like they're even touching. If there's excessive gas going into the pistons "washing" the rings, it could mess up the finish on the rings. The original carb on this car was dripping gasoline into the engine, even after the rebuild. I drove over 2,000 miles across country and only got 14 MPG with the original one barrel. Awful performance the whole way.
Other threads talk about cars that have sat and carboned up and are sticking. That seems like the cylinders would have originally broken in and would not look the way they do now.
What do you think, is it a case of rings that never broke in? Something else?
Do you think it could be some sort of plating? I found pictures of Nikasil coatings (nickel silicon carbide) that leave the cylinder this golden color. The youtube video looks like it would be pretty unlikely to douse an entire block in a vat.
https://www.youtube.com/watch?v=Rn53m2-TNSo
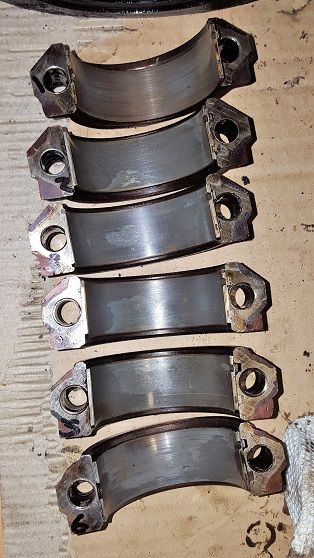
I pulled the crankshaft out of my spare engine today. I continue to be unimpressed with the shape of the spare engine. Thankfully the old engine was overhauled, hopefully I won't need the spare block. The price was right and I'm learning a heap.
Not much experience with bearings, but the copper look doesn't seem good. It almost, but not quite, gives me the impression that a bearing spun on cylinder #1.
I seem to remember seeing a GM 044 marking on the back of one of the rod bearings. I didn't pop out any of the mains. What do I look for to figure out if the crank's been ground already?
Main Cap Bearings
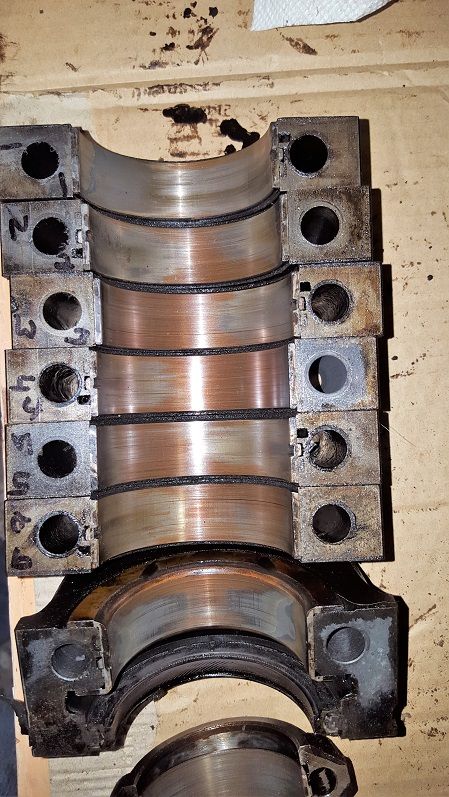
Rod Cap Bearings
Block Bearings
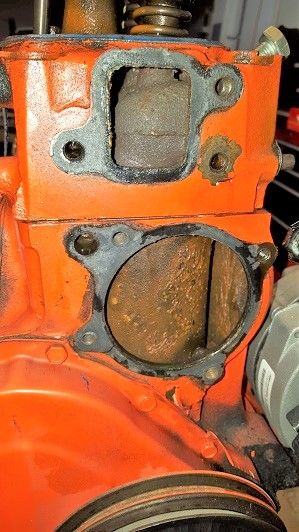
Took the engine in today. Mechanic thought the cylinder with the light colored exhaust valve was running okay, but said the color should be a bit darker.
He didn't like the hash marks in the cylinder. Made lots of grumbling comments about people who don't have the right equipment or use the wrong stones for the rings (or something of the like). He thought the hashes were too deep, as I believe somebody has mentioned. It's a good chance it'll get bored out to 040 to ensure a nice round hole with a good, appropriate finish.
He says the wear pattern of the bearings is pretty typical. We'll see how far down the grind needs to go.
Thanks again for the advice,
What we have are similar symptoms with the original carb/intake and new holley carb/offy intake. Backfiring (that's getting worse over time) and awful performance, although Holley was better than stock. I verified every vacuum line was good, vacuum readings at idle were decent and pretty smooth. I replaced the intake manifold gasket and used RTV to ensure there wasn't a leak there.
I continue to suspect multiple problems. But this week I was looking closely at my carb setup that has a 1" spacer to prevent obstructions. There's a danged logo/numbering on the spacer which I'd put facing up towards the carb. The carb has some passages between barrels that give more opportunity for vacuum leaks.
On one of the last runs before I tore the engine out, I took carb cleaner to the car. I sprayed all over the place, couldn't find anything. But there was an area when I really doused the primary side of the carb would cause the RPMs to drop. Hmmmm, but I couldn't even see where it was. I thought since the cleaner was dripping on everything maybe some made its way in through the throttle shaft.
Looking at the pictures, it looks like you and those at Camaros.net called it. A vacuum leak.
Below is the carb and the spacer, the spacer is flipped up. You can see on the spacer how the seal isn't made where the passages are discoloration. Look closely at how little metal is there to make the seal with the gasket.

Now look at the primary side of the gasket (rotated clockwise). A bunch of photoshop to try to better highlight the dark streak that blasts right through the "CAT NO. 6006" and on out. Next to it is some weird texture, like it soaked up something (maybe my carb cleaner?). It looks much too much like coincidence.
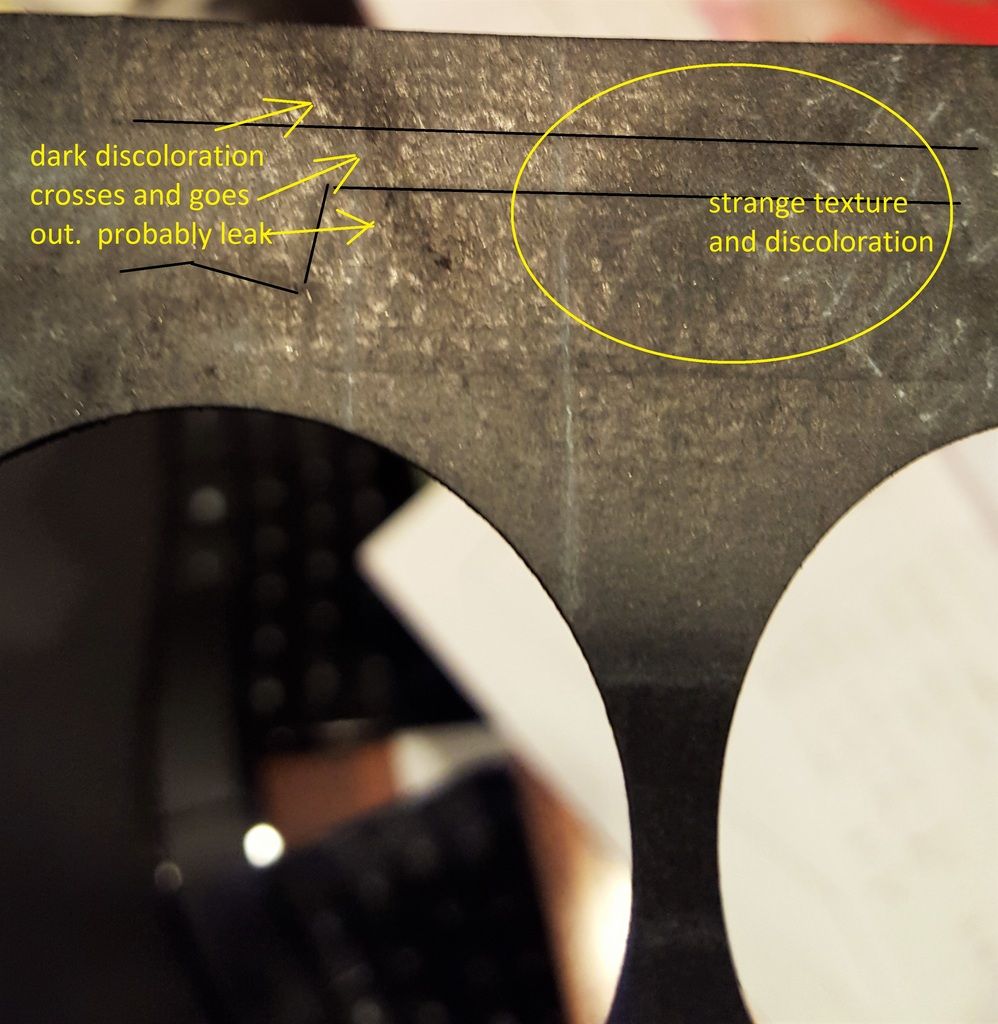
I'm changing up the carb when the engine comes back together, will either flip the spacer or hopefully chunk it.
Thanks!
Mark
The cheap ones at Autozone work pretty well but they're likely to only have 1" spacers. I recently put in a 1/2" plastic spacer and extra thick gaskets and I don't have any leaks now.
Definitely flip it if nothing else. Check with your machine shop if they have speed stuff. They might have a better spacer and thick gaskets.
Brief chat with the machine shop today. Shocking results!
1. Valve springs are weak, 10-15 lbs lighter than spec. This is likely cause for some of the backfires and a reason why it happened on both carbs. The other leak certainly contributed.
2. "It's about the worst bore and hone job I've ever seen." He thought the hash on that would chew right through new rings. Pistons will be bored out to 0.040 (0.030) today.
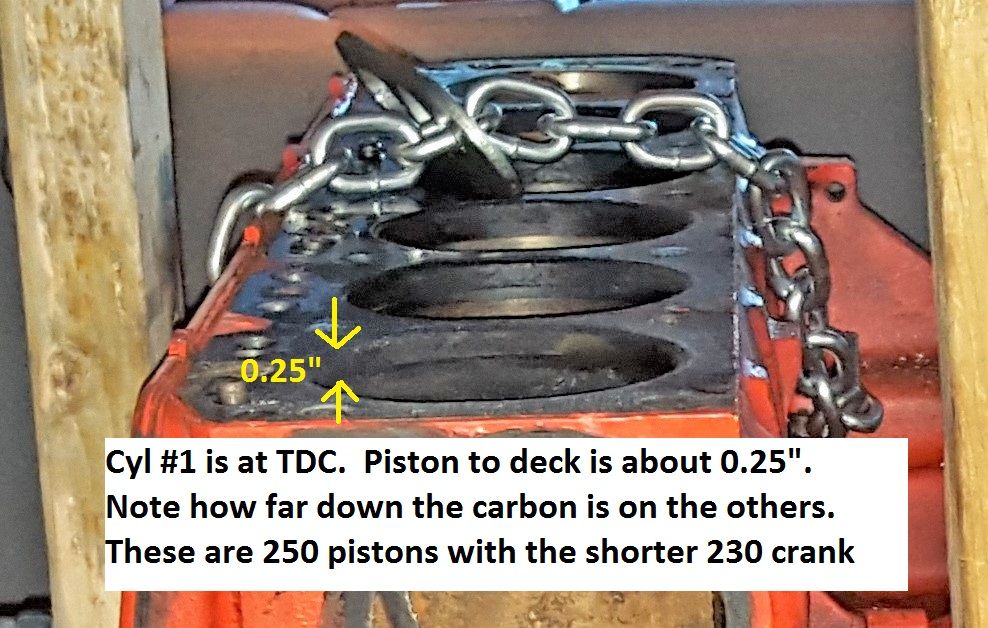
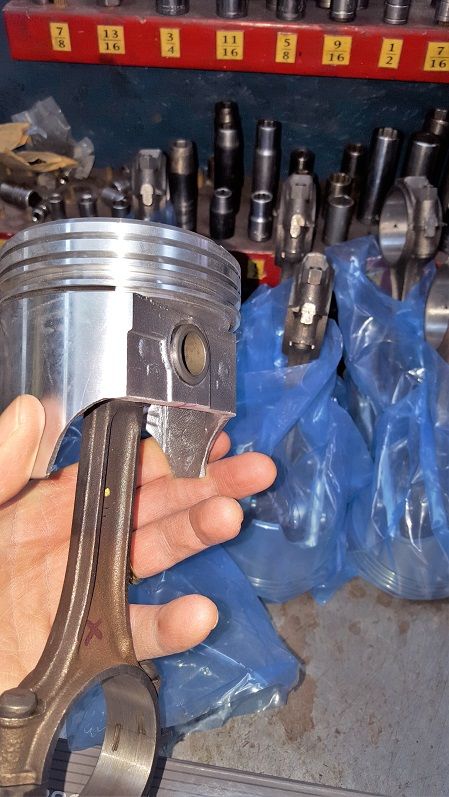
3. The wrong pistons were installed at the last overhaul! When I brought the engine in, Bill kept looking funny at the engine. He got out his measuring device, but didn't say much. I thought maybe it wasn't TDC, but it actually was. Turns out that 250 CID pistons were installed with the shorter-stroke 230 CID engine. Rough estimate that the compression ratio was somewhere around 6:1 at best and the cause of my 105-110 PSI compression. This makes me feel good that there was a major defect that was causing this engine to run so horribly and that when it's done with the 250 crankshaft, flat-top pistons and moderate CAM, that this engine is going to SING! I didn't have a good picture at TDC, but did find one. Jim pointed out that ordering the wrong pistons can be forgivable since somebody assumed it was a 250. But how does one put the engine together and not notice? Oh yeah, that's right, considering the boring job, it may have been done in somebody's garage.
Anybody experience this sort of error before?
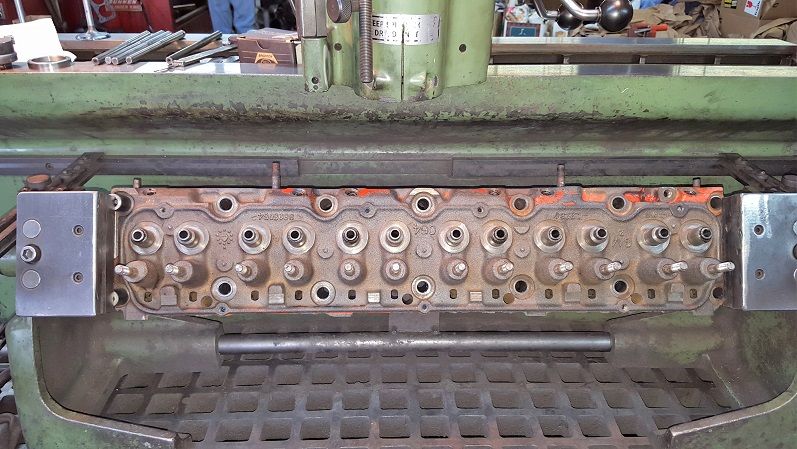
New valve guides added, hardened exhaust seats (valves remain 1.5"), intakes increased from 0.172 to 0.184.
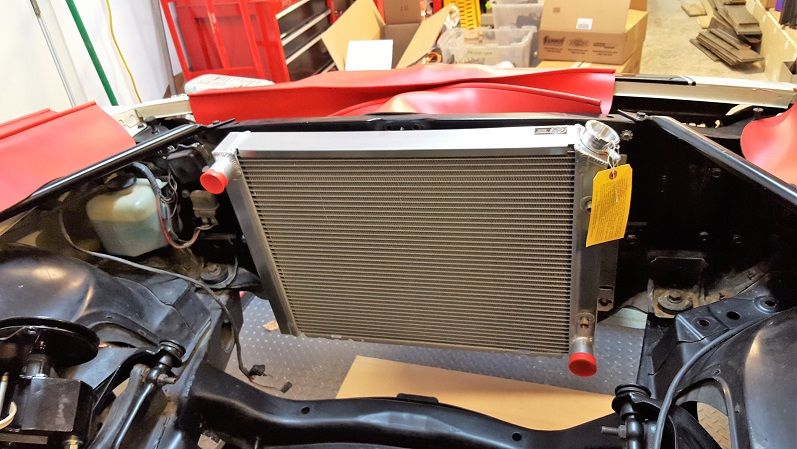
New Be-Cool radiator should significantly improve cooling. I'm also adding a 1600 CFM electric fan and chunking the mechanical fan. amperage max is 12-14A, hopefully I can hang out with the 60A alternator for a while.
About how many gallons of antifreeze do you think will fit? I'll probably put in be-cool's antifreeze and get the double-warranty.
Old vs. New core thickness. Both are double core.
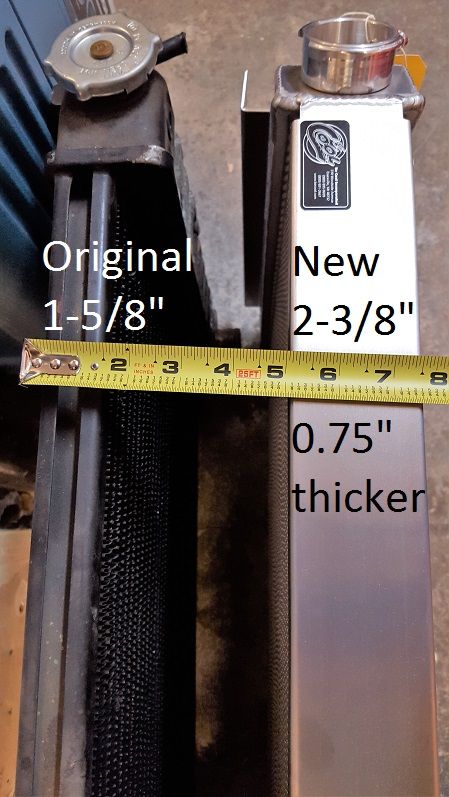
Chose Be-Cool because of a good friend's great experiences for his many cars and I know nothing about the other suppliers. The tech rep helped me by providing full mechanical drawings and specs for the fans because it was far from obvious from online information which radiator would fit this car. Parts list to all that I bought
· 12009 Radiator
· 75014 Electric Fan
· 72231 Fan Brackets
· 75021 Wiring Harness
· 70003 Recovery Tank
· 70001 Billet Radiator Cap
That'll make a big difference.
When I did my 3 core radiator I had to either ditch the mechanical fan or find a different spacer. The fan interfered with the radiator.
I bought a cheap fan and relay on ebay. Every part in it died except the relay. The temp sensor died within about a 2 weeks. The fan died about 4 months later. When the fan died I stopped in Autozone and found a universal fan for about $60. Mounted it as a pusher fan and haven't had a problem since.
...plus it's hidden.

I made a radiator fill panel as well. Doesn't do anything other than cover up the front hole. Now you can't see much at all other than the radiator and the rheostat mounted to the side of it.
Looks good! Be-cool radiators are nice.
Thanks all... Stopped by the machine shop today, it's progressing nicely.
New Pistons mounted on rods
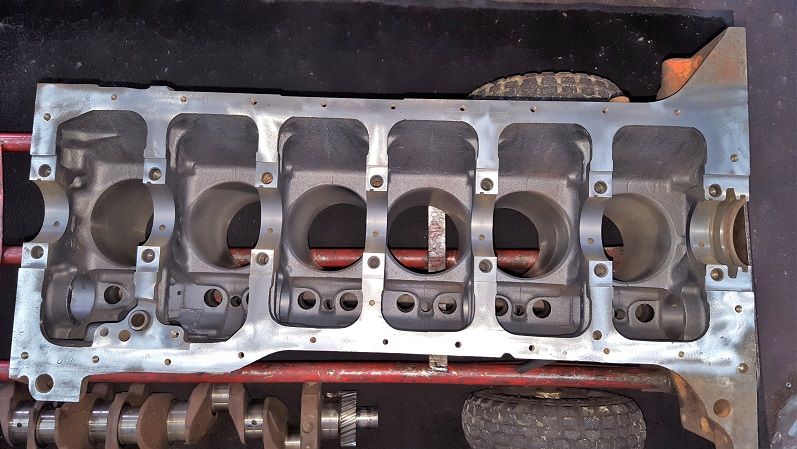
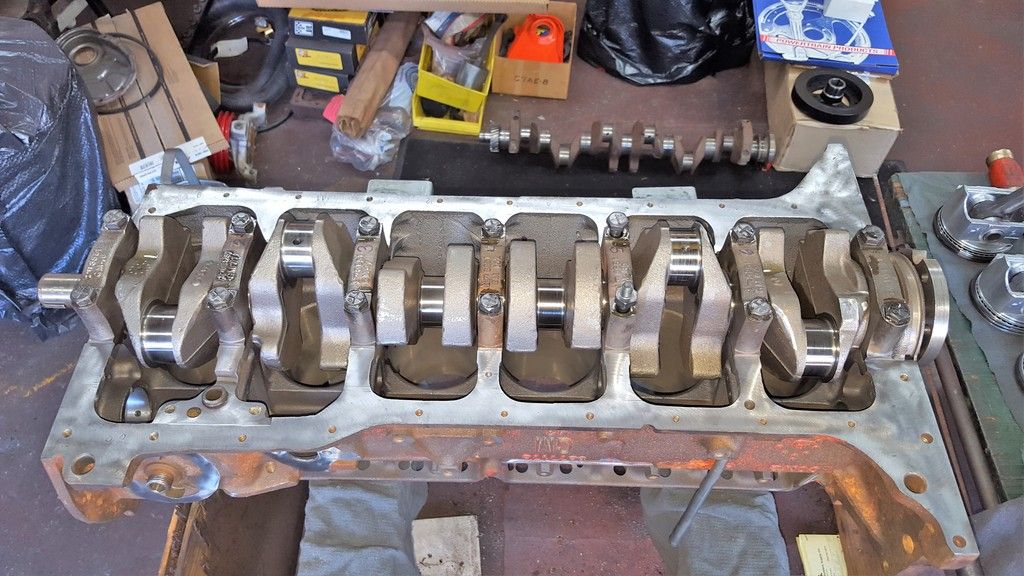
Block bored to 0.040", surfaces sealed, brass freeze plugs next
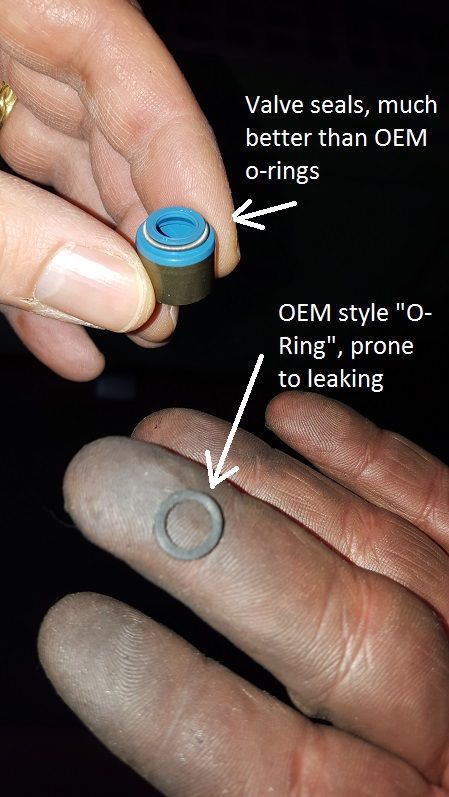
Head work in progress, machining to accept new style valve seals
Valve seals, new style much better
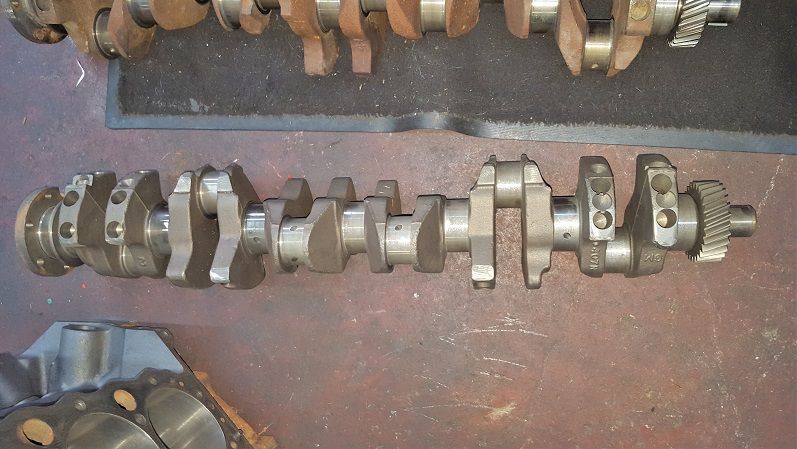
Balanced and polished crankshaft
Thanks all... Stopped by the machine shop today, it's progressing nicely.
Valve seals, new style much better
Mark,
Are you using Teflon seals on the exhaust guides too?
Just wondering if you discussed that with your machinist?
I had a head done with all Teflon seals and the exhaust guides were heavily worn at the next valve job years later. I was told the Teflon seals cleaned the oil off the stem too well.
He liked them for intake valves only, and stock or umbrella seals on the exhaust side.
Just curious and others please chime in if you think the guy was wrong.
Thanks.
Pete,
I wonder what type of valves and guides your engine had. I install those type seals on intakes and exh for all street engines. Race engines get just the oring on the exhaust to somewhat limit oil.
Thanks all... Stopped by the machine shop today, it's progressing nicely.
Valve seals, new style much better
Mark,
Are you using Teflon seals on the exhaust guides too?
Just wondering if you discussed that with your machinist?
I had a head done with all Teflon seals and the exhaust guides were heavily worn at the next valve job years later. I was told the Teflon seals cleaned the oil off the stem too well.
He liked them for intake valves only, and stock or umbrella seals on the exhaust side.
Just curious and others please chime in if you think the guy was wrong.
Thanks.
The seal can only do its job effectively if the guides and valve stems are not worn. An o-ring seal is all that's needed on the exhaust valves for street engines, but regardless of make or model of the engine, both intake and exhaust require a full umbrella style seal for race applications.
Thanks Gbauer, TJ, Chevelle292, Tom, CNC,
Putting these seals on all of the valves. All new guides and new valves. I didn't realize the racing engines needed a little bit of oil on the exhaust, and it sounds like street could get by with that also, but this is street use only and I really dislike burning oil, so we should be good.
[quote=tlowe #1716]Pete,
I wonder what type of valves and guides your engine had. I install those type seals on intakes and exh for all street engines. Race engines get just the oring on the exhaust to somewhat limit oil.
[quote=Chevelle292Wagon]
Tom,
Memory fades on this, but it seems like it was all new stock parts. The guides may have been knurled and then replaced on the next valve job when the heavy wear was noted.
One thing to remember is that both contact surfaces wear out, not just one or the other. So chances are that even though the guides may have been replaced later, the valve stems themselves had wear on them also, but weren't replaced as they should have been, decreasing the new life that was expected.
One thing to remember is that both contact surfaces wear out, not just one or the other. So chances are that even though the guides may have been replaced later, the valve stems themselves had wear on them also, but weren't replaced as they should have been, decreasing the new life that was expected.
I'm afraid I can't answer the question about what guides were in the head and what the condition of the guides and valve stems were.
But now I see there are Viton seals that resemble Teflon seals and may be a good choice too.
I'll have to look into those.
Thanks.
Update: machinist is done, waiting for the assembler to get done with holidays. Transmission 200r4 due to arrive next week. Ski season and awesome snow this year, so hard to say when install occurs.
Held garage night with local VCCA vintage chevy club. We discussed my clunking powerglide. The flex plate where the torque converter attached was really beat up. I've got a new heavy duty plate. The guys said the bolt holes were likely elongated (plate is gone now) and the most likely cause of the clunk when shifting gears. One guy had exactly same issue on his service truck years ago and fixed with a new flex plate.
Is yours a column shift or floor shift?
Let me know where you're getting the pieces for the 200r4 conversion. I'm doing the same swap this spring.
...once again we're going down exactly the same path!
This car is going to rock so well, it's going to be hard to figure out what to attribute to what! Correct pistons, more aggressive CAM, ported head, 3-spd+OD auto tranny. It's a jump from << 100 HP to 225 or more HP. I'm going to have to be careful stepping on the gas...
This forum will get regular updates, of course.
For the transmission, I went the route of high quality (I hope :-)), lesser risk, turnkey and more cost. From cpttransmission.com: 200r4, torque converter (non-locking as recommended by Art for this car), conversion bracket. Column shifter, conversion kit link below (blessed by Art also)
http://cpttransmission.com/2004R_trans_2to4.htmhttp://www.shiftworks.com/kugel.htmI've got a list 18 deep of action items to do before the engine & tranny are to be installed. Maybe I can get those in this weekend if all this glorious skiing doesn't wipe me out first.
A non lock-up converter is OK if you are looking to get the fastest ET for all out racing.
If that is what you are looking for?
I've been thinking about the converter a lot lately and reading up on it. Sounds like you want a 2,000 to 3,000 RPM stall with our cam. Kinda wondering if I could just keep the converter I have now. It's the stock PG converter.
No,
A stock PG converter will not work with your camshaft. Need a higher stall.
I believe I've ordered the
"88230 - 200 4R non-lockup 12" Converter 2200 Stall
200 4R 12" Converter 2000 to 2200 Stall non-lockup "
If I recall correctly, the reason for the recommendation was two-fold. First there's no computer or electronics currently in the car and you have to add something for the lockup. Second with my tall 3.08 rear-end gear ratio, it will have trouble shifting in and out of lockup. Of course if that's true, if I put in the 3.73 gears, maybe it's not correct.
An update. Stopped by the machine shop yesterday, block was in process of assembly. One disconnect, I'd wanted studs since I had a head gasket blow a very long time ago after a head bolt came loose, but I hadn't communicated this well. So maybe another two weeks until it's ready to come home.
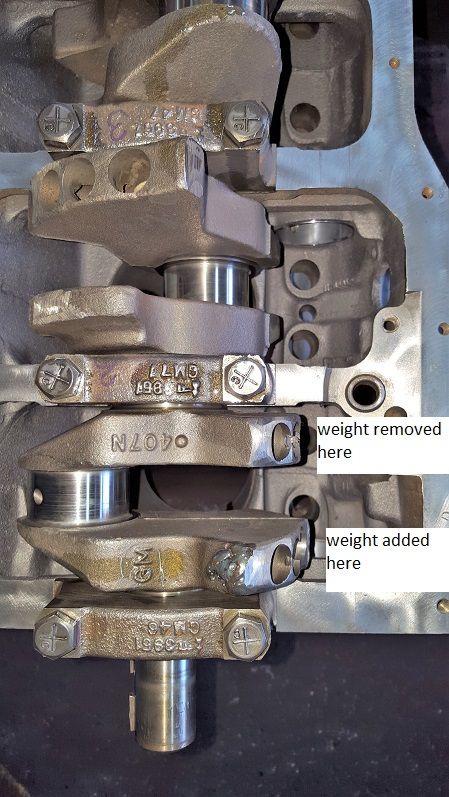
Crankshaft in, torqued down.
FYI on some of the balancing that was done to the crank.
Somebody else was having their head rebuilt, so we get a side by side look. I think Jim said my springs give around 110 lbs pressure and the stock are around 66 lbs. Some of the parts come from a v8. I didn't notice before that there are dampening springs inside of the big coil springs.
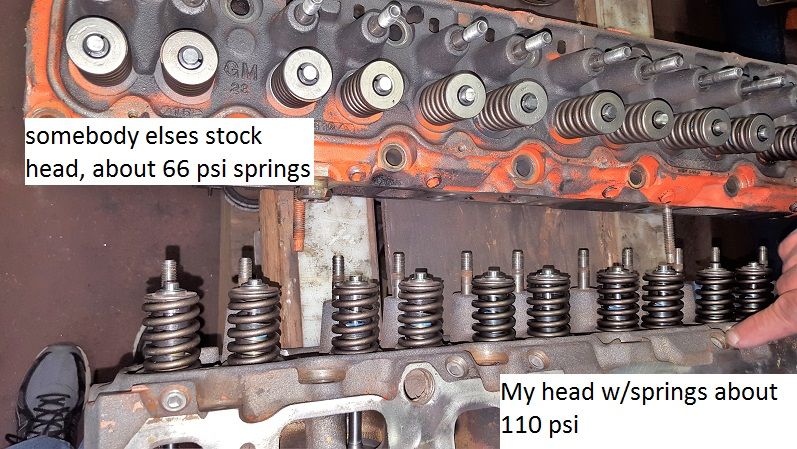
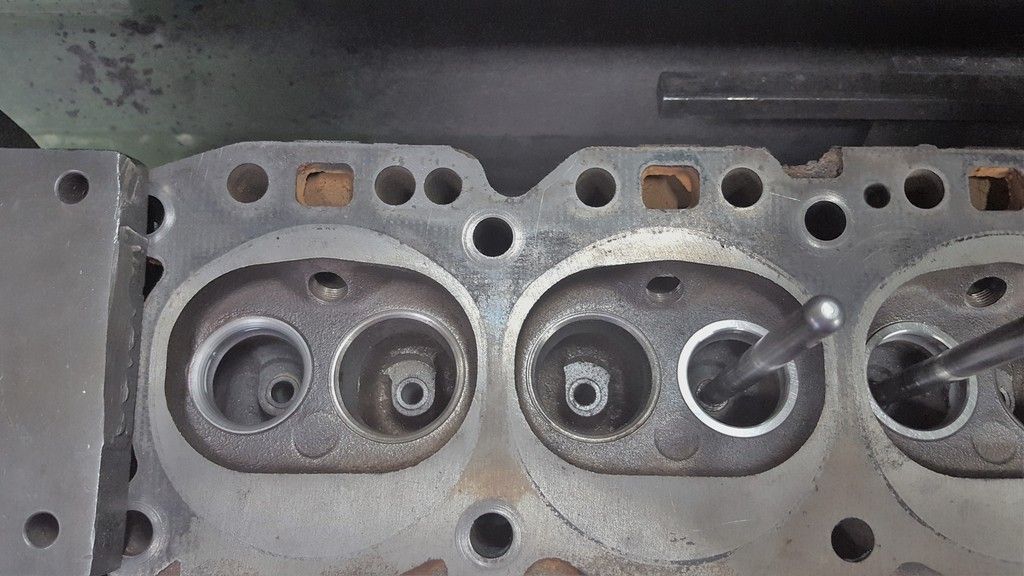
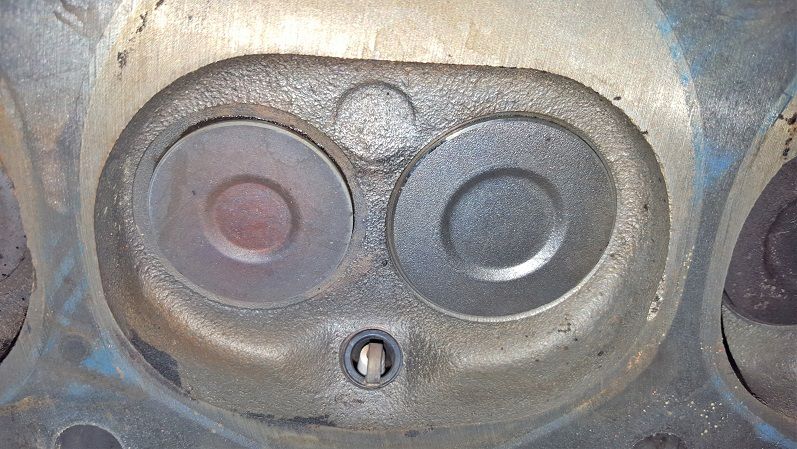
To show a comparison between stock valves and the larger 1.72" intakes on my head. 1.72"
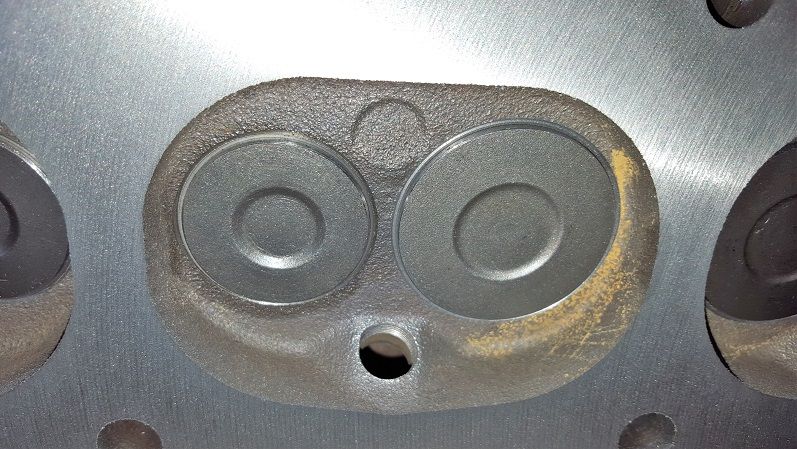
Stock valves...
Thanks TJ!
Another update. Studs have snagged me again. They're so tall that they just touch the top of my beautiful valve cover. Rather than rip it all apart and shorten the studs, the machinist is confident to take a touch of metal off the inside of the valve covers.
I should be bringing this baby home Saturday. Installation won't be for another week or two afterwards.
Mark
Engine is safe and sound in the garage, having picked it up last Monday. I'll start working in earnest tomorrow, but don't anticipate it getting installed until another week. Then I'm betting another few weeks of messing around until startup. Maybe more. Guessing the throttle (rod vs. cable) will cause me some head scratching.
Look for updates coming Sunday night!
Thanks, George!
Aye skippy, it is. I got it from Tom Langdon. It is said to come from a 1980's six cylinder. The coil isn't on the block, but is from a Ford to get the cylinder stock look. It looks at first blush like stock, but upon closer inspection you can see differences.
Ah... I couldn't tell.
HEI really smoothed out my engine. Runs a lot better with it.
Attached new 200r4 and torque converter. Almost ready for tomorrow's installation.
Another glitch. Few plate cover is different on the 200r4 than on the powerglide. Gotta find one of those, haven't looked yet.
Spell check got me. Flex plate.
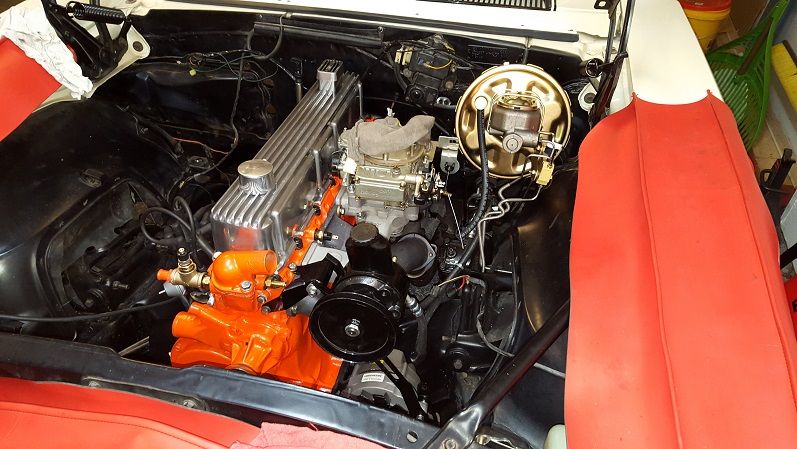
Engine is in! Big problem, though. New cross member for the 200r4 hits exhaust pipe.
Throttle needs to be converted to a cable. Beyond that, just normal stuff.
Hopefully will get pictures posted soon.
You don't need an exhaust. Just run open headers. Problem solved!
Congrats! Can't wait to see the video. I'm very interested in how the 200r4 drives behind the 250!
Thanks, funny! But I've got a new G-Force crossmember in shipping, will let you know how it works out.
If you don't mind can you make a list of parts, suppliers and costs for the 200r4 swap? That'd make life a whole lot easier for me...
Also I saw this:
http://www.jegs.com/i/FITech+Fuel+Injection/546/30003/10002/-1Looks like it'd be perfect for our cars and the price is certainly right.
Add in a fuel pump, lines (need a return) and a sending unit from a 69 (there's one that has a return line bung) and you're under a grand for a self-tuning FI system.
Thanks, funny! But I've got a new G-Force crossmember in shipping, will let you know how it works out.
Did you have an issue with the PS pump mounting to the new manifolds?
If you don't mind can you make a list of parts, suppliers and costs for the 200r4 swap? That'd make life a whole lot easier for me...
Also I saw this:
http://www.jegs.com/i/FITech+Fuel+Injection/546/30003/10002/-1Looks like it'd be perfect for our cars and the price is certainly right.
Add in a fuel pump, lines (need a return) and a sending unit from a 69 (there's one that has a return line bung) and you're under a grand for a self-tuning FI system.
Hey George, sure I'll try to pull this together over the next few months. I keep a more in depth log of what I do offline, can add this. Mind you, it's depressing how much I've spent.
Mark
Thanks, funny! But I've got a new G-Force crossmember in shipping, will let you know how it works out.
Did you have an issue with the PS pump mounting to the new manifolds?
Hey lifeguard, no issues. It was constructed new, suppsedly matching an original. It was a tight fit, but didn't obstruct with either the stock or theven Tom Langdon manifold.
Cool. I've heard the bracket for the PS on the integrated head engine needs to be modified and an extra support added when switching head and manifolds out. The earlier bracket for PS may be a better fit.
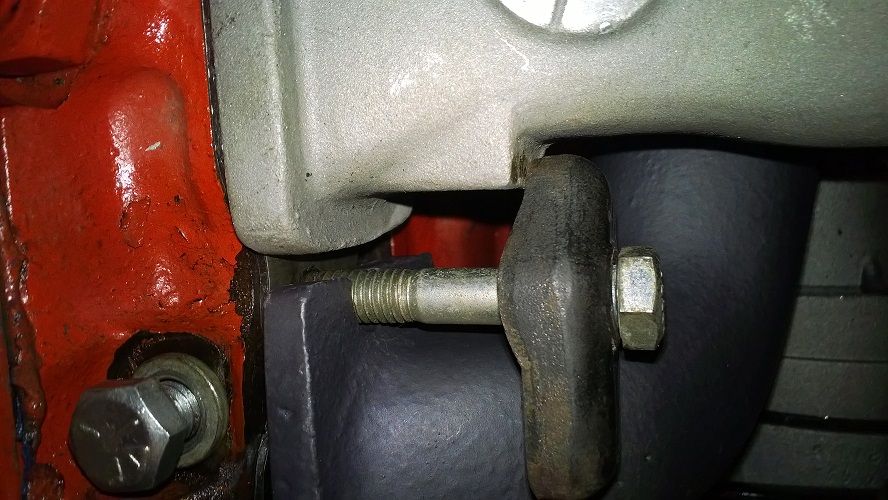
I had to grind down a bit of my power steering pump bracket to use the stock spreaders with Langdon headers and the Offy intake. It was just about 3/16" or so.
I had to grind down a bit of my power steering pump bracket to use the stock spreaders with Langdon headers and the Offy intake. It was just about 3/16" or so.
Ok, similar to what I've heard another guy did with his integrated head bracket. And he used a double eye turnbuckle to replace the attachment point on the manifold.
Making slow and steady progress over the weekend...
- New crossmember in. Exhaust hits it just a bit, not total obstruction.
G-Force with Bowties Overdrive behind
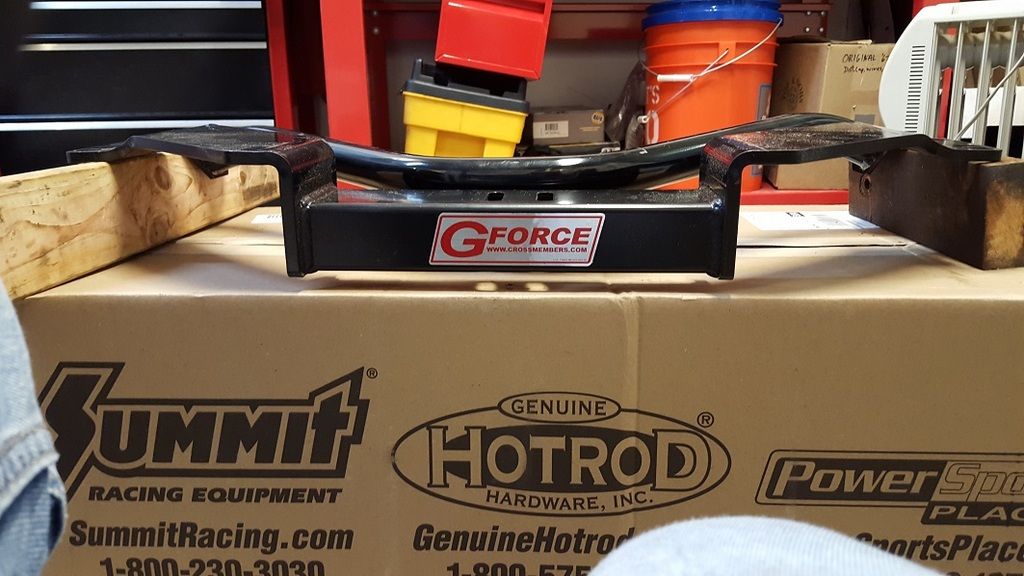
Here's the difference in clearances. Hey George, if you can use the BTO, I'll make you a great deal. Both are really high quality, just more clearance on the G-Force.
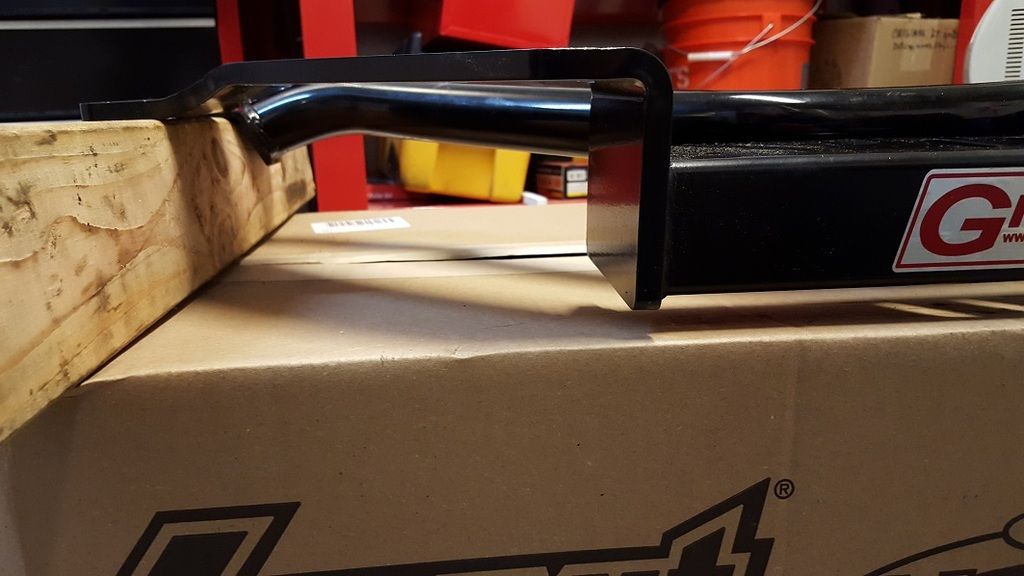
Argh, just a little touch in one spot in the corner. Maybe I can grind a bit off the crossmember.
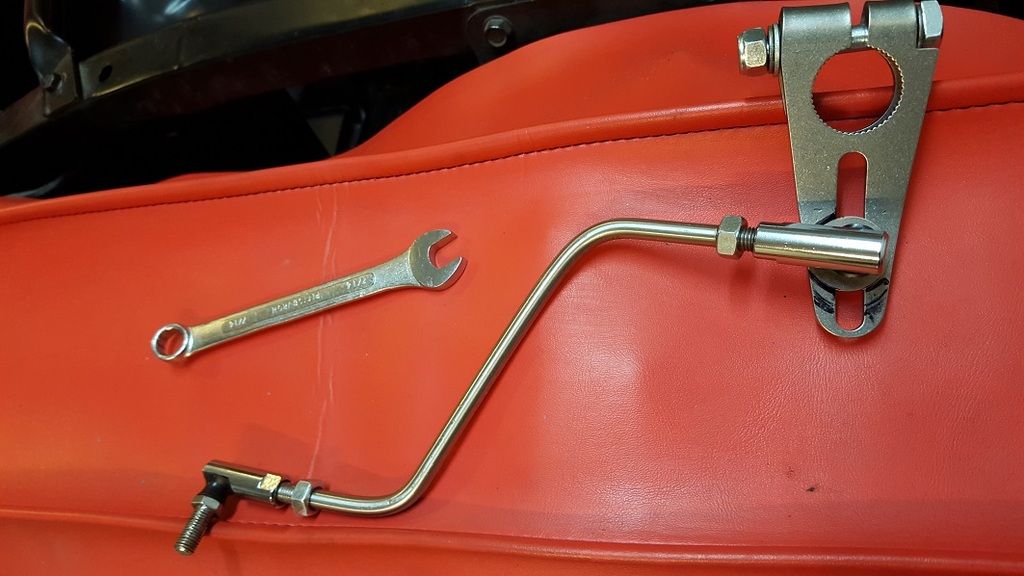
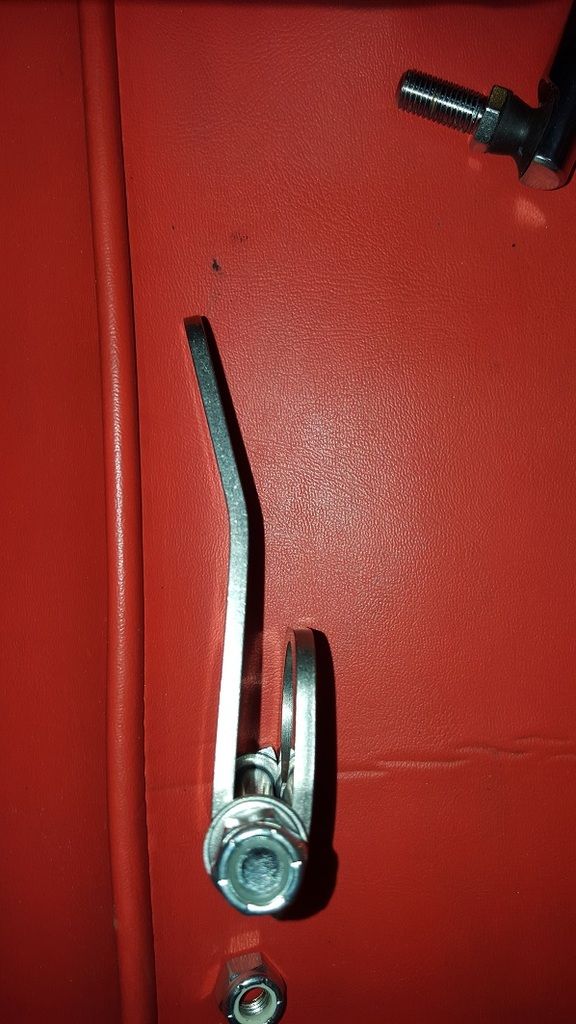
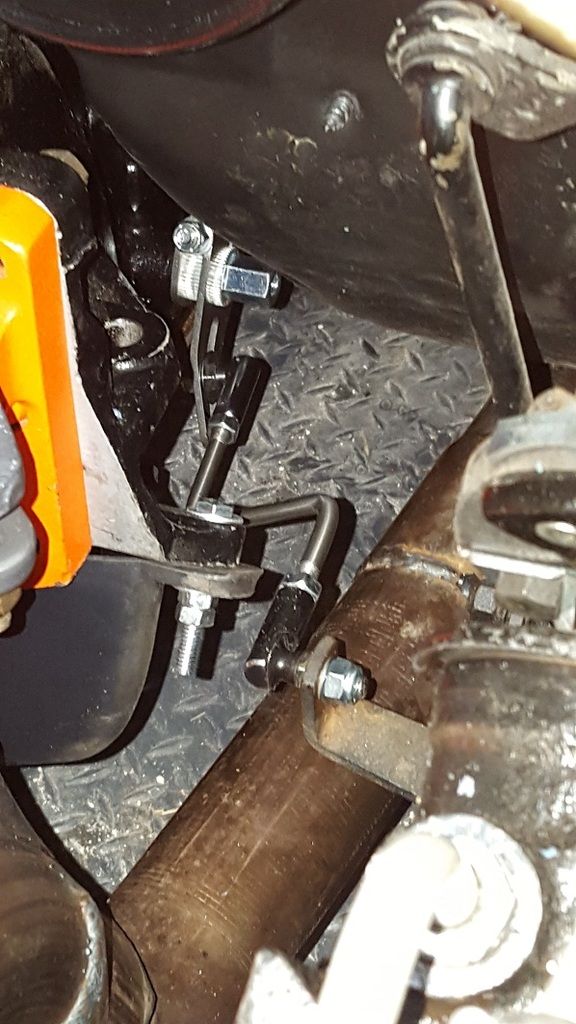
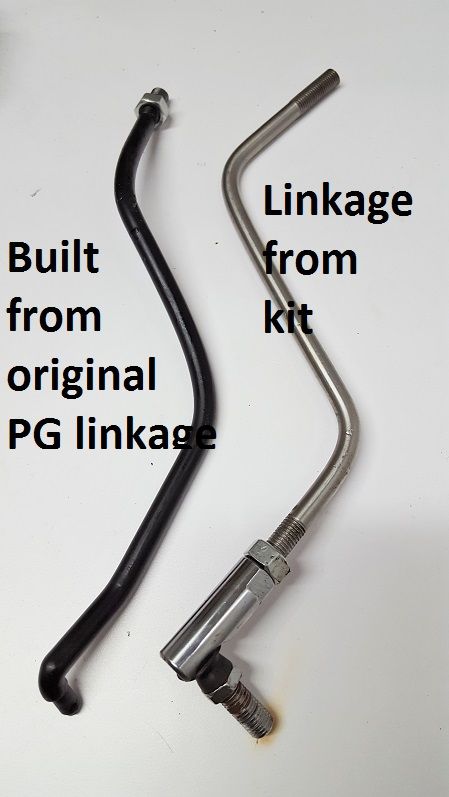
- Transmission linkage added. This took hours and hours to do. I started with a piece of ROMEX to create my first pass at a model. Put the spline onto the transmission before installing the transmission. :-) I bent the rod appropriately to get the right bend. I did two 90 degrees to start with, but it was super squishy so ended up with the angled bend. Once bent and in place, you cut the rod and thread it. Well for me, you end up cutting both ends. Then cut and thread again. So paranoid of making it too short. I had to bend the lever out to prevent obstruction with the bottom of the transmission. They show the bolt on the outside, but then the rod obstructed with the transmission. Bolt on the inside obstructs with the transmission. Tons of trial and error. Got it all in place. Park seems right, Reverse is closer to neutral, but the bottom gears aren't quite on either. Everything seems shifted, but it'll be close enough I hope. The lever is set up for short or long throw. My setup was neither, somewhere in the middle.
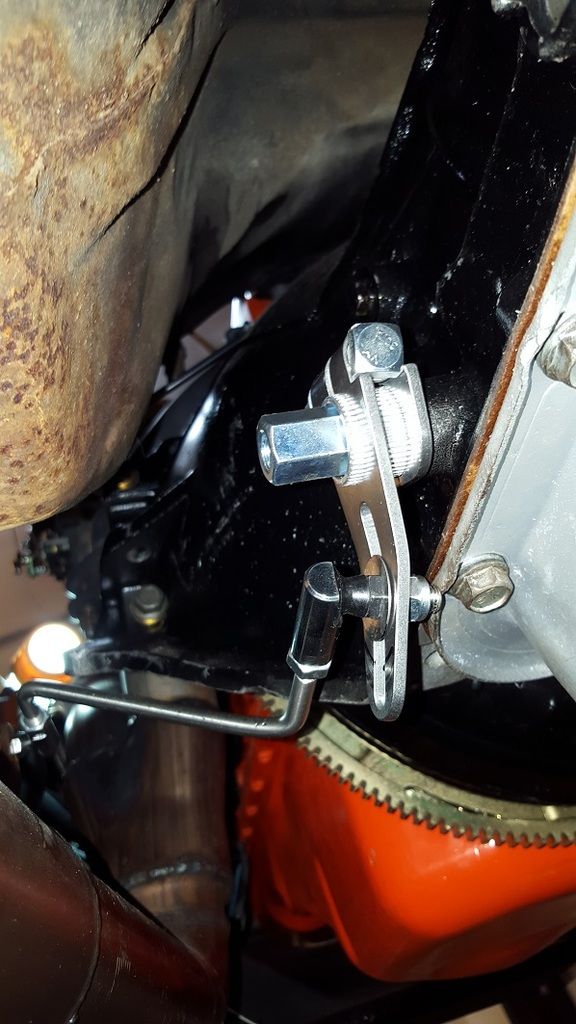
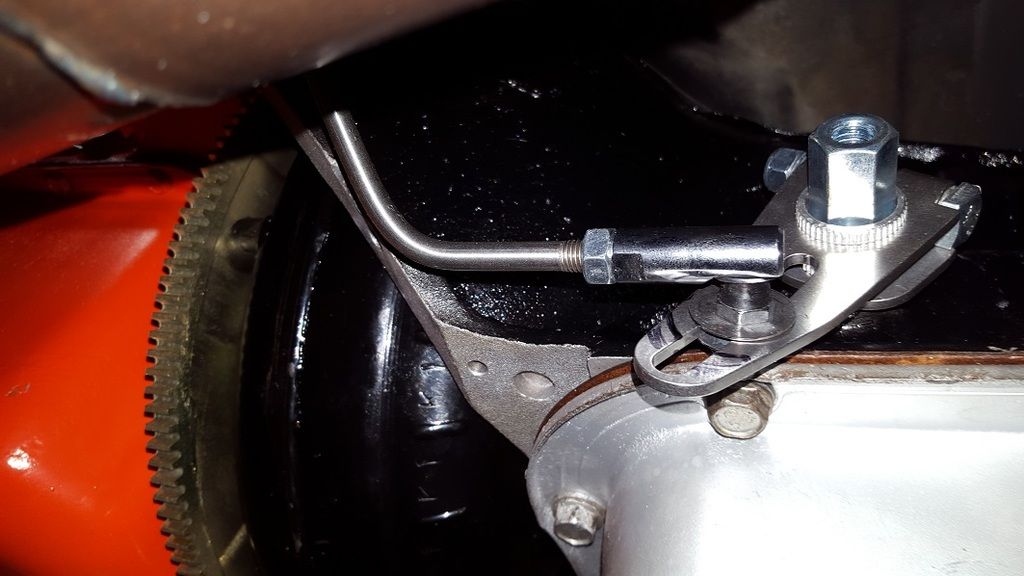
I believe there are kits for all this...
I believe there are kits for all this...
Haha, this is the kit.
You need to play with the slotted adjustment on the arm to get more, or less throw....that is why the gears are not all correct, it should correct the issue.
1. Mount the trans lever with a ball socket on it.
2. Start from NEUTRAL and accurately measure the travel of the stud from neutral to each gear.
3. Mount a ball stud on the end of the column shift arm.
4. Repeat the process of measuring the travel from neutral to each shifter quadrant gear location.
5. - TBD. Reconcile the movement of the column with the movement of the shifter lever by lengthening / shortening the throws, re-clocking the splines, or reversing the lever, or any combination of all three adjustment possibilities to make it shift precisely into each gear.
Great process, thanks!! Since it appears to be working now, I'll put the adjustment off later.
On a 67 Camaro, how does the reverse lights turn on? I didn't see any cables or connectors on the 200r4.
The oil cooler lines for 200r4 are said to be bottom on transmission run to bottom on radiator. Hope to hook these up tonight.
Thanks,
Mark
I believe there are kits for all this...
Haha, this is the kit.
Need more kit in your kit?
Sounds like I'll have fun when I do mine. Luckily I won't be going it alone. The shop manager at work has a dirt track car that I helped build so he'll help me on the trans swap. We're buds like that.
Sounded good once it got going!
Sounds like timing needs adjustment, also, is it just me, or does it sound "tight" once its warmed up? I have the perfect air cleaner for you Mark....pm me about shipping it to you.
Sounds like timing needs adjustment, also, is it just me, or does it sound "tight" once its warmed up? I have the perfect air cleaner for you Mark....pm me about shipping it to you.
Oh man, I've already got a nice new air cleaner on order. I'll PM you about yours.
The initial timing for the start in this video, set by hand by lining up the pickups in the distributor was off, probably 5 degrees retarded. It's just under 10 advanced now. I haven't tuned the idle mixture yet. Set the screws to 1.25 turns open on the bench. I verified that it has the right jets (51? Can't remember right now).
The engine does feel tight when warm. The starter has a hard time turning it over. I figure the starter is old, the compression is high, and the new engine a bit tight, so I've got a new starter on order too. Hopefully it's not an issue.
Thanks!!
Mark
Sounded good once it got going!
So sweet it is, thanks!
Mark
Try turning the low sides out to around 2 or 2/12 turns, that will help the starting issue you have when its warm.
Maybe the starter is okay after all. The battery drops voltage quickly, to 12.2V overnight. With nothing attached, a charge took many hours and dropped from 14.2V to 13.6v in 15 minutes. The first charge last night was fast. All that cranking was too much. But that wasn't enough cranking to wipe the battery.
I suppose I will put in the new starter as insurance.
If you do change the starter. I always recommend stepping up to a newer GM PMGR (permanent magnet gear reduction) unit.
For the 153 tooth flywheels , I believe it is a 1995 Camaro with 305 starter
For 168 tooth use a 1996 Silverado with 350 starter.
They are a direct bolt in, are high torq and low weight.
Some older engines (pre 74?) will only be drilled for 2 straight across starter bolts, these require the diagonal bolt. It will need to be drilled and tapped. Easy to do.
For a baseline I run 52 jets, a 32 squirter and 6.5 power valve on my 390 CFM Holley. Timing at 10-12 degrees advanced. Idle screws: start at 2.5 turns out. Mine is a tad rich but not enough to foul plugs. Plugs read good with this setup.
start with the electric choke vertical and adjust from there. Probably going to be a bit rich when cold. I like to keep it just loose enough to turn it with effort until I get it locked in.
Vac advance is on the lower port on the carb, trans on upper.
Mine is a tad rich but not too bad.
Runs really smooth! Hows the 200r4?
If you do change the starter. I always recommend stepping up to a newer GM PMGR (permanent magnet gear reduction) unit.
For the 153 tooth flywheels , I believe it is a 1995 Camaro with 305 starter
For 168 tooth use a 1996 Silverado with 350 starter.
They are a direct bolt in, are high torq and low weight.
Some older engines (pre 74?) will only be drilled for 2 straight across starter bolts, these require the diagonal bolt. It will need to be drilled and tapped. Easy to do.
Hi Tom, did you have to adjust with shims? Mine is 153 tooth, if that matters.
Thanks,
Mark
Shimming is the same for any starter, shim as required.
The 153 PMGR starter has a straight across bolt pattern.
The 168 PMGR starter is the one with a diagonal bolt pattern.
If you do change the starter. I always recommend stepping up to a newer GM PMGR (permanent magnet gear reduction) unit.
For the 153 tooth flywheels , I believe it is a 1995 Camaro with 305 starter
For 168 tooth use a 1996 Silverado with 350 starter.
They are a direct bolt in, are high torq and low weight.
Some older engines (pre 74?) will only be drilled for 2 straight across starter bolts, these require the diagonal bolt. It will need to be drilled and tapped. Easy to do.
Did you mean 1992, which was the last year the 305 small block came in the 3rd Gen Camaro? Or is from a different engine?
Not sure about the 305, but they used smaller 153 flexplates in cars and the starters were the PMGR type in 1996. Not sure when they started doing them. I stock them.
Hi Tom,
Do you mean like this starter?
http://www.summitracing.com/parts/pwm-9502/overview/On my starter, there are three wires. The main 12V and two additional wires that I don't know the purpose for. If you look at this one (and the starter from my spare engine), there is only one wire connection. Do you know what to do with the second wire?
Thanks,
Mark
Not sure about the 305, but they used smaller 153 flexplates in cars and the starters were the PMGR type in 1996. Not sure when they started doing them. I stock them.
Oh, maybe it was the V6 Camaro starter then. The 4th gen Camaros just had base models with V6 and Z28s with V8s. 1992 was the last year of the 3rd gen with the rare V6 base that was usually upgraded to a 305 V8, and the Z28s which had 305s and optional 350. That was that last of the small block Chevy in the Camaro.
Took her out today for a long, 30 mile run. Then moderate acceleration for breakin. I had opened the idle mixture to 2 turns, wary of running rich. Serious hesitation. When cold, stalled when put in gear.
When I had the carb on the bench and pulled a bowl to check the jet size, I accidentally messed up the setting for the accelerator pump. Thought I got it back, b <\ maybe not?
Maybe I need 2.5 turns like others.
Good news is that my 0-60 time has greatly improved to around 14 sec with moderate throttle! It was 19.5 before the overhaul. Yeah!
Great your making progress with getting it out on the road.
Question, why are you opening the idle mixtures so much? Typically they only need to be open 1.5 turns.
Normally the throttle idle screw is turned in to the idle speed you want. Then the idle mixtures are adjusted for the highest idle. Then you readjust the idle speed with the idle throttle screw one last time.
Hi Tom, thanks. Holly says to adjust to highest vacuum, probably same as your process. I started with 1.25 turns. Others do 2.5. Next week I'll get back to it follow your process. I need to check out the accelerator adjustment. Thanks for the tip!
Accelerator pump: adjust the screws so when the throttle is WOT the pump just has a couple thousandths left before it's fully extended.
Timing: start at 10 or 12 degrees advanced.
Mine: 52 jets, 32 squirter, 6.5 valve.
Idle screws: highest vacuum and both the same.
If it's rich it'll die when going into gear. Also if it's retarded.
Make sure your electric choke engages and disengages with time.
I drove mine from 300 ft above sea level to 3300 feet today. Went to Skyline Drive with the family. I noticed it ran a bit more rich up high. If you're at higher than 1,000 feet your numbers above will be different than mine.
You went to Skyline Drive? It starts 10 minutes from my house

You went to Skyline Drive? It starts 10 minutes from my house
Entered in the North entrance and drove down to the tunnel, turned around and exited at Luray.
I've lived in Front Royal since 2010 and STILL have not driven it. Been waiting for the Nova to be ready, and this summer it is on the road.... it's time
I've lived in Front Royal since 2010 and STILL have not driven it. Been waiting for the Nova to be ready, and this summer it is on the road.... it's time
Drive the whole thing once. There's a nice winery down on the south end called Veritas. Get their "3".
Make sure to bring your camera and an Ipod or something for music because you won't get a phone signal to run Pandora or radio stations worth a darn.
I'd be happy (and nervous) just listening to the engine....
Hi, more updates.
Adjusted idle to 900 RPM, idle mixture screws to 1-5/8th where the vacuum is 16 lbs. The accelerator pump is set to be almost full at full throttle. Later while out driving I swapped the vacuum advance from ported to non-ported (full) and the RPM popped up to what sounds like 1100. I haven't done more settings yet. Over 120 miles on the car, I think the break-in is pretty much done. Except for the oil change at 300-500 miles.
With these settings and moderate throttle, the outcome is 0-60MPH in under 12 seconds (26 sec when I bought the car). I was surprised when the rear tires spun and the tires chirp shifting from 1st to 2nd. Yeah! I can't wait for full throttle.
I've still got a ways to go, though. There is a big hesitation upon acceleration even at moderate speeds. Moving the vacuum advance to always-on reduced the hesitation. Full throttle sounds awful with less oomph than mid-throttle and I've experienced a backfire through the carb. So I'm shy of the throttle. I'm back to the original 1/4" gas line from the fuel pump to the carb, don't know if that would affect this.
Next steps are to mess with the accelerator pump external setting.
For the starter, I ended up making a cleaner ground from the engine to the starter through the right angle bracket by cleaning off paint. It seemed to crank faster. But I found it to still crank slowly one time when it was hot.
We're getting there!
I'm wondering if the advance should be ported or non-ported too? I have the assembly manual to the 1978 Camaro, and the Monojet vacuum hose routing diagram shows the Thermac hose and advance hose hooking to the tee on the throttle body base for full manifold vacuum. The ported vacuum just goes to the purge valve on the Evap cannister.
I believe my original carb was non-ported. It idles faster with non-ported, so it must be better, eh? I just have to watch for knocking upon acceleration. I'm running premium.
I did some adjustments on the accelerator pump today. I tightened up the nut on the plastic lever which should cause the pump to back off more and maybe have more total throw. Almost all hesitation at low throttle is gone. There is still some hesitation at mid-throttle and WOT still runs like a dog. The jets are 51. The nut is much tighter than gbauer's suggestion of WOT with just a little left on the pump. The new adjustment should leave a lot more swing on the pump.
Additional tips on setting the accelerator? Do I just try turning it tighter and then looser and see which works best?
Thanks!
Yeah, you had a much older 1bbl than my Monojet. I have one ported vacuum on mine and it runs to the Evap canister. Two full manifold on a tee on the carb, two full manifold on the intake on a tee, and one full vacuum for the EFE (no power brakes). Sounds like the inline 6 has always run the advance off full manifold vacuum. I have an adjustable advance canister I put on my HEI too.
To clarify when I said "just touching" I meant at WOT the plunger should be just short of full extension.
To change duration, etc, you change the cam or cam screw location. I've played around with them and, to be honest, they don't seem to make a lot of difference. Some but not a lot.
I believe my original carb was non-ported. It idles faster with non-ported, so it must be better, eh? I just have to watch for knocking upon acceleration. I'm running premium.
I did some adjustments on the accelerator pump today. I tightened up the nut on the plastic lever which should cause the pump to back off more and maybe have more total throw. Almost all hesitation at low throttle is gone. There is still some hesitation at mid-throttle and WOT still runs like a dog. The jets are 51. The nut is much tighter than gbauer's suggestion of WOT with just a little left on the pump. The new adjustment should leave a lot more swing on the pump.
Additional tips on setting the accelerator? Do I just try turning it tighter and then looser and see which works best?
Thanks!
Yeah, you had a much older 1bbl than my Monojet. I have one ported vacuum on mine and it runs to the Evap canister. Two full manifold on a tee on the carb, two full manifold on the intake on a tee, and one full vacuum for the EFE (no power brakes). Sounds like the inline 6 has always run the advance off full manifold vacuum. I have an adjustable advance canister I put on my HEI too.
Found an article that is claimed to be written by a GM engineer explaining vacuum advance. In it, he says that the vacuum advance should be connected to full manifold not ported:
http://chevellestuff.net/tech/articles/vacuum/port_or_manifold.htmI wonder why the Holley instructions tell you to connect the advance to the ported nub?
I worked on the accelerator adjustment. I changed the holley CAM from 2 to 1. I tightened up the CAM adjustment (hopefully I didn't stretch the diaphram). But still it hesitates and occasional backfire.
The accelerator jet is only 25. I'll increase it. They recommend by three, so .028. What is yours set at?
Thanks!
When you adjust the cam follower (spring etc)- tighten it until there is end play between the follower and the cam with the throttle closed - then carefully back it off until the end play is gone but no looser.
If it still pops when you stomp on it - either you need a bigger squirter or a different cam. Holley has an cam assortment.
28 is probably still too small. I recommend buying a 28 and a 32 at the same time. 28 was too lean for me.
My main jets are 52's.
Thanks efi-diy, Thanks for the tip. I tried this adjustment last night. I'm a bit concerned that I've stretched the diaphram, because I've tightened the nut all the way and it still seems to be engaging a bit. I never adjusted it when it was new and it was a quite a bit further out. When I order new nozzles, I'll order a new diaphragm just in case I damaged mine.
When you adjust the cam follower (spring etc)- tighten it until there is end play between the follower and the cam with the throttle closed - then carefully back it off until the end play is gone but no looser.
If it still pops when you stomp on it - either you need a bigger squirter or a different cam. Holley has an cam assortment.
28 is probably still too small. I recommend buying a 28 and a 32 at the same time. 28 was too lean for me.
My main jets are 52's.
Hmmmm, I was going to order both 28 and 31's. Maybe save the $12 and order only 31's. I'm thinking this also was (a small) part of the backfiring issue previously.
My main jets are 51's now. Since I need to order the nozzles and they're cheap, i'll order 52's for down the road.
Thanks for the tips!
51 is probably about perfect. 31 squirter is also about perfect.
Backfires are caused by timing and/or lean conditions.
If you do change the starter. I always recommend stepping up to a newer GM PMGR (permanent magnet gear reduction) unit.
For the 153 tooth flywheels , I believe it is a 1995 Camaro with 305 starter
For 168 tooth use a 1996 Silverado with 350 starter.
They are a direct bolt in, are high torq and low weight.
Some older engines (pre 74?) will only be drilled for 2 straight across starter bolts, these require the diagonal bolt. It will need to be drilled and tapped. Easy to do.
Update on the starter. I had already purchased the Summit brand direct replacement which has the ignition bypass built in. No muss, no fuss. It even came with a full load line curve of torque, amps, RPMS.
The RPMs were significantly higher at cold start than the old starter! I assume that the hit starts will be better as well.
Thanks for the suggestions, always learning experience!
Put in a 35 accelerator nozzle and a 8.5 power valve (6.5 originally). I forgot to order 52 jets, so still 51.
Low end acceleration is really good now. Full throttle acceleration is much improved, but not quite where it could be.
But wow, what a difference! The roads ended up a little wet and I was spinning and fish tailing like crazy! Woohoo! Looking forward to dry roads.
Still dinking around with the transmission, but almost done with that.
I doubt you'll see any difference going from a 52 to a 51 jet. A 35 nozzel is pretty big, though.
Top end would be more on the spring selection you have for the secondary. The primaries can only do so much. I think that's where you need to play next. For me the second weakest spring is the one that works best. Secondary spring kits are cheap. If you really want to play around with it Holley makes a quick change kit for the secondary spring that you might find useful.
Sounds like you have the primaries sorted out. Time to go and play with the secondaries.
Well, uh, I was going to try the 32 nozzle first, but after dropping the gasket, nozzle, and screw down into the throat and ever so gingerly removing the carburetor, I did the work on the bench. Since the hesitation was still sizeable with the 31, it seemed unlikely that 32 would do the job so went straight to the next size up, 35. I didn't want to take the carb off again! You'll note that I have the high compression engine and larger intake valves with porting done on the head (no lumps though). I think I have the same CAM as your new one. But I think the combo leads to bigger nozzle.
Just watched a youtube video on changing the secondary spring kit. Looks like I can do it easy without removing the carb and with tiny risk that I shoot the spring into the carburetor throat. :-)
I never remove the carb to change the squirter. Just use a screwdriver and a pair of needle nose pliers.
As to changing the spring: you'll need to remove the carb. Too much going on not to. You'll want to do it on a bench. That's why they make the quick change kit.
The secondary spring is in that part that hangs off the carb by the choke. You have to remove the choke to get to the last screw to remove the secondary actuator.
Have you pulled your plugs yet after driving it normally? Drive it around (don't flog it because you'll get into your secondaries) and shut it down as soon as you pull into your garage. Let it cool a bit (or don't let it cool like me...) and pull a plug to get a reading. That'll tell you if you're too rich or lean. Also tells you about your timing.
Thinking it out a bit it could also be your vacuum advance. Either one will result in poor power.
The column shifter on the new 200-4R was super sloppy loose. On the hypothesis that it was due to two ball joints in the linkage kit, I cut down and reformed the linkage from the original power glide. It's not quite as sloppy, but I can't get the letters to all line up, but it's good enough. Park is P and Over Drive is the first D. Everything else is off.
Hey George & others,
To address the bogging at lower RPMs with the foot down hard, I swapped in the light secondary vacuum spring (original was medium). To my surprise, I got many more backfires and worse bogging. I checked the vacuum to see if I introduced a leak, but it looked fine. Timing 12 BTDC w/o vacuum, 36 w/vacuum and 43 or 46 revving up, if I remember the last two correct. Premium gas.
I think the plugs look alright, this is from 4 and 6 cylinders. The base of the plugs are still black, so shouldn't be too lean.
Engine seems to run great at higher RPMs, so maybe the secondary is opening too soon. I didn't see any check ball in the unit, but not all of them have that. Did yours? Holley.com says to start with heavier springs, move lighter until it "kicks", then back off to the next higher spring. Can somebody explain what a "kick" feels like?
Ideas other than put in a heavier spring?
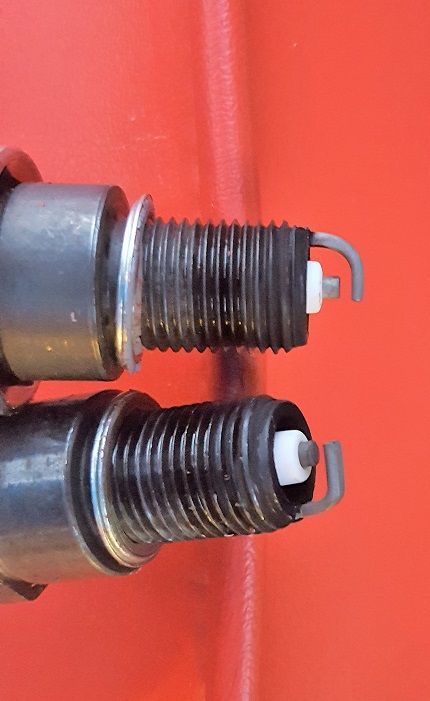
Plugs look lean or a hot plug.
Do you have a O2 wide band reader yet? Takes out all of the guess work plus save a lot of time tuning/trouble shooting.
MBHD
Plugs look lean or a hot plug.
Do you have a O2 wide band reader yet? Takes out all of the guess work plus save a lot of time tuning/trouble shooting.
MBHD
Hi, no I do not, just heard about them. Do you have recommendation for sensor and reader?
I changed to heavier spring, brown color, one off of the heaviest and the worst of the bogging and backfire is gone! The engine didn't like the secondaries opening so soon. Upper RPMS are awesome. But lower RPMS still not living up to potential. Probably need different jets, but I'd like to try the O2 sensor, be more scientific and less experimental.
Thanks!
yup looks lean to me.
Just a heated O2 sensor is enough for a temporary tuning session, remove and use a metal plug when not needed. A regular narrow band is sufficient to get you in the ballpark, and you can read it with a digital multimeter. No need to spend money on a wide band setup. I've been doing this for 20 years with a regular O2 before "Wideband" became a buzz word.
That said, wideband kits have come down in price so much that if you DO decide to get a permanent setup, they are now the way to go.
Note that cheap LED gauges need a voltage regulator to eliminate system voltage fluctuation, or the gauge will lie. Some DIY kits have this included but still get affected by system voltage changes. For kicks I built a couple of those to see if they were any good. In older cars the fluctuation was too great for the electronics to "clean" the voltage sufficiently.
I use Innovate products for Air Fuel ratio readings. They have a long wire harness so you can install it temporary at the end of the tailpipe. So you use it on other cars also.
After thinking about it, I think I'll ask the muffler shop to install an O2 sensor when I take it in for some work sometime this summer. I can run a multi-meter on it. In the meantime, I'm going to continue the shot-gun tuning approach.
My primary jets are stock 51. Gbauer's got 52's. My larger valves seem to be a bit thirstier than his, so maybe I'll try 53 next.
For the Power Valve, my understanding is that the rating is for the point at which the vacuum needs to drop to open and not for the amount of fuel that comes out, correct? The summitracing tuning video says there are two ways to think about power valve size selection. First is the same as Holley, take the vacuum at idle in gear, divide by two. Second is to take the vacuum and subtract two. My idle vacuum is 13 PSI, meaning 6.5 (came stock in the carb). My vacuum at full throttle was something like 2 PSI, measured before I adjusted the secondaries. I had put in 8.5 which had shown a marked improvement. I've got a 9.5 on the bench. The engine seems to run so well at upper RPMs (assume with secondary's open) that I don't want to touch anything more on the secondary's.
How much risk to bump to 53's and 9.5 power valve?
Best to not make multiple changes. You will not know what is or not working.
I would up the primary jets.
P.S. Vacuum is measured in inchs of mercury, not PSI
AEM uses the latest wideband sensor - require minimal warmup - like 5 seconds so it can be used to set up cold start.
I've checked the digital innovate and aem against a reference (lab quality) wideband. AEM is faster and a bit more accurate. The digital innovate is a close 2nd.
Cruise - aim for 15:1
WOT - aim for 12.8 to 12.9:1
Tune for part throttle cruise with jet size. Then adjust the PVCR to get WOT.
A 9.5" PV will bring in WOT enrichment sooner - down side is your mileage will suffer.
If your pull 2" of vac @ WOT and the sec. throttle blades are 100% open. The carb is too small.
Great info, efi-diy. I'll ask guys in the local club if they have the O2 sensor. But I'm a gonna try the shotgun approach for now. With all luck, the package arrives tomorrow and I can try Sunday. Here's the experiments to run with installed values and (new parts values). It may rain this weekend, slow things down...
Power Valve 8.5 (9.5 on the bench, I could try that tomorrow)
Main Jets 51 (54, 53 in delivery)
Squirter 35 (37 in delivery)
Gbauer, I found your last year's thread. You put in 10.5 power valve, 37 squirter and I think 53 main jet. did you stick with those?
I checked my notes on vacuum. at 25MPH I had 12", 35,45,55 all had 13" or 15". Reverse 13, idle 19. Power valve 9.5 probably will work okay, but 10.5 would violate the Summit racing recommendation to remain 2 below the lowest value. But if it's working in George's, another data point that maybe 9.5 is fine over 8.5.
I'd start with the main jets. You must have a vacuum gauge, awesome for tuning a carb. Notice how with any acceleration the vac will drop to 5 or lower? That is when the PV is open. That fuel circuit is separate from the main jets.
Get your hands on a WBO2 as has been talked about.
I have a extra that could be rented out. It is the Innovate unit with the long wire. I recommend the bung be put within 3 feet of the engine.
I changed my settings long ago. It's 6.5, 52, and 32 now.
I changed my settings long ago. It's 6.5, 52, and 32 now.
Thanks for the update. Parts did not arrive yesterday (couldn't bring myself to pay $43 for overnight:-)).
I'll try the 54 jet first. While bowl is off, I'll pop the secondary bowl to find out what jets are in there.
And I'll try the timing according to vacuum (max - 2"). If it still stumbles, I'll try the 37 squirter.
Thanks for the tips! Can't wait for next weekend!
Put in a 54 today, runs really well now! I've got 35 accelerator squirter, 8.5 power valve, secondary is one spring tighter than medium stock.
I did the 2" vacuum thing. Took it all the way up to 36BTDC with vacuum disconnected, got a little more than 20" vacuum. Then backed off to 18", which was at 16.4BTDC. Surprised it's that high. Then adjusted the idle mixture, got the vacuum to raise to 19". Test drove and off to chopping springs.
Starter solenoid did something weird. Cranked slowly, I would hear that slow crank every 10 or so cranks, the next one is always fast. But this time when I let off on the key, the motor went spinning full RPM without engaging the starter. Even with the key off. I removed the quick disconnect from the battery. I removed the wire from the switch and the starter cranked full speed. I cut power again, tapped with a hammer a few times and got it to work.
Seems that it must be a bad solenoid. Thoughts?
How long were you holding the key in the "start" position? Solenoid contacts easily overheat and weld themselves together if left "on" for too long.
How long were you holding the key in the "start" position? Solenoid contacts easily overheat and weld themselves together if left "on" for too long.
It was only a few seconds, five at most. When I hear it turn slowly, I try to stop and try again to see if it's still slow, which is what I did.
I had just finished the long tuning process. The starter was certainly warm. Maybe natural cooling freed it or maybe the hammer.
No chance it's the ignition switch, right?
If you can't fix it with a hammer you have an electrical problem mate. lol
If you can't fix it with a hammer you have an electrical problem mate. lol
Haha, I like that one!
New starter from summit on order ready for exchange.
I took the car in for alignment (new springs). The drive home was mid-70's, partial sun, 50 minutes of nearly idle crushing rush hour traffic. Before the overhaul, the engine would be getting hot, hot, hot. I'll try to get a picture of the plugs just to see how she's running.
The electric fan cycled on and off. Not once did the temp light come on!
Yeah!
Ok, back from being away from my PC for two weeks. Sway bars on front, proper sub-frame alignment and some trim modifications and the wheels no longer appear to hit the fenders. Yeah!
Main jets: 52
Accelerator nozzle: 35
Power valve: 8.5
Secondary jet: 59
Secondary spring: one stronger than middle
Plugs are getting a touch of color versus pure white before. We're getting close.

She still has a significant stall coming off the line. I'm thinking about my 53 main jet on the bench and power valve 9.5 to try out tomorrow. I'm afraid that it is indeed the distributor and it needs trimming or whatever was suggested. I'm not ready yet to get the exhaust work done, where I'll have them put an O2 sensor in, so just doing some shotgun of parts for now with parts on the bench.
Big progress today. Main jets were 54's (forgotten i put those in). Put in the 9.5 power valve, seemed to help slightly. Went to the machine shop, guys came out with timing lights and help. Timing is 8BTDC with premium gas. Max timing is 40BTDC. Smoother, but still sluggish in lower RPM. Discovered exhaust leak, shop put it up and found one nut disappeared! The replaced it, tightened it all up with air wrench and amazingly, it's not nearly as sluggish as it was. Wow, not having proper back-pressure really surprised me as to the effect.
Another problem though. I had used some sort of sealer (liquid metal?) on the intake header to seal up the Offenhauser water plugs. Those are ever so slighly leaking.
Now that the intake is on the car and I'm reluctant to remove, what are your recommendations to repair? Guys tell me to pop out the plug, thread it for pipe threads and put in a plug. Just looks super hard for the front plug, just really hard for the back plug. Suggestions?
Thanks!
I always recommend welding those ports closed. The metal is too thin to thread and tap.
Any chemical you use to seal it is a bandaid.
I used a 2-part liquid epoxy to seal mine and haven't had a leak in 3 years.
I think those casting plugs are only good for sealing exhaust and not water.
I think those casting plugs are only good for sealing exhaust and not water.
Barely adequate for that!
That said epoxy does work if done properly.
I also agree on the staked in plugs they come with. Removing the staked in plugs and welding a cover over the hole is the only permanent fix that will stand up over time and heat cool cycles that these intakes will see. You also have to remember the antifreeze behind the plug can have more than 16lbs of pressure.
I also don't like to hear stories from guy's on how they have to tear the intake back off to repair at a later date. Hence , I try to give the best advice possible.
I also don't like to hear stories from guy's on how they have to tear the intake back off to repair at a later date. Hence , I try to give the best advice possible.
I'm trying to remember why I took the route of epoxy, had something to do with the rush decision to have the machinist install the intake and headers. Coulda, woulda, shoulda...
Thanks for the tips, it looks like I'll be taking it apart this fall once the rainy season starts.
More progress. Put in 10.5 PV and the hesitation is all but gone, only is a few scenarios. Woohoo! Main jets could probably go one setting higher. I've got that and some how I ordered two 10.5 PVs on the bench, but I'm sticking with what I've got so far.
To recap again:
Main jets: 57
Accelerator nozzle: 35
Power valve: 10.5
Secondary jet: 59
Secondary spring: One stronger than center
Punch list to fix:
1) slow water leak from intake. pull, clean out epoxy, weld on plates.
2) some sort of oil leak, think (hope, no pray) it's the power steering pump, but not certain. Oil isn't nice and clean since my oil change a few weeks back, so shouldn't be engine oil.
3) replace upper ball joint boot that i'd installed incorrectly.
4) slow oil leak on transmission line.
5) new hard gas line because there's too much rubber hose. They won't let me on the track next year with it.
6) fix reverse lights. with new 200-r4, lights are on in N-D, but not R. pull steering wheel and adjust and maybe grind.
7) get 'r dyno'ed. Lower priority right now.
Once that's all done, then I'll start on the interior. I keep thinking I'll put in AC, but many that's going to be tough.
Thanks again!
I made that one last change to 58 jets. Ever so slight improvement, there's just a bit of hesitation coming off the line (but the rear wheels are spinning). It feels like there should be more low end, but it's plenty good enough for now until I get the dyno. It might just be that I need to move to the 3.55 rear end (3.08 today). I did back the timing off just a touch to 6.5 BTDC since it's running richer.
To recap again:
Timing: 6.5 BTDC
Main jets: 58
Accelerator nozzle: 35
Power valve: 10.5
Secondary jet: 59
Secondary spring: One stronger than center
I disconnected the host to the power steering pump and it's still leaking. Man, must be that new oil filter I put in, but some things don't make sense. Maybe put another filter on it and see. I hear you can buy a nice kit with glasses to put phosphorous in your oil and see where it's coming out. Another filter is cheaper.
Oil leak might be the valve cover. The only way I can get them to seal is with enough silicone to make Dolly Parton blush.
Oh and no matter how new the oil itll still look black after running through these engines.
Maybe I missed it in the thread but:
* What cam did you end up getting? Need Lift I E, Duration at .050 I & E, Lobe Sep and Advance or Lobe Centers for both I & E.
* What was the compression and deck clearance as built?
* If you have full throttle yet, what RPM is the trans shifting at?
That will help the Gonkulator a lot thanks.
GREAT thread, this will be a great archive for folks building an engine up. Should be a Reality TV show, but not too many folks would watch probably.
Oil leak might be the valve cover. The only way I can get them to seal is with enough silicone to make Dolly Parton blush.
Oh and no matter how new the oil itll still look black after running through these engines.
I think you called it. I pulled off a bunch of stuff and discovered oil up by the thermostat housing. Certainly not coming from a power steering pump. I checked the hex bolts holding on the cover and found them to be finger tight at best. Must have settled in over time. It's Tom's nice aluminum head that in theory won't deform with tight finger tightening. So I tightened them all up and drove it a bit. Still a couple of drips, but not as bad as before. I still have a drip coming from transmission compression fitting that I'm kicking myself about (put the fitting where you can't get to it).
If I need to, I'll do the valve cover when I pull the manifold off to fix the leaking water plugs. (grumble grumble).
Thanks!
Maybe I missed it in the thread but:
* What cam did you end up getting? Need Lift I E, Duration at .050 I & E, Lobe Sep and Advance or Lobe Centers for both I & E.
* What was the compression and deck clearance as built?
* If you have full throttle yet, what RPM is the trans shifting at?
That will help the Gonkulator a lot thanks.
GREAT thread, this will be a great archive for folks building an engine up. Should be a Reality TV show, but not too many folks would watch probably.
It's the "I know just enough to get me in trouble!" show. Haha.
I sure do gas it. Past break-in, using Valvoline VR1 (high zink) oil now. Probably 1000 miles or more by now. My gas mileage is pretty bad, but it seems that all I do is go out and floor it to see how she runs. Let's see if that gets better once I get on a long road trip....
Back to the topic. CAMs. I don't have a tachometer. One of those things one of these years is to swap out the console. I've got some gauges for putting below the dash cheap on sale, but haven't put them in either.
Comp CAM 280H
RPM 1500 to 5500
Valve Timing 0.006
Lobe Separation: 110
Intake Centerline: 106
Duration: Intake=280, Exhaust=280
Duration @ 0.050 Lift: I=230, E=230
Valve Lift: I=0.536, E=0.536
Lobe Lift: I=0.306, E=0.306
Valve Timing @ 0.006 Lift
....Exhaust closes 26 ATDC, Opens 74 BBDC
....Intake Opens 34 BTDC, Closes 66 ABDC
Engine is bored out to 0.040".
More notes...
1. New flat-top pistons from a 307. Compression ratio should be about 9.25:1.
2. New CompCams Camshaft 280H.
3. Head intake increased to 1.72', some porting work done
4. Crankshaft and rods balanced
5. Studs installed instead of head bolts for tighter fit
6. Manifolds installed with all bolts and thick flat washers
7. 200r4 transmission from cpptransmission.com along with 2200-2400 rpm stall converter (3.08 rear end)
I haven't done a compression check. I know it's a heap higher because the old starter would barely crank the engine over.
Still hope to get her dyno'ed soon. Once done, you can compare to the Gonkulator!
Should be practically a ProStocker!
Here is what spit back out of the Gonkulator - I gave it fairly slippery traction since you mentioned wheelspin even with the 3.08s:.
Torq 205 at 2000 (less than a bone stock 250!)
Torq 268 at 3800 (now it wakes up)
Powr 246 at 5300
Below 3000 it WILL feel soggy, less punch than a stock 250 up to maybe 2500rpm or so. Above that it wakes up.
Shifting at 5400rpm
2.39 60ft
10.15 at 69.7 1/8 mile
15.82 at 85.2 1/4 mile
7.86 0-60mph
Even shifting at 4000, your 0-60mph times should be in the 9's if its running right, at full throttle. REALLY need a tach in there though for any full throttle runs so you can see whats going on.
I always short-shift a new combo on purpose, ie let it shift at 4000 or so - then I see how it clocks out vs the Gonkulator. If its running right, then I let the revs go up. If not, why scream the revs until you figure out the problem?
Your hot combo does like a bigger carb, A 550cfm Holley added 1 ftlb and 7hp for 253hp. However, it made very little diff on the clock:
Same as above, but with 550 Holley
2.38
10.13 at 69.9
15.79 at 85.4
7.82 0-60mph
Point being, if that carb keeps giving you trouble, why not try another one? I usually try at least 3 different carbs on a combo, just to see which one it "likes" best. Even a different 390 Holley, or a 450 Holley, 550 Holley, 500 AFB, 500 Autolite 4100 (I like those on the Chevy 6's) etc. That carb may just be an ornery one!
ON THE DYNO STUFF:
The GOnkulator says 143 RWHP, but I don't find it too useful to compare chassis dyno RWHP numbers, they tend to be all over the place. Good for tuning the car, but the numbers don't mean much.
Best is, get it running right, then hit the strip, get some timeslips. Best "dyno" I know of. And a lot more fun.
Hey DeuceCoupe, thanks for the analysis!
What does the Gonkulator say about stock 230?
What do you think about FITECH EFI?
Holley 570 CFM? THANKS!
Hey DeuceCoupe, thanks for the analysis!
What does the Gonkulator say about stock 230?
What do you think about FITECH EFI?
Holley 570 CFM? THANKS!
Stock 250 (no other changes from above 15.82 at 85.2):
Torq 229 at 2600
Powr 154 at 3800
2.39 (same as above across the intersection)
10.99 at 61.1 1/8 mi
17.53 at 74.4 1/4 mi
10.4 0-60mph
That's about 16 carlengths behind your new build, LOL.
No idea on that EFI, never run it myself. I'm sure it would run at least as good as the carb and use a lot less gas, just depends on the price.
Those 570 / 670 / 770 Street Avenger Holleys are kinda strange. I have never had one but have heard the idle transition circuits are not as good as the old Holleys. Maybe they fixed that who knows. And I don't know how they are "flowed" but per the venture & throttle sizes:
570sa = 450cfm Holley old school
670sa = 600cfm
770sa = 780cfm
So the 570sa would be a good fit for your engine except I cant comment on that idle transition funny business.
What do you think about FITECH EFI?
Damnit, Mark! We're practically building identical cars!
(that's on my list for next year)
As soon as I put in my 2004r I'm likely going to do 3.55's and a posi so maybe I'll outrun you yet!
I think this summer we both need to get onto 1/4 strips and trade timeslips. It'd be really interesting to compare the two. The only difference will likely be the rear end, exhaust setups, and time zones.
Never occurred to me but I think youre right, near identical 67 & 68 Camaros. Looks like Mark runs a bigger cam. I have both in the Gonkulator, they are about a carlength apart and the 1/4 mile traps. So close it would come down to weather, tailwind, track prep.
Game on! Never been on a track. Just lots of slow speed go-carts. Should be fun!
I was a little surprised the 2 cars Gonkulate so close since Mark has a much bigger cam, so I looked back at the Gonk. Right now Mark's Gonkulator file has that 3.08 gear and 1960's era street traction ie none.
By just adding a 3.55 gear and decent traction (making the 2 cars equal in those areas), and then shifting the big cam at 5600, the difference is now over 0.3 sec or about 3 carlengths. Equal race down low but then the big cam pulls away.
The 3.73 rear in Mark's car cut off almost another .10 sec so either gear would fix it.
Would still make a great timeslip race though, since things don't always turn out as Gonkulated!
I'm ordering a different cam today, then. Engine is going to be out next week anyway.
Which cam would give me the biggest advantage here? Can't let Mark beat me!
{grumbles incoherently...}
regardless I'll still have the faster time slip at the end of the day no matter what because if I'm going to the track I'm bringing two cars.
My little 6er and my 2014 Mustang GT Coyote with 430hp, 390 ft-lbs. That one should do 12.7 after I put on 285's out back.
gbauer,
It might be hard to go much bigger, I have your trans down in the Gonk with a 1900stall which is kinda tight. So too big of a cam will hurt it. I tried a Comp264S solid cam,
220-220-108 .513 .513 gross lift
Torq 256 at 3700
Powr 232 at 5100
Shifting at 5400:
2.23
9.93 at 69.6
15.67 at 84.9
Is .17 worth a cam swap? Depends how bad you want it, that still puts you at a disadvantage to Mark but you have a more streetable cam too.
I think it would take more converter and/or more gear to make a bigger cam work.
I happened to have my manuals open, found the specs on the engines. I started with a stock 230. Nevermind that it was probably running about 40% down on power with engine trouble. My best 0-60 on the road was about 20 seconds.
The gonkulator really tells the story, high RPMs really shine!
Comparison to my stock 230
stock 230 => Torque 220 at 1600 HP 140@4400
stock 250 => Torque 235 (+7%) at 1600 HP 155@4200 (+11%)
big cam 250 => Torque 205 (-7%) at 2000 HP 246@5300 (+76%)
My big cam on the gonkulator
Torq 205 at 2000 (less than a bone stock 250!)
Torq 268 at 3800 (now it wakes up)
Powr 246 at 5300
Gonkulator Stock 250 (no other changes from above 15.82 at 85.2):
Torq 229 at 2600
Powr 154 at 3800
gbauer,
It might be hard to go much bigger, I have your trans down in the Gonk with a 1900stall which is kinda tight. So too big of a cam will hurt it. I tried a Comp264S solid cam,
220-220-108 .513 .513 gross lift
Torq 256 at 3700
Powr 232 at 5100
Shifting at 5400:
2.23
9.93 at 69.6
15.67 at 84.9
Is .17 worth a cam swap? Depends how bad you want it, that still puts you at a disadvantage to Mark but you have a more streetable cam too.
I think it would take more converter and/or more gear to make a bigger cam work.
2200 stall...
How can I beat Mark? That's what's important here.
Screw it! Nitrous kit
gbauer,
Ok the 2200 converter helps. With the Comp 264S cam 220-220-108 that gives
2.17
9.81 at 69.6
15.54 at 84.9
I then tried a bigger cam, Erson TQ20, 232-232-108, .515 .515 gross lift. I set it up 4 advanced to equalize that:
Torq 254 at 3900
Powr 238 at 5300
Even shifting up higher at 5600 Gonk to:
2.18
9.85 at 69.9
15.56 at 85.2
the bigger cam never makes back what it gives up at the line, so I'd stop with the Comp 264S or similar unless there are plans for even more converter or gear.
Either way it is getting very close between the two cars.
Isnt NOSS illegal unless you run a "NO FEAR" windshield banner, a big coffee can tailpipe, and wear a baseball cap backwards and say "dude" all the time? Oh wait, there's Street Outlaws and their "Street" Cars.
What if you ran a 4L60 trans 3.06 1st gear? Yes its a bigger RPM drop into 2nd - but it'll launch a lot harder and pull harder through the 60'. Plus you get OD for criusing.
What if you ran a 4L60 trans 3.06 1st gear? Yes its a bigger RPM drop into 2nd - but it'll launch a lot harder and pull harder through the 60'. Plus you get OD for criusing.
You can use a 700R4 and get the same thing without the need for an ECM.
Here are a couple interesting Gonks I did on gbauer's car, with the 232-232-108 Erson TQ20 cam:
2.75-1.57-1.00 200-4r gears
2.18
9.85 at 69.9
15.56 at 85.2
3.06-1.63-1.00 700r4 4L60 gears (I JUST changed the gears no other changes)
2.13
9.82 at 69.7
15.55 at 84.9
The wider ratio has the advantage of .03 thru the 1/8 mile, but only .01 at the quarter. The RPM drop offsets most of the small gain.
Instead I just tried swapping to a 3.90 gear instead of the 3.55, it seemed the easiest change. With the old 200-4r 2.75 ratios this Gonked to
2.14
9.78 at 69.7
15.47 at 86.0
That's a .08 gain in the 1/4 mile, and with the overdrive, still plenty good to keep the cruising revs down.
Going to a 3000 stall and staying with the 3.55 rear gave
15.39 at 85.3
And the 3000 stall with 3.90 gears was best of all of course:
15.30 at 86.1
Of course we can keep going forever, another cam swap, etc, I was just surprised that the 3.06 1st gear didn't really seem to help, in the Gonkulator anyway.
The 700R4, 4L60E etc, trans has a huge drop into 2nd gear and unless you have a turbo or huge torquey engine it is going to have a hard time pushing through 2nd gear. Two cents
MBHD
Would the 3.06 first gear of the 700-r4/4l60e help more if the car had a mild cam like the Comp Cams 252? In theory, the car would have more torque after the 1-2 shift with the smaller cam. Of course top end horsepower would be down. Jay
A torque converter with a little more flash, (not to be confused with stall) will aid in powering through the steeper gear change. The six cylinder's greater rotating mass, (heavy crankshaft) will help too.
Jay,
That seems to work - I think the 3.06 1st favors tight stalls and mild cams, ie a nearly flat power curve so the drop doesn't hurt so much. I grabbed my old 250 Nova as an example, stock 250cid, 4bbl, glide-3.08rear.
2.64
11.45 at 61.8
17.88 at 76.0
That much is pretty much what the real car ran on the GTECH.
Then I swapped in the Gonkulator to a 200-4r trans, 2.75 1st:
2.39
10.82 at 63.8
17.05 at 78.2
Finally, I just keyed in the new 700r4 GEARS, 3.06 and 1.63:
2.35
10.75 at 63.6
17.00 at 78.1
So that's a .08 gain in the 1/8 mile, and holding a .05 gain thru the 1/4 mile.
Still a small gain, and the thing to me is, the whole purpose of those fancy upscale transmissions is to have a lockup converter, so you could run higher stall, which would again negate the gain of the 3.06 1st gear. Well that was my intuition anyway. Then I repeated the Gonkulator, same setups, 3000 stall:
200-4r=2.75 3000 stall
2.24
10.51 at 64.1
16.72 at 78.4
700-r4=3.06, 3000 stall
2.16
10.43 at 64.0
16.65 at 78.3
So the 3.06 1st gear keeps, even adds to its small edge even with higher stall. Why? Because with that 3000 stall, we are back "on the converter" after the shift so it softens the 1-2 RPM drop. Very interesting.
So I'd just say, mild ie factory vanilla cam likes the 3.06, bigger cams like the 2.75 1st. In between probably it a tie.
Thanks Deuce Coupe. That is some interesting info. In the late 70s I think there was a school of thought at GM that said use a deep first gear, would work the same for performance with a higher rear gear .the 700r4 is an example. Another example would be Lifeguards Camaro with a 3.50 first gear three speed.i am still tossing around a trans swap. The 200 is the easy fit, next would be a 200r4. A 700r 4 would be more work but might be worth it. For about $500 a 3.06 first can be had for the th350 but the jump to second would still be 1.52. I have a 2.73 rear axle so the OD won't help much even with a low rpm cam that I plan to run. If I had a power glide car a th350 or th200 or a 200r4. Would one of the first things I would do. The first two are almost a bolt in for some cars, not sure about an early nova. Looking at your nova, the 60' gain is huge. Driving on the street would be mor fun too. Some time ago, you ran my car through the famous Gonkulator and said the gain for going to a 2.74 first from 2.52 wouldn't be worth it. Jay
Thanks Deuce Coupe. That is some interesting info. In the late 70s I think there was a school of thought at GM that said use a deep first gear, would work the same for performance with a higher rear gear .the 700r4 is an example. Another example would be Lifeguards Camaro with a 3.50 first gear three speed.i am still tossing around a trans swap. The 200 is the easy fit, next would be a 200r4. A 700r 4 would be more work but might be worth it. For about $500 a 3.06 first can be had for the th350 but the jump to second would still be 1.52. I have a 2.73 rear axle so the OD won't help much even with a low rpm cam that I plan to run. If I had a power glide car a th350 or th200 or a 200r4. Would one of the first things I would do. The first two are almost a bolt in for some cars, not sure about an early nova. Looking at your nova, the 60' gain is huge. Driving on the street would be mor fun too. Some time ago, you ran my car through the famous Gonkulator and said the gain for going to a 2.74 first from 2.52 wouldn't be worth it. Jay
Yeah, I think you were on to something when you recommended the 4spd for my application instead of the 3spd, when I mentioned how hard it is to find a good speed from a stoplight to go from 1st to 2nd. With my 3.50:1 first gear (2.73 "perf" ratio in open carrier), the jump from that to 1.89 in 2nd is pretty steep. Breaking that shifting up into 2.47 and 1.65 would ease the transition. Or just going to a 3.11:1 1st gear 3spd (or 4spd might be better than a 3spd). When you get to the standard 2.85:1 3spd of pre-'75, there seems little point in shift twice rather than once before direct drive. The deeper first allowed a higher rear end ratio, which is a stop-gap fix on their way to overdrive transmissions. The Gonkulator gave me a 0.2 second 1/4 mile improvement from changing 3.5-3spd to a 3.5-4spd. But there was no improvement for the 3.11-4spd (maybe I should have had him run the 3.11-3spd too?). And changing to a 3.08 rear would be marginal improvement. Here, this is probably simpler:
3.5-3spd/2.73 = 3.5-4spd/2.56 = 3.11-4spd/2.73 < 3.5-4spd/2.73 = 3.5-4spd/3.08 = 3.11-4spd/3.08
The deeper the first gear, the more gears you need in-between to smooth transition. That's why a deep 3.06 1st in a TH350 was probably never attempted. But once you have OD, you don't need a real deep first. With the 4 gears on a 700 or 200, the 200's first gear makes more sense with a deeper rear end gear being the advantage of the OD 4th.
I looked at how GM changed 1st gear and rear end ratios over the years and the pattern I saw was:
2.85/3spd - 3.08/std - 3.42/perf - (3.73/hi-perf?)
3.11/3spd - 2.73/sted - 3.08/perf - (3.42/hi-perf?)
3.50/3spd - 2.56/std - 2.73/perf - (3.08/hi-perf?)
The TH350 kept getting the lower gear as the 3spd without changing the 1st gear. So it had a 3:08 pre '76, then a 2.73 pre '79, and finally ending up with the 2.56. So sounds like from the Gonkulator a TH350 with 2.73 is ok, but if going to a 200, then a 3:08 rear should be used?
IIRC that read about the 3.06 first gear th350 in a off road fourm. Think rock crawling. In a auto trans the converter softens the drop somewhat compared to a manual. Like was posted on this thread before, a looser converter would help cover the drop better than a stock unit. Looks like to me those GM engineers were on to something. How well do these o.d. auto transmissions work without lock up? Does it overheat the trans like i have heard or is that just a myth? Jay
IIRC that read about the 3.06 first gear th350 in a off road fourm. Think rock crawling. In a auto trans the converter softens the drop somewhat compared to a manual. Like was posted on this thread before, a looser converter would help cover the drop better than a stock unit. Looks like to me those GM engineers were on to something. How well do these o.d. auto transmissions work without lock up? Does it overheat the trans like i have heard or is that just a myth?
Not sure on overheating. I've only had two 700 vehicles and never disabled the lockup. But the lockup is what made them so fuel efficient compared to the TH350, so I'm not sure why i would do that?
That softening may be why autos are always a gear less the manuals in the same cars?
Yeah, that gear swap for the TH350 has been around since at least the late '80s. I remember seeing it in catalogs then.
There is a way to get around the overheating issue during the build on the overdrive transmissions. My converter builder described it to me, but I don't build transmissions. My brother does, and he did it to mine. I'll get the info and put it up here.
That would be good to know what is done to keep them from overheating. Mshaw 230, are you experiencing any trans heating problems so far? Do you have a trans temp gauge? Because he is running a looser converter I would think the trans would run hotter. Does anyone here know if someone makes a gearset for a th 350 where both first and second gears are lower? Like 3.06- 1.75-1 or something simular? Jay
That would be good to know what is done to keep them from overheating. Mshaw 230, are you experiencing any trans heating problems so far? Do you have a trans temp gauge? Because he is running a looser converter I would think the trans would run hotter. Does anyone here know if someone makes a gearset for a th 350 where both first and second gears are lower? Like 3.06- 1.75-1 or something simular? Jay
Check with Jim Beaty at ATI
That would be good to know what is done to keep them from overheating. Mshaw 230, are you experiencing any trans heating problems so far? Do you have a trans temp gauge? Because he is running a looser converter I would think the trans would run hotter. Does anyone here know if someone makes a gearset for a th 350 where both first and second gears are lower? Like 3.06- 1.75-1 or something simular? Jay
Its called a 4l60...
4L60E, 3.06, 1.62, 1.00, 0.70
Isnt NOSS illegal unless you run a "NO FEAR" windshield banner, a big coffee can tailpipe, and wear a baseball cap backwards and say "dude" all the time? Oh wait, there's Street Outlaws and their "Street" Cars.
If that's what I have to do I'm willing to go there.
That would be good to know what is done to keep them from overheating. Mshaw 230, are you experiencing any trans heating problems so far? Do you have a trans temp gauge? Because he is running a looser converter I would think the trans would run hotter. Does anyone here know if someone makes a gearset for a th 350 where both first and second gears are lower? Like 3.06- 1.75-1 or something simular? Jay
IMO having a low first gear set is not the way to go even if those calculations seem to show an advantage.
They make a low gear set for a Th350 2.75 first gear set that would has less of a drop I the 1st to 2nd gear shift but my friend that build transmissions said that gear set is not that strong.
MBHD
That would be good to know what is done to keep them from overheating. Mshaw 230, are you experiencing any trans heating problems so far? Do you have a trans temp gauge? Because he is running a looser converter I would think the trans would run hotter. Does anyone here know if someone makes a gearset for a th 350 where both first and second gears are lower? Like 3.06- 1.75-1 or something simular? Jay
A non-lockup looser converter and numerically low e.g. 3.0:1 diff gears are a problem waiting to happen. The converter will be in slip - which generates heat.
Best solution - ditch the non-lockup converter.
That s why I was wondering about the 200-4R in the Camaro. It's a non-lockup unit with overdrive and a 3.08 axle ratio. When running in OD the converter could be in "slip mode" which would build heat pretty fast. It may be ok depending on converter design. According to Hughes, they can make me a non lock up converter for my TH 350 that would have a little more stall speed but feel "tighter" on the freeway when up to speed. I have not done this as of yet because I haven't decided on what trans I am going to end up with. Trust me I am the last person who would claim to be any kind of trans expert. Jay
That s why I was wondering about the 200-4R in the Camaro. It's a non-lockup unit with overdrive and a 3.08 axle ratio. When running in OD the converter could be in "slip mode" which would build heat pretty fast. It may be ok depending on converter design. According to Hughes, they can make me a non lock up converter for my TH 350 that would have a little more stall speed but feel "tighter" on the freeway when up to speed. I have not done this as of yet because I haven't decided on what trans I am going to end up with. Trust me I am the last person who would claim to be any kind of trans expert. Jay
I really don't know much about the lighter duty autos. Back in the day it was all small block V8s, TH400s, TH350s, TH700s, T10s, and Muncies that people talked about. So I really don't know much about their little brothers until I got my 3spd Saginaw and started learning about how the Sags are put together. I'd like to learn more about the application of 200s. Especially what they will fit into with modifying the sheet metal of the drivetrain tunnel. I know the 700s will fit in a 3rd gen Camaro, but not earlier Camaros or Novas.
The 2004r is roughly the same package as a TH350. It's more expensive to build than a 700r4 but it can be built to take a beating.
The 2004r is roughly the same package as a TH350. It's more expensive to build than a 700r4 but it can be built to take a beating.
Oh, ah, interesting. So they took the TH350, added an OD (and lockup converter?) and called it the TH200r4. So it's identical to the TH350 otherwise? Is it the same length, so it can be used with the factory driveshaft? I thought the TH200r4 was a weaker tannie than the TH350 because of the 200 number. But the 350 stands for taking up to 350 ft-lbs of torque, while the 400 is for 400 ft-lbs (although we know both can handle more than that even in stock configuration). That should be plenty for a naturally aspired 250 or even 292 inline?
That depends on the flavor of 2004r you choose. The stock ones from a GNX are quite a bit stronger than, say, a Buick LeSabre.
The driveshaft is the same length as the powerglide and TH350. You'll need to modify the crossmember.
You can see the modified crossmember I'll be using here:

I also had to get new linkage, a TV cable, and, of course, a new bezel. If you have a floor shifter you might need to do more.
For wiring you'll need a keyed power source and a new switch or relay for the brake light to disengage OD. I haven't gotten that far yet.
May also need a new dipstick or modify the old. Mine, luckily, already has a correct one.
You can see the body isn't huge. Mine is built for 700hp. I think it'll hold up just fine...
The 2004R is NOT derivative of the TH350!!!
It was developed from the TH200 three speed automatic that was developed for lighter vehicles and originally placed behind V6 engines and the smaller V8s in the 4.7 liter range. The overdrive version is slightly heavier built, but will not measure up to the 700R4 and 4L60E as far as heft and strength.
It is NOT the overdrive that needs to be disengaged! The lockup clutch in the torque converter is what must be de-activated. With proper circuitry, (which can be found by searching the internet) you can make this work. There is also a hydraulic circuit in the valve body that can keep the converter clutch from being activated in first and second gear.
In a light weight car, the 2004R can handle pretty good horsepower, given the proper modifications and some better aftermarket parts.
Ah, I got confused on that answer. Looking back at the 2nd Gen Camaro, after 1973 the only auto used in the Camaro for everything including inlines was the TH350 except:
1980 - 229cid - Chevy 90/V6 - TH200 (but CA Buick 231cid got the TH350)
1981 - 229cid - Chevy 90/V6 - TH250 (same gearing as the TH350, a variant?, CA Buick is TH350)
Then they lightened the Camaro in 1982 third gen, and the inline returned as a 151cid L4:
1982 - L4/60-V6/305 - all TH200c
1983 - L4/60-V6 only cars with carbs - TH200c (all others got the TH700r4
1984 on - all engines - all TH700r4
For the Saginaw in the Camaro after 1977:
1978/9 - L6 w/ 3.5 3spd - V8 w/ 2.85 4spd (except Z28)
1980 - 229cid Chevy w/ 3.5 3spd - 305 w/ 2.85 4spd
1981 - 229cid Chevy w/ 3.5 3spd
1982 - All Sag 4spd but 3.5 w/ L4, 3.6 w/ V6, 3.42 w/ LG4, 2.88 w/ LU5
1983 - Sag 4spd in L4 & V6 w/ 3.5
1984 - Sag 4spd in L4 w/ 3.5 (end of the line for Sag 4spd
1985/6 - L4 still available but with 5spd
The L4 in the 3rd gen Camaro is pretty rare to find. I'm not any were really produced after '83 but they were still listed as the base engine. Midway thru '83 they went from carbs to fuel injection for it. Would interesting build one of those in a 3rd gen Camaro if you can find one.
A 4l60 will bolt in place of a th350 - with minor mod's - in some cases none.
Depending on the vehicle - the cross member might have to move rearward ~ 1/2" and the driveshaft might need to be shortened.
I have had to do no mods or both to mechanically do installations.
Capacity wise a stock 4l60 wins hands down over even a decently built 200r4. The 200 series clutch just don't have the surface area.
For $600 you can buy all the aftermarket parts needed to build a 400 #/ft capable 4l60. Not many inliner's here are making more than that torque output.
If your making BIG power - put a 4l80 in it and forget it. They are a th400 + and extra planetary gear set to get OD.
The 700R4 , 4L60E , will not bolt right in replacing a TH 350 Powerglide, M20, M21, trans etc you would need a different length driveshaft.
MBHD
If you are removing the TH350 with the long tailshaft housing, the 700/4L60 will go right in. Even uses the same slip yoke! I swapped in enough TH350s for these when they first came out to sink a canal barge!! They were suffering from the new design bugs that plagued many new transmissions back then and folks paid good money to go to the more reliable TH350. We swapped many into light pickups back then too.
For about three years, I spent ten hours a day under cars and trucks making these swaps and helping to R&D the new transmissions for the aftermarket industry. For a while, the brackets for the crossmember were still there on the frame of the GM cars and trucks to make the exchange even easier!!
The only thing required to swap in the 700/4L60 is to relocate the crossmember and shifter cable and replace the detent cable with the appropriate one. If you are replacing a short 350 or 'Glide or one of the 4spds your local driveshaft shop can shorten the shaft for "real cheap" and even the slip yoke can be reused.
If you're replacing a stick, (manual) tranny, you will, of course, have to find the appropriate replacement gear selector assy.
The 700R4 , 4L60E , will not bolt right in replacing a TH 350 Powerglide, M20, M21, trans etc you would need a different length driveshaft.
MBHD
That was my understanding from way back when, was that the 700 was indeed longer than the TH350 that 2nd Gen Camaro's used, and there was no way to fit it in the drivetrain tunnel without modifying the sheetmetal of the floor. I would presume the Nova was the same. The 3rd gen Camaros came ready to fit it, and it was the only real performance transmission for the 3rd gen Camaro, as the 5spds were too light duty. My guess would be the 2nd gen Camaro used the shorter TH350 then.
Don't know about anything other than first gen camaros here. It's much longer than the PG or TH transmissions used on first gens.
The 700 is NOT a bolt-in for first gen Camaros. The 2004r is easier. Just need to either modify the crossmember or get a new one, adapt a TV cable, get new shifter linkage, and wire it up. It'll fit right in after that. Driveshaft length does not change.
I was mistaken on the TH350 to 2004r. Thought they were basically the same since they swap so easily.
From Wiki:
THM200-4R[edit]
For the 1981 model year, the 200-4R (sometimes called 200R4) was introduced. The components which were prone to failure in the THM200 were improved, and this transmission was used with high-power applications primarily the Buick Grand National. The 200-4R was configured with several different torque converters and gear ratios depending on the vehicle application.
Unlike the 700R4, most 200-4Rs have a multicase bellhousing for use with Chevrolet, Buick/Olds/Pontiac (BOP), and Cadillac engines. However, 200-4Rs share mounting locations with the TH-400. Since the external dimensions are similar to the TH-350 (overall length, drive shaft yoke spline count/diameter and general size), 200-4Rs are often swapped in place of TH-350s in older vehicles to provide an overdrive gear.
Early models had PRND321 on the cluster, while later models had PRN(D)D21, with the left D identified as the overdrive gear by a square or oval ring.
The THM200-4R can be found in the following vehicles:
1981-90 B-Bodies
1981-84 C-Bodies
1984-88 G-Bodies
1985-90 D-Bodies
1981 Pontiac Firebird (with 301cid engine, non-turbo)
1989 Pontiac Firebird Trans Am Indy Pace car (with Buick V6 and a Turbocharger)
The THM200-4R was phased out after 1990; its final usage was in the GM B-body vehicles.
The gearing for the 200-4R is:
First - 2.7405404:1
Second - 1.567567:1
Third - 1.00:1
Fourth - 0.673913:1
Reverse - 2.07:1
THM700R4 / 4L60 / 4L60E / 4L65E / 4L70E[edit]
See also: GM 4L60-E transmission
The four-speed Turbo Hydra-Matic 700R4 was introduced for the 1982 model year for use in Chevrolet/GMC vehicles.
In 1990, the Turbo Hydra-Matic 700R4 was renamed the 4L60. Under the new designation, the "4" stands for the number of forward gears, the "L" for longitudinal applications (rear-wheel-drive), and the "60" is the strength rating (less than the 4L80). "60" is the relative torque value. For example, 80 is stronger than 60, which is stronger than 40, etc. A 4L80-E can handle more torque than a 4L60-E. The "E" denotes electronically controlled shifting. The 4L60 however is hydraulically shifted based on governor pressure and throttle valve (TV) cable position. 1992 was the last year of widespread usage of the 700R4 (4L60). The 1993 Camaro, Corvette and Typhoon were equipped with the last production 700R4. The last design change of the 700R4 was an added checkball to the valve body.
In 1992 electronic controls were added, and it became the 4L60-E. The 4L60E is not easily swapped with the 4L60, as the 4L60E depends on an ECU to shift.[2] The 4L60E went into service in trucks, vans, and SUVs in 1993 and in all RWD passenger cars (Corvette, F and B/D bodies) in 1994.
In 2001, an updated version the 4L65-E, was introduced. Five-pinion planetaries, along with a strength-improved output shaft, were improved to withstand the 300+ lb·ft (400+ N·m) of torque of the 6.0 Vortec engine. The 4L70E transmission is the same as a 4L65E with a speed sensor located in the pump.
700R4 / 4L60 / 4L60E / 4L65E / 4L70E / Technical Description[edit]
The Turbo Hydra-Matic 700R4 can be identified by an oil pan number six shown at General Motors Transmission Pans.
The tailshaft housing is held onto the main case by four bolts (the bolt spacing is similar to the THM350), and uses a square-cut o-ring seal, and not a gasket. The typical width of this transmission where it bolts to the engine is 20 in (51 cm) overall. From the engine/trans mating surface to the cross member mount bolt is 22.5 in (57 cm), and engine/trans surface to output shaft housing mating surface is 23.375 in (59.37 cm) overall, with the tail shaft housing typically measuring 7.625 in (193.7 mm). External dimensions are similar to a THM350 with a 9 inch tailhousing found in Chevrolet/GMC long wheelbase truck/vans and 1971-76 B-bodies (Bel Air, Impala, Caprice).
Transmission fluid cooler lines on the 700R4 the bottom fitting on the right side of the transmission is the "out" line to the cooler and the top fitting is for the return line from the cooler. These fittings are .25 in (6.4 mm) pipe thread, and can include an adapter from the factory for threaded steel lines in a SAE size. 4L60Es manufactured after 1995 use snap-in connections instead of threaded.
The original version of the transmission had a 27-spline input shaft (shared with the THM200C and 2004R) which was a common failure point. In 1984, the 700R4 designed for use behind Chevrolet small block V8s received a 30-spline input shaft similar to those found on TH400 transmissions and which also used a different torque converter than its 2.8 V6 and 2.2 L4 engines. Between 1984-1987, internal components, from the ring gear to the oil pump housing, were updated, ending with the auxiliary valve body for 700s manufactured after October 1986.
In 1995, the 4L60E received a PWM-controlled lockup converter. The early designs simple on or off lockup function while the later design can variably lock as to not feel the lock up occur. GM added a 5th solenoid to the valve body, called the PWM solenoid.
In 1996, GM introduced a redesigned 4L60E transmission case that incorporated a bolt-on bell (2 piece case, bell and case) housing and an 6 bolt tail housing. This 2 piece case style was first seen in 1996 and up model S-10 Blazer, S-10 Truck, GMC Jimmy, and GMC Sonoma with the 4.3L engine. In the large majority of 1998 & later applications of the 4L60E were 2 piece cases (i.e., a removable bell housing). Both transmissions are the same internally. The non-PWM (1993-1994) style 4L60Es are not interchangeable with PWM-style (1995 and later) 4L60Es. Also in 1996, GM changed the 3-2 solenoid to a different style which makes it not interchangeable with any previous models.
For the model year 1996 GM trucks, there were 2 versions of the 4L60E transmissions. One had a bolt on bell housing the other did not. The bolt on bellhousings used on the 4.3L and 1996-2002 GEN I+ versions of the Small Block Chevrolet used the same bellhousing while the LSx engines used a longer bellhousing to accommodate a redesigned torque converter with a longer pilot nose (GM sells an adapter assembly for using the LSx 4L60-Es when used with an early engine).
The gearing for the 700 is:
First - 3.06:1
Second - 1.63:1
Third - 1.000:1
Fourth - 0.70:1
Reverse - 2.29:1
(Gear ratios are always expressed to x.xx rounding +/- as a worldwide industry standard, actual mathematical ratios may vary)
700R4 / 4L60 / 4L60E / 4L65E /4L70E Applications[edit]
[3][4]
1982-1992 Chevrolet Blazer/GMC Jimmy
1982-2005 Chevrolet Corvette
1983-1996 Chevrolet Impala and Caprice police specials equipped with 350 engines.
1983-1985 Oldsmobile 350 Diesel equipped models.
1983-2002 Chevrolet Camaro/Pontiac Firebird
1985-2005 Chevrolet Astro/GMC Safari
1991-1992 GMC Syclone
1991-1992 Oldsmobile Custom Cruiser
1989-2003 Chevrolet S-10/GMC S-15/Sonoma
1989-2005 Chevrolet S-10 Blazer
1989-2001 GMC S-15 Jimmy
1990-1996 RWD Cadillac Fleetwood/Cadillac Brougham/Cadillac Limo
2002-2009 Chevrolet TrailBlazer/GMC Envoy
1992-1993 GMC Typhoon
1984-2010 Chevrolet Suburban
1982-2012 Chevrolet Van
1994-1996 Chevrolet Impala
1994-1996 Buick Roadmaster
1993-2010 Chevrolet C/K
1993-2010 Chevrolet Tahoe/GMC Yukon
1999-2006 Cadillac Escalade
2002-2008 Chevrolet Avalanche
2003-2007 Hummer H2
2004-2007 Buick Rainier
2004-2012 Chevrolet Colorado/GMC Canyon
1988-2006 Holden Commodore
2004-2006 Pontiac GTO
2005-2009 Saab 9-7X
edit: See what you started, Mark!?!?!
PS: still haven't been able to get to my swap yet...
HA ! Good review. Sometimes its good to get things out for discussion.
A few notes to add; while its true that the 4L60E usually requires a electronic controller there is a way to control the line pressure using a vacuum modulator (like a TH350) and a push button module to shift the gears (mind you its a full manual operation) - push button 1 - you get 1st gear, push button 2 - you get 2nd gear, push button 3 - you get 3rd gear, push button 4 - you get OD. A vacuum switch like used on the 700r4 can be used to lock up the converter. The PWM signal for lock is part of the push button box.
Alternatively PCS makes an excellent controller that uses 4 knobs on the front panel to set up the shift points, lockup and shift firmness. Its well suited for folks that don't like computers - its simple to use and install. The upside no throttle cable/brackets to deal with like on a 700r4.
Some time next year I plan on putting a 4l60 into my 2nd gen (1979), so I'll know all the gritty details once done.
95% of the late model stronger 4l65/70e factory parts swap back to the earlier 700r4 (30 spine input shaft).
That would be good to know what is done to keep them from overheating. Mshaw 230, are you experiencing any trans heating problems so far? Do you have a trans temp gauge? Because he is running a looser converter I would think the trans would run hotter. Does anyone here know if someone makes a gearset for a th 350 where both first and second gears are lower? Like 3.06- 1.75-1 or something simular? Jay
This is a problem I need to worry about? Yikes.
Ok, after months of no work, got some time to work on the car.
1) All oil pan bolts are now properly torqued. You can read in a different thread how the engine builder didn't tighten them.
2) Backed the PV to 9.5. My last experiment was 10.5. Other settings: main jet 54, accelerator 35, secondary 59, timing 8BTDC with max at 40BTDC. My notes said 8.5PV had a lot of hesitation, so I don't want to drop back to that.
3) Disconnected water from manifold. My epoxy seals for the Offenhauser intake were leaking water (yeah, should've welded aluminum over them). Car seemed to run fine today, so maybe I'll just leave it as is. I don't run during freezing. I'm using stubbed hoses now, I'll need to cap them if I do.
Next thing to do is to replace one of my transmission cooler lines. I just couldn't get the joint to seal. I had the joint in a bad place, under the engine mount. This winter I removed the joint to get to it, but it's still drip, drip, dripping. So a new line is on order. After this, it's all pretty much done until it's time to put a 3.55:1 rear end in it (3.08 today). Time to get the interior work don.
The car had a great run last weekend, weather was beautiful 60F hazy skies. So we drove up into the foothills, got some ice cream and played a game of chess. :-)
The new transmission hose appears to have done the trick. It looks like the previous tube had gone too far into the hose joint. The compression fitting had the line compressed, looked like the fitting couldn't get far enough in. It's hard to get it just right, but it looks like it's okay.
I ran a single solid line from my trans cooler to the trans on the 2004r. You'll have lots of bends so movement shouldn't be an issue. It was straight forward enough. Just took a bit of routing and time.
Now that I've been driving the engine and have the carb tuned, I'm not satisfied with what I've done. I could use a taller gear in the rear, but even with a 2200-2400 RPM stall converter, it won't overcome the low-end just drag. I put in too big of a CAM. Yeah, some will say I told ya' so, so I'm saying it for you. I have an opportunity with my leaking oil pan gasket to fix that with only the CAM cover gasket as gbauer suggests. Maybe I do a CAM swap at the same time. More work, yes, but the car will feel better.
To remind you of the specs...
- 200-4R 4-speed, 3.08:1 rear end
- Langdon iron headers, Holley 390
- 250 (conversion from 230)
- hardended exhaust seats, 1.5" stock size
- enlargened intake valves, 1.72" to 1.84"
- flat top pistons to increase compression
- 0.040" overbore
- COMP Cam 280H,
Intake & exhaust: duration: 280, duration @ .050": 230, valve Lift 0.536, lobe lift 0.306
RPM Range: 1500-5500
http://www.compcams.com/Company/CC/cam-specs/Details.aspx?csid=62&sb=2I like goosing the engine, going from 1st to second the tires chirp pretty good. But getting started, even from 2200 RPM, it's super sluggish. I should've known, it needs an even bigger stall which turns out just won't work so well with how I usually drive it.
Now, the question is which CAM to go with?
Stock: (I just have a hard time going stock). But what about the torque and such?
Intake: duration: 240, duration @ .050": 192, valve Lift 0.455, lobe lift 0.26
Exhaust: duration: 248, duration @ .050": 200, valve Lift 0.455, lobe lift 0.26
RPM Range: 500-4500
http://www.compcams.com/Company/CC/cam-specs/Details.aspx?csid=58&sb=2One step up, the 252H:
Intake & exhaust: duration: 252, duration @ .050": 206, valve Lift 0.474, lobe lift 0.272
RPM Range: 800-4800
http://www.compcams.com/Company/CC/cam-specs/Details.aspx?csid=59&sb=2Another step up, the 260H:
Intake & exhaust: duration: 260, duration @ .050": 212, valve Lift 0.489, lobe lift 0.28
RPM Range: 1000-5000
http://www.compcams.com/Company/CC/cam-specs/Details.aspx?csid=60&sb=2It seems like the 252H is the way to go, but what do I really know? I'd like to see torque improvements in the 2K-3K range.
From earlier thread...
Comparison to my stock 230
stock 230 => Torque 220 at 1600 HP 140@4400
stock 250 => Torque 235 (+7%) at 1600 HP 155@4200 (+11%)
big cam 250 => Torque 205 (-7%) at 2000 HP 246@5300 (+76%)
My big cam on the gonkulator
Torq 205 at 2000 (less than a bone stock 250!)
Torq 268 at 3800 (now it wakes up)
Powr 246 at 5300
Gonkulator Stock 250 (no other changes from above 15.82 at 85.2):
Torq 229 at 2600
Powr 154 at 3800
I am always conservative on cams.
Here is something you can try that is way easier and could solve your problem. Install some bleed down lifters. Rhoads is a popular lifter and they kinda pioneered the idea of a variable rate lifter.
You can use lifters made for SBC and they will not take long to install.
You will gain idle vacuum and torq at low rpm. Your cam should make nice power from 2500 even as it is.
I have my Thrifty Cam in the wagon's 250. It pulls like a mule from a dead stop.
Try the lifters, they are easy to do.
Oh my goodness, I had it wrong. I've got the 260H installed, not the 280H, this isn't as bad as I'd thought. Tom, I now remember talking with you and I thought going much higher was not what I wanted. I found the order form and confirmed it was the 260H. I had written down my initial thought and didn't delete/update it.
These Rhoads lifters look awesome, they'll take it back close to the stock at low RPMs. It looks like the V-Max Rack are the ones for this engine. You can order a kit for the 6 cyl. The "Super Lube Groove Option" is supposed to get more oil to the CAM. Not that I'm going to change oils, but do you think that would alleviate the need for high-zinc oil?
On the installation, it says you go one by one adding the lifters with the cylinder at TDC, put in a 0.020" feeler gauge, and adjust to the point where they bottom out and start to open the valves. That's it? No adjustments after the fact?
Documentation says they should clatter a bit at lower RPMs.
I think there is something else wrong with your setup if that is the cam you have. You better double check the #'s. I remember a post many moons ago from you saying about using the big 230 duration cam.
If you have a 260 cam, something else is wrong, my engine pulls like a mule even at low rpm with similar cam.
You have even road in mine.
Mark,
Back in Oct of 2016 , you said it had the comp 280 cam with 230 duration. It makes a big difference. Which one do you have?
Maybe I missed it in the thread but:
* What cam did you end up getting? Need Lift I E, Duration at .050 I & E, Lobe Sep and Advance or Lobe Centers for both I & E.
* What was the compression and deck clearance as built?
* If you have full throttle yet, what RPM is the trans shifting at?
That will help the Gonkulator a lot thanks.
GREAT thread, this will be a great archive for folks building an engine up. Should be a Reality TV show, but not too many folks would watch probably.
It's the "I know just enough to get me in trouble!" show. Haha.
I sure do gas it. Past break-in, using Valvoline VR1 (high zink) oil now. Probably 1000 miles or more by now. My gas mileage is pretty bad, but it seems that all I do is go out and floor it to see how she runs. Let's see if that gets better once I get on a long road trip....
Back to the topic. CAMs. I don't have a tachometer. One of those things one of these years is to swap out the console. I've got some gauges for putting below the dash cheap on sale, but haven't put them in either.
Comp CAM 280H
RPM 1500 to 5500
Valve Timing 0.006
Lobe Separation: 110
Intake Centerline: 106
Duration: Intake=280, Exhaust=280
Duration @ 0.050 Lift: I=230, E=230
Valve Lift: I=0.536, E=0.536
Lobe Lift: I=0.306, E=0.306
Valve Timing @ 0.006 Lift
....Exhaust closes 26 ATDC, Opens 74 BBDC
....Intake Opens 34 BTDC, Closes 66 ABDC
Engine is bored out to 0.040".
More notes...
1. New flat-top pistons from a 307. Compression ratio should be about 9.25:1.
2. New CompCams Camshaft 280H.
3. Head intake increased to 1.72', some porting work done
4. Crankshaft and rods balanced
5. Studs installed instead of head bolts for tighter fit
6. Manifolds installed with all bolts and thick flat washers
7. 200r4 transmission from cpptransmission.com along with 2200-2400 rpm stall converter (3.08 rear end)
I haven't done a compression check. I know it's a heap higher because the old starter would barely crank the engine over.
Still hope to get her dyno'ed soon. Once done, you can compare to the Gonkulator!
Hi Tom,
I thought I had the 280H for some reason. But when I looked at the bill from the machine shop, it had "61-233-4" as the part number for the camshaft. This is the 260H, which I'm glad because the 280H is too tall for my use. 260H seems like it's what I should have.
Things to work on: 1) mechanical advance, 2) bump up the timing since it's too low at operating RPMs. I still wonder why that distributor drops timing 1 degree from 700->800 RPM.
I'll try to do a comparison of the springs I have with the ones from the set to see if they compare to heavy or light. After that, it's time to take it to the carb connection to have them rear wheel dyno it, check and adjust the carb according to an O2 sensor.
I'll get to the distributor/timing next weekend. There's football to watch this afternoon!
What else should I be looking at for now?
Mark
Hey folks,
I've been distracted the past year rebuilding my 1980 Chevy k20 4x4. Still another six months before that's done, about two years (or is it three???) in the making. I put a new build SBC into it, just can't wait to get her on the road. You all will be happy that I resisted abandoning the truck project and putting the sbc into the Camaro instead. It looked really nice sitting next to it on the crate. Tempting.
Anyways, the Camaro is a cruiser and not a track star and I still am not satisfied with it. 0-60 is tepid at best due mostly to the low-end performance. Higher rpms sing. Gas mileage is horrendus. Its spring, time to do some work to get this car running right.
There's a number of things that I did right with the build but more things that I did wrong. I'll put a list here.
Good
1) converted 230 to 250, flat head pistons
2) 200-4r upgrade from the power glide
3) headers and Clifford intake
4) stainless exhaust
5) electronic ignition
Bad
6) too big a CAM for my use compcams 260H p/n 61-233-4 (yeah, you told me so
)
7) widened exhaust valves (yeah, you warned me
)
8) too wide tires on rear for this engine (235/60r15). Well, too wide in general for the car.
Neither good nor bad
9) Holley 4 bbl carb
10) 2200rpm torque converter
Manifestations:
- Slow off the line at lower RPMs, but will chirp the tires shifting 1st to 2nd.
- Requires richer jets, gas mileage is awful (13 or 14, even with OD).
- Timing needs to be very far advanced at low RPMs (i.e. 18 without vacuum at idle) to get any sort of performance out of this.
Dealing with #6 and #7, the timing is very far advanced, but the distributor is not set up properly.
Now, there are things I can do and things I can try and things I can fix
One Experiment I could run: Put the original points & condenser distributor back in, measure the timing curve and compare to my aftermarket EFI. See how it runs. I think it would be rather interesting to put the original distributor back in and try it out. I think the resistor wire is still there for me to use.
Things I can do:
- Install Rhoads lifters to accommodate the larger CAM and larger exhaust
- Get the distributor adjusted properly for this engine
- Convert to 2 BBL Holley EFI carb
- Smaller tires (225 or 215) on rear
- Put a smaller CAM into it (ugh)
Id like your thoughts. The biggest issue is the CAM, bigger exhaust valves and loss of low-end torque. That needs to be addressed first.
Thanks,
Mark
I posted in the "what's your timing" thread about today's experiment. The HEI distributor I have is set up with a much flatter curve than the original distributor. The original, with points & condenser, seems to run better.
I knew I needed to set up the distributor, didn't realize it was like this. Instead of setting up the distributor, I'm going to put in a Pertronix. I can go with the lightest weight advance spring and get similar to what I got with the original. I always run premium which says it should be okay.
I don't have a way to post pictures, but can post video of the three charts I built.
https://youtu.be/_qEEwLWeaVcDanged speedometer broke on my test run, it was so smokin!
Have any of you used Rhoads lifters? What's your experience?
Rhoads lifters are the pump up hydraulic lifters that increase effective lift at higher engine speeds when oil pressure increases. We used a couple of sets of them thirty years ago with mixed results.
The one set SEEMED to perform a little better at higher RPMs, but we never got to run actual tests at the track to confirm those results.
The other try wasn't successful. The engine either wouldn't idle properly with the valve lash set to specs, or it wouldn't rev because we opened up the valve lash to get it to idle.
LOOOONG time ago!! I don't know if the "technology" has improved or if they're even still around.
There were several different leak-down hydraulic tappets, mixed reviews.
1. low oil pressure delays the added duration
2. low oil viscosity delays the added duration
3. low oil temperature speeds up the added duration
These factors work against consistency, stall speed, etc.