|
|
Joined: Oct 2009
Posts: 471 Likes: 9
Contributor
|
OP

Contributor
Joined: Oct 2009
Posts: 471 Likes: 9 |
Putting 302 rod bearings in 261 chevy. Looks like the rod bearings need to be chambered to clear the crank pin filet. Has anyone done this by hand and if so what is the procedure and tools. Thanks!
|
|
|
|
|
Joined: Sep 2008
Posts: 3,669 Likes: 42
1000 Post Club
|
|
1000 Post Club
Joined: Sep 2008
Posts: 3,669 Likes: 42 |
It needs to be done in a lathe. You will need to make a fixture from an old connecting rod. Done it many times on 250's and 292's. You also need to make sure the GMC rods also were machined with a radius back in them after they were narrowed or that will also cause you problems as well. You may also have to narrow the bearings since the GMC bearing is wider than the Stovebolts. That conversion is a little more involved than is realized.
Class III CNC Machinist/Programmer
|
|
|
|
|
Joined: Oct 2009
Posts: 471 Likes: 9
Contributor
|
|
OP
Contributor
Joined: Oct 2009
Posts: 471 Likes: 9 |
Charlie baker did these rods for me many years ago. Just now trying to use them. I don't have access to a lathe so I guess the question is there no other method? Anyone know of someone who can do this procedure?
|
|
|
|
|
Joined: Jul 2004
Posts: 365
Contributor
|
|
Contributor
Joined: Jul 2004
Posts: 365 |
Lay the bearing shell in the crank throw and visually see if in fact it is touching the radius. Another way is to actually bolt the rod and bearing to the crank, then see if it can be rotated easily. Even with the wider GMC bearing, it's not that much!
|
|
|
|
|
Joined: Oct 2009
Posts: 471 Likes: 9
Contributor
|
|
OP
Contributor
Joined: Oct 2009
Posts: 471 Likes: 9 |
I could turn the crank by hand after I put three of the piston rods in. Put the fourth and fifth in and more resistance but could turn using a crank turning socket on the snout. Put the sixth in and would not budge. Took cap off and you can see where it was compressing on the filet. Armond, are you saying that the bearings may only need a little chamfering?
|
|
|
|
|
Joined: Oct 2009
Posts: 471 Likes: 9
Contributor
|
|
OP
Contributor
Joined: Oct 2009
Posts: 471 Likes: 9 |
Anyone know of a machinist or machine shop that could narrow my bearings? I do not have the ability to do this myself so will need help.
|
|
|
|
|
Joined: May 2000
Posts: 1,464
1000 Post Club
|
|
1000 Post Club
Joined: May 2000
Posts: 1,464 |
I'd do this procedure using a rotary milling table in a mill. You cau use an old rod to center up the insert, and a 45 degree cutter to take off as much as you need. Worked for me.
FORD 300 inline six - THE BEST KEPT SECRET IN DRAG RACING!
|
|
|
|
|
Joined: Sep 2008
Posts: 3,669 Likes: 42
1000 Post Club
|
|
1000 Post Club
Joined: Sep 2008
Posts: 3,669 Likes: 42 |
Here are a few pics from a Stovebolt Performance book showing a GMC rod having the chamfer re-machined in it after it has been narrowed to fit the Stovebolt engine.   Photos are the copyrighted property of the author, and are not for distribution in any shape or form by anyone! Photos are the copyrighted property of the author, and are not for distribution in any shape or form by anyone!
Class III CNC Machinist/Programmer
|
|
|
|
|
Joined: Apr 2007
Posts: 92
Active BB Member
|
|
Active BB Member
Joined: Apr 2007
Posts: 92 |
If you only need a radius/chamfer and not a width decrease try the following:
1. clamp bearing shells around a block of wood or plastic that is narrower than the bearing.
2. locate a pc. of 1/4 cold rolled bar.
3. using a hacksaw, carefully cut a slit in one end about 3/4 long.
4. fold a 1 X 2 pc. of emery cloth lengthwise and insert in slit.
5. mount rod in a die grinder.
6. hold die grinder parallel to bearing centerline and bump the paper against the ends until desired radius is generated. Coarser paper will take off material more rapidly so use caution and start with 220 grit or finer.
1952 Chev 1300 Cdn. ½ ton
|
|
|
|
|
Joined: Oct 2009
Posts: 471 Likes: 9
Contributor
|
|
OP
Contributor
Joined: Oct 2009
Posts: 471 Likes: 9 |
Thanks everyone. Thanks CNC for the photos. Turns out a really good friend of mine who use to crew on an alcohol funny car says he can do it. I have to locate a 302 rod to make a fixture out of to hold the bearing and then be able to chuck it in a lathe and narrow the bearings. Looks like the procedure will be to cut the small end and beam off, narrow the wide end sufficiently for the narrowing and to be able to chuck it in a lathe. CNC I just looked at my rods and they don't have much of a chamfer so I will show my friend the pictures and see if we can put a little more of a chamfer.
|
|
|
|
|
Joined: Sep 2008
Posts: 3,669 Likes: 42
1000 Post Club
|
|
1000 Post Club
Joined: Sep 2008
Posts: 3,669 Likes: 42 |
Sure, glad it helped you out. If he looks at the pics, he should be able to fix you up with no problems. Make sure he chamfers both sides of your rods also.
Class III CNC Machinist/Programmer
|
|
|
|
|
Joined: Sep 2008
Posts: 3,669 Likes: 42
1000 Post Club
|
|
1000 Post Club
Joined: Sep 2008
Posts: 3,669 Likes: 42 |
Any luck finding a GMC rod? There were two different forgings so make sure you get the right one that has the same width bearing tangs as the bearings you will be using.
Class III CNC Machinist/Programmer
|
|
|
|
|
Joined: Oct 2009
Posts: 471 Likes: 9
Contributor
|
|
OP
Contributor
Joined: Oct 2009
Posts: 471 Likes: 9 |
I did find a rod with the correct tang. The rods I have use the 1/4 inch tang so that is what I got. Probably start this week on the fixture.
|
|
|
|
|
Joined: Aug 2006
Posts: 289
Contributor
|
|
Contributor
Joined: Aug 2006
Posts: 289 |
If I'm reading you correctly are yours hitting on the side edge of the bearing or the angle in the radius of the crank? I've "hand" chamfered my 302 bearings for years to make sure the oil would flow out properly. I have more side clearance than stock so it's always one of my checks and I do it by putting the bearing in the rod and use a bearing "knife" to add more clearance for the oil.(about a 45 degree angle)
The GMC has a lot of bearing surface so this has never been a problem. My side clearance is a minimum of .015"+ The side clearance comes from using a surface grinder at work.
Good Luck
216.158 MPH 12-Port 302 GMC on 70% 171.0 MPH 302 stock head on gasoline 7 years later
|
|
|
|
|
Joined: Oct 2009
Posts: 471 Likes: 9
Contributor
|
|
OP
Contributor
Joined: Oct 2009
Posts: 471 Likes: 9 |
You read the problem correctly. What does a bearing knife look like? I am willing to try doing it by hand as I just got an extra set of bearings in. Where can I buy one of these knives?
|
|
|
|
|
Joined: Aug 2006
Posts: 289
Contributor
|
|
Contributor
Joined: Aug 2006
Posts: 289 |
I use the trianglar one my dad had in his machine shop and I've has since 1963. In the McMaster-Carr book they are called bearing scrapers and I guess that's what I meant to say. Any machine shop supplier should be able to help you out....JD
216.158 MPH 12-Port 302 GMC on 70% 171.0 MPH 302 stock head on gasoline 7 years later
|
|
|
|
|
Joined: Jan 2005
Posts: 2,123 Likes: 3
1000 Post Club
|
|
1000 Post Club
Joined: Jan 2005
Posts: 2,123 Likes: 3 |
The tool is less imporant than understanding the purpose: when the rod moves laterally to either CW shoulder, its bearing edge must be contoured to prevent contact with the CW cheek radius to the journal.
You could do it with a rock if you had time enough.
|
|
|
|
|
Joined: Sep 2008
Posts: 3,669 Likes: 42
1000 Post Club
|
|
1000 Post Club
Joined: Sep 2008
Posts: 3,669 Likes: 42 |
The purpose of getting a spare rod was to make a fixture to narrow them in a lathe, you just use any number of lathe tools formed or ground to do this. You can narrow or chamfer the bearings with this method, done it hundreds of times.
Class III CNC Machinist/Programmer
|
|
|
|
|
Joined: Oct 2009
Posts: 471 Likes: 9
Contributor
|
|
OP
Contributor
Joined: Oct 2009
Posts: 471 Likes: 9 |
Have the rod, cut the beam and small end off. Taking it to a friend who will narrow it to stock 235/261 width, and then some. The then some is where I am still figuring out. Have to carve out time to look at the rod journal and measure the width to not include the filet. Armond left me a message last month but I missed it so I just followed up with him.
|
|
|
|
|
Joined: Oct 2009
Posts: 471 Likes: 9
Contributor
|
|
OP
Contributor
Joined: Oct 2009
Posts: 471 Likes: 9 |
So as an update. My friend and I just finished making the fixture to narrow the bearings. We cut the beam off the rod and ground down the casting on either side of the outside of the big end so the lathe tool would work a little more smoothly, if that makes any sense. We chucked it in the lathe using inside clamps and turned down both sides of the outside of the big end so that we could clamp the rod end in the lathe using outside clamps. We then measured a stock 261 rod bearing and the 302 rod bearing and decided to take about .080 from each side of the bearing. We blued the bearing, scribed .080 lines on each side of the 302 bearing, put the scribed 302 bearing in the rod end, chucked it into the lathe and cut the rod end until it had reached the .080 mark on the bearings. We then used a little tool that he had used to scrape bearing on an alcohol funny car and put a little chamfer on each side. Today I will mock up the bearing to see if we cut enough off. I have a picture of making the fixture but don't know how to post it. If someone could post it for me I can email it.
|
|
|
|
|
Joined: Oct 2007
Posts: 5,015 Likes: 47
1000 Post Club
|
|
1000 Post Club
Joined: Oct 2007
Posts: 5,015 Likes: 47 |
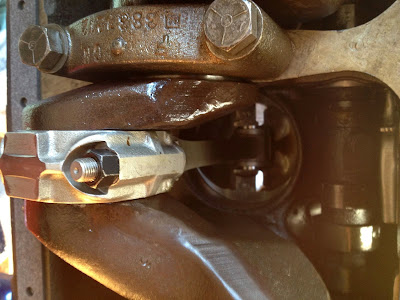
Here you go. I hope this works. These are mdonohue05's pictures I just posted them for him.  Machining the outside of the big end so an outside clamp can be use to hold the rod end.  This is the finished tool with another uncut bearing half installed just to see how it fits. Once both halves are installed and tightened we will cut the bearings to the tool and chamfer following the cut.  Another shot showing the turned down rim with an uncut bearing half in place. 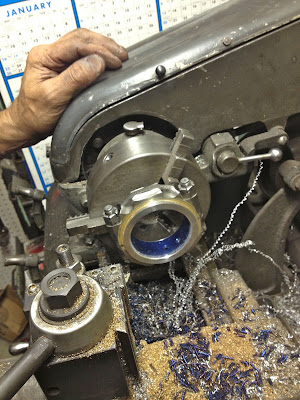 We put a bearing in the rod after we had scribed .080 lines on each side of the bearing. Then we cut each side of the rod down until it cut the bearing at the scribed line. After we did both sides, we double checked to make sure we actually got the .080 off
Last edited by Beater of the Pack; 09/24/12 06:24 PM.
"I wonder if God created man because he was disappointed in the monkey?" Mark Twain
|
|
|
|
|
Joined: Oct 2009
Posts: 471 Likes: 9
Contributor
|
|
OP
Contributor
Joined: Oct 2009
Posts: 471 Likes: 9 |
Ok so this past weekend my good friend Pete "lucky" Luciano of Lucky's Race Cars in Phoenixville, PA,, machined the bearings down. The gmc bearings are now narrow enough to clear the crank radius. Narrower than stock gmc but wider than stock 235/261. Probably did not need to narrow them as much as I did but I wanted to make sure I had more than enough clearance Installed the bearings on Sunday and no more problems. Rotating assembly actually rotates now, lol. So I think the gmc swap goes like this: early gmc rods with.990 pins and 1/4 inch bearing tang, big end narrowed to 235/216 dimension. Slightly narrowed rod bearings. The testy part is you need custom pistons with the pin moved to compensate for the longer rod. I have a couple of pictures is beater would be nice enough to post for me.
|
|
|
|
|
Joined: Oct 2007
Posts: 5,015 Likes: 47
1000 Post Club
|
|
1000 Post Club
Joined: Oct 2007
Posts: 5,015 Likes: 47 |
Send them like last time and I'll get them posted. This is good stuff. I'm thinking about doing a similar thing with Hudson rods in a GMC.
"I wonder if God created man because he was disappointed in the monkey?" Mark Twain
|
|
|
|
|
Joined: Oct 2009
Posts: 471 Likes: 9
Contributor
|
|
OP
Contributor
Joined: Oct 2009
Posts: 471 Likes: 9 |
You are too cool Beater! Pictures are on the way.
|
|
|
|
|
Joined: Oct 2009
Posts: 471 Likes: 9
Contributor
|
|
OP
Contributor
Joined: Oct 2009
Posts: 471 Likes: 9 |
So here is what I discovered. Federal mogul bearings come with a small chamfer on the bearings. You can get them in as is and the motor will spin, but they are really too close as after a couple of rotations, you can see a little distortion on the edges of the bearing. The sealednpower bearings do not have a chamfer and absolutely hit the crank filet radius, distorted the bearing, and locked the motor. The bearings I got from egge were gm bearings but apparently from a couple of different sets. There is no question that the bearings need to be cut down a little bit. We used a standard lathe tool and cut slowly until we got to the desired size. Chamfered with same tool just higher. Touched up the edges with some fine abrasive paper, polished with even finer paper. The tool needs to go slow or else it may chatter and make the edges a little rougher. The sealed power and federal mogul bearings were softer and easier to machine, the steel in the gm bearings was noticeably harder and we had to be more careful machining them
|
|
|
|
|
Joined: Oct 2007
Posts: 5,015 Likes: 47
1000 Post Club
|
|
1000 Post Club
Joined: Oct 2007
Posts: 5,015 Likes: 47 |
Here you go Mike.  Stock size 302 bearings on the 235/261 crank  Comparing the stock 302 bearing with the cut down 302 bearing 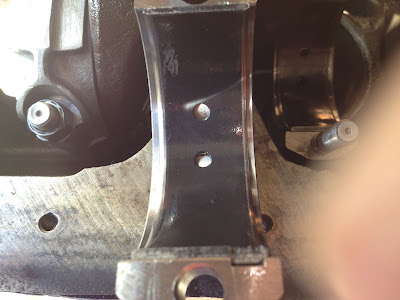 This is the cut down bearing installed in the narrowed 302 rod. You can see that there is more than enough clearance now for the crank  Same view you can see just how close  These bearings came from Patrick's who got them from egge. I am not particularly happy with the bearings but they will work. Egge apparently sprayed them with some sort of coating. Put like a thousandth on the clearance. Came off with lacquer thinner and then the clearances came in to spec
"I wonder if God created man because he was disappointed in the monkey?" Mark Twain
|
|
|
|
|
Joined: Sep 2010
Posts: 8
Active BB Member
|
|
Active BB Member
Joined: Sep 2010
Posts: 8 |
Stuff like this makes my day! Thanks for sharing.
|
|
|
|
|
Joined: Oct 2009
Posts: 471 Likes: 9
Contributor
|
|
OP
Contributor
Joined: Oct 2009
Posts: 471 Likes: 9 |
oh believe me its my pleasure. I know that some folks are not so generous but to be sure, i love playing with these motors and am happy to help anyone with what limited knowledge I have. What fun would it be otherwise! Besides, when I first became an inliner, i was in my early 20s and did not know all that much. Lots of the early members were very gracious and generous with me and i think a lot of that was just their simple enthusiasm for the club and the motors we were all playing with. I come from that same background!
|
|
|
|
|
Joined: Oct 2009
Posts: 471 Likes: 9
Contributor
|
|
OP
Contributor
Joined: Oct 2009
Posts: 471 Likes: 9 |
So the last piece to this is that when I installed the cam, I was checking the rod to cam clearance and what do you know, 030 on two of the rods, not nearly enough, sooooooooooo, out came the cam three different times so I could use the die grinder and grind some clearance. I ground a little more than I intended so I am a little concerned that I weakened the cam a bit but it is what it is. So that looks like the last piece for the 302 gmc swap. Clearance the cam for the rods. I will take a few final pics this week or so, right now, buttoning down the hatch for the hurricane.
|
|
|
|
|
Joined: Oct 2007
Posts: 5,015 Likes: 47
1000 Post Club
|
|
1000 Post Club
Joined: Oct 2007
Posts: 5,015 Likes: 47 |
So the last piece to this is that when I installed the cam, I was checking the rod to cam clearance and what do you know, 030 on two of the rods, not nearly enough, sooooooooooo, out came the cam three different times so I could use the die grinder and grind some clearance. I ground a little more than I intended so I am a little concerned that I weakened the cam a bit but it is what it is. So that looks like the last piece for the 302 gmc swap. Clearance the cam for the rods. I will take a few final pics this week or so, right now, buttoning down the hatch for the hurricane. Here's the picture for that. 
"I wonder if God created man because he was disappointed in the monkey?" Mark Twain
|
|
|
|
|
Joined: Oct 2009
Posts: 471 Likes: 9
Contributor
|
|
OP
Contributor
Joined: Oct 2009
Posts: 471 Likes: 9 |
Finished up the bottom end and went to bolt on the head and it would not go on. Seems the pop up venolia pistons are not machined correctly and are hitting the head. I bought these pistons from themnover 20 years ago so I am stuck figuring out what has to me modified, short of machining off the lump, and that would be a shame so the project is done as far as I can go for this year. Too cold to work out in the garage now. Beater has graciously agreed to post the last few pictures for me. Going to start aanother block as I need a motor by spring and no time to sort out the piston thing on this motor. Soon as I get it sorted out I will post.
|
|
|
|
|
Joined: Oct 2007
Posts: 5,015 Likes: 47
1000 Post Club
|
|
1000 Post Club
Joined: Oct 2007
Posts: 5,015 Likes: 47 |
Last edited by Beater of the Pack; 12/04/12 12:50 AM.
"I wonder if God created man because he was disappointed in the monkey?" Mark Twain
|
|
|
|
|
Joined: Oct 2010
Posts: 4
Newcomer
|
|
Newcomer
Joined: Oct 2010
Posts: 4 |
I used to be a factory rep. for a production engine rebuilding company. When we built a 261 chev. egine we always used a crank that had ben chrome plated on the rod and main journals. We then used copper alloy bearings. We never had a bearing problem in this engine. One or two thousands of an inch of chrome is a wonderful thing on bearing journals. I once seen a 327 chev that was in a drag rail that run a .010 chrome plated crank. This engine would naturally burn out bearing on a regular basis. We would only polish the crank back to std. and he would run again. Some times we had to put the crank in a grinder to get the excess bearing material off from it so we could polish it to finish.
|
|
|
|
|
Joined: Oct 2007
Posts: 5,015 Likes: 47
1000 Post Club
|
|
1000 Post Club
Joined: Oct 2007
Posts: 5,015 Likes: 47 |
You say that like it's a good thing? It eats bearings but you can fix it? 
"I wonder if God created man because he was disappointed in the monkey?" Mark Twain
|
|
|
|
|
Joined: Oct 2009
Posts: 471 Likes: 9
Contributor
|
|
OP
Contributor
Joined: Oct 2009
Posts: 471 Likes: 9 |
The weather was fairly decent today so I decided to talkie the piston Lump to head interference issue. Last week I had made a tracing of a pristine 57 235 head using pressure sensitive rubbing paper and made a cardboard template to duplicate the combustion chamber of the 235 head. Put it on the 261 motor and confirmed that the pop ups were hitting the exhaust valve combustion chamber. So did you ever have a duh-lightbulb moment? Week I did and realized that a 261 head at 95 cc Was going to be physically bigger and that notwithstanding my specifically ordering the pistons for a 261 block with a 235 head, it was possible the pop ups were cut for a 261 head. So I checked a 56 261 head and sure enough,I had clearance on the 261 head where there is none on the 235 head. I checked the casting number of the 261 head that I had with the cc numbers that Tom Langdon had gotten for me before he retired from gm and I had a somewhat nice surprise in that rather than the 95.5 cc Head, I have a 86.2 cc head, so not as bad as I feared. About 7.1 cc larger than the 848 head. Hopefully between the pop ups and a small cut on the head and can keep a little compression in the motor. So if you are going to order pop up pistons, make sure you specify which head you are using and make sure that specification appears on you order form. now off to build a new new head.
|
|
|
|
|
Joined: Oct 2009
Posts: 471 Likes: 9
Contributor
|
|
OP
Contributor
Joined: Oct 2009
Posts: 471 Likes: 9 |
So many have viewed this thread I thought I would provide an update. I tried a 261 head, a 55-56 5913 head, a 57 848 head and a 59-62 848 head, and the lumps hit all of the heads. Made a template up and figured about where the lumps were hitting and thought that there is no way, short of me buying a mill and learning how to use it, that I could fix these pistons. On a whim, I went into my files and miraculously found my reciept and job number from 1992 when I purchased the pistons. So I called Venolia and spoke to a gentleman named Tom Prock (more on that in a bit). Turns out Venolia keeps excellent records for their custom piston orders and he still had mine! Told me that Bob Toros who made my pistons, probably forgot to tell me that one end of the lump was only semi finished and was supposed to be hand fitted to the head for maximum compression. Mr. Toros apparently passed away a couple of years ago. Mr. Prock asked me to send him the pistons to get the end cut back so they won't hit the head. He was very cool to deal with. Now, when I got off the phone, I kept thinking that I recognized his name for some reason. So I plugged his name in on a Google search and I was right. Mr. Prock ran a number of cars here on the east coast, particularly when I was a boy. The one I really remembered was a Willys, the Prock and Howell F Troop car. That car has either been restored or recreated as one was on display at the Englishtown Funny Car reunion a couple of years ago. Ran a couplenof other cars over the years and was tom mcewen's crew chief for a time. Anyway, I just thought that Mr Prock was very cool to talk to me and help me get the piston issue sorted out. Props to Venolia!
|
|
|
|
|
Joined: Oct 2009
Posts: 471 Likes: 9
Contributor
|
|
OP
Contributor
Joined: Oct 2009
Posts: 471 Likes: 9 |
So after I sent my pistons to venolia, they could not figure out what was wrong with them. Turns out mine were fully machined. They asked if I could makenthem a cast of the combustion chamber, which I did. They figured out what was wrong. Here, in the 90s before cnc computer machining, they used a plexiglass template. When mynpistons were made, the template was put on upside down so the lumps were correctly positioned but the shape was backwards. So in deference ton the fact that my pistons were in fact 20 years old and long out of any warranty, they worked it out with me. I paid the cost of new raw forgings, they handled the rest and made me up a brand new new set of pistons. They also machined the lumps off the original pistons for near zero deck flattops. Hats off to Tom Prock at venolia!
|
|
|
|
|
Joined: Oct 2009
Posts: 471 Likes: 9
Contributor
|
|
OP
Contributor
Joined: Oct 2009
Posts: 471 Likes: 9 |
I have a picture or two if someone will help me post them.
|
|
|
|
|
Joined: Oct 2007
Posts: 5,015 Likes: 47
1000 Post Club
|
|
1000 Post Club
Joined: Oct 2007
Posts: 5,015 Likes: 47 |
Send them like you did the last ones and I'll try and post them for you.
"I wonder if God created man because he was disappointed in the monkey?" Mark Twain
|
|
|
|
|
Joined: Oct 2007
Posts: 5,015 Likes: 47
1000 Post Club
|
|
1000 Post Club
Joined: Oct 2007
Posts: 5,015 Likes: 47 |
Here are Mike's pictures.   This is the piston that I purchased 20 some years ago. If you look closely you can see the lumps were placed correctly but the shape was backward 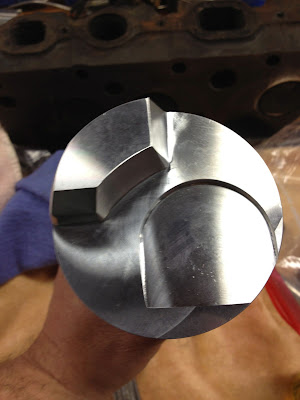 This is the new venolia pop up
"I wonder if God created man because he was disappointed in the monkey?" Mark Twain
|
|
|
|
0 members (),
152
guests, and
42
robots. |
|
Key:
Admin,
Global Mod,
Mod
|
|
|
|