|
|
Joined: Dec 2010
Posts: 535
Major Contributor
|
OP

Major Contributor
Joined: Dec 2010
Posts: 535 |
Finished up the wiring harness for this. The quick connects plug right into the engine harness. Most the other wires probably won't be used and will be trimmed once installed in the car. The only wires outside the plugs that will be needed is: +12v power, O2 sensor in, Fuel Pump trigger, and torque converter control. I intend on adding a vehicle speed sensor and possibly a couple pressure sensors for fuel and oil and possibly electric fan control. Some of the other wires might come back into play for boost control down the road. 
|
|
|
|
|
Joined: Oct 2006
Posts: 185
Contributor
|
|
Contributor
Joined: Oct 2006
Posts: 185 |
Randal, send me the aluminum dash panel and I will engine turn it for you, w
hat do you think???
|
|
|
|
|
Joined: Dec 2010
Posts: 535
Major Contributor
|
|
OP
Major Contributor
Joined: Dec 2010
Posts: 535 |
Engine turn it? I've already disaster'ized it =P I was looking at my exhaust options. Basically either half the Skylark's old exhaust or half the Firebird's old exhaust. I cut the Firebird's old exhaust in half. I thought about leaving the dual part from the X-pipe back, but opted against that. I should have enough exhaust stuff to be able to cut out and replace the remaining X-pipe piece with a good piece of mandrel bent tubing. On the right is 2.5" Skylark mandrel bent exhaust from a Summit universal kit complete with Summit brand muffler. On the left is what came with the firebird which is 2.5" regular bent exhaust with Flowmaster mufflers, I think 40 series but don't know for sure.  I should be able to make some quick back to back tests on how each sounds. The Summit brand one bolted up.  The Flowmaster brand bolted up.  Wired up the control panel and megasquirt. It's pretty hokey but it'll get the job done. That battery is an old one out of my Skylark that I am pretty sure has a dead cell in it. I have the charger on it now and I think it'll get the job done just fine. It never up and quit on me, but would instantly drop to ~11.9 volts when the key was turned off, but would start fine the next day or even several later from 11.xx volts.   The outriggers for some anti-roll support. I won't get too crazy with revving it if things look shaky.  As the car sits right now waiting for rear gears and all the other work. 
|
|
|
|
|
Joined: Sep 2004
Posts: 5,839 Likes: 1
1000 Post Club
|
|
1000 Post Club
Joined: Sep 2004
Posts: 5,839 Likes: 1 |
Since this is in the blown & EFI section, how bout some sort of device pics that compresses the air.
5 PGS of engine build & EFI w/no blower/turbo?
Are you at least thinking of blowing it?
MBHD
12 port SDS EFI 
|
|
|
|
|
Joined: Sep 2011
Posts: 210
Contributor
|
|
Contributor
Joined: Sep 2011
Posts: 210 |
Your ignition reminds me of a Mercruiser 140 setup I worked on a few years ago. I always thought it would work good on a 6 cylinder. mercruiser ignition
|
|
|
|
|
Joined: Dec 2010
Posts: 535
Major Contributor
|
|
OP
Major Contributor
Joined: Dec 2010
Posts: 535 |
This is my "throw together" engine, basically hauled it home from a classified ad, opened it up, pulled it all apart, nodded, put it all back together, used rings, used bearings, etc. I modified the head for the oiling system, raised the main line oil pressure, etc. Figured the first one of these I built shouldn't have too much machine work in it in case I screw the pooch on the oil mod's and EFI stuff. Basically it's lipstick on a pig, haha. When I have it running good in the car I'll start on my turbo engine build, which will include custom forged pistons, a re-ground cam I have and a ported head. I know the shop that ported this head and will be sending a cleaned up head I have to them for chamber and port work. I've already had my head shaved to a true 12 port. You've seen my idea of going to a reverse flow cooling system, and part of that is to keep the head cool for the turbo that is coming. I have not yet purchased or sized the turbo as I want to get a decent baseline on this engine so I know what to expect before sizing the turbo. 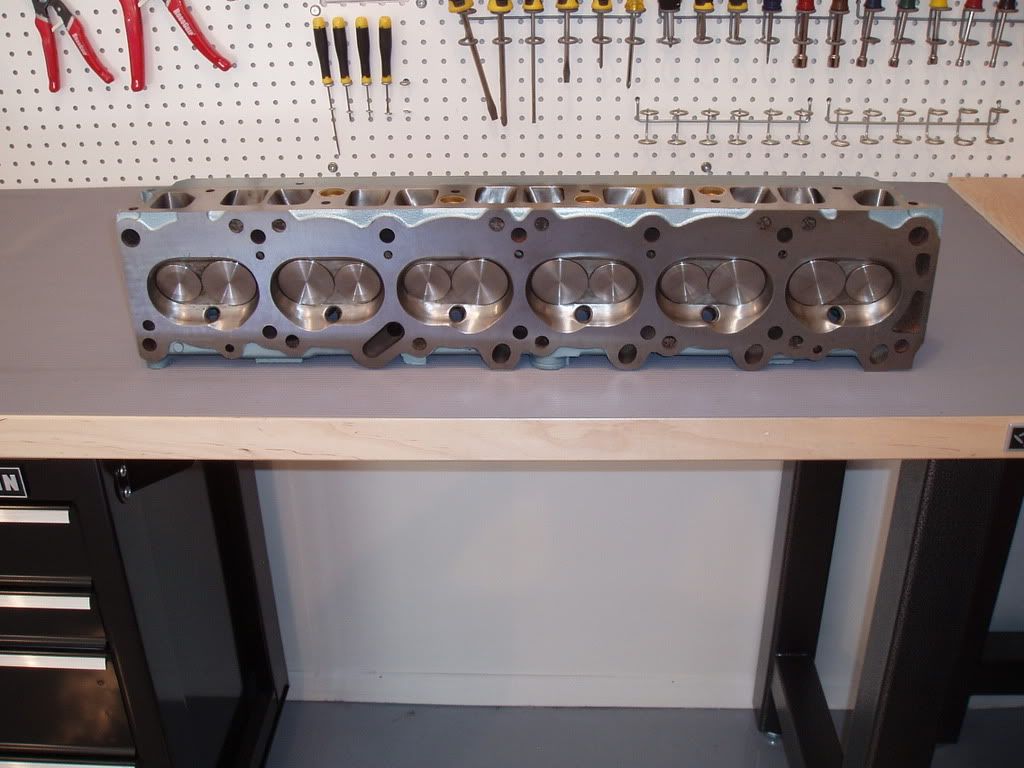 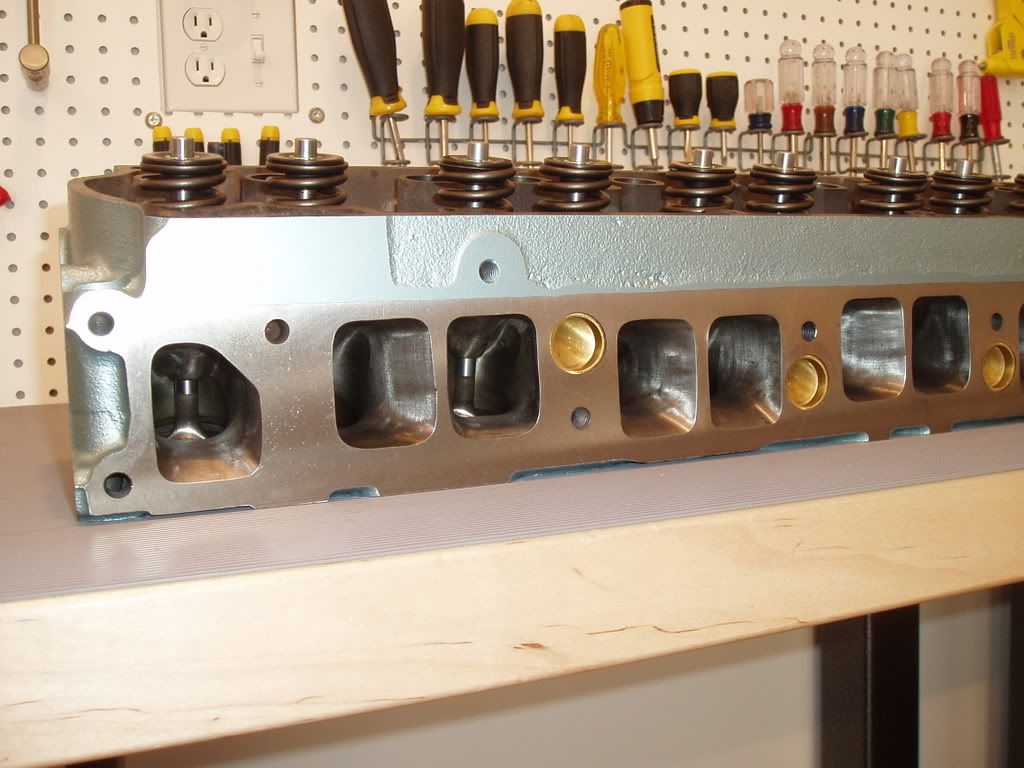 Have it just about fired up. Tested the crank and cam sensors yesterday while cranking the engine sans fuel/spark. The spark is working as desired, but the fuel rails leaked at the injectors so I'm pulling the fuel rails off this morning to do some clean up passes with green scotchbrite and replace all the o-rings on the injectors just to be safe.
Last edited by TheSilverBuick; 11/10/13 01:46 PM.
|
|
|
|
|
Joined: Dec 2010
Posts: 535
Major Contributor
|
|
OP
Major Contributor
Joined: Dec 2010
Posts: 535 |
Your ignition reminds me of a Mercruiser 140 setup I worked on a few years ago. I always thought it would work good on a 6 cylinder. mercruiser ignition Hmm, interesting. I have around $68 plus spark plug wires and spark plugs, then some small things into my ignition. Junkyard ignition coils and brackets cost me $11 (some how a friend get's them amazingly cheap), the crank trigger wheel, $32, crank sensor $25, junkyard cam sensor from a 4-cylinder FWD transmission, hacked up stock points distributor, a short length of 3/4" aluminum tubing a local store was trying to get rid of. So probably all in around $120 ignition system that will light off almost any amount of boost you put in the engine.
|
|
|
|
|
Joined: Sep 2004
Posts: 5,839 Likes: 1
1000 Post Club
|
|
1000 Post Club
Joined: Sep 2004
Posts: 5,839 Likes: 1 |
Nice! I am not too familiar w/the Poncho 6's, what size valves are those & what do those heads flow? MBHD
12 port SDS EFI
|
|
|
|
|
Joined: Dec 2010
Posts: 535
Major Contributor
|
|
OP
Major Contributor
Joined: Dec 2010
Posts: 535 |
The stock valves are the same size as the Pontiac 389, 1.92" intake and 1.60" exhaust, but the ones pictured are probably 1.94" intake with the 1.60" exhaust. I don't recall off hand what it flowed, I just remember that it picked up a ton of flow by unshrouding the intake valve. Here is a picture of the un-ported chamber and valve size. Both these pictures are from the engine I'm putting together, basically cleaned up the parts (hot tanked the head and checked for cracks)  And unported ports. 
|
|
|
|
|
Joined: Dec 2010
Posts: 535
Major Contributor
|
|
OP
Major Contributor
Joined: Dec 2010
Posts: 535 |
Here is my good head ready to go to the porting shop. I'm going to use narrower 11/32" valve stems as well. Lighten the valvetrain up a bit and add a couple cfm. I was tempted to go to 5/16th but opted not to.  You can see where it's been shaved to get a true 12-port versus the picture in the previous post that the divider between intake ports leaves about an 1/8" gap between the divider and gasket. 
|
|
|
|
|
Joined: Sep 2004
Posts: 5,839 Likes: 1
1000 Post Club
|
|
1000 Post Club
Joined: Sep 2004
Posts: 5,839 Likes: 1 |
You could possibly also use smaller sized valve stems I am sure but you would need to install the correct sized guides. Same size the LS newer engines use.
They are metric sized stems, can't remember off hand what size they are, but they are smaller than 11/32"
Might want to look into that?
MBHD
12 port SDS EFI
|
|
|
|
|
Joined: Dec 2010
Posts: 535
Major Contributor
|
|
OP
Major Contributor
Joined: Dec 2010
Posts: 535 |
Stock valve stems are 3/8th and I've already reduced them to 11/32 (bronze guide inserts). During that decision process I looked at 5/16, 8mm and 7mm (maybe even 5mm) options. I consulted with two different head porters and both stated that the reduction from 11/32 to 7mm (or was it 5mm?) might yield 5cfm and it was more about reducing valvetrain weight than increasing air flow. I feel confident I'll be able to maintain valvetrain stability with 11/32 stems to what ever rpm the ports choke at so didn't see a need to go to a smaller diameter stem. It requires custom valves no matter what (longer stem above the retainer notch) and it appeared the cost of custom smaller stem valves and retainers was higher than custom 3/8 or 11/32 stem valves and standard retainers.
|
|
|
|
|
Joined: Dec 2010
Posts: 535
Major Contributor
|
|
OP
Major Contributor
Joined: Dec 2010
Posts: 535 |
I was set back yesterday pretty substantially when my fuel rail system did not work out. I cleaned up the holes, replaced the o-rings, etc to no avail. So I am going to a common rail but ran into the exact problem that caused me to look at "alternative" fuel rail configurations, namely I either have interference from the thermostat housing or with the throttle body. I simply cannot get a straight line to fit. I got word the guy giving me a remote mount automotive electric water pump has put it in the mail on Friday so I yanked the thermostat housing off the engine, removed the intake, chiseled out the injector bungs, re-installed the intake, hung the fuel rail in place with injectors installed and bungs hanging from the injectors into the intake, and put a fresh coat of JB quik-weld on it. I now have a second coat of JB quik weld on it to make sure it seals and holds and will clean up and re-paint the intake this week. I ordered up some 1/4" aluminum plating and will make a water outlet block off plate and a water pump hole plate and bolt a water outlet to the pump plate. I've already knocked out the two freeze plugs and installed the ones I welded nipples onto. Going all out on the external water pump now. 
|
|
|
|
|
Joined: Dec 2010
Posts: 535
Major Contributor
|
|
OP
Major Contributor
Joined: Dec 2010
Posts: 535 |
Three steps forward, two steps back.   I'm waiting on some aluminum plates so I can block off the old thermostat opening and make a water pump block off plate for the water outlet to bolt on to.
|
|
|
|
|
Joined: Sep 2004
Posts: 5,839 Likes: 1
1000 Post Club
|
|
1000 Post Club
Joined: Sep 2004
Posts: 5,839 Likes: 1 |
My friend uses these & runs AN fitting & hoses. http://sdsefi.com/hardware.htmMBHD
12 port SDS EFI
|
|
|
|
|
Joined: Dec 2010
Posts: 535
Major Contributor
|
|
OP
Major Contributor
Joined: Dec 2010
Posts: 535 |
I've seen those and they are pricey. At least around $40 each. Got the new rail installed. I have to make a rail hold down, which shouldn't be too challenging. Still waiting on some aluminum plating to block off the thermostat housing. It's going to be a tight fit.. I may remote the fuel pressure regulator after all.    I probably won't do much work on the engine tomorrow. I am going to swap the differential carrier and gears tomorrow. I'll probably have to go to a shop downtown to have the pinion bearing pressed off, and I'll hone the old bearing out a bit and use it to set the number of shims for a good tooth pattern then install the new bearings on the pinion.
|
|
|
|
|
Joined: Dec 2010
Posts: 535
Major Contributor
|
|
OP
Major Contributor
Joined: Dec 2010
Posts: 535 |
While not an engine update, I installed the 4.56 gears and the mini-spool into the Firebird. While the axles were out I checked and they fit nicely in my old 8.5" rear end with a true positraction and 3.42 gears. If things go south with the mini-spool and it doesn't take an axle out I can swap the rear end assembly if needed. I really want to run this engine with these gears! It'll be 3,000 rpm at 75mph with the overdrive.  Plugging away. Piece by piece. Plumbed in the electric water pump. 1 1/4" inlet and two 1" outlets into the head. I hmm and hawed over how to set up the tee in the water line and decided that I'd straight line it to the front port to potentially have more flow go that way. If it does work that way then it will set the circulation up better to push the water from the front of the head rear wards where the largest opening in the deck is. As the water is heated up it'll get a second blasting of cool water from the pump. Or maybe it won't matter? I think I know how to wire in a relay so that it'll run off the controller normally but when going WOT (or some specified load) it'll go full tilt. Later I can add the condition when it see's boost.  I was looking at the water pump controller and the directions said to stick the probe where the thermostat would be for it to best control the temperature. I'm not sure how most folks install the probe, but I dug out a 230 OHC bypass spacer and reamed the hole out until it was a snug fit. But that still left the problem of seal and retention.  A short length of hose would do a good job of sealing, so I did that and two hose clamps. But then I found that I could still slide the probe with some effort. With the cooling system pressuring up I figured I needed better positive retention, so I had the hose hang over the back of the probe and stuck another clamp on there to keep it from pushing outwards.  Then it was time to make up my block off plates. A 1/4" thick plate of aluminum ready to be cut.  Cut and grinded out the aluminum block off plate. Drilled a 1 1/4" hole in the plate and bolted the spacer and thermostat housing too it.  The belt cover installed.  
Last edited by TheSilverBuick; 11/18/13 02:16 PM.
|
|
|
|
|
Joined: Apr 2004
Posts: 3,556 Likes: 35
1000 Post Club
|
|
1000 Post Club
Joined: Apr 2004
Posts: 3,556 Likes: 35 |
Question
How will you get air out of the system that is stuck in the head?
Inliner Member 1716 65 Chevelle Wagon and 41 Hudson Pickup Information and parts www.12bolt.com
|
|
|
|
|
Joined: Dec 2010
Posts: 535
Major Contributor
|
|
OP
Major Contributor
Joined: Dec 2010
Posts: 535 |
Next new picture I post up will be of the thermostat block off plate in the cam housing and it will have an air bleed hole and plug. It's the highest point of the cooling system and ideal place to put a bleed valve.
Last edited by TheSilverBuick; 11/18/13 04:42 PM.
|
|
|
|
|
Joined: May 2000
Posts: 1,464
1000 Post Club
|
|
1000 Post Club
Joined: May 2000
Posts: 1,464 |
Instead of a plug use a Schraeder valve (tire stem). They are available at heating and cooling firms with a 1/8 or 1/4 pipe plug stem. Very handy. I use them on my drag cars.
FORD 300 inline six - THE BEST KEPT SECRET IN DRAG RACING!
|
|
|
|
|
Joined: Dec 2010
Posts: 535
Major Contributor
|
|
OP
Major Contributor
Joined: Dec 2010
Posts: 535 |
Interesting idea. I contemplated using a simple brass valve or radiator drain cock, but an 1/8 NPT plug will work just as well and I shouldn't have to open it that often.
|
|
|
|
|
Joined: Sep 2004
Posts: 5,839 Likes: 1
1000 Post Club
|
|
1000 Post Club
Joined: Sep 2004
Posts: 5,839 Likes: 1 |
While not an engine update, I installed the 4.56 gears and the mini-spool into the Firebird. While the axles were out I checked and they fit nicely in my old 8.5" rear end with a true positraction and 3.42 gears. If things go south with the mini-spool and it doesn't take an axle out I can swap the rear end assembly if needed. I really want to run this engine with these gears! It'll be 3,000 rpm at 75mph with the overdrive. I thought the stock Firebird rear axle is a 8.20? Did you install a later model rear axle? What trans are you using? 200R4? MBHD
12 port SDS EFI
|
|
|
|
|
Joined: Dec 2010
Posts: 535
Major Contributor
|
|
OP
Major Contributor
Joined: Dec 2010
Posts: 535 |
It's a Chevy 8.2" instead of a BOP 8.2". A previous owner changed it out at the some point in the car's history. Interestingly enough, my first '69 Firebird I bought back in 2000 had the same exact swap done on it, a Chevy 8.2" with 2.73 gears. The axles are the same as the 27 spline 8.5", which I have an 8.5" axle from my '77 Skylark that is direct swap, but has one bad axle in it. 200-4r I rebuilt, so it's quality is suspect as I've never rebuilt one before, lol. It was behind my old Buick 231 V6 for several years and in good working order when I pulled it for the 455/TKO-600 swap. It was super clean inside and I probably could of gotten away with simply doing the shift kit valve body modifications. I pretty much went full out on the shift kit and got a rebuilt 2,000-2,500 rpm locking stall converter for $120'ish on E-bay. Lock-up will be controlled via the MegaSquirt.   
Last edited by TheSilverBuick; 11/18/13 10:05 PM.
|
|
|
|
|
Joined: Dec 2010
Posts: 535
Major Contributor
|
|
OP
Major Contributor
Joined: Dec 2010
Posts: 535 |
Got the thermostat block off plate finished up, complete with hole to purge the air out of the cooling system and wrapped up the fuel system. Took a few tries, but got the fuel system buttoned up. At least I hope I do. Today's testing seemed to go well, held 44psi of fuel pressure. After a few fittings were leaking at first so it was too hard to tell if I had some seeps or not after I had the system pressured up. 
|
|
|
|
|
Joined: Dec 2010
Posts: 535
Major Contributor
|
|
OP
Major Contributor
Joined: Dec 2010
Posts: 535 |
It's running! I had a bit of a scare though. My oil pressure return line popped out when I first started it up and the oil that spilled all over the side of the engine and on the floor looked cloudy, which had me freaked out about a possible head gasket or worse problem. I pulled all the spark plugs and none had water on them. On closer inspection of the oil, it was very very aerated. So I drained the oil, and when it quit draining I ran the water pump for a while and no more fluid came out the oil drain hole, so I figure the oil was too thick for the temps. It was a mixture of 20w-50 and Lucas oil and the temps were in the high 20's*F, so I topped it off with some room temperature 10w-30 (and changed the filter just in case) and after running it for a while the oil still looks good and clean. No bubbles, no water, but I'll be keeping an eye on it. My water inlets both seep a little around the welding, so I probably missed a spot on each. I'll look more at it later, but I may just add some aluma-seal to it and see if it stops. Here is a video of it going. YouTube made it fuzzier, but you can still get an idea of what is going on. The smoke around the fill tube is mostly the oil burning off from when the return tube popped out of the side hole. I still haven't decided exactly how I'm going to affix the return line to the tube. Rev's pretty good considering there is not throttle position sensor and isn't tuned very well. The timing is probably off what is displayed by 5-10* as I haven't checked/calibrated it with a timing light yet. It gets a bit warm, but with hardly any tune and almost no air flow on the radiator, I can't complain too much, hopefully it cools off once settled in. http://www.youtube.com/watch?v=xlwdRxNeyuM&feature=share&list=UUspCpZrffJo4BJ5Am4jH-sA
|
|
|
|
|
Joined: Sep 2004
Posts: 5,839 Likes: 1
1000 Post Club
|
|
1000 Post Club
Joined: Sep 2004
Posts: 5,839 Likes: 1 |
Congrats!
It should rev very quick w/just a flex plate installed.
My 250 w/just a flex plate revved like it was a late model sport bike motorcycle engine, crazy fast!
MBHD
12 port SDS EFI
|
|
|
|
|
Joined: Dec 2010
Posts: 535
Major Contributor
|
|
OP
Major Contributor
Joined: Dec 2010
Posts: 535 |
Thanks! Here is a video of starting it up and then the exhaust with the Summit universal muffler, a mystery Flowmaster muffler and then uncorked. It's not as loud as I would expect uncorked, but then again this is the small 1bbl cam in it. Still needs some tuning work. I can't tell if the smoke is fuel, oil or condensation from it being 32*F out. I re-used the piston rings in it, so I wouldn't be entirely shocked if it's oil. http://www.youtube.com/watch?v=j4vxtb42llc&feature=share&list=UUspCpZrffJo4BJ5Am4jH-sA
Last edited by TheSilverBuick; 11/23/13 10:13 PM.
|
|
|
|
|
Joined: Oct 2007
Posts: 5,015 Likes: 47
1000 Post Club
|
|
1000 Post Club
Joined: Oct 2007
Posts: 5,015 Likes: 47 |
That is great. I like the Flowmaster but it's hard to tell for sure.
"I wonder if God created man because he was disappointed in the monkey?" Mark Twain
|
|
|
|
|
Joined: Sep 2004
Posts: 5,839 Likes: 1
1000 Post Club
|
|
1000 Post Club
Joined: Sep 2004
Posts: 5,839 Likes: 1 |
Looks like blue smoke, then condensation.
Flowmaster sounds good.
MBHD
12 port SDS EFI
|
|
|
|
|
Joined: Apr 2004
Posts: 3,556 Likes: 35
1000 Post Club
|
|
1000 Post Club
Joined: Apr 2004
Posts: 3,556 Likes: 35 |
I liked the Summit sound. Good job on all of it.
Inliner Member 1716 65 Chevelle Wagon and 41 Hudson Pickup Information and parts www.12bolt.com
|
|
|
|
|
Joined: Dec 2010
Posts: 535
Major Contributor
|
|
OP
Major Contributor
Joined: Dec 2010
Posts: 535 |
^^^First vote for something other than Flowmaster!
Thanks. I too am partial to the summit sound.
|
|
|
|
|
Joined: Jun 2011
Posts: 56
Active BB Member
|
|
Active BB Member
Joined: Jun 2011
Posts: 56 |
I like the Flowmaster, but you have to have a way to uncork it, too!
Gearhead's Quickchange Exchange
"My Rear End is Louder Than Yours"
|
|
|
|
|
Joined: Sep 2004
Posts: 5,839 Likes: 1
1000 Post Club
|
|
1000 Post Club
Joined: Sep 2004
Posts: 5,839 Likes: 1 |
When you turbocharge it, you wont want either Summit or Flowmaster muffler on it. Too restrictive.
MBHD
12 port SDS EFI
|
|
|
|
|
Joined: Dec 2010
Posts: 535
Major Contributor
|
|
OP
Major Contributor
Joined: Dec 2010
Posts: 535 |
The turbo will be the muffler at that point!
|
|
|
|
|
Joined: Sep 2004
Posts: 5,839 Likes: 1
1000 Post Club
|
|
1000 Post Club
Joined: Sep 2004
Posts: 5,839 Likes: 1 |
If you like quietness of the Summit muffler & sound, you are not going to like just a straight pipe & the turbo.
MBHD
12 port SDS EFI
|
|
|
|
|
Joined: Dec 2010
Posts: 535
Major Contributor
|
|
OP
Major Contributor
Joined: Dec 2010
Posts: 535 |
It's not so much the decibels as much as the deeper bass. But, if I don't like it, I'll change it, nothing to locked in. I moved the car into the shop to start prepping it for the engine. More I looked over the car the more work I need to do to it =/ It was pretty sketchy driving from Alabama to Nevada, so I have to correct some of these things (brakes and steering are mint though). 
|
|
|
|
|
Joined: Dec 2010
Posts: 535
Major Contributor
|
|
OP
Major Contributor
Joined: Dec 2010
Posts: 535 |
Look what showed up today! Now I want to drive it even more. It sits a little far forward here because the back of the console doesn't fit between the backs of the seats, but I'll solve that.  Never let practicality get in the way of fun   This is what I mean by it doesn't fit between the seats. I'll figure something out, even if I simply have to trim the console. 
|
|
|
|
|
Joined: Jun 2007
Posts: 1,411
1000 Post Club
|
|
1000 Post Club
Joined: Jun 2007
Posts: 1,411 |
Wow, all that and cup holders too. 
My, what a steep learning curve. Erik II#5155
|
|
|
|
|
Joined: Dec 2010
Posts: 535
Major Contributor
|
|
OP
Major Contributor
Joined: Dec 2010
Posts: 535 |
Throwing a couple turkey pot pies in the oven as I kick back for the night. Welded a nipple to the oil fill tube and re-painted it, use the same technique as posted on my Thunderbird. Was interesting when it caught fire. I expected the oil to catch fire, what I didn't expect was it set up an airflow that had a jet of fire out one end and even sounded like a jet. Dropped it in a bucket of water I had ready for it when it lit up more than I was comfortable with. Installed the engine in the car as well. I used the Ford brackets to lift the engine ( http://sohcsix.yuku.com/topic/3103/Are-these-brackets-for-the-OHC-engine#.Upfl0MTqkzI). The first lift try one of the brackets started bending, so I set it back down and ran the chain through both loops on each bracket and it was good from there. Was fairly level and straight even. The scariest part of all engine installs.  Safely in!  Lots of room on the sides compared to a V8, but you guys know that ;-) A turbo is going to look good on the passengerside there.  This is pretty organized for me. I need to set the radiator in the see where I'll mount the electric water pump. Now that I've installed the engine, I can see I have more than enough room that on my good engine I won't drill the head for the external oil pressure regulator, I will certainly use the oil plug at the rear of the head.  The intake/exhaust side. I need to get a universal throttle cable that will reach the new location. I will still likely get a steel pulley wheel to support the 90* bend to the firewall. Likewise for the TV transmission cable. Oh, my exhaust system interfered with the motor mount, so I had to trim one of the catches off the motor mount that is there if the rubber separates. So I also used the old racer trick of drilling a hole through the motor mount to run a bolt with a lock nut at the other end, but not snugged up to the mount to keep the mount from separating.  After getting the engine in I pushed the car forward and now it waits to get the transmission installed. 
Last edited by TheSilverBuick; 11/28/13 10:04 PM.
|
|
|
|
|
Joined: Apr 2004
Posts: 3,556 Likes: 35
1000 Post Club
|
|
1000 Post Club
Joined: Apr 2004
Posts: 3,556 Likes: 35 |
Yeah, Now that is moving. What is your ETA to get it up and running?
Inliner Member 1716 65 Chevelle Wagon and 41 Hudson Pickup Information and parts www.12bolt.com
|
|
|
|
0 members (),
307
guests, and
21
robots. |
|
Key:
Admin,
Global Mod,
Mod
|
|
|
|