|
|
Joined: Dec 2010
Posts: 535
Major Contributor
|
OP

Major Contributor
Joined: Dec 2010
Posts: 535 |
FINALLY got the Raspberry Pi to bring up Tuner Studio. Its still a bit slow, but I think there is plenty of room for optimizing the startup of the Pi for smoother function. I'm going to poke around with optimizing the startup and system resources then work on getting it to remote desktop over to a netbook I have to test it out in the Firebird. 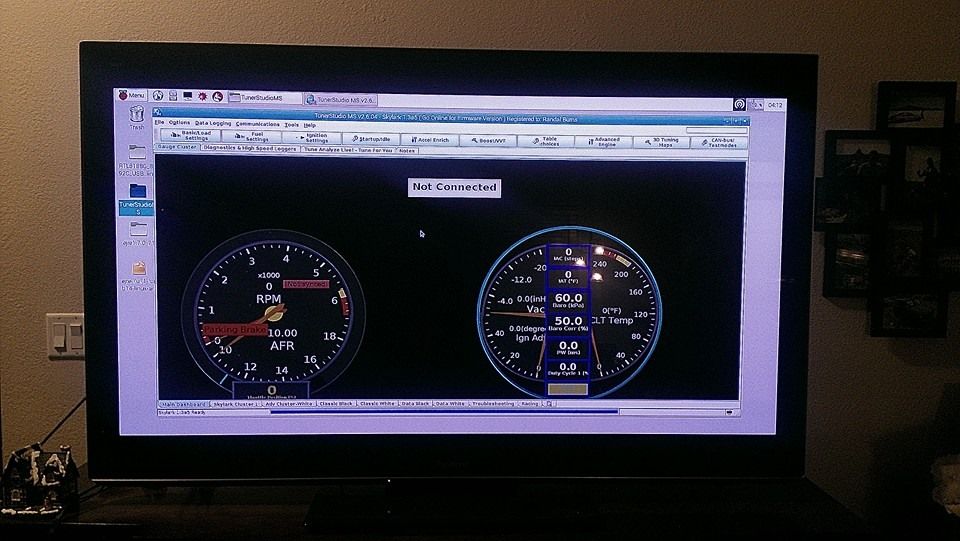
|
|
|
|
|
Joined: Dec 2010
Posts: 535
Major Contributor
|
|
OP
Major Contributor
Joined: Dec 2010
Posts: 535 |
I got the transmission back in the Firebird yesterday, but it didn't go as smoothly as planned when my transmission jack decided it wanted to bleed off now so became useless. I went around town seeing if any of the stores had a transmission jack adapter for a standard floor jack, but no luck. So I attempted to weld up some simple brackets, but really didn't have enough scrap metal on hand to make a good transmission holder and had one failed attempt to install the transmission with the modified jack cradle. Then I resorted to the simple board of wood on a floor jack like I had done before having a transmission jack and it worked like a charm. Making me wish I hadn't wasted 3 hours for an alternative solution when the simple one worked so well =/ 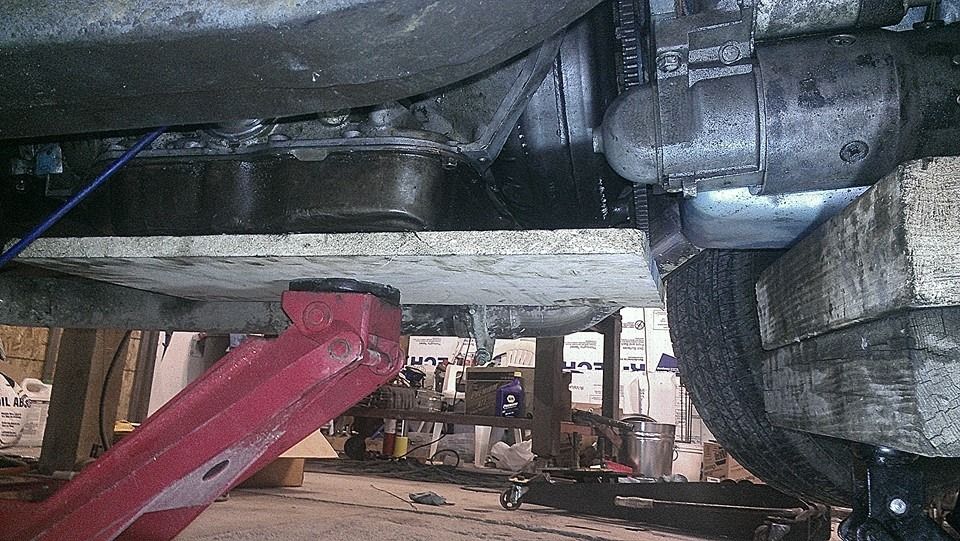 The other thing I worked on was moving the TV cable from the throttle linkage to the gas pedal. I found a spot on the gas pedal where it moved the 1.5" from closed throttle to WOT, and mounted a bracket there. It actually required a bit of final adjusting down from my marked spot, but I checked it with the transmission pan off and am happy with the settings now. I cut the TV bracket off the throttle bracket and welded a strip of medal to the bottom of it to make it angle down towards the gas pedal like the throttle cable does. Then used a simple self tapping screw to hold it in place. So the cable clips in just like it would at the throttle body/carb. 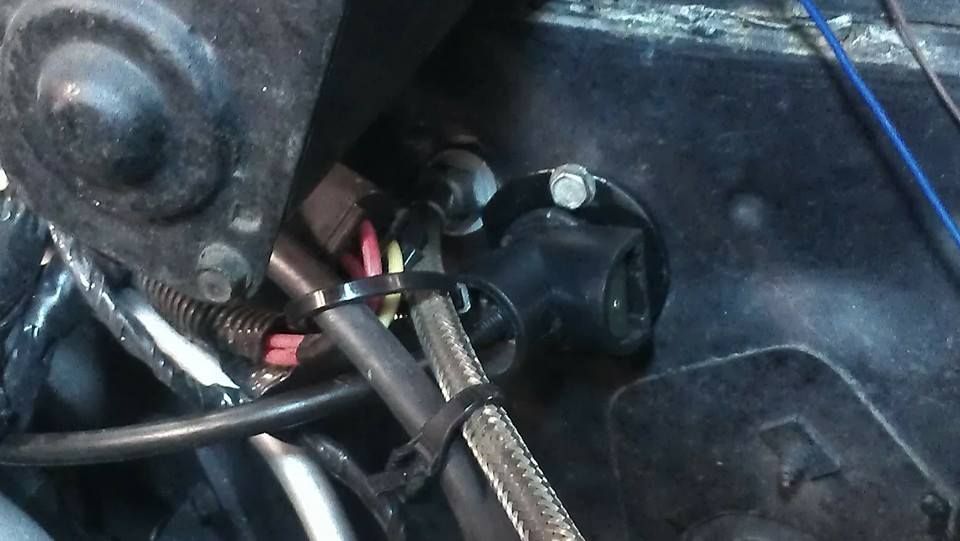 I welded a simple screw to the top of a cable clamp and clamped it to the gas pedal. By sliding it up and down the pedal as well as adjusting the cable tension, I got the adjustment where I am happy with it. The TV cable clip snaps nicely onto the screw head, and loosely pivots on it quite nicely. I greased it just to keep wear down. Hope it works.... 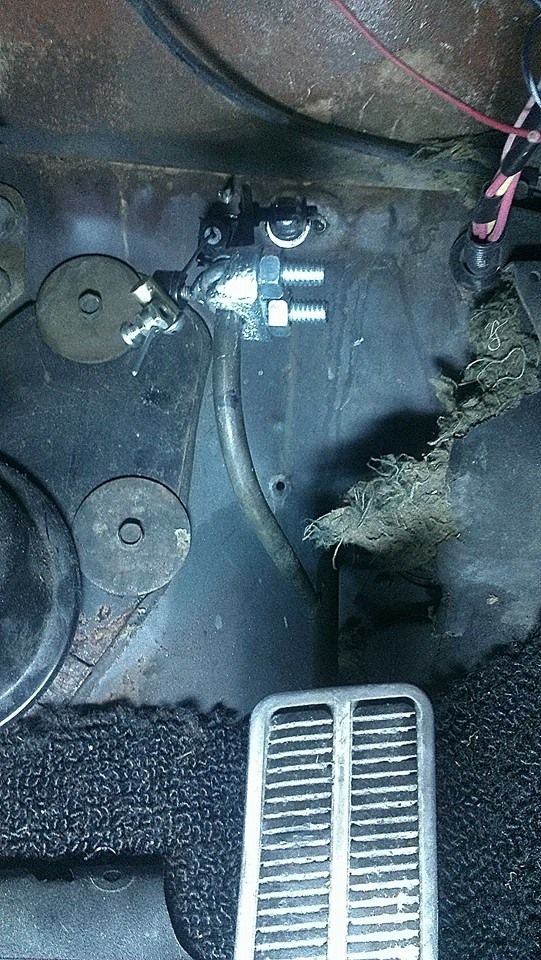 Today I'll finish up the small stuff and then pull the front brakes off for a disc brake swap. Hopefully that goes smoothly....
|
|
|
|
|
Joined: Nov 2013
Posts: 482
Contributor
|
|
Contributor
Joined: Nov 2013
Posts: 482 |
I like what you did with the tv cable. That setup might be easier than brackets out on the engine. This could be good for people who want to try different carbs on the same engine. Jay 6155
|
|
|
|
|
Joined: Dec 2010
Posts: 535
Major Contributor
|
|
OP
Major Contributor
Joined: Dec 2010
Posts: 535 |
I heard about setting it up that way on a Buick board. Yesterday I took it out for a test drive and it appeared my transmission work was in vain as it shifted the same. It seems to be good with the 3.42 gears (speedo might actually be accurate...), but the engine also had a mis-fire. So I needed to trouble shoot that before any more testing could be done. Made this nifty modification to the top bolts so they are easier to install and remove. [url="http://s42.photobucket.com/user/TheSilverBuick/media/Facebook/Firebird%202/10933787_10204886065605074_629223608550336789_n.jpg.html"] 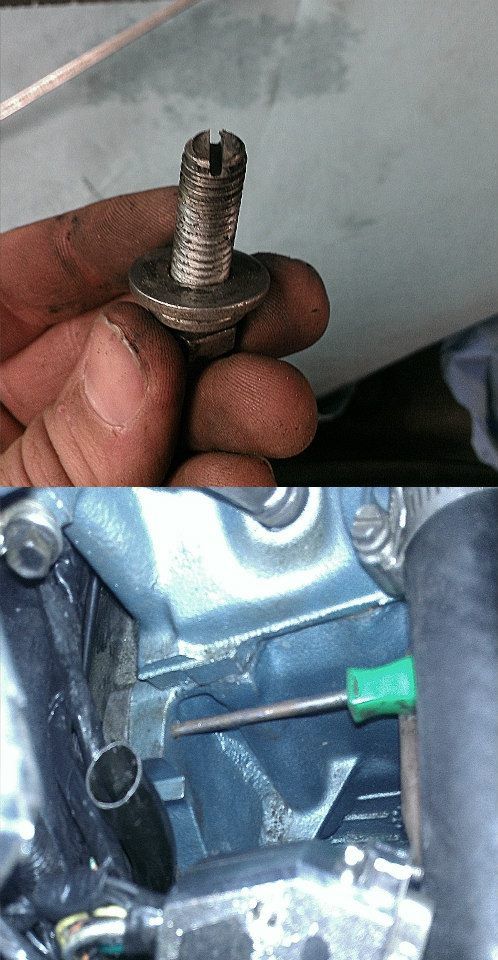 [/url] I was going to start on the disc brake swap, but I'm far less prepared than I thought I was. Missing basic things like brake hoses and caliper pins =P So that is on hold for at least another week while I gather the last few parts. Working on the car today I fixed the miss-fire as well as made some improvements to the transmission. The miss was simple enough, I put the timing light on each plug wire and they were doing their job, got the laser temp gun out and cylinders 1 through 5 had around 200ºF exhaust manifold temps and number six was at 60ºF. Turned out the injector plug came loose. Soon as I pushed on it the engine smoothed right out. Probably came loose from messing with the TV cable near the firewall. The transmission, I decided to hook up a pressure gauge to see how the hydraulic pressure of the system was doing as well as what the pressure rise was with throttle. I had measured 1.5" of travel on the throttle valve, but doing some internet reading last night it sounds like the best setups have around 1" of travel, referenced off WOT. So I slid the bracket down the pedal linkage and adjusted the cable accordingly. The pressures however are essentially mediocre. Despite the modifications to the transmission it just meets OE spec's for pressure, BUT in driving it, the shifts are snappy, the transmission downshifts nicely with throttle input, and the upshifts have no hesitation anymore! :thumbs: The speedometer now runs a tad slower than I'm actually going (was way faster), if I put 26" tires back on it, it might be spot on. The lingering issues, is I would have expected more pressure out of the pump, but it caps out around 175-180psi, which if fine for stock, but I expected more. What really bothers me is going into reverse it doesn't hit into gear as fast and firmly as it had before. The hydraulic pressure is actually decent compared to the book spec, while at the same time pressure in L1 is a tad low which I think might have some shared hydraulic flow paths, which I'm going to look into. I got apparently too aggressive with the 3rd gear shift. It was a bit softer than the 1-2 shift before I had problems, so I upped the hole size and now it's pretty harsh regardless of throttle input. Oh well. With the 3.42 gears its waiting longer than necessary to shift into 3rd gear, and its likely from the modifications I made to the governor to make it shift later with the 4.56 gears. If I drop the pan again, I think I can stick a spring back in the governor and it might fix that. Otherwise, I think I can be happy with it for quite a while. I'm actually quite surprised how much I am liking the 3.42 gears. I was thinking after the 4.56's that the car would drive like a dog, but its not bad at all. It doesn't quite pick the front end up as responsively as the 4.56 gears did, but it drives quite nice. It is ALSO quite nice not having the spool in the rear anymore! It should be interesting to see if my fuel economy goes up. I was getting right around 20mpg with the 4.56's.
|
|
|
|
|
Joined: Sep 2004
Posts: 5,839 Likes: 1
1000 Post Club
|
|
1000 Post Club
Joined: Sep 2004
Posts: 5,839 Likes: 1 |
That looks like a big torque converter. I just got a used 4L80E transmission & man, that stock torque converter is damm heavy, so is that trans whew!  Is that a stock T.Q.200R4?, what does it stall to? Some engines like a taller gear, they will just run better. MBHD
12 port SDS EFI 
|
|
|
|
|
Joined: Dec 2010
Posts: 535
Major Contributor
|
|
OP
Major Contributor
Joined: Dec 2010
Posts: 535 |
It's "rated" as a 2,500rpm stall, but the most I got out of it was around 1,700rpm. Need more torque =P
Yeah the 4L80's weigh a ton, as do their converters. That's why my final plans include a 4L60e because they are lighter than the 4L80's but are still electronically controlled and thus a more reliable overdrive than the 700 or 200.
|
|
|
|
|
Joined: Sep 2004
Posts: 5,839 Likes: 1
1000 Post Club
|
|
1000 Post Club
Joined: Sep 2004
Posts: 5,839 Likes: 1 |
You might get a little more higher flash stall w/the taller gears.
Guys have installed 4L80E trans that has replaced the stock 700R4 in there Syclones & Typhoons & have been very good swap for these vehicles.
There has been direct comparisons back to back with the 4L80E/700R4 swaps, the 4L80E trans did not make any Sy/Ty's any slower, even though the trans are heavier & having a taller first gear did not hurt performance.
Main thing they all gained was reliability.
When you have a vehicle weighing in at 3600 LBS Syclone, & 4000 LBS Typhoons, having all wheel drive, boost launching at minimum 360 ft lbs & 600+ ft lbs of torque, this is very hard on stock, & even built 700R4's.
For my Camaro, a turbo application, rear wheel drive, somewhat light, I just do not like the idea of having a 3:06 first gear, fearing it will be way too easy to blow the tires away, that is one reason I choose to use a 4L85E, plus , stock, they can take a lot more power/abuse over a 4L60E/4L65E.
They do make 4L60E taller gear sets, but having a trans like that will be a weak link for my application IMO.
MBHD
12 port SDS EFI
|
|
|
|
|
Joined: Dec 2010
Posts: 535
Major Contributor
|
|
OP
Major Contributor
Joined: Dec 2010
Posts: 535 |
The turbo LS guys, and naturally aspirated guys running 8's and 9's often pick up .5-1 in ET simply changing from a 4L80e to a TH400 or Powerglide. I know of at least a half dozen Drag Week folks that can attest to this. Weighing highway cruising rpm/speed against competitive ET's. There is a ton of HP tied up in the 4L80e, but it is definitely as strong as a bucket of rocks with very minimal work. The turbo LS guys just install a shift kit (valve body work only) in a stock 4L80e and consistently run dyno'd ~700HP through them and mid-9's.
I'm going to take my chances with a guy that advertises to the turbo LS guys his ability to build reliable 4L60/65e transmissions in 3,600lb cars with 1,200HP. So I'm going to get an "800HP" rated one from him for my hopefully 500-600HP L6.
I agree the 3.06 first gear is steeper than ideal, especially for the rpm drop, but if I plan the system out right, or work with the boost controller (megasquirt) I can have boost in first gear not come on full bore until upper rpm, or for what ever the traction can take, and then by the time it shifts and drops rpm the torque from the boost level is there to pull it back up. Plus, the 60e's overdrive ratio of .70 is better than the 80e's .80.
|
|
|
|
|
Joined: Sep 2004
Posts: 5,839 Likes: 1
1000 Post Club
|
|
1000 Post Club
Joined: Sep 2004
Posts: 5,839 Likes: 1 |
I am not looking to be the fastest inline Chevy 250. It will have a lock-up converter as well, = worse ET.
So a 4L85E trans should do what I need it to do.
The car will be for the street, drive on the freeway, go to car hops, Hot August nights etc.
In selecting for a trans, HP is not what kills transmissions, torque sure does though.
Instead of getting a 800 HP trans, you should tell the trans shops, what torque you will or are going to be putting out.
I looked for a low cost converter for my 700R4, Aprrox price $350, the shops advertisement said the one I was looking at was rated to 550 HP.
I had talked with them & told them my engine puts out 600 ft lbs of torque, but only made 396 HP.
So he had told me that 550HP converter will not hold up to the torque my stock engine puts out & recommended to get a more pricey converter, to the sum of $600, so I said thanks anyways, so I still have a stock converter for now.
MBHD
12 port SDS EFI
|
|
|
|
|
Joined: Nov 2013
Posts: 482
Contributor
|
|
Contributor
Joined: Nov 2013
Posts: 482 |
Why in a cyclone did the trans swap not hurt performance ? Is it because a turbo car or truck is more forgiving ie just make more boost down low to make up for the loss of gear ratio or the more even gear spacing make up for the loss of the 3.06 first gear? Jay 6155
|
|
|
|
|
Joined: Sep 2004
Posts: 5,839 Likes: 1
1000 Post Club
|
|
1000 Post Club
Joined: Sep 2004
Posts: 5,839 Likes: 1 |
Why in a cyclone did the trans swap not hurt performance ? Is it because a turbo car or truck is more forgiving ie just make more boost down low to make up for the loss of gear ratio or the more even gear spacing make up for the loss of the 3.06 first gear? Jay 6155 I think if the Syclone had a N/A engine, the results might have been different? Not sure though. Having a turbo definitely lets the truck push through 2nd gear pretty quick. The one thing I do not like with the 700R4, is the gear spacing 1st to 2nd, it has a huge RPM drop. But since the Syclones & Typhoons has a lot of torque, it seems to work out just fine. With my 97 Silverado equipped with the 4l60E trans, the RPMs drop a good amount going into 2nd & it seems a bit longer and lumbering along trying to reach 3rd gear. I think if your engine is sort of weak when it comes to torque output, a 200R4 would be the better gearing to have. There are companies that make the same ratio gear set as a 200R4 trans that you can install into a 700R4/4L60E/4L65E, so there might be some ET improvment when switching over to a better spaced gear set. MBHD
12 port SDS EFI
|
|
|
|
|
Joined: Nov 2013
Posts: 482
Contributor
|
|
Contributor
Joined: Nov 2013
Posts: 482 |
Going from a 3.06 first to a 2.48 first is one heck of a change. I think that it would show up way more on a n/a engine like you said. I know one thing that the deep first gear works well when towing a load. Our trailblazer really uses the help of that 3.06 gear when getting a extra 6k of boat moving from a dead stop. By winding out first a little longer the drop to the 1.63'in second is not so bad. In second I can maintain 55-60'mph all day long going up hills. I would bet that simply,buying a 200-4r would be just as cheap as that gear set for the 700. Jay6155
|
|
|
|
|
Joined: Dec 2010
Posts: 535
Major Contributor
|
|
OP
Major Contributor
Joined: Dec 2010
Posts: 535 |
Shifting gears back to the Raspberry Pi. Because part of the boot time of the Pi is related to the complexity of the Tuner Studio cluster display I wanted to make one that is pertinent to what I'd like to see. Down the road I can make different variations to it as well as the screen I'm looking at getting is a touch screen and I should be able to simply swipe left and right to change to different pre-programmed layouts. Like a phone so to speak. I super-imposed it onto a picture of the dash. 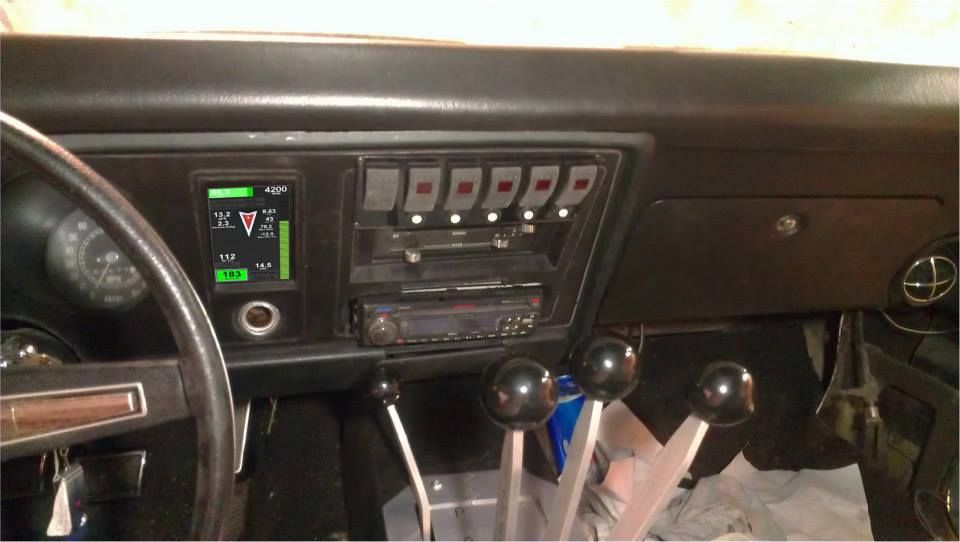
|
|
|
|
|
Joined: Dec 2010
Posts: 535
Major Contributor
|
|
OP
Major Contributor
Joined: Dec 2010
Posts: 535 |
First test run with the raspberry pi as a car computer for a gauges. On this run its a bit laggy, but I do believe there is room in configurations for speed improvements. Plus this was a visual ran through a remote desktop view, which may introduce lag. I think this was successful enough to warrant purchasing a 7" screen for it. 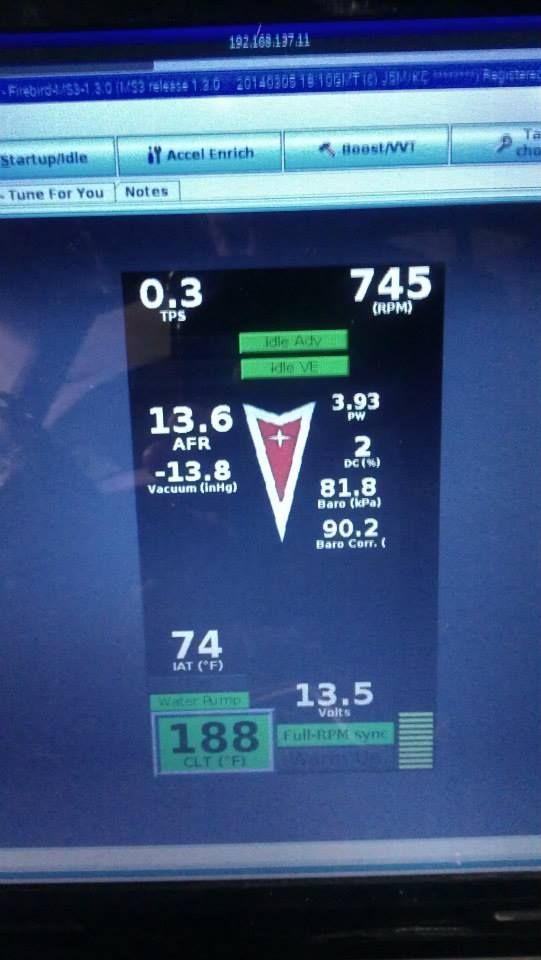 A short video of the test run showing the current lag. A friend of mine is pretty sure it's the remote desktop causing the lag, and the lag won't be there with an actual monitor connected. http://youtu.be/mJbFnaJXQ-Q
Last edited by TheSilverBuick; 01/22/15 12:23 AM.
|
|
|
|
|
Joined: Dec 2010
Posts: 535
Major Contributor
|
|
OP
Major Contributor
Joined: Dec 2010
Posts: 535 |
I've been driving the Firebird to work and back everyday over the last few weeks. A few updates. I've got the Raspberry Pi and a 7" screen working, but have not yet made a power supply for the screen that will work in the car, so in car testing hasn't happened. Plus I still need to do the programming to auto start Tuner Studio. 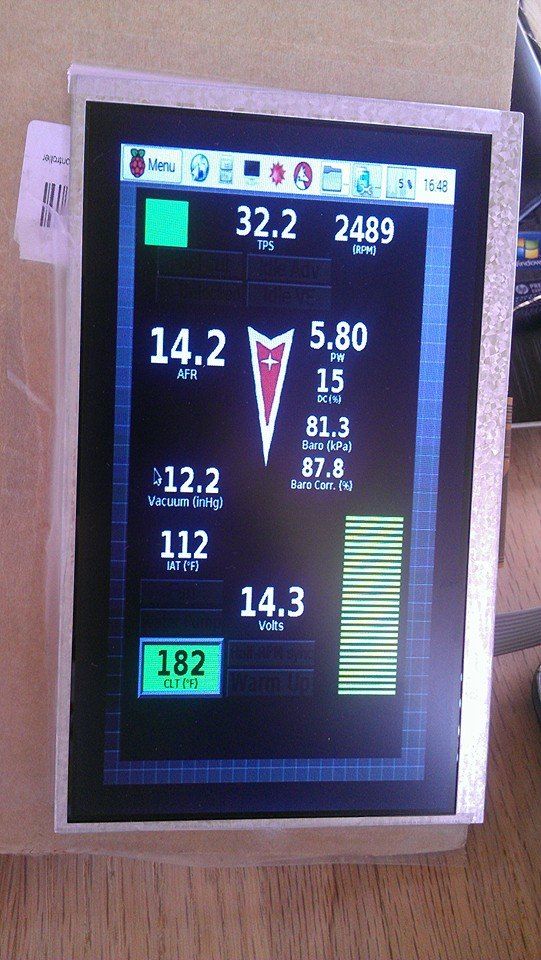 Did some minor work to the Firebird last weekend. The cam housing seal behind the sprocket had been leaking for a while. It would also whistle when crankcase vacuum got above 10inHg**, so I decided to change out the seal yesterday. The old one was pretty crudded up. I also dropped the trans pan and pulled the pressure regulator apart to check which spring I had in there. I "think" I may of had the reverse boost valve in backwards (it all falls out so fast when the clip is removed), but I now get a significant pressure jump in reverse, D2 and D1 that I didn't see before. It already has the "green" spring in it, which with the .500 boost valve should be getting me over 200psi. On my test drives it did spike up to 200psi a couple times, but generally hung around 140-160psi while driving (and 75psi at idle). The only other spring available is a "pink" spring that diesel 700-r4's got. I may go looking for one, I'm getting real good at dropping the pan and not spilling any fluid, but I have a feeling this trans is just on borrowed time. Time to start saving for a built 4L60e. I did install an electronic pressure sensor good to 300psi in the test port, so I'll wire that into the MegaSquirt so I can check the pressure via the laptop or when I get the Rpi installed I can have it displayed. Perhaps that'll give me some warning if the average pressures start trending downwards. Here is the mess the seal was creating. The good news is it appears to be the only oil leak the engine has. 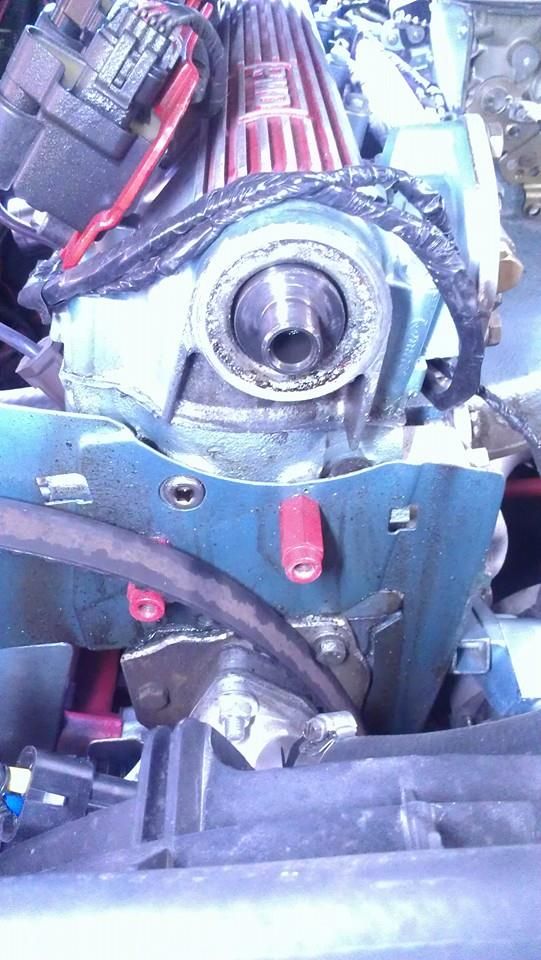 And a fresh seal installed. Simple job, only took about 15 minutes from pulling the car into the garage, pull the front apart, chisel a hole into the seal, pry it out, tap a new one in.  **I installed a check valve between the intake vacuum and crankcase and it seems to have kept the vacuum in the crankcase down to around 8inHg most the time, which was below the whistling threshold. I worked on the intake manifold some as well. A welder I ain't =/ I need more practice for sure. It likely needed more heat, but it seemed anything higher than what I had it set at and it'd blow through the metal. Oh well, at least most the welds are on the bottom =D I'm going to run either some radiator solder or braze material over the welds to try and ensure they are air tight. I now need to figure out how I'm going to attach the plenum. I have a few ideas, but not settled on any particular one yet. Needed more heat, but hopefully will get the job done. 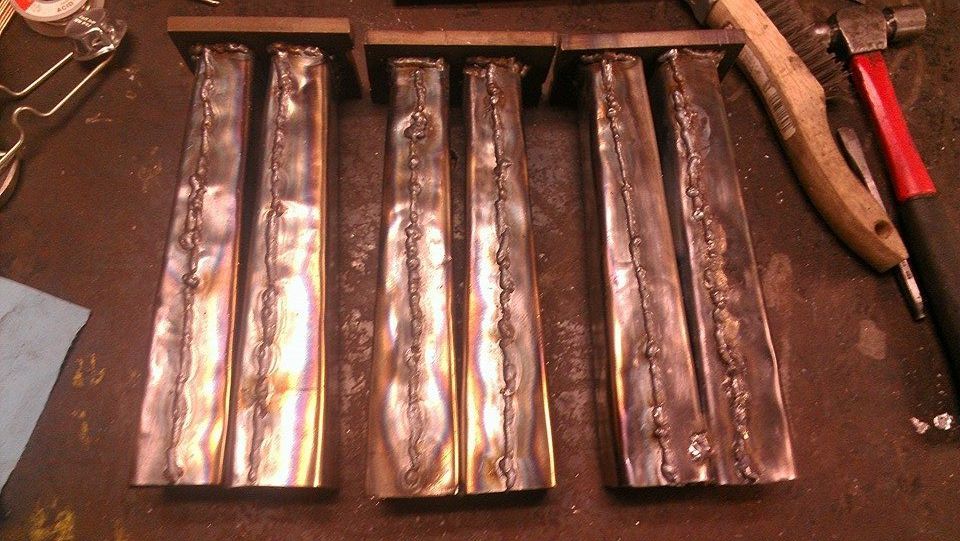 Fortunately this is the visible side! =D 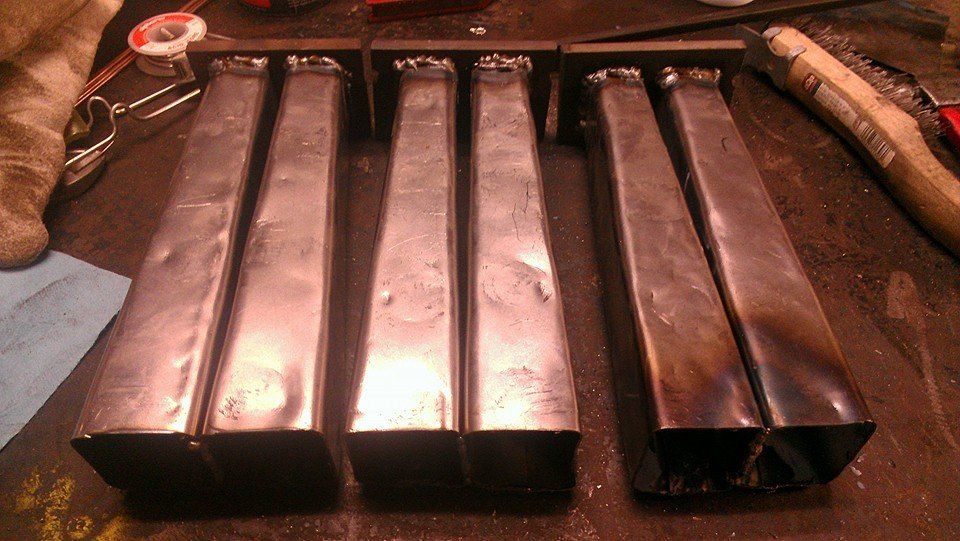
Last edited by TheSilverBuick; 02/11/15 12:53 AM.
|
|
|
|
|
Joined: Dec 2010
Posts: 535
Major Contributor
|
|
OP
Major Contributor
Joined: Dec 2010
Posts: 535 |
Did some intake work this weekend. Truly testing my abilities (or show casing my lack of?), but as long as I can get the final product to hold vacuum and pressure I'll be happy with it. Plus a coat of paint covers a lot of sins, lol. Also I didn't realize my error until I was mounting it up, but it appears I welded the last pair of runners upside down on the flange so they sit a tad lower, which has caused the plenum tube to angle downwards some. Not a critical flaw, nor do I think it'll even bother me once installed, just not squared up. On the positive side, it should allow more clearance for the throttle cable to come over the top of the runners from the firewall. Just tack'd together at the moment. 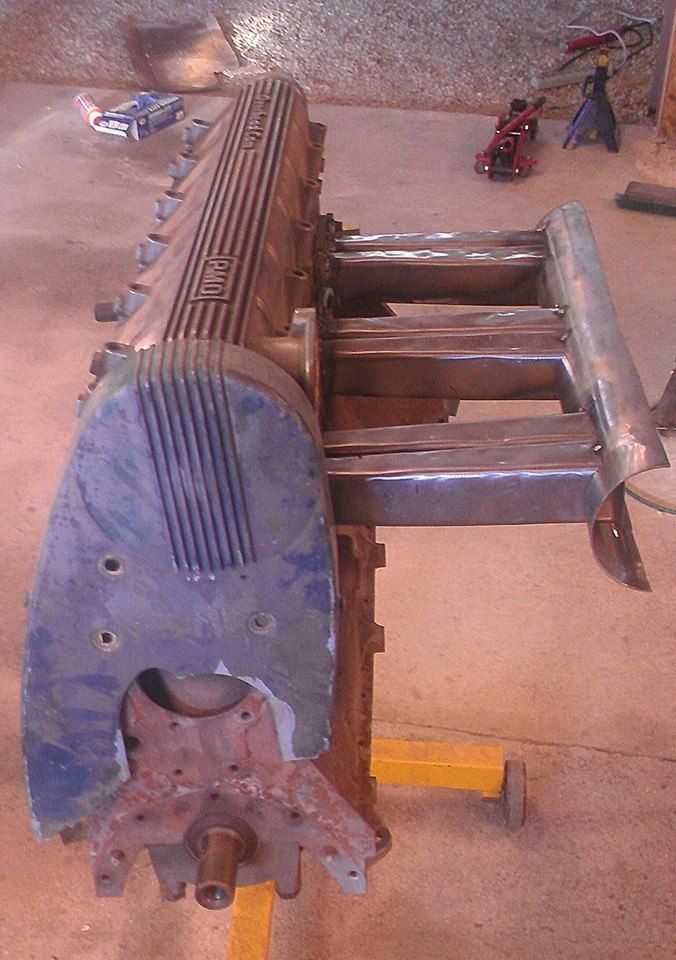 The tube is a fixed distance from the head, the front and rear ports are pretty much centered on the tube with the middle one slightly up of center. I've flared the ends and currently debating about how to handle the entrance. I see three options, 1) Leave it as it sits, 2) Weld pie shaped corners on, 3) Make a separate single pieced curved entrance to weld to the port pairings. I'm leaning between 1 & 3. I will probably try and give 3 a shot. 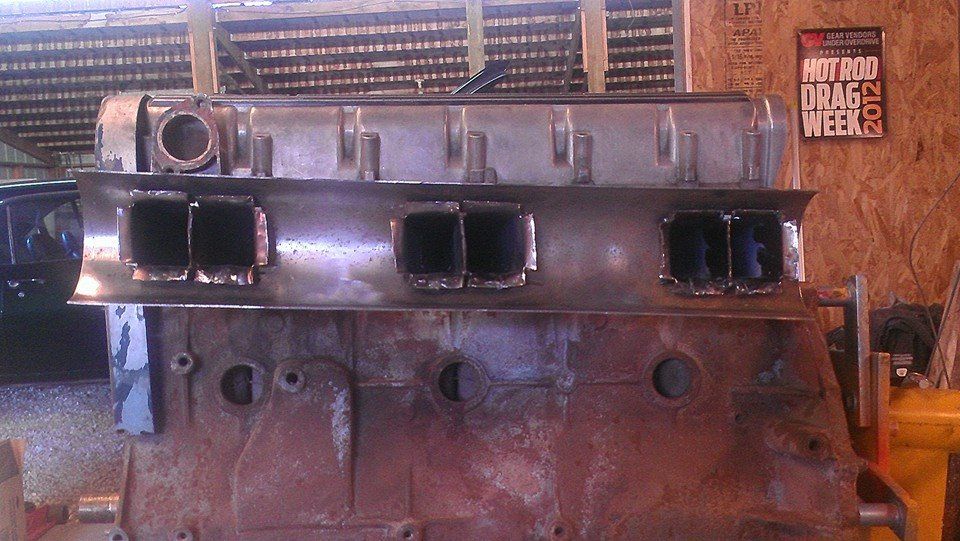 Needs plenty of clean up work on the entrance, but overall I'm satisfied with how it looks at this stage. It will be going on a ported head so the head lip seen there shouldn't be present on my other head. The other head is gasket matched, so I intend on doing the same on the intake if possible (shouldn't require much). 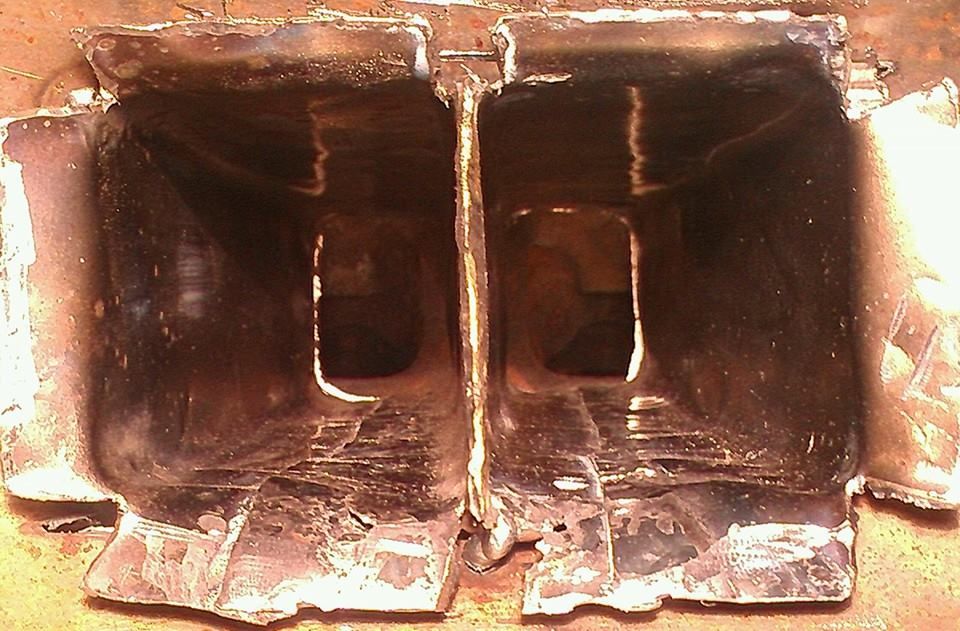 Also got these really slick steel injector bungs from CNC Dude Scott. The idea is to make a jig that will make it so the injectors will all be the same angle and use the same jig to drill the holes in the rail to make the rail fit easily. The issue I ran into with the stock intake was the injectors hit the throttle body/carb. This isn't the case, so I'm going to lay them over at least 45º. I haven't decided how close to the flange I'm going to put them since I can't reasonably angle them at the back of the valve due to the ports pointing away from each other in the head. 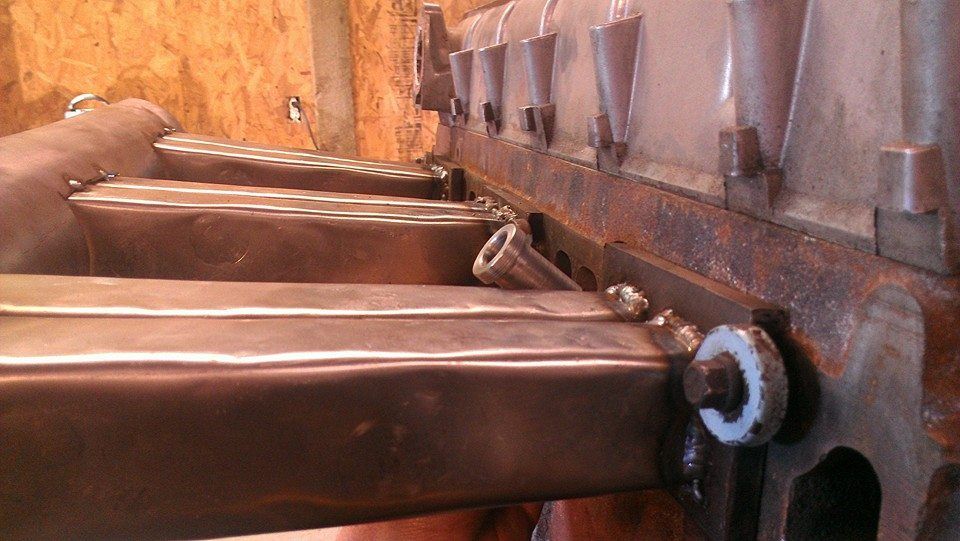 This is how a friend of mine did it on his big block Ford intake and I plan on doing something similar.  
|
|
|
|
|
Joined: Sep 2004
Posts: 5,839 Likes: 1
1000 Post Club
|
|
1000 Post Club
Joined: Sep 2004
Posts: 5,839 Likes: 1 |
You could add brazing rod & blend in a nice radius's with a hand porting tool.
The 90 degree angle of the port runners to the head is not too great of an entry.
I think you should have raised the top of the ports in the cyl head & at least had some sort of a better angle of the runners.
J.M.O.
MBHD
12 port SDS EFI
|
|
|
|
|
Joined: Dec 2010
Posts: 535
Major Contributor
|
|
OP
Major Contributor
Joined: Dec 2010
Posts: 535 |
I've been trying my hand at brazing, and will do so at least one or two more times, but I haven't been overly successful with it yet.
There is still going to be a step anyway you look at it. Either one ~90º or a Z with a step at the bottom and top causing flow interference/turbulence. Maybe next round.
In other news, I secured some Manley stainless steel valves, so odds are the head will come off one more time before the turbo.
|
|
|
|
|
Joined: Dec 2010
Posts: 535
Major Contributor
|
|
OP
Major Contributor
Joined: Dec 2010
Posts: 535 |
|
|
|
|
|
Joined: Sep 2004
Posts: 5,839 Likes: 1
1000 Post Club
|
|
1000 Post Club
Joined: Sep 2004
Posts: 5,839 Likes: 1 |
That is much much better.  MBHD
12 port SDS EFI
|
|
|
|
|
Joined: Dec 2010
Posts: 535
Major Contributor
|
|
OP
Major Contributor
Joined: Dec 2010
Posts: 535 |
I finished making the other two. They need some finishing body work, and I'll weld in material on the cuts and try and blend them smooth after install. 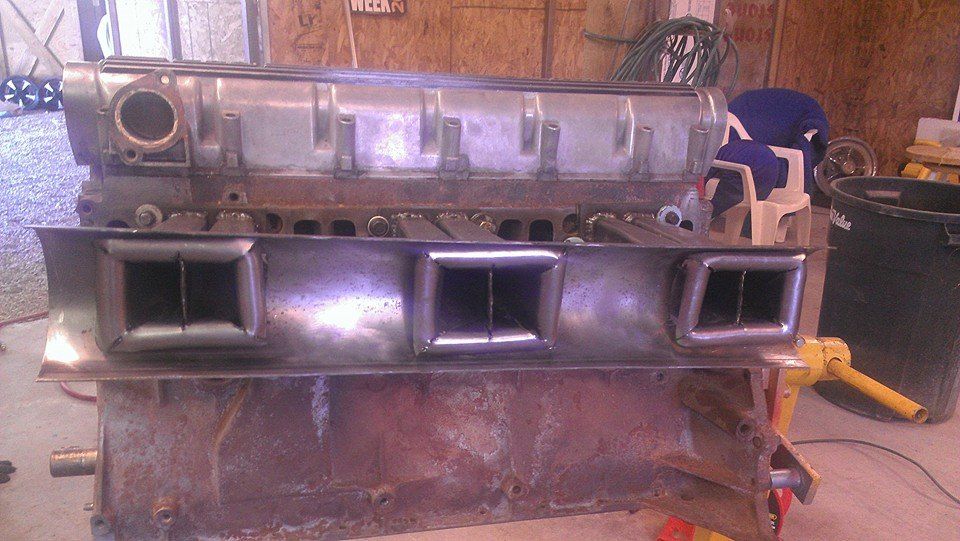 I made the entrance to the first one a bit longer since its going to be fairly close to the throttle body. They are just hanging there, the middle one squares up when held in place.  To make them was fairly crude. Take a flat piece of metal, cut some lines in the middle and hammer away. I took a piece of pipe I had and cut it in half then welded it to bolt to clamp in the vise. Then found a socket in my spare socket drawer that fit nicely in it and started hammering away. I used my anvil to finish up the corners. 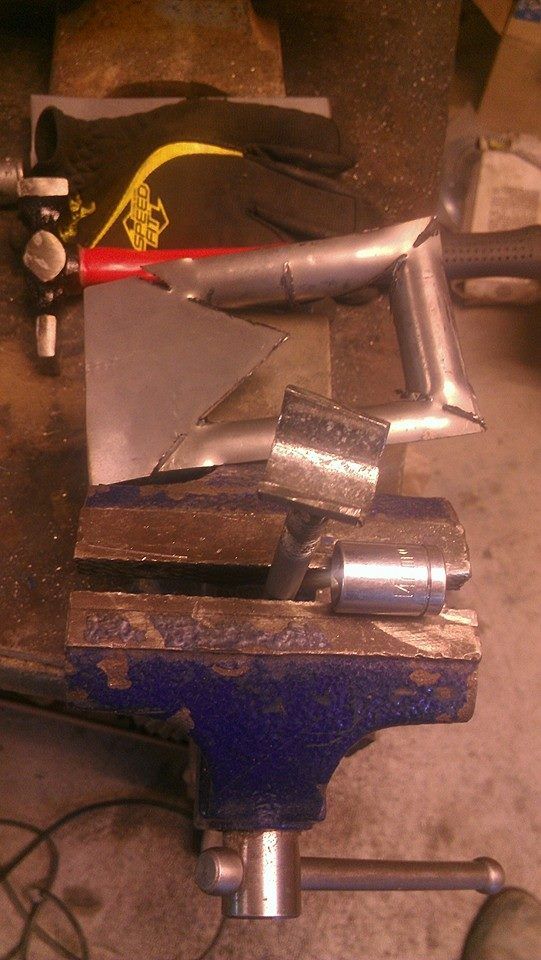 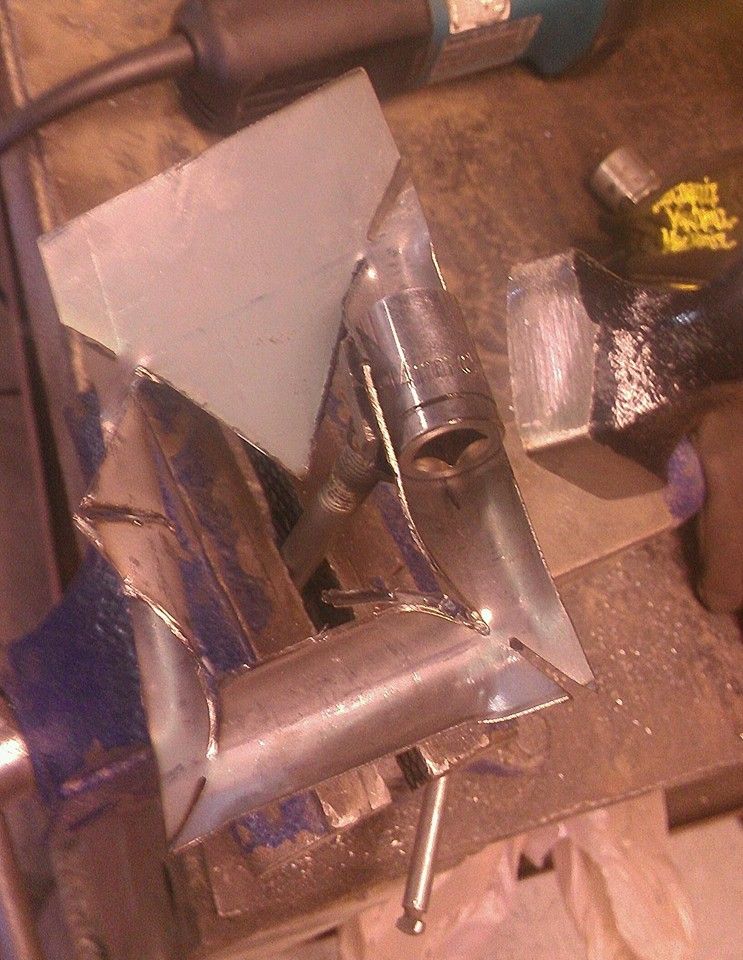 I've welded up almost all the gaps around the runners and the pipe now, so its mostly sealed. I have the most difficult part left, which is between the runners as it passes through the pipe wall left.
Last edited by TheSilverBuick; 03/21/15 07:53 PM.
|
|
|
|
|
Joined: Dec 2010
Posts: 535
Major Contributor
|
|
OP
Major Contributor
Joined: Dec 2010
Posts: 535 |
I struggled today with the intake. My welds have leaks in several places based on putting acetone on the welds and seeing where it bleeds through. I've attempted some brazing on the manifold today as well. I brazed up the areas between the runners where it goes through the tube fairly successfully, but when I attempted to braze up the MIG seams to seal them up, I didn't like the warping the metal was doing during the heating so I did not pursue it further and will cover the welds with epoxy before painting. I also attempted to use the brazing rod to fill in the openings on the port entry and over all failed miserably. So I MIG'd a bunch of metal all over the place and took a grinder too it. It's about as good as it'll get and soon be hidden, but reasonably functional. 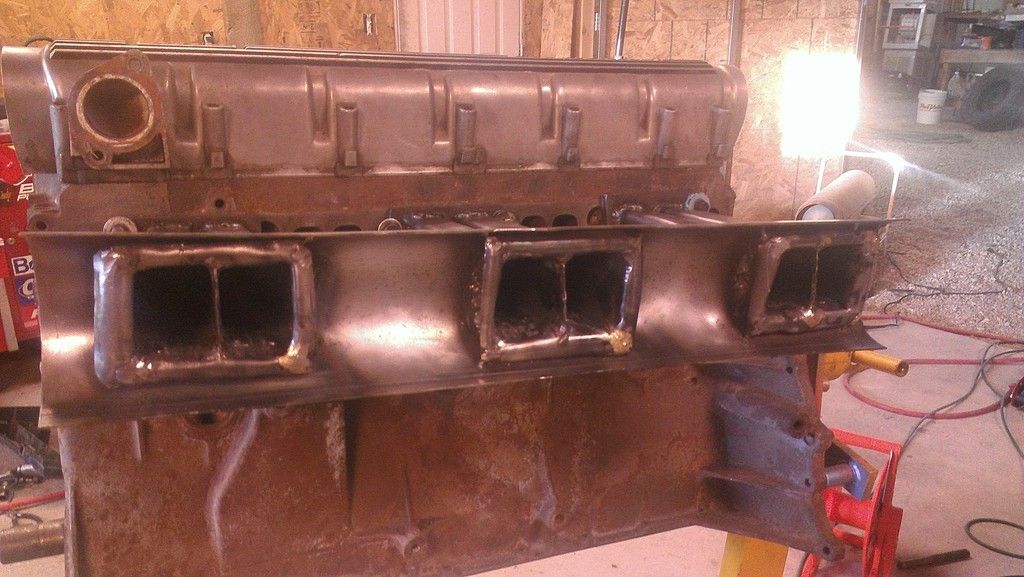 Set the other end of the tube on it for a visual of what it'll look like in there. 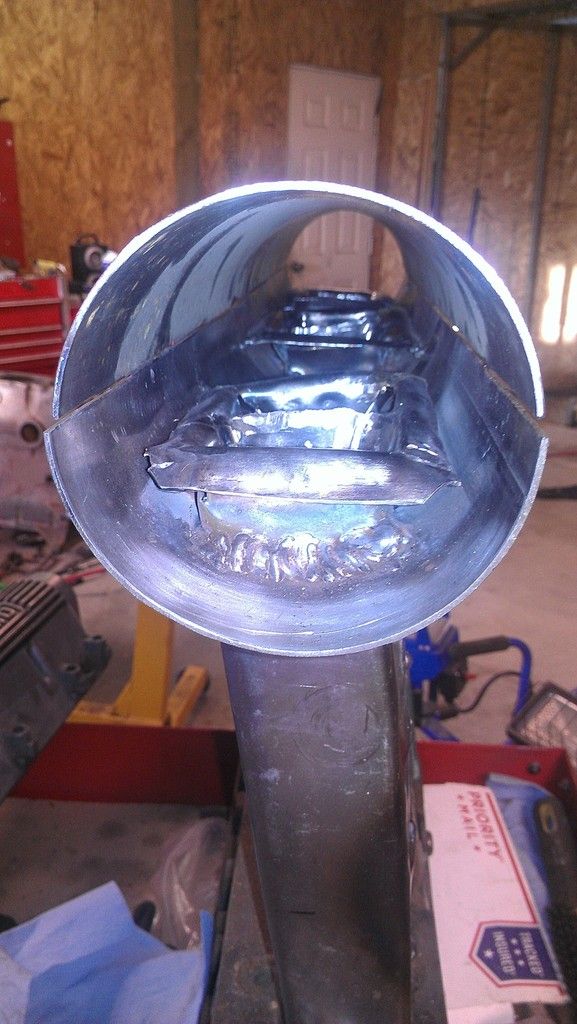 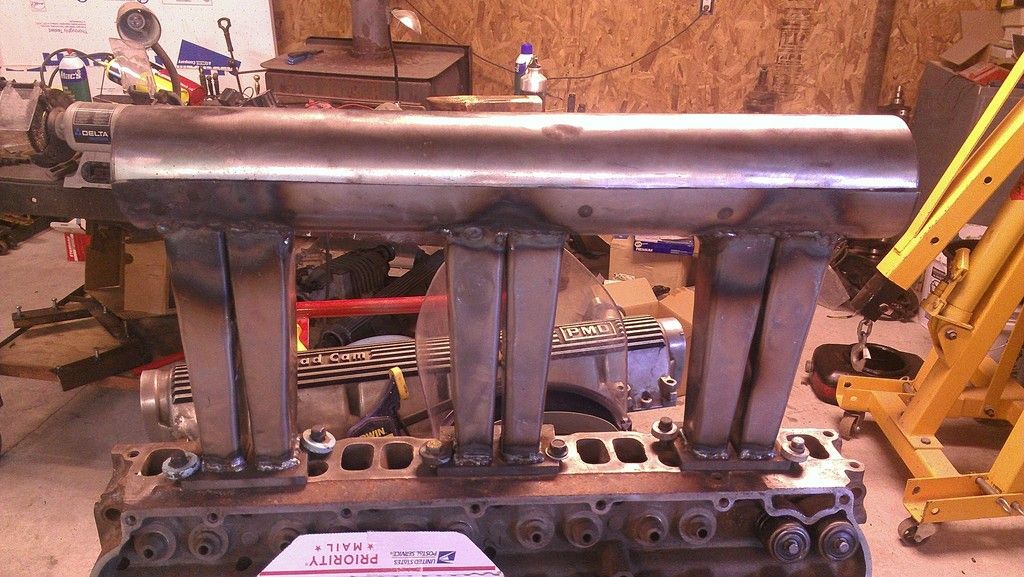
|
|
|
|
|
Joined: Apr 2004
Posts: 3,556 Likes: 35
1000 Post Club
|
|
1000 Post Club
Joined: Apr 2004
Posts: 3,556 Likes: 35 |
It ain't pretty on the inside, but it will be functional. Keep it up!
Inliner Member 1716 65 Chevelle Wagon and 41 Hudson Pickup Information and parts www.12bolt.com
|
|
|
|
|
Joined: Sep 2004
Posts: 5,839 Likes: 1
1000 Post Club
|
|
1000 Post Club
Joined: Sep 2004
Posts: 5,839 Likes: 1 |
It ain't pretty on the inside, How dare you!!!!!   MBHD
12 port SDS EFI
|
|
|
|
|
Joined: Dec 2010
Posts: 535
Major Contributor
|
|
OP
Major Contributor
Joined: Dec 2010
Posts: 535 |
To get in on all these turbo recommendations going around I figured I'd ask for suggestions for my setup and goals.
I've been doing some research and have a rough idea of what I "think" I can use, but I've never actually bought a turbo and put it on an engine for practical experience.
Some guidelines, I expect to "grow" into the turbo as needed by changing and upgrading various parts of the engine after initial installation, but the general goal I'm going for is 600 flywheel horsepower, and peak around 5,500rpm with a slightly bored over 250" engine. A broad boost curve would be nice, but given the HP goal, I wouldn't expect boost to really come on down low, but if it can, great! I'm expecting to need around 20-24psi of boost to accomplish that goal.
Based on some estimations/calcs/scenerio's I've ran it appears around 21psi at 5,500rpm would get me to the goal and using a t4 flange, 70mm wheel with a ~.80 a/r turbo. I found one turbo with close specifications, but cannot find a compressor map for it, grrrr.
|
|
|
|
|
Joined: Sep 2004
Posts: 5,839 Likes: 1
1000 Post Club
|
|
1000 Post Club
Joined: Sep 2004
Posts: 5,839 Likes: 1 |
To get 600 HP, I would think you are going to have to spin more RPM than just 5500 RPM. Could be wrong, just thinking off the top of my head. Specs on your turbo camshaft?
If your camshaft will only make power to 5500 RPM, it sounds like you would be building a high torque engine & not so much a high HP engine. Cyl head flow capabilities.
Use as big a turbine wheel you can get away with, about an "S" trim from Turbonetics would be a good size, "Q" for quicker spool but more back pressure.
70-72 MM compressor wheel.
.84-.96 A/R for the turbine housing, depending on your goals & how much turbo lag is acceptable for you.
Split entry turbine housing.
Lots of variables when selecting a turbo, compression ratio, auto trans, manual,, you want peak boost @ what RPM,, daily driver, track car, street car, focused more for the street? etc etc.
MBHD
12 port SDS EFI
|
|
|
|
|
Joined: Dec 2010
Posts: 535
Major Contributor
|
|
OP
Major Contributor
Joined: Dec 2010
Posts: 535 |
It looks like I'm not too far out in left field then, as that is around what I expected to need, and given the air flow demand I expect the turbo to have some lag down low. I'm going to try and get a twin scroll turbo and if I do it will be plumbed in as such.
Ultimate goal is the drag strip, and it will be an automatic transmission. I have to go get the cam card for the duration and LSA numbers, but the lift is .460" and I expect my good head to flow around 220-230cfm at that lift. My current head is "probably" around 200cfm, but unless measured its just speculation. The tapered port tunnel ram intake ought to help as well.
|
|
|
|
|
Joined: Sep 2004
Posts: 5,839 Likes: 1
1000 Post Club
|
|
1000 Post Club
Joined: Sep 2004
Posts: 5,839 Likes: 1 |
You are not far off, but the intake you designed is more for higher torque numbers & peak HP numbers will be low.
I did not say too much because I thought you were making an intake for a N/A engine (which would be good), but not so much for turbocharging.
Having peak/great cyl head flow numbers will return you with high HP numbers.
Having a cylinder head such as our stock 2 valve heads will not make as high HP numbers but will give some good torque numbers when turbo or supercharged.
Just as an example, my V-6 4.3 cyl head flows 150ish CFM @ 28 inches with a 1.94" intake valve, = pretty bad, the camshaft is as anemic also (all stock), so when I chassis dynoed it, it made a peak of 604 FT lbs of torque but only 396 peak HP, @ 24-25 PSI of boost.
Track ET, 3600 LBS no driver, 12.0 @ only 108 MPH, that was when I dynoed @ 386 HP & 550 FT lbs, was running too lean at that time.
Not the fastest by any means, but the engine is still 100% original stock untouched.
MBHD
12 port SDS EFI
|
|
|
|
|
Joined: Dec 2010
Posts: 535
Major Contributor
|
|
OP
Major Contributor
Joined: Dec 2010
Posts: 535 |
I did the first in car test with the Raspberry Pi, and other than the expected slow boot up and the cursor in the way, the test was successful! I need to solve the cursor issue and I still want to work on the boot up time, but I think this is a pretty good test of the proof of concept. I will probably try and make the desktop background black so it shouldn't flash so white on start up. https://youtu.be/PuRptJNBIMAAs a reminder of what I'm ultimately going for.
|
|
|
|
|
Joined: Dec 2010
Posts: 535
Major Contributor
|
|
OP
Major Contributor
Joined: Dec 2010
Posts: 535 |
Drove into Salt Lake City this morning (~250 miles). Not sure what fuel mileage it is getting yet as I haven't put gas in the car yet, but it seems like its going to be over 25mpg, despite driving 80mph for ~100+miles of the trip. Flying by the Bonneville Salt Flats. 
|
|
|
|
|
Joined: Sep 2004
Posts: 5,839 Likes: 1
1000 Post Club
|
|
1000 Post Club
Joined: Sep 2004
Posts: 5,839 Likes: 1 |
I would think it should get better mileage going from 4:56 gears to 3:42's
Plus you can cruise @ 80 MPH turn some lower RPM.
12 port SDS EFI
|
|
|
|
|
Joined: Dec 2010
Posts: 535
Major Contributor
|
|
OP
Major Contributor
Joined: Dec 2010
Posts: 535 |
All is not as it seems it seems. After tallying up the numbers I'm getting the same 19mpg (13 around town) I was getting with the 4.56's =P Its the same story with the Skylark, I've tried a variety of gears from 3.08 to 3.89 and the car gets the same mpg. I'm guessing though the 80mph plus some pretty high winds offset any likely gains of a lower cruising rpm.
I'm going to try some different fueling strategies with the injection. I've switched it to finish injecting fuel just before the intake valve opens at lower rpm and throttle. I've been running only injecting fuel when the intake valve is open and as much as possible while the exhaust is closed. I also re-ran the compression tests, and the worse one is 12% off, but its always been that way (not surprising how crappy the bores and valves look), but I decided to take those numbers and put some minor fuel trims in each of the cylinders figuring if they are not all pulling the same amount of air they don't need the same amount of fuel. I'm tempted to wing in the ignition timing trims too. Its practice if nothing else.
I also noticed I had my TPSdot(sensitivity) set at a ridiculously high 120, so I lowered it to 20 and not surprisingly it got more zing off idle.
I'll do some datalogging this week going to work and see if I can further optimize the tune at cruising speeds.
|
|
|
|
|
Joined: Apr 2004
Posts: 3,556 Likes: 35
1000 Post Club
|
|
1000 Post Club
Joined: Apr 2004
Posts: 3,556 Likes: 35 |
How much timing are you running on the highway? What does the vacuum do when going 80?
Can you give your cam specs again and the calculated compression?
That mileage is a bit lower than I would expect.
Inliner Member 1716 65 Chevelle Wagon and 41 Hudson Pickup Information and parts www.12bolt.com
|
|
|
|
|
Joined: Dec 2010
Posts: 535
Major Contributor
|
|
OP
Major Contributor
Joined: Dec 2010
Posts: 535 |
Static compression is right at 8.3:1.
I didn't have the laptop hooked up to see what vacuum I was pulling, but I wouldn't be surprised if it was fairly low because the wind on the highway was stiff, which likely meant my timing was in the mid to high 30's. Again, since I didn't have the laptop open I don't have the AFR either. Cruising around 2,300-2,400rpm.
I don't have the @.050" numbers or necessarily the advertised numbers, just the published numbers by GM, which are likely at .006" lift. 244 duration on the intake and exhaust, 0.438" lift, and 108º LSA. The lobes have a fairly fast rate of opening by design.
|
|
|
|
|
Joined: Dec 2010
Posts: 535
Major Contributor
|
|
OP
Major Contributor
Joined: Dec 2010
Posts: 535 |
Worked on the intake some more today. Still needs lots of finishing work, but it's progress! Thanks goes to CNC-Dude for the steel injector bungs that I will be able to weld into place. First my template for drilling and eventually holding the injector bungs. The two ratchet straps and the claps working together held the angle iron in place surprisingly tight. 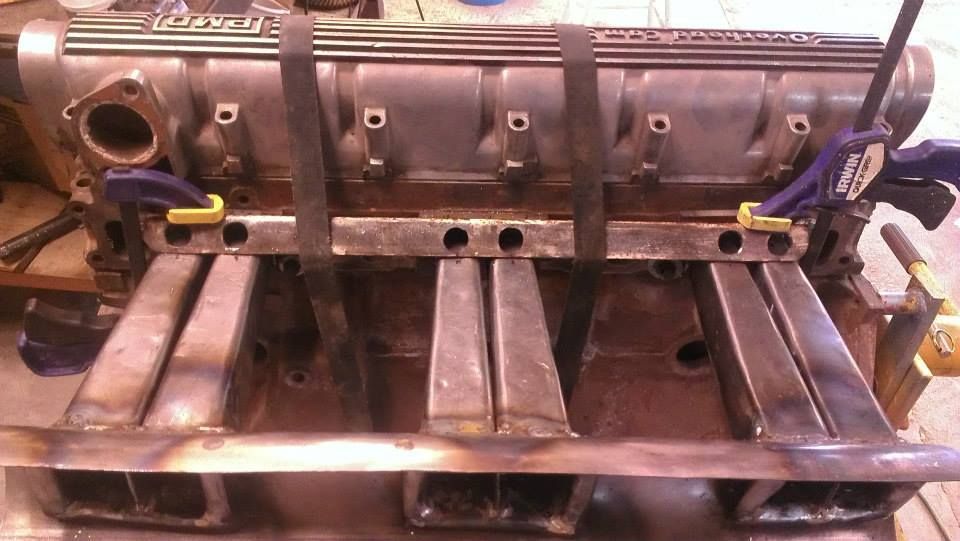 Drilled out the runners and fit the steel injector bungs. It took a little finishing grinding to get the shape needed to actually fit them in to place. 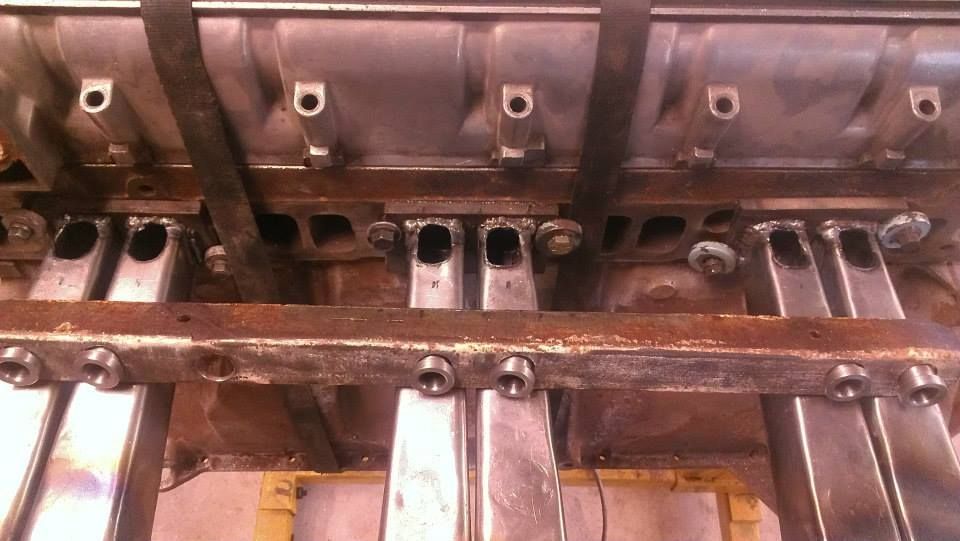 I will have to cut the angle iron up in a way that I can remove it after tack welding the bungs to the runners. 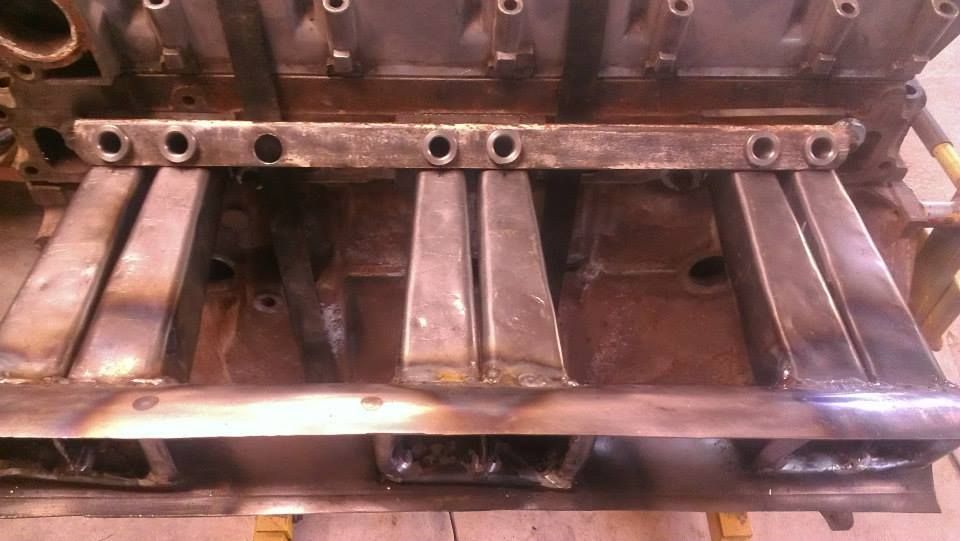 At a 45º angle the injector bungs fit very well. High quality work on the injector bungs. They are the perfect length. 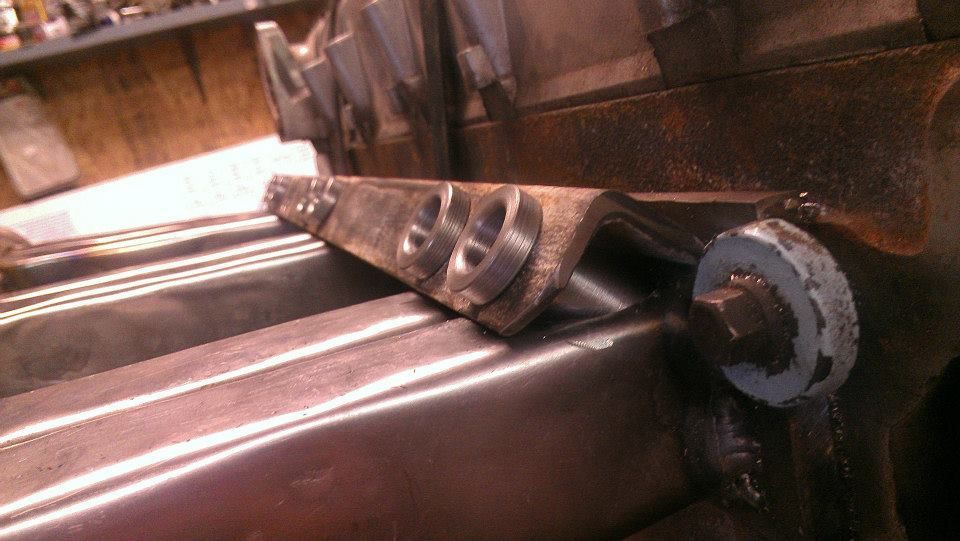 More clean up work will need to be done after they are welded in. I may to a rough cut on the bungs before installing them to reduce the amount of grinding required in the port. 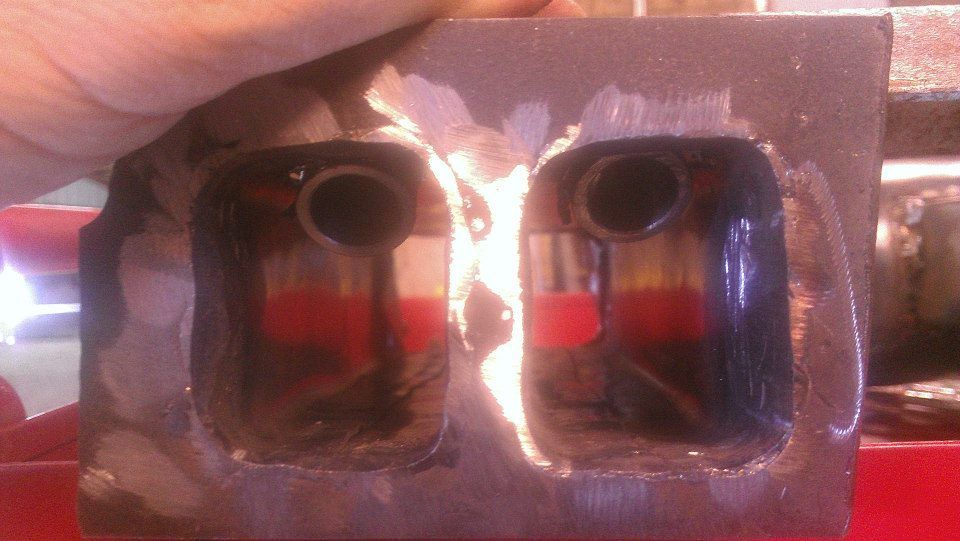 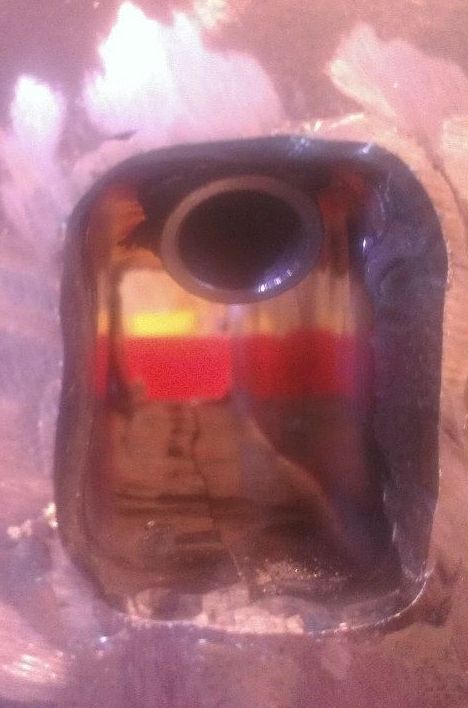 I also bought a bulk supply of the sealer I'm going to slather over all the welds =P
|
|
|
|
|
Joined: Dec 2010
Posts: 535
Major Contributor
|
|
OP
Major Contributor
Joined: Dec 2010
Posts: 535 |
Just to humor myself I decided to measure the volume of the chamber on the '66 1bbl head I modified to see what it is and to plug that number into my engine parameters. It came out to 65cc's and have 9.55:1 compression on my engine, which is about 1.25 more than it currently has. I'd have to work over the other chambers, do some porting, and possibly minor machine work for me to be happy enough with it to use. I do think I have some brand new OE valves for this head, and I probably would shim up the springs it came with. If I used a set of TRW LF2289 pistons and cut some small valve relief's in them, my compression would be a flat 9.0. So I think I may have a game plan for a "back up" engine. What I'm considering for my primary turbo engine is getting some forged flat top pistons and have some minor valve relief's cut into the top and that should net me 8.8:1 or so, which is good. 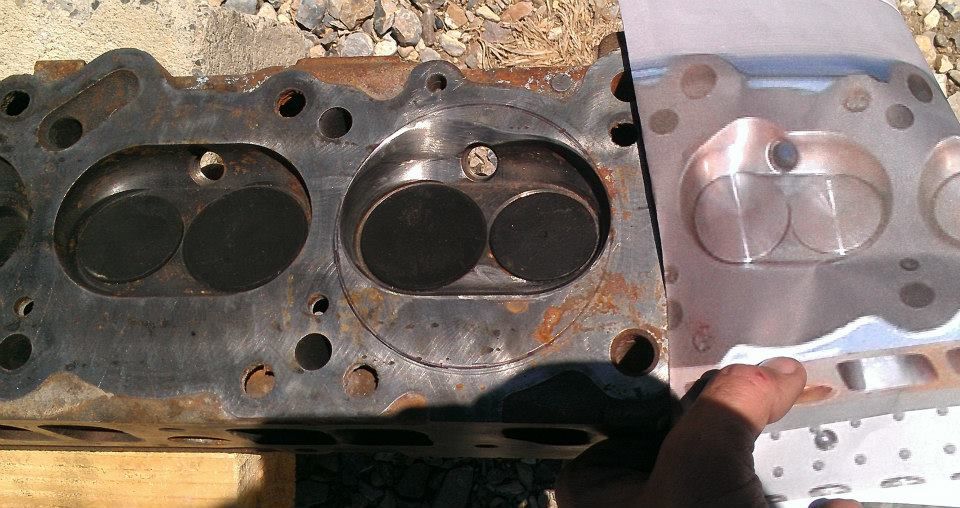
|
|
|
|
|
Joined: Dec 2010
Posts: 535
Major Contributor
|
|
OP
Major Contributor
Joined: Dec 2010
Posts: 535 |
Been side tracked on the intake because I pulled the engine out of my Buick for an oil pan and cam upgrade (as well as general clean up of it), but I have the Firebird washed up and going to take it on the Car Craft Anti-Tour to Morro Bay next weekend.
|
|
|
|
|
Joined: Dec 2010
Posts: 535
Major Contributor
|
|
OP
Major Contributor
Joined: Dec 2010
Posts: 535 |
The wife and I are heading out for the Car Craft Anti-Tour later today. Going to take a leisurely drive to the mountains, then out to the coast before the start then up to Morro Bay for the car show there (part of the Anti-Tour). It'll be a a bit over 1,500 miles when all said and done. Hoping for a trouble free drive and a fun few days  I wanted to visit the sailing rocks in Death Valley on the return, but it appears to be a ton of dirt road and actually more worrisome is running out of gas! Will have to check that off the bucket list another time. 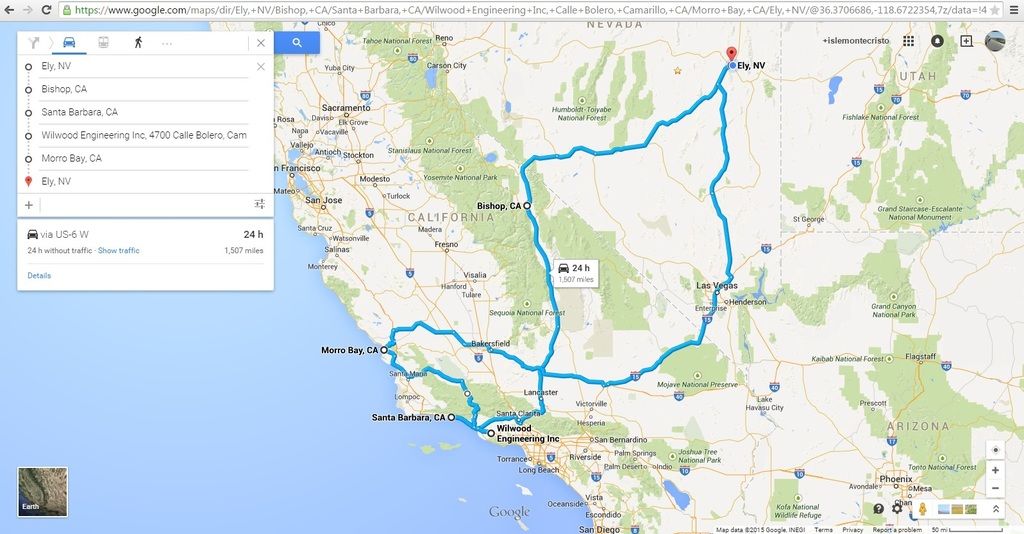
|
|
|
|
|
Joined: May 2000
Posts: 1,464
1000 Post Club
|
|
1000 Post Club
Joined: May 2000
Posts: 1,464 |
Why does Car Craft call it an "anti-tour"?
FORD 300 inline six - THE BEST KEPT SECRET IN DRAG RACING!
|
|
|
|
|
Joined: Dec 2010
Posts: 535
Major Contributor
|
|
OP
Major Contributor
Joined: Dec 2010
Posts: 535 |
Because its a lot less formal than Hot Rod's Power Tour. Often notice of where it is going is given only a month in advance (though I think now they've gone 4 times to Morro Bay...) and its on the west coast plus its significantly smaller than Hot Rod's Power Tour. Well so much for a nice trip to the coast and back. Failed to make it to the event when the left front wheel bearing went out on me 380 miles from home. I tried having it changed in a small town, but the spindle was trashed, so I had my brother bring my truck and a u-haul trailer out and pick my wife and I up with the car. Ironically enough, last year on the Anti-Tour my Skylark trashed a front left wheel bearing too, but in that case the spindle was just fine and I changed it out on the road. Moral of the story is I'm now going to be pulling the bearings apart for inspection at least annually! To add insult to injury, I have a complete disc brake conversion kit ready, new wheel bearings and all, that I just hadn't had time to swap on. D'oh! At least I break down in scenic locations 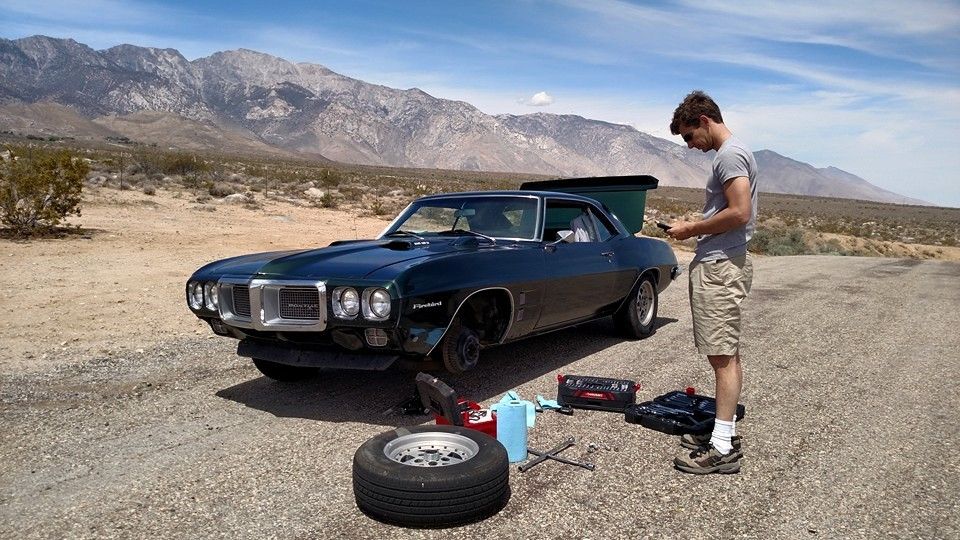 Here is a shot of what I saw when I pulled the wheel off =/ 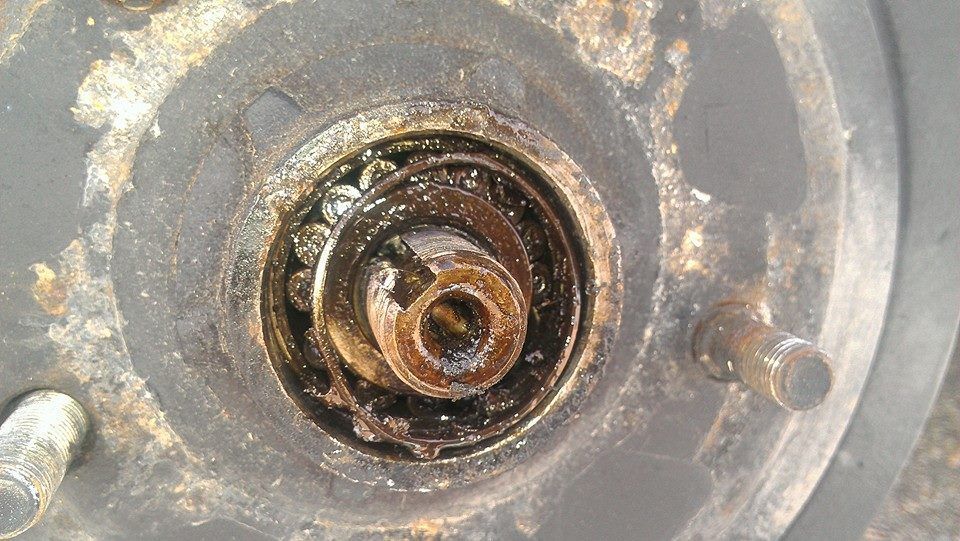 Once I realized it needed a tow truck, and the tow truck was about 2 hours out, the wife and I had a wine and cheese picnic along the side of the road. Hey, figured I wouldn't be driving for at least 3 hours =P  Got back home last night so did the disc brake swap today. 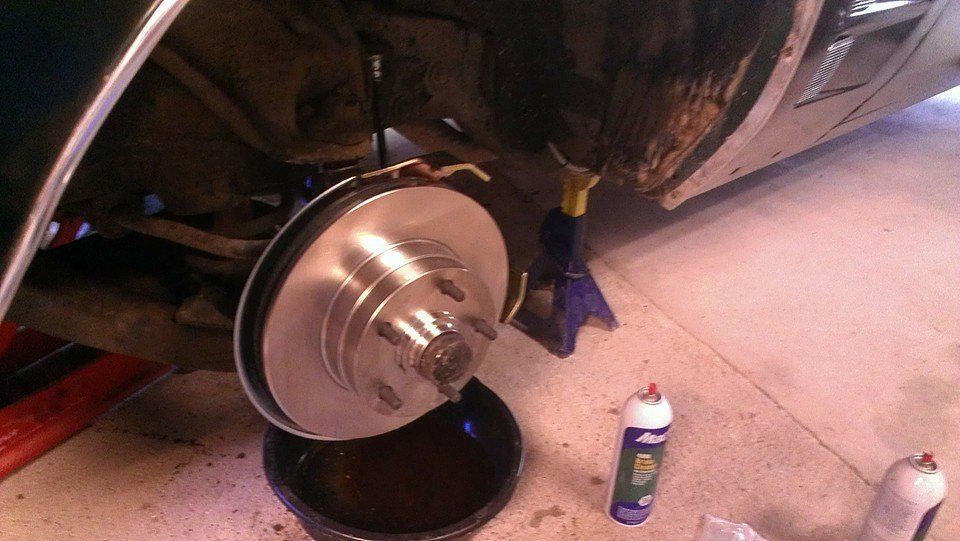 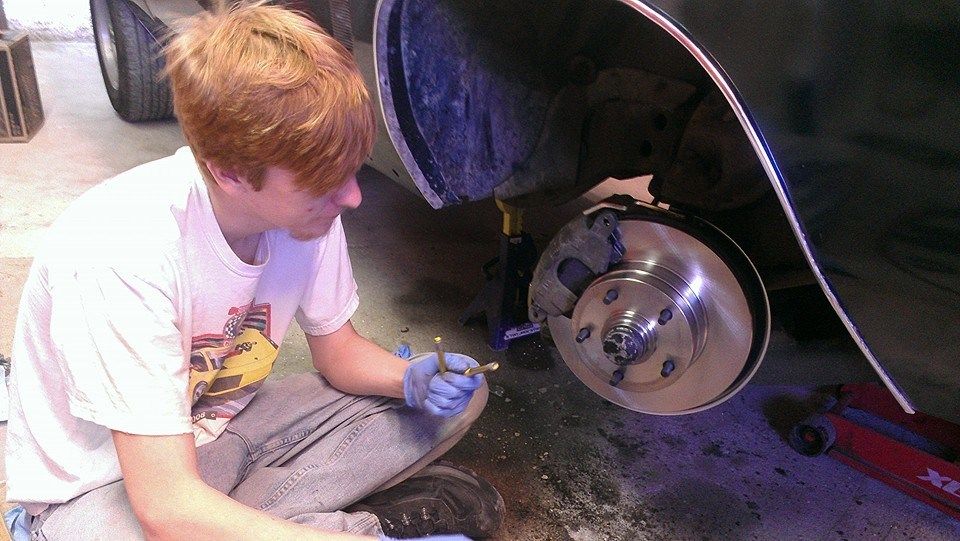 I didn't change the master cylinder or porportioning valve, so it may need a little work, but I have a nice firm pedal and it doesn't nose dive. The only real issue is during a panic stop the rears lock up before the front, so it should be addressed eventually. I'm glad to have it back on the road already.
|
|
|
|
1 members (stock49),
186
guests, and
39
robots. |
|
Key:
Admin,
Global Mod,
Mod
|
|
|
|


