|
|
Joined: Mar 2010
Posts: 623
Major Contributor
|

Major Contributor
Joined: Mar 2010
Posts: 623 |
So I got the head apart today. Few sticky old keepers were the main problem. Plus the first valve had a mushroomed tip causing some scoring of the valve guide on the way out. Good thing the head is getting new valve guides anyway. Then the block came next. Wasn't bad. Had to rent a harmonic balancer puller but that was the biggest hurdle. I finally got to bust out my dial bore gauge and micrometers today and I found a few odd things when measuring the crank and bores. Here are the measurements (from 1 in the front to 7 in the rear) Crank Journal - 2.2994" 2.2994" 2.2996" 2.2994" 2.2995" 2.2997" 2.2996" Main Bearings - 2.3010" 2.3010" 2.3010" ??????? 2.3020" 2.2999" 2.3010" Clearances - 0.0016" 0.0016" 0.0014" ??????? 0.0025" 0.0002" 0.0014" Add oddly enough, the crank was difficult to turn over after they were all torqued down... I wonder why... So it looks like that plastigauge was right on the money as to how big my clearances are. I guess I should've plastigauged them all huh? Because these measurements would be redone at the shop, I was wasn't too worried that my bore gauge wasn't long enough to get the middle journal so I skipped that measurement since I only had a few hours left to finish everything up. I'm not sure if that #6 bearing was just oversized or what but I checked the back of a few of the bearings and they were labeled STD so they should have been a standard size replacement unless that one oversized bearing was thrown in. All of the measurements were done off of a 2.3000" calibration from the micrometer and that #6 bearing did indeed sweep past the zero'd 2.3000" mark into < 2.3000" territory. Any idea what could've caused that extra small bearing? All of those bearing clearances also seem a bit tight, I'm planning on having them polish the crankshaft while it's there. I understand the purpose isn't to take off material but will it happen to take off material in the process? also... DO NOT EVER HAMMER YOUR HARMONIC BALANCER ONTO THE CRANK. I hammered it on during assembly (this engine never ran because of the main bearing clearances) and it totally ruined the thrust surface on the thrust bearing. Like it just as well could've been thrown into a dryer full of screwdrivers. But anyway... I got the head all rolled up and ready to ship off. The stripped down block, old pistons, new pistons, and new rod bolts are in the truck. I gotta head back to St. Louis tomorrow but my dad is going to drop them off while he's in the city on monday. He should be able to drop off the head the same day or some time next week. Some pics of the day's work Had to get the original block out of the corner of the garage  Had to dig out the head from the parts. That's the 2nd junkyard block on the stand in the pictures  Clamped the head down and used a piece of angle iron with a slit cut in the end plus some cardboard shoved in the combustion chamber to push against the valve to compress the spring and get the valve out.  Removed the manifold studs  Lots of gross buildup on the intake valves.  Head all disassembled 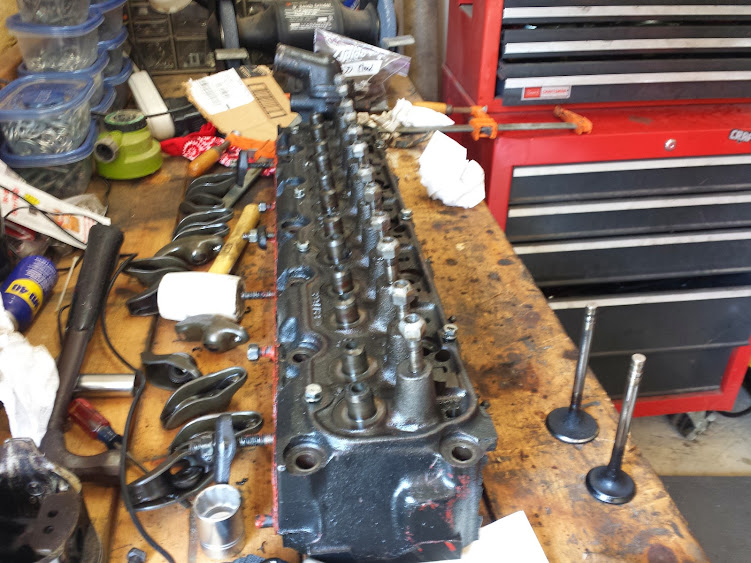
69 Buick Special Deluxe. Intercooled Turbo Chevy 250 @ 15psi on a stock long block. It's kinda fast.
|
|
|
|
|
Joined: Sep 2008
Posts: 3,669 Likes: 42
1000 Post Club
|
|
1000 Post Club
Joined: Sep 2008
Posts: 3,669 Likes: 42 |
You need to check the runout on the crank to see if its bent or the journals are out of round. Something is making the crank feel tight. You also need to check the bearing clearnaces at the parting line also, and even the housing bores. Anything less than .002" on the rods and mains is too tight for this high an output engine, .0025" would even be better but all the journals need to be round within a tenth or so and not tapered. Your bearing clearance is measured from the largest size that the crank mics, not the smallest.
Class III CNC Machinist/Programmer
|
|
|
|
|
Joined: Sep 2004
Posts: 5,839 Likes: 1
1000 Post Club
|
|
OP
1000 Post Club
Joined: Sep 2004
Posts: 5,839 Likes: 1 |
An easier way to take the valves out are to use a rag, place it inside of the combustion chamber use a socket & a hammer & tap on the socket, the keepers will pop right out usually w/a couple of hits. This probably cant be done with supper stiff springs, unless you have a bigger hammer.  When the valve tips are mushroomed, you would use a smooth cut file & file the top side of the tips down, this way, it won't damage the guides. Did you oil/grease up the main bearings while you was trying to turn the crank? MBHD
12 port SDS EFI 
|
|
|
|
|
Joined: Mar 2010
Posts: 623
Major Contributor
|
|
Major Contributor
Joined: Mar 2010
Posts: 623 |
So I got out and measured it one last time. That 6th main bearing is definitely the problem though. I torqued them in sequence and it spun freely until that bearing was tightened. Measured the 6th bearing with a dial bore gauge again. It was almost the exact same. 6th bearing measured 2.3001" (before was 2.2999"), and I measured at the parting line and it was 2.3030".
0.0029" seems like a pretty large taper
The taper on the number 2 bearing was only 0.0003" taper with measurements of 2.3013" and 2.2016" at the parting line.
I did oil the bearings when trying to turn the crank. I didn't imagine that turning the crank with dry bearings would ever be a good idea.
I made sure to wipe off all oil when taking measurements though.
The machine shop will all the measurements anyway to figure out what it needs but at least I know something is jacked on the #6 bearing.
So to get that extra .0005+ to get it above .0020" clearance, will it need to be turned? Or do they offer undersized bearings to add in clearance or something? I don't imagine polishing would take off much if any at all.
69 Buick Special Deluxe. Intercooled Turbo Chevy 250 @ 15psi on a stock long block. It's kinda fast.
|
|
|
|
|
Joined: Sep 2008
Posts: 3,669 Likes: 42
1000 Post Club
|
|
1000 Post Club
Joined: Sep 2008
Posts: 3,669 Likes: 42 |
It would be a good idea for them to check the main housing bores while its there. They may be able to polish the journals some to get a few tenths more clearance. The rod housing bores and main housing bores can often be adjusted to achieve the bearing clearances you want if the crank isn't being turned.
There is a .001" spread from the high to low tolerance of the rod and mains housing bores, so it just depends on where all of this falls as to how they might proceed to get you there.
Class III CNC Machinist/Programmer
|
|
|
|
|
Joined: Mar 2010
Posts: 623
Major Contributor
|
|
Major Contributor
Joined: Mar 2010
Posts: 623 |
An easier way to take the valves out are to use a rag, place it inside of the combustion chamber use a socket & a hammer & tap on the socket, the keepers will pop right out usually w/a couple of hits. This probably cant be done with supper stiff springs, unless you have a bigger hammer. When the valve tips are mushroomed, you would use a smooth cut file & file the top side of the tips down, this way, it won't damage the guides. MBHD That was how I did the first couple and I think that was what caused the mushroomed tip because the socket I used slipped. I also didn't want to destroy the springs since I might have to use them for break in assuming they fit the new head setup. I actually did try to file the mushroomed tip but I didn't spend much time on it as it wouldn't have made a difference because the guides will be drilled out anyway. It would be a good idea for them to check the main housing bores while its there. They may be able to polish the journals some to get a few tenths more clearance. The rod housing bores and main housing bores can often be adjusted to achieve the bearing clearances you want if the crank isn't being turned.
There is a .001" spread from the high to low tolerance of the rod and mains housing bores, so it just depends on where all of this falls as to how they might proceed to get you there. That's what I was going to have them do. I was going to tell them how out of round the #6 bearings was and tell them to check out the bore to see if it was the actual bore or just a messed up bearing. I'm going to try to have them shoot for 0.0025" on each main clearance. I still don't understand how that one bearing could've been that bad!? Is it possible to just have a bad bearing from the factory that would've given readings like that? It's going to drive me crazy that I didn't swap in another good bearing and measure it to see if it was the bearing or the bore. Also why would the standard set be that small? I mean they're pretty consistently .0015" +- .0001" besides #5 and #6 and #5 could've just been a bad reading.
69 Buick Special Deluxe. Intercooled Turbo Chevy 250 @ 15psi on a stock long block. It's kinda fast.
|
|
|
|
|
Joined: Sep 2008
Posts: 3,669 Likes: 42
1000 Post Club
|
|
1000 Post Club
Joined: Sep 2008
Posts: 3,669 Likes: 42 |
Well, it really wasn't that bad. It fit in the parameters that GM set as standards to follow. So you can have quite a bit of variation in the same engine and still be in spec as far as they are concerned.
Class III CNC Machinist/Programmer
|
|
|
|
|
Joined: Mar 2010
Posts: 623
Major Contributor
|
|
Major Contributor
Joined: Mar 2010
Posts: 623 |
Well, it really wasn't that bad. It fit in the parameters that GM set as standards to follow. So you can have quite a bit of variation in the same engine and still be in spec as far as they are concerned. Did you say that with regards to the fact that they were all .0015" +- .0001" or about the #6 being out of round? Would it have run on that .0015" +- .0001" oil clearance? Or would it have just seized up after firing.
69 Buick Special Deluxe. Intercooled Turbo Chevy 250 @ 15psi on a stock long block. It's kinda fast.
|
|
|
|
|
Joined: Sep 2008
Posts: 3,669 Likes: 42
1000 Post Club
|
|
1000 Post Club
Joined: Sep 2008
Posts: 3,669 Likes: 42 |
GM actually has .0006"(6 Tenths) as being the low side tolerance and up to .0036" as the high for bearing clearance on the 194,230,250 and 292 engines, so anywhere in between this GM calls acceptable. Stock GM cranks out of the box aren't even round within a .0001" most of the time. I have seen some as much as a half a thousandths out of round right out of the box.
Keep in mind that GM doesn't make any parts themselves, they have outside manufacturers all over the world make every single nut and bolt and engine component for them, they just assemble them in Detroit or other assembly plants around the country. So it just depends on who made the batch of cranks or machined the blocks during that assembly period as to how precise they came out.
Class III CNC Machinist/Programmer
|
|
|
|
|
Joined: Mar 2010
Posts: 623
Major Contributor
|
|
Major Contributor
Joined: Mar 2010
Posts: 623 |
So then it should be fine as long as I fix that #6 cap and get it to at least .0020" with some heavy polishing/light turning? Any reason to go bigger than that?
Any idea as to what caused that super tight clearance on #6?
69 Buick Special Deluxe. Intercooled Turbo Chevy 250 @ 15psi on a stock long block. It's kinda fast.
|
|
|
|
|
Joined: Sep 2008
Posts: 3,669 Likes: 42
1000 Post Club
|
|
1000 Post Club
Joined: Sep 2008
Posts: 3,669 Likes: 42 |
Without looking at the housing bore for that position and seeing what shape it is in would be hard to say. You have to consider the bearing set, the block housing bore and crank journal. All three are manmade and each have manufacturing tolerances that can allow fluxuations from one engine to the next and within the same engine. At this point it is irrelevant why, just dont put it back that way. That is why blueprinting is so critical to performance builds, it take a lot of the variations found in these components and eliminates them as best as it can be.
Class III CNC Machinist/Programmer
|
|
|
|
|
Joined: Sep 2008
Posts: 3,669 Likes: 42
1000 Post Club
|
|
1000 Post Club
Joined: Sep 2008
Posts: 3,669 Likes: 42 |
Looking at your journal measurements, the size for a standard main journal is 2.2983"/2.2993". So what size are you actually measuring for your journals?
What sizes are you measuring for the housing bore of the mains?
Class III CNC Machinist/Programmer
|
|
|
|
|
Joined: Mar 2010
Posts: 623
Major Contributor
|
|
Major Contributor
Joined: Mar 2010
Posts: 623 |
I was measuring the main journals with a micrometer. These were the measurements I got from the mains
1)2.2994"
2)2.2994"
3)2.2996"
4)2.2994"
5)2.2995"
6)2.2997"
7)2.2996"
Then I set my micrometer to 2.3000" and calibrated my bore gauge from that and measured the assembled bearings with the bore gauge and got.
1)2.3010"
2)2.3010"
3)2.3010"
4)2.3010"
5)2.3020"
6)2.3001"
7)2.3010"
Giving clearances of
1).0016"
2).0016"
3).0014"
4).0016"
5).0025"
6).0004"
7).0014"
Even if the micrometer isn't exact, the measurements of the bores were relative to the micrometer anyway so the clearances are correct.
I made the stupid mistake of ONLY measuring the main bores with the bearings in there so I can't tell you what the actual bore is. If I knew that then I could know if it was a bad bearing or not.
Regardless, I know what to ask the shop to do and then what to measure and look for once it's back from the shop and I'm assembling it.
69 Buick Special Deluxe. Intercooled Turbo Chevy 250 @ 15psi on a stock long block. It's kinda fast.
|
|
|
|
|
Joined: Mar 2010
Posts: 623
Major Contributor
|
|
Major Contributor
Joined: Mar 2010
Posts: 623 |
Just got off the phone with the machine shop. Looks like everything is good to go. They're going to bore and hone .040" over, zero deck, install new pistons (convert to floating pin if needed) on the rods, figure out what is wrong with the #6 cap and line hone or whatever is needed, polish/turn the crank if needed, replace cam bearings, install ARP rods bolts and reround the ends, tap the crank snout for a sbc bolt, file the rings, and... I think that's it.
Spring pressures were 93lbs @ 1.75" installed height and 290lbs @ 1.23" which is full lift of the cam. Seems kinda light on the seat which bugs me.
Head should be sent off to Tom tomorrow or Wednesday along with the head rebuild kit so I can get that in the works.
69 Buick Special Deluxe. Intercooled Turbo Chevy 250 @ 15psi on a stock long block. It's kinda fast.
|
|
|
|
|
Joined: Apr 2004
Posts: 3,556 Likes: 35
1000 Post Club
|
|
1000 Post Club
Joined: Apr 2004
Posts: 3,556 Likes: 35 |
Don't convert a stock rod to floating pins. Leave them as press in. The rods will be too thin.
Inliner Member 1716 65 Chevelle Wagon and 41 Hudson Pickup Information and parts www.12bolt.com
|
|
|
|
|
Joined: Mar 2010
Posts: 623
Major Contributor
|
|
Major Contributor
Joined: Mar 2010
Posts: 623 |
Don't convert a stock rod to floating pins. Leave them as press in. The rods will be too thin. I let them know. I told them to call me if there should be any reason to try to convert to floating pin. They said it should be a few weeks. Hopefully by some miracle can happen and they can get it done in 2 so I can work on assembly between the end of my job and school starting
69 Buick Special Deluxe. Intercooled Turbo Chevy 250 @ 15psi on a stock long block. It's kinda fast.
|
|
|
|
|
Joined: Sep 2004
Posts: 5,839 Likes: 1
1000 Post Club
|
|
OP
1000 Post Club
Joined: Sep 2004
Posts: 5,839 Likes: 1 |
I finally got to bust out my dial bore gauge and micrometers today Got a pic & brand of your dial bore gauge? Thanks I need to get one. MBHD
12 port SDS EFI
|
|
|
|
|
Joined: Mar 2010
Posts: 623
Major Contributor
|
|
Major Contributor
Joined: Mar 2010
Posts: 623 |
I finally got to bust out my dial bore gauge and micrometers today Got a pic & brand of your dial bore gauge? Thanks I need to get one. MBHD I'll try to get pics of em next time I'm home. Nothing special. Just ebay tools
69 Buick Special Deluxe. Intercooled Turbo Chevy 250 @ 15psi on a stock long block. It's kinda fast.
|
|
|
|
|
Joined: Dec 2005
Posts: 452
Contributor
|
|
Contributor
Joined: Dec 2005
Posts: 452 |
On floating pins, yes do not use a bushing this will make the pin end too thin.
But you can hone the small rod end and make it a floating pin without any problem, have done this and made over 600HP with a stock rod and ARP bolts.
Turbo-6
|
|
|
|
|
Joined: Apr 2004
Posts: 3,556 Likes: 35
1000 Post Club
|
|
1000 Post Club
Joined: Apr 2004
Posts: 3,556 Likes: 35 |
He plans on driving this a bunch. The non bushed rods would not last long.
Inliner Member 1716 65 Chevelle Wagon and 41 Hudson Pickup Information and parts www.12bolt.com
|
|
|
|
|
Joined: Jul 2000
Posts: 4,585 Likes: 19
1000 Post Club
|
|
1000 Post Club
Joined: Jul 2000
Posts: 4,585 Likes: 19 |
I have done the same to mine as turbo-6 has, I also drill oiling hole in the rod to make sure it stays lubed.
Larry/Twisted6 [oooooo]  Adding CFM adds boost  God doesn't like ugly.
|
|
|
|
|
Joined: Dec 2013
Posts: 199
Contributor
|
|
Contributor
Joined: Dec 2013
Posts: 199 |
Tlowe, check your messages, should have one from me.
Back to the thread at hand!
|
|
|
|
|
Joined: Mar 2010
Posts: 623
Major Contributor
|
|
Major Contributor
Joined: Mar 2010
Posts: 623 |
Head should be getting sent off to Tom tomorrow.
69 Buick Special Deluxe. Intercooled Turbo Chevy 250 @ 15psi on a stock long block. It's kinda fast.
|
|
|
|
|
Joined: Mar 2010
Posts: 623
Major Contributor
|
|
Major Contributor
Joined: Mar 2010
Posts: 623 |
block work is done. will get the block back within a couple weeks whenever I can make it home. pictures will ensue!
Last edited by snowman4839; 09/15/14 12:21 AM.
69 Buick Special Deluxe. Intercooled Turbo Chevy 250 @ 15psi on a stock long block. It's kinda fast.
|
|
|
|
|
Joined: Sep 2004
Posts: 5,839 Likes: 1
1000 Post Club
|
|
OP
1000 Post Club
Joined: Sep 2004
Posts: 5,839 Likes: 1 |
What all did you have done to the block?
Just curious.
MBHD
12 port SDS EFI
|
|
|
|
|
Joined: Mar 2010
Posts: 623
Major Contributor
|
|
Major Contributor
Joined: Mar 2010
Posts: 623 |
hot tanked and magnafluxed
bore .040" over and hone
zero deck
line hone (it ended up needing it for some reason. I'll talk more with the shop to figure it out)
new cam bearings
and the other work they did
ARP rod bolts installed and rods rerounded
new forged pistons installed on rods
seems like I'm forgetting something
69 Buick Special Deluxe. Intercooled Turbo Chevy 250 @ 15psi on a stock long block. It's kinda fast.
|
|
|
|
|
Joined: Sep 2008
Posts: 3,669 Likes: 42
1000 Post Club
|
|
1000 Post Club
Joined: Sep 2008
Posts: 3,669 Likes: 42 |
Class III CNC Machinist/Programmer
|
|
|
|
|
Joined: Mar 2010
Posts: 623
Major Contributor
|
|
Major Contributor
Joined: Mar 2010
Posts: 623 |
Yeah, crank was polished too.
69 Buick Special Deluxe. Intercooled Turbo Chevy 250 @ 15psi on a stock long block. It's kinda fast.
|
|
|
|
|
Joined: Apr 2004
Posts: 3,556 Likes: 35
1000 Post Club
|
|
1000 Post Club
Joined: Apr 2004
Posts: 3,556 Likes: 35 |
Did they balance the rotating assy?
Inliner Member 1716 65 Chevelle Wagon and 41 Hudson Pickup Information and parts www.12bolt.com
|
|
|
|
|
Joined: Mar 2010
Posts: 623
Major Contributor
|
|
Major Contributor
Joined: Mar 2010
Posts: 623 |
Did they balance the rotating assy? and balancing with the new pistons yes.
69 Buick Special Deluxe. Intercooled Turbo Chevy 250 @ 15psi on a stock long block. It's kinda fast.
|
|
|
|
|
Joined: Mar 2010
Posts: 623
Major Contributor
|
|
Major Contributor
Joined: Mar 2010
Posts: 623 |
Got to the machine shop yesterday. Man it was like gearhead Christmas. I managed to forget the build sheet that had everything they did at home but I think I can remember most of it. Hot tanked block Bore and hone .040" over Line hone mains to .025" clearances New cam bearings Install ARP rod bolts Reround large end of rods Float the small end of the rods (I asked them not to but they ended up saying they needed to) Put on the Ross flat tops File fit rings to .019" and .021" for the top and bottom rings respectively. Deck the block .017" for a zero deck. Clean and polish the crank Balance the rotating assembly. Drill and tap snout of crank for a SBC bolt Everything looks great and is coming along nicely. I have about a month before Fall break when I get back home to get some serious work done. Hopefully the head will be ready by then but if not, I still have a good bit of work to put the short block together. Got them all sitting pretty in the back  The block  New Ross Racing flat tops  The cleaned and polished crank.  Fun extra pic. Here's the drag car they were building at the machine shop. It has twin 106mm turbos haha. It was wild. 
Last edited by snowman4839; 09/20/14 11:33 AM.
69 Buick Special Deluxe. Intercooled Turbo Chevy 250 @ 15psi on a stock long block. It's kinda fast.
|
|
|
|
|
Joined: Dec 2010
Posts: 535
Major Contributor
|
|
Major Contributor
Joined: Dec 2010
Posts: 535 |
Merry Christmas indeed =D
|
|
|
|
|
Joined: Mar 2010
Posts: 623
Major Contributor
|
|
Major Contributor
Joined: Mar 2010
Posts: 623 |
Getting back wednesday night so I should be able to get the rotating assembly in this weekend.
Cam ordered. Probably going to use the stock timing gear set unless y'all have another suggestion.
Head is still with Tom. Hoping I can get it by Christmas time.
69 Buick Special Deluxe. Intercooled Turbo Chevy 250 @ 15psi on a stock long block. It's kinda fast.
|
|
|
|
|
Joined: Sep 2008
Posts: 3,669 Likes: 42
1000 Post Club
|
|
1000 Post Club
Joined: Sep 2008
Posts: 3,669 Likes: 42 |
You need to use a Cloyes timing set with the multi-keyways so you can degree the cam.
Class III CNC Machinist/Programmer
|
|
|
|
|
Joined: Mar 2010
Posts: 623
Major Contributor
|
|
Major Contributor
Joined: Mar 2010
Posts: 623 |
so you can degree the cam. How does the timing set relate to degreeing the cam? Why couldn't I degree the cam with the stock set? Thoughts on iron vs aluminum cam gear?
Last edited by snowman4839; 10/21/14 12:34 AM.
69 Buick Special Deluxe. Intercooled Turbo Chevy 250 @ 15psi on a stock long block. It's kinda fast.
|
|
|
|
|
Joined: Sep 2008
Posts: 3,669 Likes: 42
1000 Post Club
|
|
1000 Post Club
Joined: Sep 2008
Posts: 3,669 Likes: 42 |
Because the stock timing set isn't adjustable, and the chances the cam will install and be dead nuts on the cam card based on only one keyway selection in the crank gear is remote. And many stock timing sets actually retard the cam from its normal "straight up" position.
Class III CNC Machinist/Programmer
|
|
|
|
|
Joined: Apr 2004
Posts: 3,556 Likes: 35
1000 Post Club
|
|
1000 Post Club
Joined: Apr 2004
Posts: 3,556 Likes: 35 |
Josh,
Use the aluminum gear on cam and steel on crank. That is the way the set comes.
There is a special straight toothed set that is steel on steel. Very noisy.
I have checked quite a few and found them to be accurate to the cam card, within 1/2 degree.
Been working on the head. Doing 3 right now. It is sitting in line ready to be ported on. All the other machine work is done.
Then deck it, perform valve job and assemble.
Inliner Member 1716 65 Chevelle Wagon and 41 Hudson Pickup Information and parts www.12bolt.com
|
|
|
|
|
Joined: Mar 2010
Posts: 623
Major Contributor
|
|
Major Contributor
Joined: Mar 2010
Posts: 623 |
Well I was talking about the steel crank/iron cam gear combo here http://www.summitracing.com/parts/clo-8-1018/overview/model/chevy-iivs the steel crank/alum cam gear combo here http://www.summitracing.com/parts/clo-8-1016But I'll go with the alum anyway. I didn't really consider this in my fall break plans but I guess I have to have the new timing set's crank gear pressed on before I can put in the rotating assembly... duh... So I might not be putting it together until thanksgiving or winter break :-( Great news on the head Tom! Thanks for the update.
69 Buick Special Deluxe. Intercooled Turbo Chevy 250 @ 15psi on a stock long block. It's kinda fast.
|
|
|
|
|
Joined: Sep 2008
Posts: 3,669 Likes: 42
1000 Post Club
|
|
1000 Post Club
Joined: Sep 2008
Posts: 3,669 Likes: 42 |
You can install the crank gear yourself very easily. No need to delay your build because of that. Just make sure the snout and crank key is free of burrs and tap it on until it seats fully against the front main shoulder. Both gear sets you list above are both Cloyes brand with the multi-keyway crank gear, so you should be able to dial it in where you want it.
Class III CNC Machinist/Programmer
|
|
|
|
|
Joined: Mar 2010
Posts: 623
Major Contributor
|
|
Major Contributor
Joined: Mar 2010
Posts: 623 |
You can install the crank gear yourself very easily. No need to delay your build because of that. Just make sure the snout and crank key is free of burrs and tap it on until it seats fully against the front main shoulder. Both gear sets you list above are both Cloyes brand with the multi-keyway crank gear, so you should be able to dial it in where you want it. Well isn't the gear press fit on the crank? I don't have a press to get the old one off. I was just wondering what the difference between the sets was between having a alum or iron cam gear.
69 Buick Special Deluxe. Intercooled Turbo Chevy 250 @ 15psi on a stock long block. It's kinda fast.
|
|
|
|
0 members (),
317
guests, and
46
robots. |
|
Key:
Admin,
Global Mod,
Mod
|
|
|
|