|
|
Joined: Aug 2014
Posts: 821
Major Contributor
|

Major Contributor
Joined: Aug 2014
Posts: 821 |
I wish I had just pulled mine. It was a PITA working in there without the engine pulled.
Don't get the cam I got. Go more aggressive. Mine is just a hair more than stock. It runs so smooth even at idle that it's hard to tell it's cammed.
Also might want to invest in a 2 piece timing gear cover. Wishing I did for 2 reasons: 1) swap would be a good hour less if I did it again and 2) that thicker aluminium would probably quiet down the aluminum cam gear.
|
|
|
|
|
Joined: Aug 2014
Posts: 821
Major Contributor
|
|
Major Contributor
Joined: Aug 2014
Posts: 821 |
I'd go with this cam if I did it over:
http://www.compperformancegroupstores.com/store/merchant.mvc?Screen=PROD&Store_Code=CC&Product_Code=61-246-4&Category_Code=CHEV466Cam194
|
|
|
|
|
Joined: Apr 2004
Posts: 3,556 Likes: 35
1000 Post Club
|
|
1000 Post Club
Joined: Apr 2004
Posts: 3,556 Likes: 35 |
Gbauer, That is a very big cam for street use. The cam in my wagon is 214 dur and .524 lift
The one you have shown is 230 dur and .536 lift
Inliner Member 1716 65 Chevelle Wagon and 41 Hudson Pickup Information and parts www.12bolt.com
|
|
|
|
|
Joined: Dec 2014
Posts: 335
Contributor
|
|
OP
Contributor
Joined: Dec 2014
Posts: 335 |
This engine has been recently rebuilt! It looks to be in really good shape for an engine to be used for an overhaul makeover. You can see the honing marks in the cylinders and there are *zero* ridges. I'd put 3500 miles on it. The water jacket is pretty clean. The headbolts came out with a threadlocker on them. I am really happy with the state of this engine! Now the ugly. There is in every cylinder what looks like a rust patina in the honing ridges. It is uniform, unlike my spare engine from the other thread. I don't know if this thing was rusted out and then given a superficial hone to get running or if the four years in the unheated barn in Wisconsin added the corrosion. Whatever it may be, I suspect it's the cause of the low compression. As far as old cars go, it would probably get better over time as the rings wear down the cylinder wall, but hey, she's getting a bore. 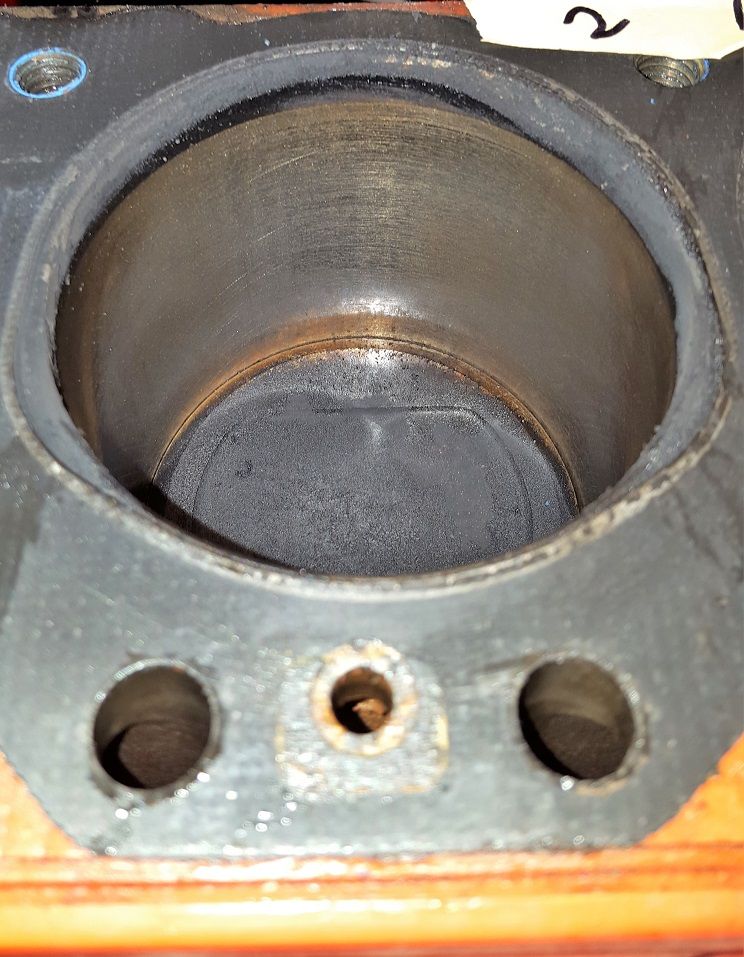 Inside the water jacket, through the holes, looks to have just a small amount of deposits, pretty good shape. 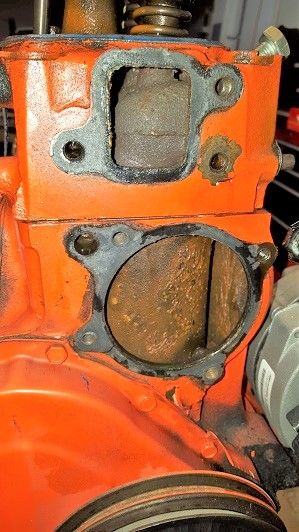 Houston, we have a problem. This is an indication, I believe, of what's causing the backfiring. Whether or not it's the valve or camshaft, I do not know. I'll bet you've seen this before. Is this what one would call a "burned valve" on cylinder #5? Note that #6 is brown, not ringed with carbon. Across the cylinders, they're pretty non-uniform across the cylinders. 
Mark
'67 Camaro L6-250
|
|
|
|
|
Joined: Aug 2014
Posts: 821
Major Contributor
|
|
Major Contributor
Joined: Aug 2014
Posts: 821 |
Did your lifters show uneven lifting like mine? Here's a pic of mine:  See how the wear marks are at different heights? That was my dead giveaway that the cam was wiped.
|
|
|
|
|
Joined: Dec 2014
Posts: 335
Contributor
|
|
OP
Contributor
Joined: Dec 2014
Posts: 335 |
Hey Gbauer, thanks for reposting the pictures. I didn't understand before, but now I see it clearly. Just to check, I went back and looked at the lifters on the spare engine and found one (cyl 1 intake) that had nearly half the brown marking of all the others. Back on my original engine. Cylinder 5 intake there's a funny sheen that's part way up with the brown going low. It may be that there's an issue with the intake on the CAM which would indicate why it's getting worse, although I don't understand how that would make the exhaust valve run hot nor how it would create backfires. It seems most likely to be a problem with the head and not the CAM. The perfect solution is to put in a more aggressive CAM. The harmonic balancer is right on. I had to advance the timing to 20 BTDC to prevent constant backfiring through the carb. Below are the two lifters on the left from cyl 5&6 intake. On the right are the first four lifters from my spare engine. 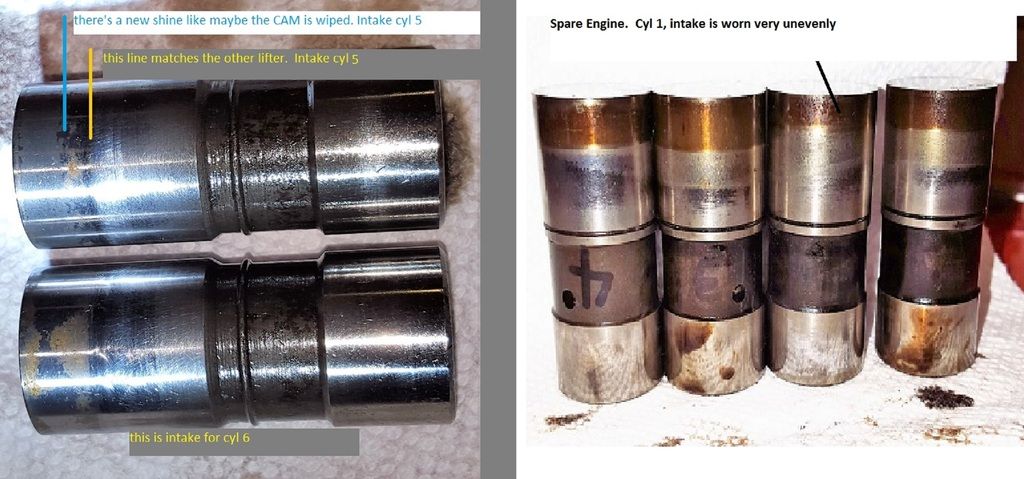
Last edited by mshaw230; 11/17/15 03:06 AM.
Mark
'67 Camaro L6-250
|
|
|
|
|
Joined: Aug 2014
Posts: 821
Major Contributor
|
|
Major Contributor
Joined: Aug 2014
Posts: 821 |
Don't know about the first pic but that second one looks just like my #6 lifter looked. I know it had been misfiring in the #6 since the day I bought the car but it definitely got worse over time for me.
|
|
|
|
|
Joined: Dec 2014
Posts: 335
Contributor
|
|
OP
Contributor
Joined: Dec 2014
Posts: 335 |
This engine has been recently rebuilt! It looks to be in really good shape for an engine to be used for an overhaul makeover. You can see the honing marks in the cylinders and there are *zero* ridges. I'd put 3500 miles on it. The water jacket is pretty clean. The headbolts came out with a threadlocker on them. I am really happy with the state of this engine! Now the ugly. There is in every cylinder what looks like a rust patina in the honing ridges. It is uniform, unlike my spare engine from the other thread. I don't know if this thing was rusted out and then given a superficial hone to get running or if the four years in the unheated barn in Wisconsin added the corrosion. Whatever it may be, I suspect it's the cause of the low compression. As far as old cars go, it would probably get better over time as the rings wear down the cylinder wall, but hey, she's getting a bore. I did a few web searches on rings not seating as these just don't look like they're even touching. If there's excessive gas going into the pistons "washing" the rings, it could mess up the finish on the rings. The original carb on this car was dripping gasoline into the engine, even after the rebuild. I drove over 2,000 miles across country and only got 14 MPG with the original one barrel. Awful performance the whole way. Other threads talk about cars that have sat and carboned up and are sticking. That seems like the cylinders would have originally broken in and would not look the way they do now. What do you think, is it a case of rings that never broke in? Something else? Do you think it could be some sort of plating? I found pictures of Nikasil coatings (nickel silicon carbide) that leave the cylinder this golden color. The youtube video looks like it would be pretty unlikely to douse an entire block in a vat. https://www.youtube.com/watch?v=Rn53m2-TNSo
Mark
'67 Camaro L6-250
|
|
|
|
|
Joined: Dec 2014
Posts: 335
Contributor
|
|
OP
Contributor
Joined: Dec 2014
Posts: 335 |
I pulled the crankshaft out of my spare engine today. I continue to be unimpressed with the shape of the spare engine. Thankfully the old engine was overhauled, hopefully I won't need the spare block. The price was right and I'm learning a heap. Not much experience with bearings, but the copper look doesn't seem good. It almost, but not quite, gives me the impression that a bearing spun on cylinder #1. I seem to remember seeing a GM 044 marking on the back of one of the rod bearings. I didn't pop out any of the mains. What do I look for to figure out if the crank's been ground already? Main Cap Bearings 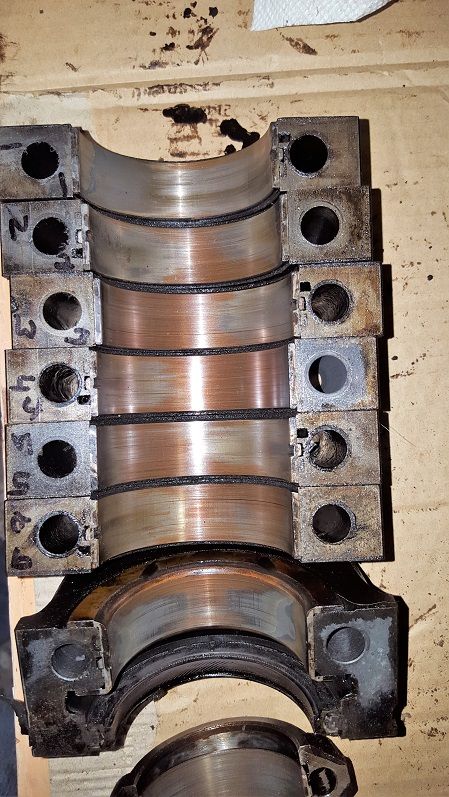 Rod Cap Bearings 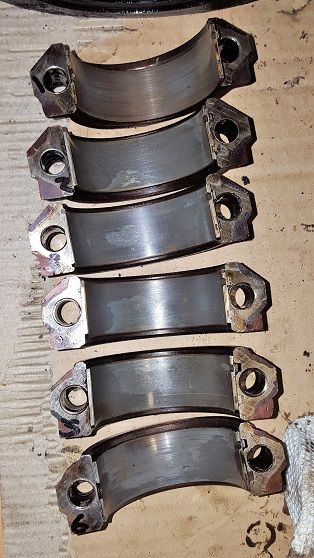 Block Bearings 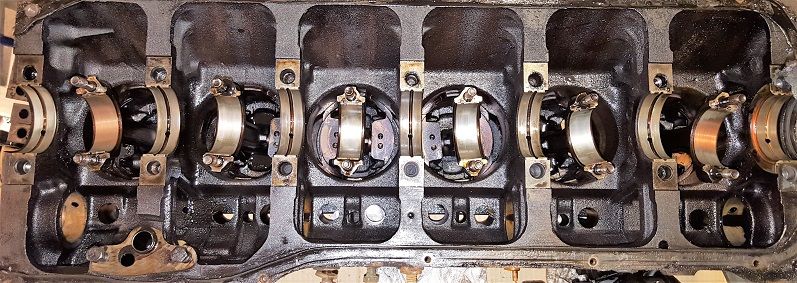
Mark
'67 Camaro L6-250
|
|
|
|
|
Joined: Dec 2014
Posts: 335
Contributor
|
|
OP
Contributor
Joined: Dec 2014
Posts: 335 |
Took the engine in today. Mechanic thought the cylinder with the light colored exhaust valve was running okay, but said the color should be a bit darker.
He didn't like the hash marks in the cylinder. Made lots of grumbling comments about people who don't have the right equipment or use the wrong stones for the rings (or something of the like). He thought the hashes were too deep, as I believe somebody has mentioned. It's a good chance it'll get bored out to 040 to ensure a nice round hole with a good, appropriate finish.
He says the wear pattern of the bearings is pretty typical. We'll see how far down the grind needs to go.
Thanks again for the advice,
Mark
'67 Camaro L6-250
|
|
|
|
|
Joined: Dec 2014
Posts: 335
Contributor
|
|
OP
Contributor
Joined: Dec 2014
Posts: 335 |
What we have are similar symptoms with the original carb/intake and new holley carb/offy intake. Backfiring (that's getting worse over time) and awful performance, although Holley was better than stock. I verified every vacuum line was good, vacuum readings at idle were decent and pretty smooth. I replaced the intake manifold gasket and used RTV to ensure there wasn't a leak there. I continue to suspect multiple problems. But this week I was looking closely at my carb setup that has a 1" spacer to prevent obstructions. There's a danged logo/numbering on the spacer which I'd put facing up towards the carb. The carb has some passages between barrels that give more opportunity for vacuum leaks. On one of the last runs before I tore the engine out, I took carb cleaner to the car. I sprayed all over the place, couldn't find anything. But there was an area when I really doused the primary side of the carb would cause the RPMs to drop. Hmmmm, but I couldn't even see where it was. I thought since the cleaner was dripping on everything maybe some made its way in through the throttle shaft. Looking at the pictures, it looks like you and those at Camaros.net called it. A vacuum leak. Below is the carb and the spacer, the spacer is flipped up. You can see on the spacer how the seal isn't made where the passages are discoloration. Look closely at how little metal is there to make the seal with the gasket.  Now look at the primary side of the gasket (rotated clockwise). A bunch of photoshop to try to better highlight the dark streak that blasts right through the "CAT NO. 6006" and on out. Next to it is some weird texture, like it soaked up something (maybe my carb cleaner?). It looks much too much like coincidence. 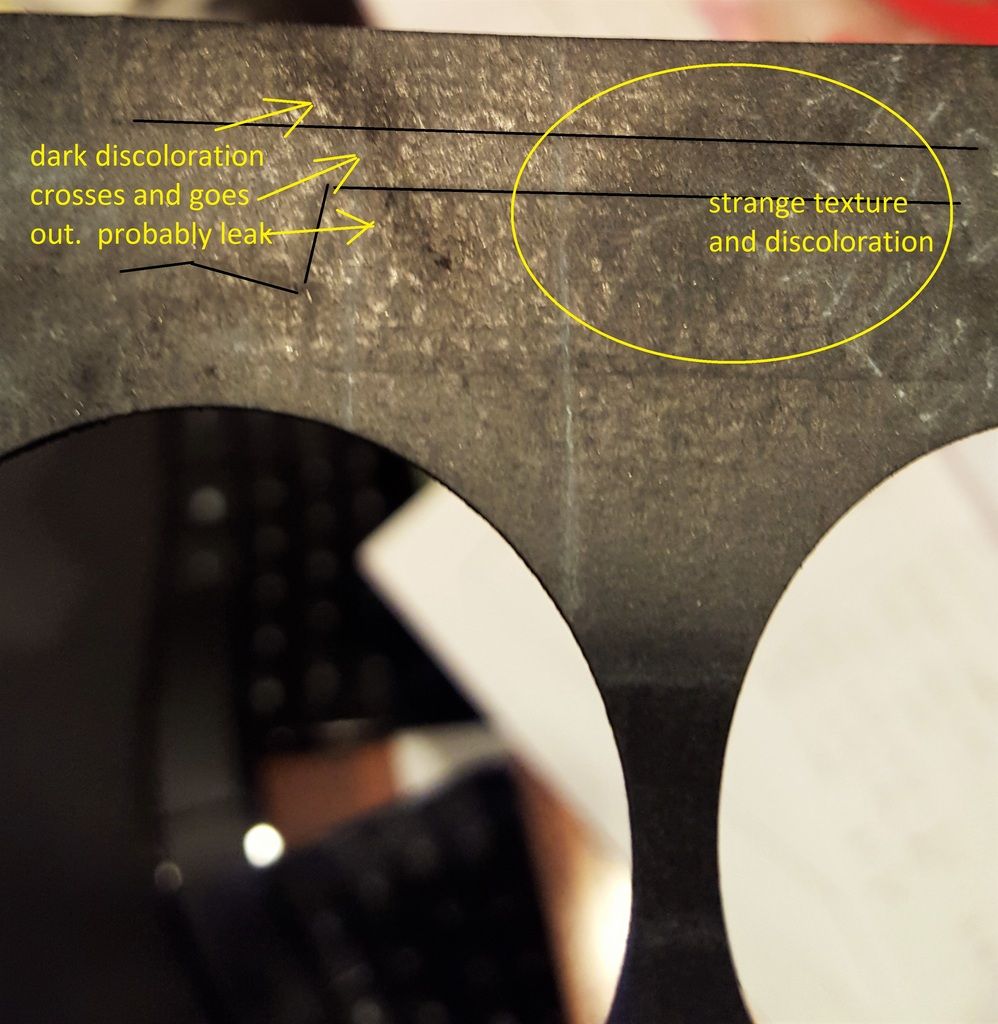 I'm changing up the carb when the engine comes back together, will either flip the spacer or hopefully chunk it. Thanks! Mark
Mark
'67 Camaro L6-250
|
|
|
|
|
Joined: Aug 2014
Posts: 821
Major Contributor
|
|
Major Contributor
Joined: Aug 2014
Posts: 821 |
The cheap ones at Autozone work pretty well but they're likely to only have 1" spacers. I recently put in a 1/2" plastic spacer and extra thick gaskets and I don't have any leaks now.
Definitely flip it if nothing else. Check with your machine shop if they have speed stuff. They might have a better spacer and thick gaskets.
|
|
|
|
|
Joined: Dec 2014
Posts: 335
Contributor
|
|
OP
Contributor
Joined: Dec 2014
Posts: 335 |
Brief chat with the machine shop today. Shocking results! 1. Valve springs are weak, 10-15 lbs lighter than spec. This is likely cause for some of the backfires and a reason why it happened on both carbs. The other leak certainly contributed. 2. "It's about the worst bore and hone job I've ever seen." He thought the hash on that would chew right through new rings. Pistons will be bored out to 0.040 (0.030) today. 3. The wrong pistons were installed at the last overhaul! When I brought the engine in, Bill kept looking funny at the engine. He got out his measuring device, but didn't say much. I thought maybe it wasn't TDC, but it actually was. Turns out that 250 CID pistons were installed with the shorter-stroke 230 CID engine. Rough estimate that the compression ratio was somewhere around 6:1 at best and the cause of my 105-110 PSI compression. This makes me feel good that there was a major defect that was causing this engine to run so horribly and that when it's done with the 250 crankshaft, flat-top pistons and moderate CAM, that this engine is going to SING! I didn't have a good picture at TDC, but did find one. Jim pointed out that ordering the wrong pistons can be forgivable since somebody assumed it was a 250. But how does one put the engine together and not notice? Oh yeah, that's right, considering the boring job, it may have been done in somebody's garage. Anybody experience this sort of error before? 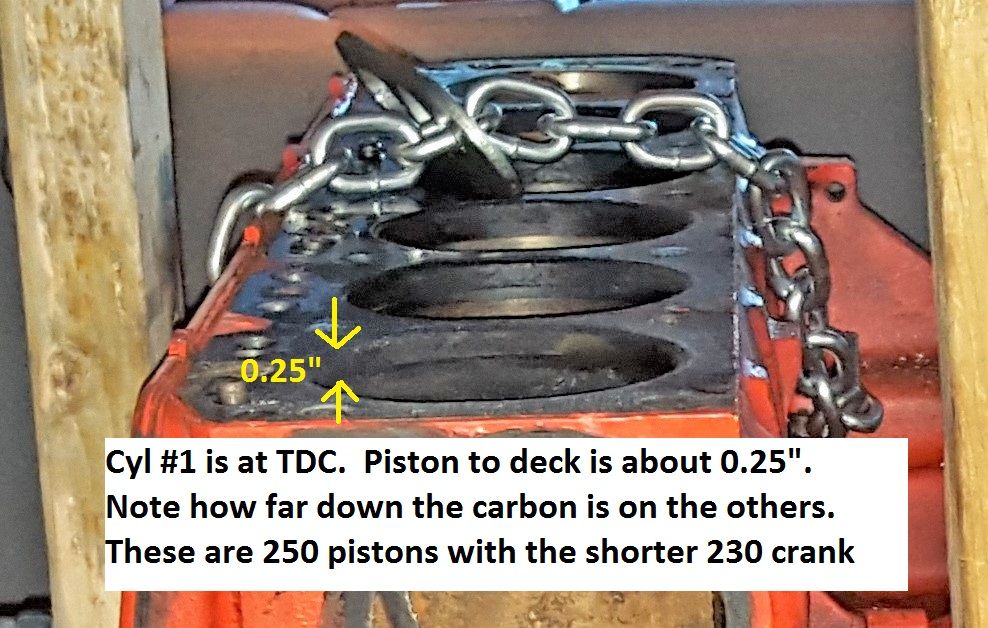
Mark
'67 Camaro L6-250
|
|
|
|
|
Joined: Dec 2014
Posts: 335
Contributor
|
|
OP
Contributor
Joined: Dec 2014
Posts: 335 |
New valve guides added, hardened exhaust seats (valves remain 1.5"), intakes increased from 0.172 to 0.184. 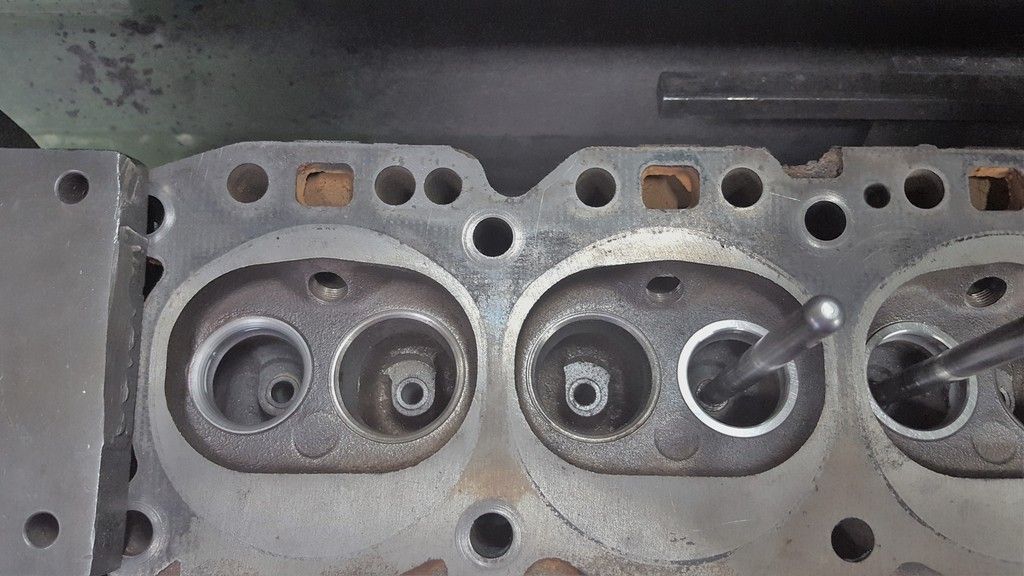
Mark
'67 Camaro L6-250
|
|
|
|
|
Joined: Dec 2014
Posts: 335
Contributor
|
|
OP
Contributor
Joined: Dec 2014
Posts: 335 |
New Be-Cool radiator should significantly improve cooling. I'm also adding a 1600 CFM electric fan and chunking the mechanical fan. amperage max is 12-14A, hopefully I can hang out with the 60A alternator for a while. About how many gallons of antifreeze do you think will fit? I'll probably put in be-cool's antifreeze and get the double-warranty. Old vs. New core thickness. Both are double core. 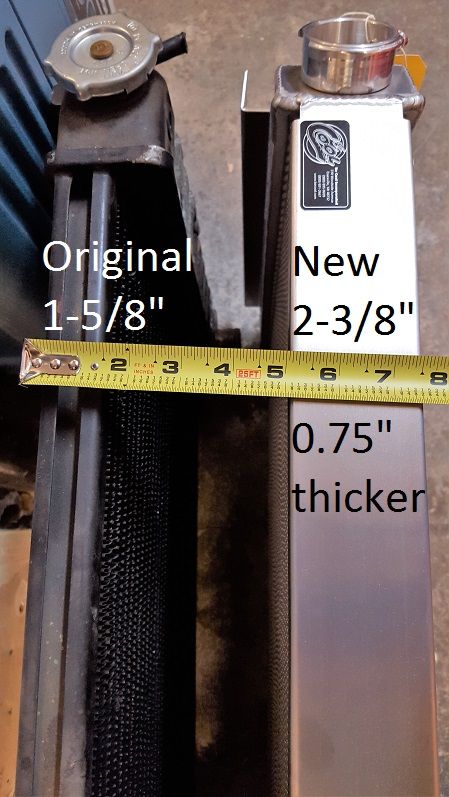 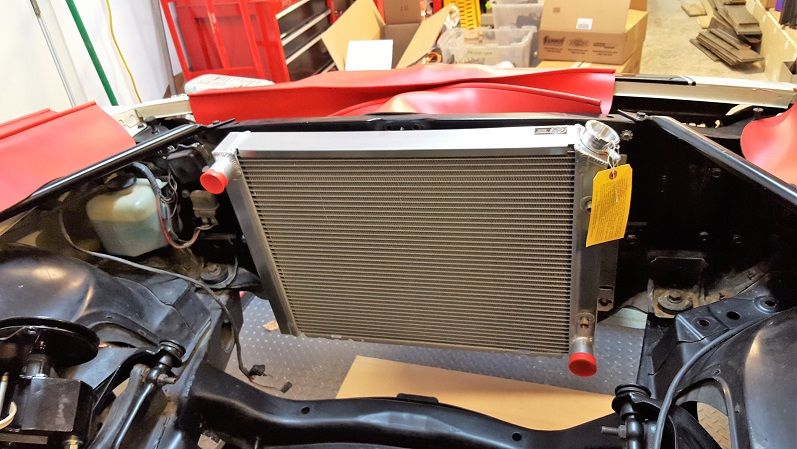 Chose Be-Cool because of a good friend's great experiences for his many cars and I know nothing about the other suppliers. The tech rep helped me by providing full mechanical drawings and specs for the fans because it was far from obvious from online information which radiator would fit this car. Parts list to all that I bought · 12009 Radiator · 75014 Electric Fan · 72231 Fan Brackets · 75021 Wiring Harness · 70003 Recovery Tank · 70001 Billet Radiator Cap
Mark
'67 Camaro L6-250
|
|
|
|
|
Joined: Aug 2014
Posts: 821
Major Contributor
|
|
Major Contributor
Joined: Aug 2014
Posts: 821 |
That'll make a big difference. When I did my 3 core radiator I had to either ditch the mechanical fan or find a different spacer. The fan interfered with the radiator. I bought a cheap fan and relay on ebay. Every part in it died except the relay. The temp sensor died within about a 2 weeks. The fan died about 4 months later. When the fan died I stopped in Autozone and found a universal fan for about $60. Mounted it as a pusher fan and haven't had a problem since. ...plus it's hidden.  I made a radiator fill panel as well. Doesn't do anything other than cover up the front hole. Now you can't see much at all other than the radiator and the rheostat mounted to the side of it.
|
|
|
|
|
Joined: Jan 2015
Posts: 376
Contributor
|
|
Contributor
Joined: Jan 2015
Posts: 376 |
Looks good! Be-cool radiators are nice. 
|
|
|
|
|
Joined: Dec 2014
Posts: 335
Contributor
|
|
OP
Contributor
Joined: Dec 2014
Posts: 335 |
Thanks all... Stopped by the machine shop today, it's progressing nicely. New Pistons mounted on rods 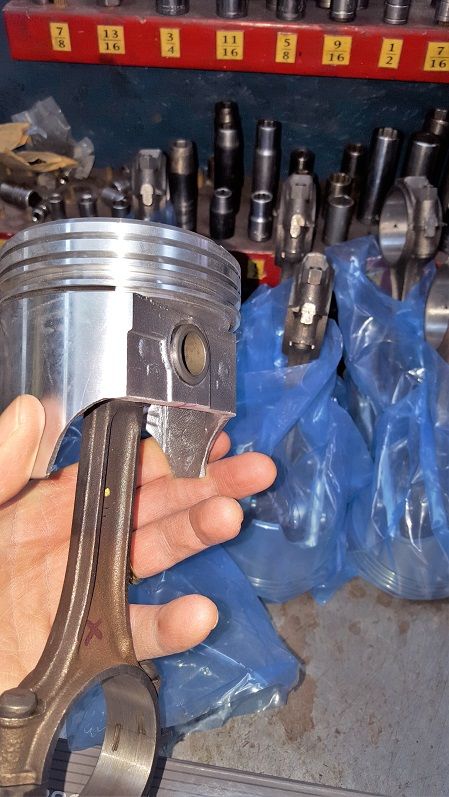 Block bored to 0.040", surfaces sealed, brass freeze plugs next 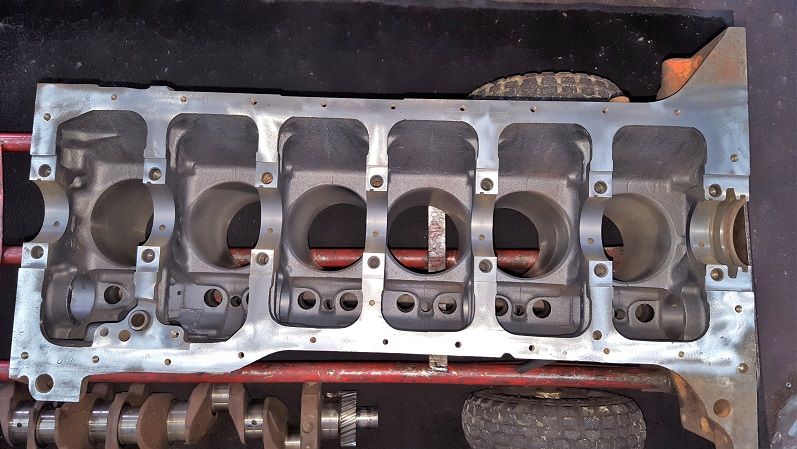 Head work in progress, machining to accept new style valve seals 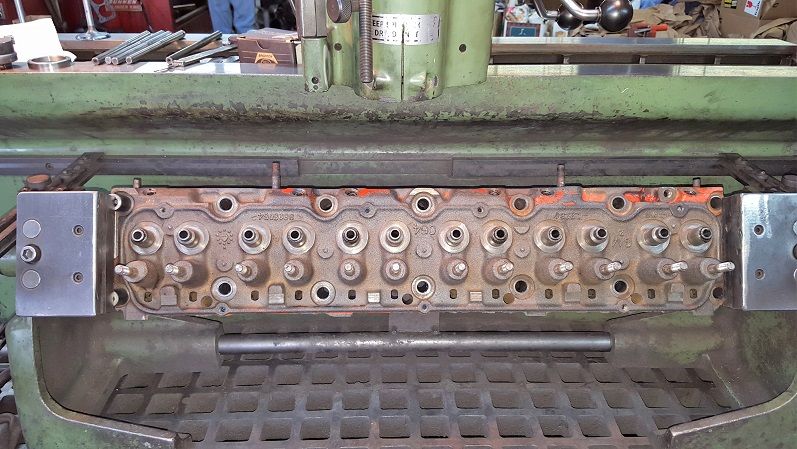 Valve seals, new style much better 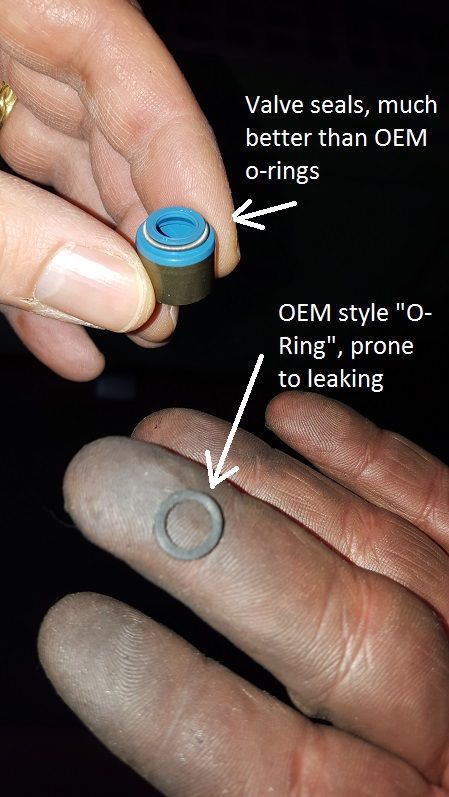 Balanced and polished crankshaft 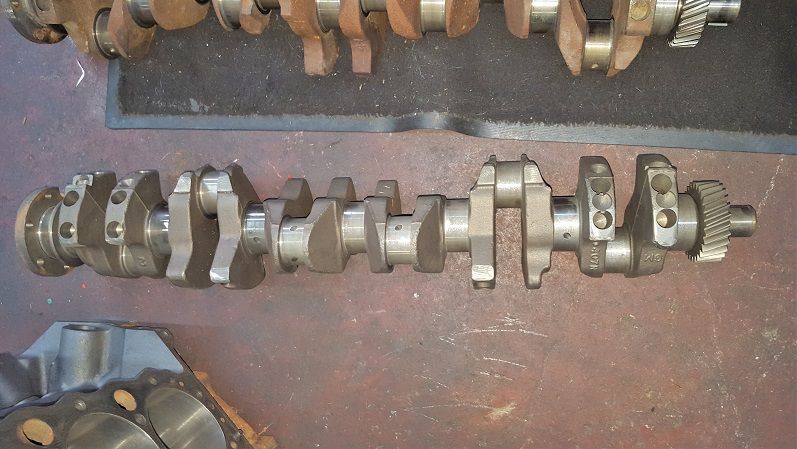
Mark
'67 Camaro L6-250
|
|
|
|
|
Joined: Aug 2014
Posts: 821
Major Contributor
|
|
Major Contributor
Joined: Aug 2014
Posts: 821 |
|
|
|
|
|
Joined: Aug 2003
Posts: 353
Contributor
|
|
Contributor
Joined: Aug 2003
Posts: 353 |
Thanks all... Stopped by the machine shop today, it's progressing nicely. Valve seals, new style much better Mark, Are you using Teflon seals on the exhaust guides too? Just wondering if you discussed that with your machinist? I had a head done with all Teflon seals and the exhaust guides were heavily worn at the next valve job years later. I was told the Teflon seals cleaned the oil off the stem too well. He liked them for intake valves only, and stock or umbrella seals on the exhaust side. Just curious and others please chime in if you think the guy was wrong. Thanks.
Last edited by Chevelle292Wagon; 12/23/15 11:56 AM.
Pete
64 Chevelle
61 C30 Panel truck
|
|
|
|
|
Joined: Jan 2015
Posts: 376
Contributor
|
|
Contributor
Joined: Jan 2015
Posts: 376 |
|
|
|
|
|
Joined: Apr 2004
Posts: 3,556 Likes: 35
1000 Post Club
|
|
1000 Post Club
Joined: Apr 2004
Posts: 3,556 Likes: 35 |
Pete, I wonder what type of valves and guides your engine had. I install those type seals on intakes and exh for all street engines. Race engines get just the oring on the exhaust to somewhat limit oil. Thanks all... Stopped by the machine shop today, it's progressing nicely. Valve seals, new style much better Mark, Are you using Teflon seals on the exhaust guides too? Just wondering if you discussed that with your machinist? I had a head done with all Teflon seals and the exhaust guides were heavily worn at the next valve job years later. I was told the Teflon seals cleaned the oil off the stem too well. He liked them for intake valves only, and stock or umbrella seals on the exhaust side. Just curious and others please chime in if you think the guy was wrong. Thanks.
Inliner Member 1716 65 Chevelle Wagon and 41 Hudson Pickup Information and parts www.12bolt.com
|
|
|
|
|
Joined: Sep 2008
Posts: 3,669 Likes: 42
1000 Post Club
|
|
1000 Post Club
Joined: Sep 2008
Posts: 3,669 Likes: 42 |
The seal can only do its job effectively if the guides and valve stems are not worn. An o-ring seal is all that's needed on the exhaust valves for street engines, but regardless of make or model of the engine, both intake and exhaust require a full umbrella style seal for race applications.
Class III CNC Machinist/Programmer
|
|
|
|
|
Joined: Dec 2014
Posts: 335
Contributor
|
|
OP
Contributor
Joined: Dec 2014
Posts: 335 |
Thanks Gbauer, TJ, Chevelle292, Tom, CNC,
Putting these seals on all of the valves. All new guides and new valves. I didn't realize the racing engines needed a little bit of oil on the exhaust, and it sounds like street could get by with that also, but this is street use only and I really dislike burning oil, so we should be good.
Mark
'67 Camaro L6-250
|
|
|
|
|
Joined: Aug 2003
Posts: 353
Contributor
|
|
Contributor
Joined: Aug 2003
Posts: 353 |
[quote=tlowe #1716]Pete,
I wonder what type of valves and guides your engine had. I install those type seals on intakes and exh for all street engines. Race engines get just the oring on the exhaust to somewhat limit oil.
[quote=Chevelle292Wagon]
Tom,
Memory fades on this, but it seems like it was all new stock parts. The guides may have been knurled and then replaced on the next valve job when the heavy wear was noted.
Pete
64 Chevelle
61 C30 Panel truck
|
|
|
|
|
Joined: Sep 2008
Posts: 3,669 Likes: 42
1000 Post Club
|
|
1000 Post Club
Joined: Sep 2008
Posts: 3,669 Likes: 42 |
One thing to remember is that both contact surfaces wear out, not just one or the other. So chances are that even though the guides may have been replaced later, the valve stems themselves had wear on them also, but weren't replaced as they should have been, decreasing the new life that was expected.
Class III CNC Machinist/Programmer
|
|
|
|
|
Joined: Aug 2003
Posts: 353
Contributor
|
|
Contributor
Joined: Aug 2003
Posts: 353 |
One thing to remember is that both contact surfaces wear out, not just one or the other. So chances are that even though the guides may have been replaced later, the valve stems themselves had wear on them also, but weren't replaced as they should have been, decreasing the new life that was expected. I'm afraid I can't answer the question about what guides were in the head and what the condition of the guides and valve stems were. But now I see there are Viton seals that resemble Teflon seals and may be a good choice too. I'll have to look into those. Thanks.
Pete
64 Chevelle
61 C30 Panel truck
|
|
|
|
|
Joined: Dec 2014
Posts: 335
Contributor
|
|
OP
Contributor
Joined: Dec 2014
Posts: 335 |
Update: machinist is done, waiting for the assembler to get done with holidays. Transmission 200r4 due to arrive next week. Ski season and awesome snow this year, so hard to say when install occurs.
Held garage night with local VCCA vintage chevy club. We discussed my clunking powerglide. The flex plate where the torque converter attached was really beat up. I've got a new heavy duty plate. The guys said the bolt holes were likely elongated (plate is gone now) and the most likely cause of the clunk when shifting gears. One guy had exactly same issue on his service truck years ago and fixed with a new flex plate.
Mark
'67 Camaro L6-250
|
|
|
|
|
Joined: Aug 2014
Posts: 821
Major Contributor
|
|
Major Contributor
Joined: Aug 2014
Posts: 821 |
Is yours a column shift or floor shift?
Let me know where you're getting the pieces for the 200r4 conversion. I'm doing the same swap this spring.
...once again we're going down exactly the same path!
Last edited by gbauer; 12/31/15 10:59 AM.
|
|
|
|
|
Joined: Dec 2014
Posts: 335
Contributor
|
|
OP
Contributor
Joined: Dec 2014
Posts: 335 |
This car is going to rock so well, it's going to be hard to figure out what to attribute to what! Correct pistons, more aggressive CAM, ported head, 3-spd+OD auto tranny. It's a jump from << 100 HP to 225 or more HP. I'm going to have to be careful stepping on the gas... This forum will get regular updates, of course. For the transmission, I went the route of high quality (I hope :-)), lesser risk, turnkey and more cost. From cpttransmission.com: 200r4, torque converter (non-locking as recommended by Art for this car), conversion bracket. Column shifter, conversion kit link below (blessed by Art also) http://cpttransmission.com/2004R_trans_2to4.htmhttp://www.shiftworks.com/kugel.htmI've got a list 18 deep of action items to do before the engine & tranny are to be installed. Maybe I can get those in this weekend if all this glorious skiing doesn't wipe me out first.
Mark
'67 Camaro L6-250
|
|
|
|
|
Joined: Sep 2004
Posts: 5,839 Likes: 1
1000 Post Club
|
|
1000 Post Club
Joined: Sep 2004
Posts: 5,839 Likes: 1 |
A non lock-up converter is OK if you are looking to get the fastest ET for all out racing.
If that is what you are looking for?
12 port SDS EFI 
|
|
|
|
|
Joined: Aug 2014
Posts: 821
Major Contributor
|
|
Major Contributor
Joined: Aug 2014
Posts: 821 |
I've been thinking about the converter a lot lately and reading up on it. Sounds like you want a 2,000 to 3,000 RPM stall with our cam. Kinda wondering if I could just keep the converter I have now. It's the stock PG converter.
|
|
|
|
|
Joined: Sep 2004
Posts: 5,839 Likes: 1
1000 Post Club
|
|
1000 Post Club
Joined: Sep 2004
Posts: 5,839 Likes: 1 |
No,
A stock PG converter will not work with your camshaft. Need a higher stall.
12 port SDS EFI
|
|
|
|
|
Joined: Aug 2014
Posts: 821
Major Contributor
|
|
Major Contributor
Joined: Aug 2014
Posts: 821 |
|
|
|
|
|
Joined: Dec 2014
Posts: 335
Contributor
|
|
OP
Contributor
Joined: Dec 2014
Posts: 335 |
I believe I've ordered the
"88230 - 200 4R non-lockup 12" Converter 2200 Stall
200 4R 12" Converter 2000 to 2200 Stall non-lockup "
If I recall correctly, the reason for the recommendation was two-fold. First there's no computer or electronics currently in the car and you have to add something for the lockup. Second with my tall 3.08 rear-end gear ratio, it will have trouble shifting in and out of lockup. Of course if that's true, if I put in the 3.73 gears, maybe it's not correct.
Mark
'67 Camaro L6-250
|
|
|
|
|
Joined: Dec 2014
Posts: 335
Contributor
|
|
OP
Contributor
Joined: Dec 2014
Posts: 335 |
An update. Stopped by the machine shop yesterday, block was in process of assembly. One disconnect, I'd wanted studs since I had a head gasket blow a very long time ago after a head bolt came loose, but I hadn't communicated this well. So maybe another two weeks until it's ready to come home. Crankshaft in, torqued down. 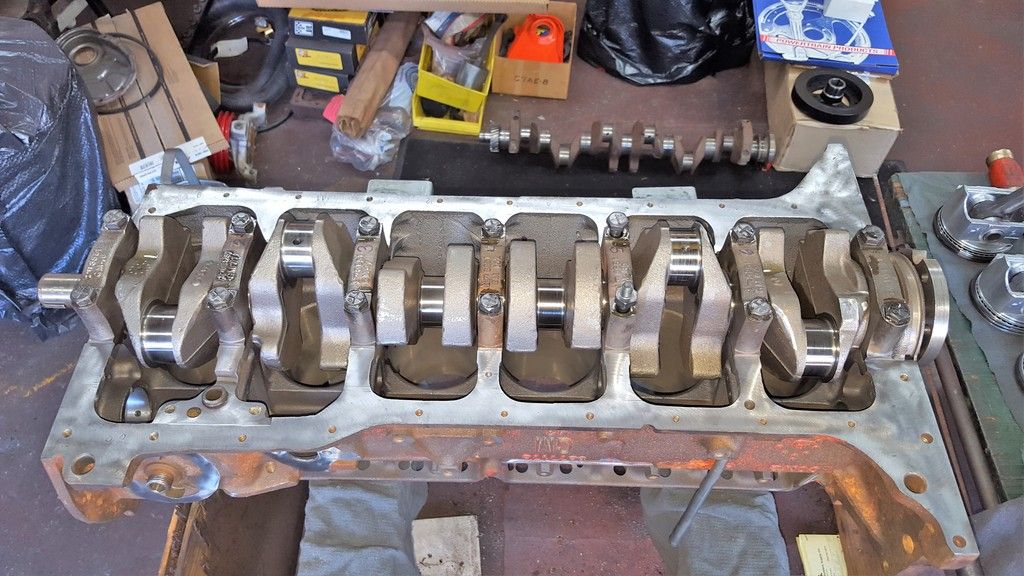 FYI on some of the balancing that was done to the crank. 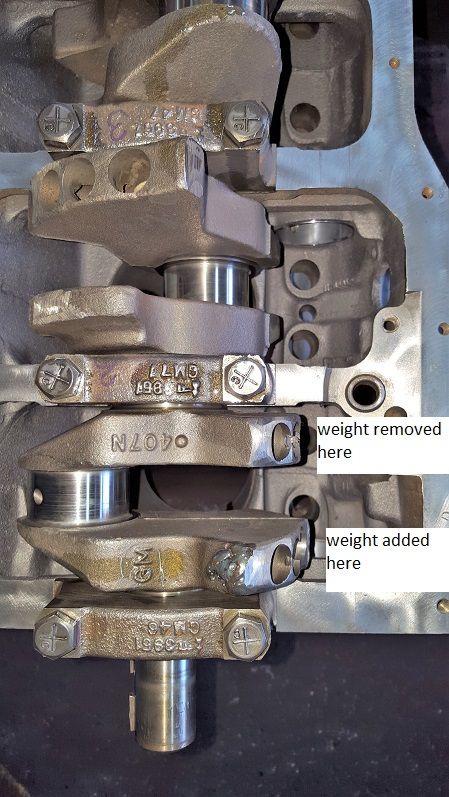 Somebody else was having their head rebuilt, so we get a side by side look. I think Jim said my springs give around 110 lbs pressure and the stock are around 66 lbs. Some of the parts come from a v8. I didn't notice before that there are dampening springs inside of the big coil springs. 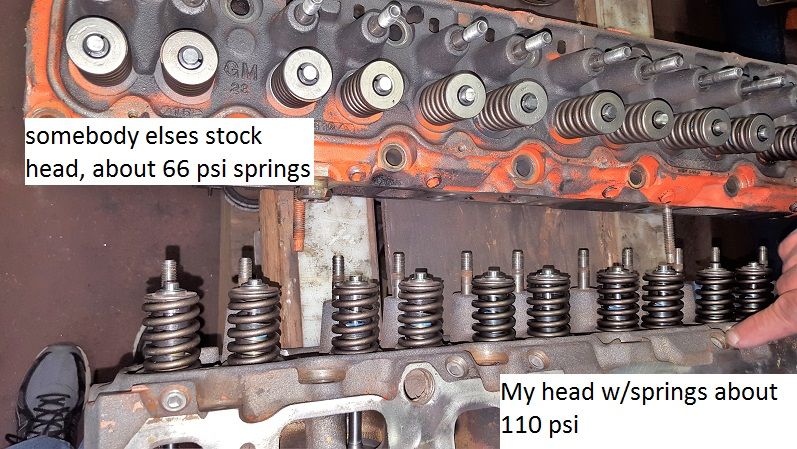 To show a comparison between stock valves and the larger 1.72" intakes on my head. 1.72" 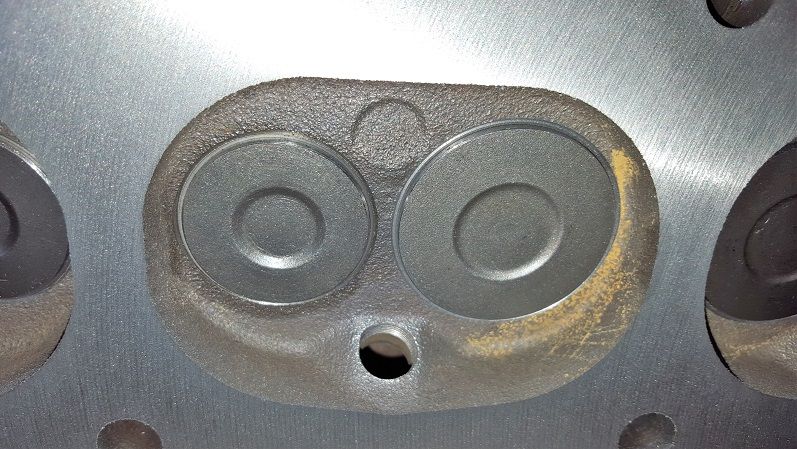 Stock valves... 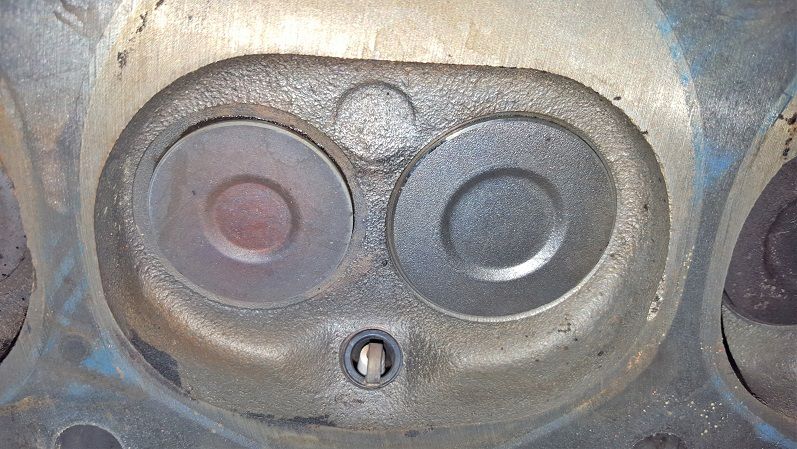
Mark
'67 Camaro L6-250
|
|
|
|
|
Joined: Jan 2015
Posts: 376
Contributor
|
|
Contributor
Joined: Jan 2015
Posts: 376 |
|
|
|
|
|
Joined: Dec 2014
Posts: 335
Contributor
|
|
OP
Contributor
Joined: Dec 2014
Posts: 335 |
Thanks TJ!
Another update. Studs have snagged me again. They're so tall that they just touch the top of my beautiful valve cover. Rather than rip it all apart and shorten the studs, the machinist is confident to take a touch of metal off the inside of the valve covers.
I should be bringing this baby home Saturday. Installation won't be for another week or two afterwards.
Mark
Mark
'67 Camaro L6-250
|
|
|
|
|
Joined: Dec 2014
Posts: 335
Contributor
|
|
OP
Contributor
Joined: Dec 2014
Posts: 335 |
Engine is safe and sound in the garage, having picked it up last Monday. I'll start working in earnest tomorrow, but don't anticipate it getting installed until another week. Then I'm betting another few weeks of messing around until startup. Maybe more. Guessing the throttle (rod vs. cable) will cause me some head scratching. Look for updates coming Sunday night! 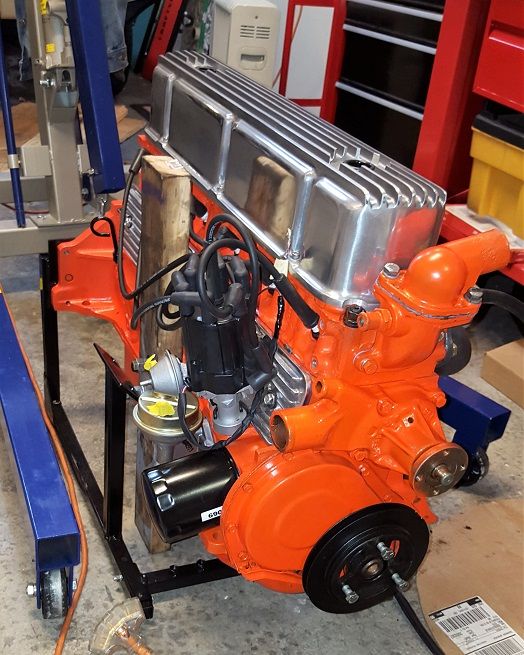
Mark
'67 Camaro L6-250
|
|
|
|
|
Joined: Aug 2014
Posts: 821
Major Contributor
|
|
Major Contributor
Joined: Aug 2014
Posts: 821 |
|
|
|
|
1 members (stock49),
404
guests, and
51
robots. |
|
Key:
Admin,
Global Mod,
Mod
|
|
|
|


