|
|
Joined: Feb 2024
Posts: 25
Active BB Member
|
OP

Active BB Member
Joined: Feb 2024
Posts: 25 |
I have a 1953 Chevy five window pickup (3100). The truck has a lot of history, formerly acting as a pusher truck on the Bonneville Salt flats. The frame was sandblasted and powder coated, it has a 1959 261 inline six engine along with a McCullouch supercharger from a 1957 Studebaker Golden Hawk. When initially running it I discovered that somewhere in its past the two lower bolts holding the timing cover in place had cracked the front end cap. Attached is a photo of the cracked front end cap. A friend knew of an engine builder that has been building race car engine for the better part of 60 years. The builder has put out feelers among his buddies in the business for either 1) a new billet end cap, which one of his buddies used to make for this engine, or 2) a replacement end cap from a donor engine that he will use to line bore and get me back up and running. Does anyone have access to the front end cap that I will need to repair this vintage truck? If you have any thoughts or ideas on where I might locate one, please let me know. ![[Linked Image from user.fm]](https://user.fm/files/v2-a3bc39a2afdac1bec219af597e0d116b/Screenshot%202024-02-01%20at%202.30.59%E2%80%AFPM.jpg)
Last edited by BobK; 02/02/24 10:42 PM.
|
|
|
|
|
Joined: Oct 2007
Posts: 5,015 Likes: 47
1000 Post Club
|
|
1000 Post Club
Joined: Oct 2007
Posts: 5,015 Likes: 47 |
Is it the same as a 235? There should be tons of them out there. Are these cast? I'd try welding it up while bolted in place, maybe on another block, reshape it drill & tap it. Put it back on and check the bearing fit. I can't figure out why it would have broken like that there should be no real stress there.
"I wonder if God created man because he was disappointed in the monkey?" Mark Twain
|
|
|
|
|
Joined: Sep 2008
Posts: 3,669 Likes: 42
1000 Post Club
|
|
1000 Post Club
Joined: Sep 2008
Posts: 3,669 Likes: 42 |
Since replacing the cap will require the block to be line bored, you might search for a shop that can competently perform that task first before you go down that road....
Class III CNC Machinist/Programmer
|
|
|
|
|
Joined: Feb 2024
Posts: 25
Active BB Member
|
|
OP
Active BB Member
Joined: Feb 2024
Posts: 25 |
Since replacing the cap will require the block to be line bored, you might search for a shop that can competently perform that task first before you go down that road.... The engine builder that I'm hooked up with has been in the business for nearly sixty years and has the equipment to line bore. His Plan A is to have a 94 year old friend of his make me a billet end cap, Plan B is to acquire an end cap from an incapacitated engine and then line bore it. While I have a lot of faith in his Plan A, I'm actively looking for a Plan B just in case.
"I don't have a carbon footprint, I drive everywhere."
|
|
|
|
|
Joined: Oct 2007
Posts: 5,015 Likes: 47
1000 Post Club
|
|
1000 Post Club
Joined: Oct 2007
Posts: 5,015 Likes: 47 |
If those are the choices you have settled on I'd make plan B plan A. A lot simpler and probably less expensive.
"I wonder if God created man because he was disappointed in the monkey?" Mark Twain
|
|
|
|
|
Joined: Feb 2024
Posts: 25
Active BB Member
|
|
OP
Active BB Member
Joined: Feb 2024
Posts: 25 |
If those are the choices you have settled on I'd make plan B plan A. A lot simpler and probably less expensive. I completely agree with you. That's the reason I'm out looking around for engine being parted out to get the end cap. So far, I'm not having much luck locating an engine like that let alone the end cap. Those end caps must be made of Unobtanium or Unicorn dust.
"I don't have a carbon footprint, I drive everywhere."
|
|
|
|
|
Joined: Oct 2007
Posts: 5,015 Likes: 47
1000 Post Club
|
|
1000 Post Club
Joined: Oct 2007
Posts: 5,015 Likes: 47 |
There is a steel plate that bolts to the block and is where the motor mount attaches. The timing cover seals to it. It takes the stress. There should be little or no load on these bolts and the timing cover. The purpose of the holes that are broken is to allow the two bottom bolts for the timing cover to pass through from the inside, a dumb design. You can see the weld nuts on the two bottom timing cover holes. This makes it mandatory to remove the pan to get to these bolts before the timing cover can be removed. If I remember those holes could be tapped to the next size without even drilling. Then bolts can be inserted & removed from the front with the pan in place.
From the looks of your cap I think someone tried very hard to remove the cover not knowing about the bottom bolts. Were the broken pieces in the engine? Did someone reassemble the engine this way.? The bolts passing from the inside would still hold the timing cover. Sealing the pan gasket is really the issue. I think these caps but it could still be welded up if there are no cracks running to the bearing area or the cap bolts. I have a friend who could weld it. A simple fix would be weld nuts on the back side for bolts from the front and form the gasket area with JB Weld. It will work and the "know it alls" will never see it.
"I wonder if God created man because he was disappointed in the monkey?" Mark Twain
|
|
|
|
|
Joined: Oct 2007
Posts: 5,015 Likes: 47
1000 Post Club
|
|
1000 Post Club
Joined: Oct 2007
Posts: 5,015 Likes: 47 |
For the part contact Owens Salvage in Wellington, Texas. Tell Bob that Jake's dad sent you.  LINK LINK
Last edited by Beater of the Pack; 02/05/24 05:55 PM.
"I wonder if God created man because he was disappointed in the monkey?" Mark Twain
|
|
|
|
|
Joined: Feb 2024
Posts: 25
Active BB Member
|
|
OP
Active BB Member
Joined: Feb 2024
Posts: 25 |
There is a steel plate that bolts to the block and is where the motor mount attaches. The timing cover seals to it. It takes the stress. There should be little or no load on these bolts and the timing cover. The purpose of the holes that are broken is to allow the two bottom bolts for the timing cover to pass through from the inside, a dumb design. You can see the weld nuts on the two bottom timing cover holes. This makes it mandatory to remove the pan to get to these bolts before the timing cover can be removed. If I remember those holes could be tapped to the next size without even drilling. Then bolts can be inserted & removed from the front with the pan in place.
From the looks of your cap I think someone tried very hard to remove the cover not knowing about the bottom bolts. Were the broken pieces in the engine? Did someone reassemble the engine this way.? The bolts passing from the inside would still hold the timing cover. Sealing the pan gasket is really the issue. I think these caps but it could still be welded up if there are no cracks running to the bearing area or the cap bolts. I have a friend who could weld it. A simple fix would be weld nuts on the back side for bolts from the front and form the gasket area with JB Weld. It will work and the "know it alls" will never see it. At some point in this engine past, it was rebuilt and the two nuts that are supposed to be in the oil pan holding the timing cover bolts were removed. (what a crappy design to have to take the oil pan down to removed the timing cover.....). In any case, as best I can tell someone tried to tap the end cap so that their bolts through the timing cover would hold tight. The oil coming from behind the timing plate (bolted to the block) was the give away that something was amiss. When I dropped the oil pan to inspect, I was greeted with a cracked end cap. I've now pulled the engine, removed the valve train, push rods, lifters, and cam shaft to remove the timing plate. I'm going to call Owens Salvage right now and keep my fingers crossed. Thanks for the referral.
Last edited by BobK; 02/05/24 06:37 PM.
"I don't have a carbon footprint, I drive everywhere."
|
|
|
|
|
Joined: Feb 2024
Posts: 25
Active BB Member
|
|
OP
Active BB Member
Joined: Feb 2024
Posts: 25 |
For the part contact Owens Salvage in Wellington, Texas. Tell Bob that Jake's dad sent you. LINKBob's out until Thursday, it was suggested that I call back then. More to come.......
"I don't have a carbon footprint, I drive everywhere."
|
|
|
|
|
Joined: Feb 2024
Posts: 25
Active BB Member
|
|
OP
Active BB Member
Joined: Feb 2024
Posts: 25 |
Are the crankshaft bearing caps the same on the 235 Chevy as the 261?
I may have located an entire set of 235 end caps.
"I don't have a carbon footprint, I drive everywhere."
|
|
|
|
|
Joined: Oct 2007
Posts: 5,015 Likes: 47
1000 Post Club
|
|
1000 Post Club
Joined: Oct 2007
Posts: 5,015 Likes: 47 |
The bearings are the same. Make sure it is a later 235 and not the early babbitt bearing one. BearingsIh yeah. Bob was at the GRAND National, Probably had a car or two there. You'll love him and if you spend any time with him you'll start talking like him.
Last edited by Beater of the Pack; 02/06/24 05:08 PM.
"I wonder if God created man because he was disappointed in the monkey?" Mark Twain
|
|
|
|
|
Joined: Feb 2024
Posts: 25
Active BB Member
|
|
OP
Active BB Member
Joined: Feb 2024
Posts: 25 |
The bearings are the same. Make sure it is a later 235 and not the early babbitt bearing one. I understand the issue with babbitt bearings but have never seen them. Can you tell from this photo which cap type this is? ![[Linked Image from user.fm]](https://user.fm/files/v2-66ee7d4a81da769b2c935f349808c824/Screenshot%202024-02-06%20at%2011.08.59%E2%80%AFAM.jpg)
"I don't have a carbon footprint, I drive everywhere."
|
|
|
|
|
Joined: Oct 2007
Posts: 5,015 Likes: 47
1000 Post Club
|
|
1000 Post Club
Joined: Oct 2007
Posts: 5,015 Likes: 47 |
I don't know what happened to my response last night. O'll try again.
Stock 49 is the guy that could answer this. He has lots of experience with his 216, a near twin of the poured bearing 235. I haven't seen the inside of one for over 50 years.
I don't see a locater tab on the bearing along the parting line which an insert bearing would have. There seems to be a lot of crud on it and that makes it hard to see. On the mating surface around the lower bolt hole there seems to be a clean space that reminds me of the shape of the shims that the babbitt engines came with. They were used to adjust the bearing as they wore. I really can't tell from the photo. Ask the seller to pop the bearing shell out.
"I wonder if God created man because he was disappointed in the monkey?" Mark Twain
|
|
|
|
|
Joined: Feb 2024
Posts: 25
Active BB Member
|
|
OP
Active BB Member
Joined: Feb 2024
Posts: 25 |
I don't know what happened to my response last night. O'll try again.
Stock 49 is the guy that could answer this. He has lots of experience with his 216, a near twin of the poured bearing 235. I haven't seen the inside of one for over 50 years.
I don't see a locater tab on the bearing along the parting line which an insert bearing would have. There seems to be a lot of crud on it and that makes it hard to see. On the mating surface around the lower bolt hole there seems to be a clean space that reminds me of the shape of the shims that the babbitt engines came with. They were used to adjust the bearing as they wore. I really can't tell from the photo. Ask the seller to pop the bearing shell out. I can't ask the seller anything at this point. For $40 for the set of four caps, I decided to take the gamble. It won't be the first $40 I've wasted on this truck and unfortunately not the last $40. They should arrive at my house via the USPS sometime tomorrow. I guess I'll know for sure then.
"I don't have a carbon footprint, I drive everywhere."
|
|
|
|
|
Joined: Oct 2007
Posts: 5,015 Likes: 47
1000 Post Club
|
|
1000 Post Club
Joined: Oct 2007
Posts: 5,015 Likes: 47 |
I just looked at some bearings on eBay and it looks like the locating tab is only on 1/2 of the shell and it has an oil groove in it. The other 1/2 looks like what is in the picture. I think you got the set I was looking at the other day because they seem to be gone now. Good luck, I think you are OK. Bearings
"I wonder if God created man because he was disappointed in the monkey?" Mark Twain
|
|
|
|
|
Joined: Apr 2003
Posts: 1,537 Likes: 15
1000 Post Club
|

1000 Post Club
Joined: Apr 2003
Posts: 1,537 Likes: 15 |
I understand the issue with babbitt bearings but have never seen them. Can you tell from this photo which cap type this is? Casting number is your best bet for identification. There are four designs ('37 to '47 #838102), ('48 - '53), ('53 PG - '55 first series) and then the second series design: ![[Linked Image]](https://www.inliners.org/ubbthreads/ubbthreads.php?ubb=download&Number=1087&filename=0dot095Cap.jpg) Image is from the GM Parts Wiki. The Search function is quite good. In this case on the Group "0.095" limited to the Oct of '62 Parts & Accessories Catalog (P&A 30).
|
|
|
|
|
Joined: Feb 2024
Posts: 25
Active BB Member
|
|
OP
Active BB Member
Joined: Feb 2024
Posts: 25 |
I understand the issue with babbitt bearings but have never seen them. Can you tell from this photo which cap type this is? Casting number is your best bet for identification. There are four designs ('37 to '47 #838102), ('48 - '53), ('53 PG - '55 first series) and then the second series design: Image is from the GM Parts Wiki. The Search function is quite good. In this case on the Group "0.095" limited to the Oct of '62 Parts & Accessories Catalog (P&A 30). Thanks but the engine is a 1959 261 from either a commercial truck or school bus. The part number on the cracked front end cap is 3837210 and I don't see it on the list.
"I don't have a carbon footprint, I drive everywhere."
|
|
|
|
|
Joined: Apr 2003
Posts: 1,537 Likes: 15
1000 Post Club
|
|
1000 Post Club
Joined: Apr 2003
Posts: 1,537 Likes: 15 |
That's the nature of the Parts Master. Sometimes what it doesn't say is as important as what it does. Based on the sequential assignment of catalog/casting numbers you've got the second series design - which jibes with a '59 261. If you're looking at replacement parts with the listed casting numbers above - they won't work with your 2nd series engine.
|
|
|
|
|
Joined: Feb 2024
Posts: 25
Active BB Member
|
|
OP
Active BB Member
Joined: Feb 2024
Posts: 25 |
That's the nature of the Parts Master. Sometimes what it doesn't say is as important as what it does. Based on the sequential assignment of catalog/casting numbers you've got the second series design - which jibes with a '59 261. If you're looking at replacement parts with the listed casting numbers above - they won't work with your 2nd series engine. Ok, I'm a little confused. My engine block casting number is 3759365 and the part number on my cracked front end cap is 3837210. Also on the passenger side of the engine is what looks like a stamped serial number of N368472CAL Where can I find out more info on this engine? Thank you.
"I don't have a carbon footprint, I drive everywhere."
|
|
|
|
|
Joined: Apr 2003
Posts: 1,537 Likes: 15
1000 Post Club
|
|
1000 Post Club
Joined: Apr 2003
Posts: 1,537 Likes: 15 |
Ok, I'm a little confused. My engine block casting number is 3759365 and the part number on my cracked front end cap is 3837210. Also on the passenger side of the engine is what looks like a stamped serial number of N368472CAL Where can I find out more info on this engine? Thank you. No worries. The paper trail left by GM has to be put into context - otherwise it can seem confusing. You definitely have a 261. So back to an earlier post (and the reason I posted the Catalog entry). I can't ask the seller anything at this point. For $40 for the set of four caps, I decided to take the gamble. It won't be the first $40 I've wasted on this truck and unfortunately not the last $40. They should arrive at my house via the USPS sometime tomorrow. I guess I'll know for sure then When those caps arrive you will be in the same boat as the Parts Counter guy at a Chevrolet dealer circa '62. Consulting the 'trusty' P&A 30 Catalog he would have known that the newest Front Cap replacement parts were marked with a yellow stripe of paint (and that the front office didn't bother to print the Casting Number of the newest repair parts). As he waded through the bin containing 0.095 front caps he would find parts that had been on hand for perhaps years - where the Casting Number is the only way to ID them for sure - hence printing them in the catalog. So when your shipment arrives if the front cap casting number matches your cracked one you are in business. If they don't you can use the Catalog entry above to see if you spent 40 bucks on one of the older (incompatible designs). If it has a different casting number entirely - post it here and I will happily research to figure out what you've got.
|
|
|
|
|
Joined: Oct 2007
Posts: 5,015 Likes: 47
1000 Post Club
|
|
1000 Post Club
Joined: Oct 2007
Posts: 5,015 Likes: 47 |
See? I didn't have the answer but I knew who did. Thanks stock49! BobK, Be sure and let us know how this works out. Given the numbers certainly helps sort them out.
"I wonder if God created man because he was disappointed in the monkey?" Mark Twain
|
|
|
|
|
Joined: Feb 2024
Posts: 25
Active BB Member
|
|
OP
Active BB Member
Joined: Feb 2024
Posts: 25 |
See? I didn't have the answer but I knew who did. Thanks stock49! BobK, Be sure and let us know how this works out. Given the numbers certainly helps sort them out. I'm not 100% certain, but I may have hit the lottery on my $40 purchase. Attached are photos of the new part and my old end cap (front and back) and a third photo of the other three caps that came with the front end cap. While there is a faint part number on the end cap, two of the others are plainly visible. While I have never seen a babbitt bearing, I don't think that's what these are as they look identical to what is on the current cracked end cap. ![[Linked Image from user.fm]](https://user.fm/files/v2-6feb581ac0f7f002077c897aedc4ad6e/IMG_4858.JPG) ![[Linked Image from user.fm]](https://user.fm/files/v2-eebf73bbfd657872f856706552e0b1f4/IMG_4859.JPG) ![[Linked Image from user.fm]](https://user.fm/files/v2-e71ecb6d37bf48e7a639bd5c2c09019a/IMG_4857.JPG)
"I don't have a carbon footprint, I drive everywhere."
|
|
|
|
|
Joined: Apr 2003
Posts: 1,537 Likes: 15
1000 Post Club
|
|
1000 Post Club
Joined: Apr 2003
Posts: 1,537 Likes: 15 |
Ok a couple of things to go over here for clarity. First is that the main bearings on stovebolts were never poured babbit. From the original design in '29 the mains were insert type bearings - but they were made to an imprecise oversize that allowed them to be line bored to whatever spec the crank was ground to: STD or undersize. In '47 the precision type bearing was introduced and used in the factory on all '48 models - and the repair parts were stocked at the Parts Counters for use back to '37 (when the 216 was introduced). This saved labor in the factory and the repair bays. ![[Linked Image]](https://www.inliners.org/ubbthreads/ubbthreads.php?ubb=download&Number=1088&filename=PrecisionBearings.jpg) As for the bearing caps you've scored I am afraid I have bad news. That set is from '54 - Casting numbers as follows: Front - 3701245, Front inter 3701246, Rear Inter 3701247, Rear - not cataloged: http://www.gmpartswiki.com/getpage?pageid=121473The '54 and early '55 (first series) are the last to use dowel/staked bearings. In the second series design the block and the cap have a tang machined into them and the back of bearing shells mate with these tangs to keep them from spinning in the journal. ![[Linked Image]](https://www.inliners.org/ubbthreads/ubbthreads.php?ubb=download&Number=1089&filename=TangTypeBearings.jpg) Some will suggest that it is best to change caps as a set and then to have the alignment checked/tweaked to make sure everything is on center. Chevy Parts Master catalogs don't say anything about sets of caps - and they aren't cataloged that way. If replacing just one cap - again the alignment should be checked by a machinist to be sure. I don't know if you can improvise that front cap onto a newer style block. But it certainly wouldn't hurt to fit it to your block and see what is different in terms of the way the bearings fit and are retained. Internet searches are also helpful in terms of tapping into the experience of others. VCCA Chat circa '03
|
|
|
|
|
Joined: Feb 2024
Posts: 25
Active BB Member
|
|
OP
Active BB Member
Joined: Feb 2024
Posts: 25 |
Ok a couple of things to go over here for clarity.
First is that the main bearings on stovebolts were never poured babbit. From the original design in '29 the mains were insert type bearings - but they were made to an imprecise oversize that allowed them to be line bored to whatever spec the crank was ground to: STD or undersize. In '47 the precision type bearing was introduced and used in the factory on all '48 models - and the repair parts were stocked at the Parts Counters for use back to '37 (when the 216 was introduced). This saved labor in the factory and the repair bays.
As for the bearing caps you've scored I am afraid I have bad news. That set is from '54 - Casting numbers as follows: Front - 3701245, Front inter 3701246, Rear Inter 3701247, Rear - not cataloged:
The '54 and early '55 (first series) are the last to use dowel/staked bearings. In the second series design the block and the cap have a tang machined into them and the back of bearing shells mate with these tangs to keep them from spinning in the journal.
Some will suggest that it is best to change caps as a set and then to have the alignment checked/tweaked to make sure everything is on center. Chevy Parts Master catalogs don't say anything about sets of caps - and they aren't cataloged that way. If replacing just one cap - again the alignment should be checked by a machinist to be sure.
I don't know if you can improvise that front cap onto a newer style block. But it certainly wouldn't hurt to fit it to your block and see what is different in terms of the way the bearings fit and are retained.
Internet searches are also helpful in terms of tapping into the experience of others. To say that I'm now totally confused is a massive understatement. Here is a photo of the old cracked cap and its bearing and the newly found one and its bearing. What is the difference? ![[Linked Image from user.fm]](https://user.fm/files/v2-56adb0cc8cbd7fd31a73f9dfb186a142/IMG_4863.JPG)
Last edited by BobK; 02/09/24 07:43 PM.
"I don't have a carbon footprint, I drive everywhere."
|
|
|
|
|
Joined: Oct 2007
Posts: 5,015 Likes: 47
1000 Post Club
|
|
1000 Post Club
Joined: Oct 2007
Posts: 5,015 Likes: 47 |
I did not know that about the mains. I knew about the line boring but didn't know why since that is usually not an issue with later GM sixes. The 216 in my $55 '48 Fleetline made me an Inline guy. Dad & I removed some shims but a tear or so later when it finally let go I had access to a fresh 235. Thanks for the information. I'm staying tuned to follow this.
"I wonder if God created man because he was disappointed in the monkey?" Mark Twain
|
|
|
|
|
Joined: Apr 2003
Posts: 1,537 Likes: 15
1000 Post Club
|
|
1000 Post Club
Joined: Apr 2003
Posts: 1,537 Likes: 15 |
To say that I'm now totally confused is a massive understatement. Here is a photo of the old cracked cap and its bearing and the newly found one and its bearing. What is the difference? Indeed. They "look" identical to me too - save the relief on the front face (left side in the photos). I have a '54 in pieces in the garage - I need to refresh my memory to see what that is for. I just looked at the change to tang bearings - it affects just the upper shells that go into the block. Apparently they did this to allow the top bearing to replaced without taking the engine out of the car (or dropping the crank for that matter). The old bearing could be rolled out and the new one rolled back in - the opposite direction - with the tang acting as a stop. Not sure if there are any other differences in the way the bearings fit with respect the parting lines between cap and block. The change in the part numbers may be as simple as that relief on the front face. But it is something that would certainly need to be noticed early on - because the timing cover fitment is late in the assembly - making for a lot of lost time (if the wrong cap were used).
|
|
|
|
|
Joined: Feb 2024
Posts: 25
Active BB Member
|
|
OP
Active BB Member
Joined: Feb 2024
Posts: 25 |
I'm not disagreeing with you, just being a bit dense. This looks correct to me and I'm trying to understand the issue so that I don't make a mistake. ![[Linked Image from user.fm]](https://user.fm/files/v2-9c5c361a6310dc6ed7c18216f89d432d/IMG_4864.JPG) ![[Linked Image from user.fm]](https://user.fm/files/v2-bc23e02031874a716fe03d571525e9aa/IMG_4865.JPG) PS> I know the bolts I'm using to hold the timing plate and timing cover are wrong, they just happened to be what I had closest to me to illustrate the fitment.
Last edited by BobK; 02/09/24 08:26 PM.
"I don't have a carbon footprint, I drive everywhere."
|
|
|
|
|
Joined: Apr 2003
Posts: 1,537 Likes: 15
1000 Post Club
|
|
1000 Post Club
Joined: Apr 2003
Posts: 1,537 Likes: 15 |
The stovebolts are all close cousins - so the basic fitment is not surprising. Chevrolet went to alot of trouble to ensure that the parts counter didn't give a serviceman the wrong part (including bright yellow paint stripes). My curiosity is sparked - I will try to find out what is different - but rest assured something is different. You have the bearing shells - mark them and try swapping them between the caps. Is the dowel/stake in the same spot? Compare how the original and the replacement fit on the block. How the edges of the bearing shells meet when the different cap and bearing combinations are installed. The top and bottom bearing shells should run on the same surface area of the crank - they cannot be offset.
|
|
|
|
|
Joined: Feb 2024
Posts: 25
Active BB Member
|
|
OP
Active BB Member
Joined: Feb 2024
Posts: 25 |
I am very appreciative of all this help, I really am. I've never seen a babbitt bearing and was concerned when I ordered these parts off of eBay that I had just wasted yet another $40 on something that would sit on the shelf. But after reading your post (above) about the bearing shell, I ran back out to the shop. For ease of discussion, when I refer to the "old" cap, I am referring to the cracked one and when I refer to the "new" cap I am referring to the 70 year old part I acquired on eBay.
I took the new cap and installed the old bearing shell and bolted it to the block. Admittedly, I am not torquing down the bolts, just making them finger tight using a 3/4" socket by hand. With the old shell and the new block, the alignment was 99% perfect. The 1% is a a minuscule edge between the top of the block and the cap itself. The width of this edge can't be measured with any tool I have, but it is less than 1/32 of an inch for sure, probably less. I feel certain that between the paper gasket and some decent amount of gasket sealer that there would be no noticeable gap between this cap and the timing plate that bolts to the front of the block.
However, I am open to be proven wrong on fitment and/or the aftermath of passing along this new cap to my engine guy to have the whole thing fitted and line bored as necessary. I certainly would like this new cap to be the answer to my problem, but if it is going to cause some serious issue down the road, then I need to keep searching for a solution.
"I don't have a carbon footprint, I drive everywhere."
|
|
|
|
|
Joined: Apr 2003
Posts: 1,537 Likes: 15
1000 Post Club
|
|
1000 Post Club
Joined: Apr 2003
Posts: 1,537 Likes: 15 |
You are zeroing in on comparing the fitment. But the concern is not with how the front face of the cap aligns with the front face of the block (which is why there is a gasket). It is about how the cap positions the lower bearing shell with respect to the upper bearing shell in the block. You will need to pull the crank gear to inspect it.
|
|
|
|
|
Joined: Feb 2024
Posts: 25
Active BB Member
|
|
OP
Active BB Member
Joined: Feb 2024
Posts: 25 |
You are zeroing in on comparing the fitment. But the concern is not with how the front face of the cap aligns with the front face of the block (which is why there is a gasket). It is about how the cap positions the lower bearing shell with respect to the upper bearing shell in the block. You will need to pull the crank gear to inspect it. It is hard to tell from this photo, but when I took the "old" bearing shell and inserted it fully into the slot on the "new" cap and then bolted it down (just finger tight on the bolts) I was able to see how the bearing shell lined up with the lower bearing shell from behind the crank timing gear. Without the timing plate installed there is a small space to view the bearing edges. The bearing shell just barely touched on each side (top and bottom shell) and the front and rear edge of the top shell lined up with the edges of the bottom shell. I did examine that fit in addition to the edge of the bearing cap with the block. So far I'm unable to see or find any deal killers. ![[Linked Image from user.fm]](https://user.fm/files/v2-bd0f3503a1f2c61fb77183771cfacaa2/IMG_4867.JPG)
"I don't have a carbon footprint, I drive everywhere."
|
|
|
|
|
Joined: Apr 2003
Posts: 1,537 Likes: 15
1000 Post Club
|
|
1000 Post Club
Joined: Apr 2003
Posts: 1,537 Likes: 15 |
This is interesting. How about the parting lines between the cap and the block? In the first picture you posted (with the old bearing shells installed in the cracked cap) the bearing shell protrudes beyond the end of cap. Does the old bearing fit the same on the new cap?
|
|
|
|
|
Joined: Feb 2024
Posts: 25
Active BB Member
|
|
OP
Active BB Member
Joined: Feb 2024
Posts: 25 |
This is interesting. How about the parting lines between the cap and the block? In the first picture you posted (with the old bearing shells installed in the cracked cap) the bearing shell protrudes beyond the end of cap. Does the old bearing fit the same on the new cap? I assume you are referring to the bearing shell protruding slightly from each side edge of the half-circle of the shell in the cap nearest the mounting surface? When I inserted the same bearing shell (the old one) into the new cap, it too protruded slightly on each edge and that matched up perfectly with the lower half of the bearing shell.
Last edited by BobK; 02/10/24 03:29 AM.
"I don't have a carbon footprint, I drive everywhere."
|
|
|
|
|
Joined: Apr 2003
Posts: 1,537 Likes: 15
1000 Post Club
|
|
1000 Post Club
Joined: Apr 2003
Posts: 1,537 Likes: 15 |
Yes exactly. When the engine is installed the crank is riding on the shells in the bearing caps and a film of oil - with the upper bearing shells providing the clearance were the oil pressure is delivered. The distance above the parting lines is an engineering spec - with upper and lower bearing shells being matched. I checked the '54 in my garage - its front bearing cap looks identical yours but it does have a casting number (3701245) along with that same raised dot casting mark between the oil drain holes: ![[Linked Image]](https://www.inliners.org/ubbthreads/ubbthreads.php?ubb=download&Number=1090&filename=RaisedDot.jpg) So this older design cap may well be of use to you (with the newer design bearing shells). But there are some details to look after when you are measuring the clearances. The 1954 and First Series 1955 engines still used shims to establish a precise fit on a particular block and crank pairing: ![[Linked Image]](https://www.inliners.org/ubbthreads/ubbthreads.php?ubb=download&Number=1091&filename=FirstSeries.jpg) This meant that during assembly all four caps were measured and selectively fit with shims of differing thickness'. The second series 1955-62 engines used more precisely ground caps and bearings which allowed an engine to simply be assembled without shims: ![[Linked Image]](https://www.inliners.org/ubbthreads/ubbthreads.php?ubb=download&Number=1092&filename=SecondSeries.jpg) As you can see the specifications on the cranks and bearings are pretty much identical (GM engineers also gave up the fractions in favor decimals). The newer design calls for tighter clearances on the front two caps vs the rear two. If it were in my garage I would proceed as follows. Take the old (broken) cap and the old bearing shell and measure the clearance with Plastigauge - crush-able plastic that is placed between bearing and bearing surface: torqued to spec and then remove the cap and bearing shell and read the clearance. Clean off the crushed plastic and replace it with new. Now repeat the process using the old bearing shell and the new Cap. I am curious to see if the clearances are different and if so by how much. But before you do anything - I have an important question. Are you trying to avoid taking the crank out of the block?
|
|
|
|
|
Joined: Feb 2024
Posts: 25
Active BB Member
|
|
OP
Active BB Member
Joined: Feb 2024
Posts: 25 |
Yes exactly. When the engine is installed the crank is riding on the shells in the bearing caps and a film of oil - with the upper bearing shells providing the clearance were the oil pressure is delivered. The distance above the parting lines is an engineering spec - with upper and lower bearing shells being matched. I checked the '54 in my garage - its front bearing cap looks identical yours but it does have a casting number (3701245) along with that same raised dot casting mark between the oil drain holes: So this older design cap may well be of use to you (with the newer design bearing shells). But there are some details to look after when you are measuring the clearances. The 1954 and First Series 1955 engines still used shims to establish a precise fit on a particular block and crank pairing: This meant that during assembly all four caps were measured and selectively fit with shims of differing thickness'. The second series 1955-62 engines used more precisely ground caps and bearings which allowed an engine to simply be assembled without shims: As you can see the specifications on the cranks and bearings are pretty much identical (GM engineers also gave up the fractions in favor decimals). The newer design calls for tighter clearances on the front two caps vs the rear two. If it were in my garage I would proceed as follows. Take the old (broken) cap and the old bearing shell and measure the clearance with Plastigauge - crush-able plastic that is placed between bearing and bearing surface: torqued to spec and then remove the cap and bearing shell and read the clearance. Clean off the crushed plastic and replace it with new. Now repeat the process using the old bearing shell and the new Cap. I am curious to see if the clearances are different and if so by how much. But before you do anything - I have an important question. Are you trying to avoid taking the crank out of the block? First, thank you for the information and advice. It is exactly what another friend suggested I do this morning when we spoke. Second, no I'm not necessarily trying to avoid taking the crank out, although if I don't need to that it would be a bonus. When I bought this truck, I received a box full of photos and receipts for everything that was spent on this truck in the past ten years before it went dormant. The engine was rebuilt with new valve seats, push rods, lifters, and even new pistons and the block was bored out slightly, etc. While the engine has sat for a considerable amount of time, it appears to be in very good condition. That being said, I'm trying to use this unexpected setback to clean up as much as I can without pouring thousands more into the project. Replacing all the gaskets and seals is a good step, I had the transmission rebuilt and I've purchased a new pressure plate and clutch disk. I've pounded most of the dents out of the oil pan and pulled the head, cleaning up everywhere that needs cleaning up. If my engine builder buddy thinks I really should pull the crank and do a line bore, then I guess I'll go along with it. But this platigauge step seems to be a good opportunity to see what the next step should be.
"I don't have a carbon footprint, I drive everywhere."
|
|
|
|
|
Joined: Feb 2024
Posts: 25
Active BB Member
|
|
OP
Active BB Member
Joined: Feb 2024
Posts: 25 |
So this older design cap may well be of use to you (with the newer design bearing shells). But there are some details to look after when you are measuring the clearances.
The second series 1955-62 engines used more precisely ground caps and bearings which allowed an engine to simply be assembled without shims:
As you can see the specifications on the cranks and bearings are pretty much identical (GM engineers also gave up the fractions in favor decimals). The newer design calls for tighter clearances on the front two caps vs the rear two.
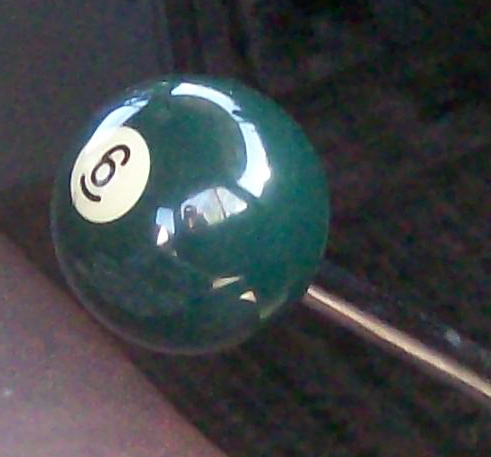
If it were in my garage I would proceed as follows. Take the old (broken) cap and the old bearing shell and measure the clearance with Plastigauge - crush-able plastic that is placed between bearing and bearing surface: torqued to spec and then remove the cap and bearing shell and read the clearance. Clean off the crushed plastic and replace it with new. Now repeat the process using the old bearing shell and the new Cap. I am curious to see if the clearances are different and if so by how much. Am I reading this correctly for my 1959 engine. The number one (main bearing) should have clearance of between .0008 and .0024 and the ID of the #1 bearing shell should be 2.6856 ?
"I don't have a carbon footprint, I drive everywhere."
|
|
|
|
|
Joined: Feb 2024
Posts: 25
Active BB Member
|
|
OP
Active BB Member
Joined: Feb 2024
Posts: 25 |
Would I then want to use the Green platigauge? ![[Linked Image from user.fm]](https://user.fm/files/v2-0cd66d699ceec761eb3798ed9407c40b/Screenshot%202024-02-10%20at%205.05.14%E2%80%AFPM.jpg)
"I don't have a carbon footprint, I drive everywhere."
|
|
|
|
|
Joined: Apr 2003
Posts: 1,537 Likes: 15
1000 Post Club
|
|
1000 Post Club
Joined: Apr 2003
Posts: 1,537 Likes: 15 |
Am I reading this correctly for my 1959 engine. The number one (main bearing) should have clearance of between .0008 and .0024 and the ID of the #1 bearing shell should be 2.6856 ? Those diagrams and engineering specifications are from the GM Heritage Info Kits. The images are from the '54 and '56 Chevrolet pubs. The specs are for stock/standard. If your crank has been ground under-size the bearing shells will have a larger ID. The clearances are open for debate - perhaps generous on the high end (but close enough for factory or shop work back in those days).
|
|
|
|
|
Joined: Apr 2003
Posts: 1,537 Likes: 15
1000 Post Club
|
|
1000 Post Club
Joined: Apr 2003
Posts: 1,537 Likes: 15 |
Would I then want to use the Green platigauge? Start off with the Red. If squishes out wide - retest with the green for precision.
|
|
|
|
0 members (),
314
guests, and
51
robots. |
|
Key:
Admin,
Global Mod,
Mod
|
|
|
|