|
|
Joined: Dec 2001
Posts: 48
Active BB Member
|
OP

Active BB Member
Joined: Dec 2001
Posts: 48 |
OK, I'm in need of either some advice or a psychiatric exam or both.  I have replaced the rear main in my GMC 302 motor 4 times in an attempt to stop the GMC continuous undercoating system and so far all have been unsuccessful. I have used each of the following seals: 1) FelPro original GMC rear main seal 2) FelPro "new & improved rear main seal with teflon/graphite impregnated rope 3) Tom Langdon's NOS asbestos rope seal 4) Best Gaskets new square rope braid with teflon/graphite impregnation. All have failed and my rear main leak continues. Here are my thoughts and tenative plans, but I'm really looking for some solid advice from those of you who have been through rear main hell with a GMC engine before. I've been playing with old GMC's a long time, and I keep telling everyone that I have never seen a rear main that didn't leak; just some leak more than others. *I'm going to pull the engine and get it on an engine stand (AGAIN!). *I'm going to use a good dial indicator to measure the runout in the seal surface on the crank. The surface showed a wierd "scrub" mark on it today while replacing rear main seal #4 (Best brand gasket) which almost lead me to think that maybe the crank has some wobble in it. I measured it on the truck with the rear main cap off (obviously) and it showed about 4 thousandths of runout, but the dial indicator setup was less than ideal. *I'm going to have the seal surface polished as if it were a crank in hopes of maybe finding some runout/play and removing it. *Is there an oversized seal that is available for these motors? * I'm going to hang myself in the shower if this doesn't fix it. This is the 4th time in 6 months that I've had this motor apart attempting to seal up the rear main. Engine runs like a bear and is everything I would ever want in this truck, but this rear main is splashing oil at an impressive rate of about a quart/1000. That's just too much and not to mention what a mess it makes of my undercarriage and canvas top. Who knows the secret to ending rear main seal hell? Here's a shot of the rear main cap with the NOS Asbestos Rope seal immediately following removal today:  As you can see, the wear on the bearing surface looks good, the sealed parts look very good, and even the rope gasket is properly seated. So how the H - E - Double hockey sticks is oil slipping by this thing? Here's the installed Best brand "square rope" seal which I thought was great. In fact, I think it is great, but for whatever reasons, my motor is giving my fits and even this very well designed seal is leaking. 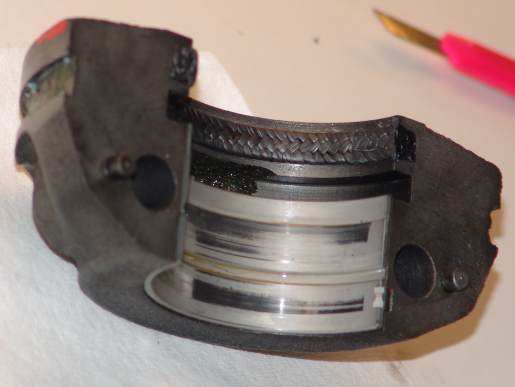 The only plausible explanation I can think of is if the runout in the rear seal surface is out five thousandths or so, it might scrub the seal back on one half of the pass, and then allow oil to slip by on the next half pass. I dunno but I'm about ready to fall on a sword and end this torture! Help! 
Rob English
II Member #2141
|
|
|
|
|
Joined: Dec 2000
Posts: 3,332
1000 Post Club
|
|
1000 Post Club
Joined: Dec 2000
Posts: 3,332 |
I think I see your problem. Hundeds of 'mechanics' over the years have done this too..  You are cutting the seal off even with the face of the main cap and It's not pushing it tight all (360 degrees) around the crank. Here is what to do. First: If the upper seal is the same as pic #1 leave it as-is. Second: Now throw away the seal in pic #2 as it will fail as the others did. Third: Install a new seal in the cap, leaving 1/4" sticking out of it on each side.. Forth: Install the cap using your best guess @ the torque. Sixth: Remove the cap. You will see that the exposed portions have gone into the block with some 'squashed' between the block/cap. Seventh: Trim away the 'squashed portions' and re install carefully so the protruding ends go into the upper seal which now is compressed a little. Eighth: Torque to specs & install oil pan. Good luck 
John M., I.I. #3370
"There are no shortcuts to any place worth going". -Anon
|
|
|
|
|
Joined: Aug 2006
Posts: 289
Contributor
|
|
Contributor
Joined: Aug 2006
Posts: 289 |
I'm not positive on the allowable runout and that could be your problem. I'll tell you what I do fiest then what I've next.
What I do. I pack so much of the seal in that almost none is cut off. I leave a slight amount extra out of the block side, peaked slightly to push into the cap side. I have already drilled and taped a 6/32 hole about 1/2" up from the split and prior to putting in the crank I screw in a pointed allen set screw into the rope seal to hold it from spinning. I then put on the cap in which the rope is also packed as tight as possible. It is cut off flush and the point of the block seal enters the cap side and torque it to your setting. I have coated everything with assembly lube generously.
At this time it takes at least a 3 foot bar to turn it over...IT IS TIGHT. By the time the rest of the engine is assembled it does get a little easier. A 12 volt HP starter has no problem.
This assembly method held at 5500 rpm with 70% nitro and did not leak. Not a dry sump under vacuum either. It had positive pressure in the engine.
Your engine may need some help with vacuum and if this is a street engine I suggest a PCV valve. This will help keep a vacuum on the engine.
I don't do this but I've heard it works. A Dodge 360 real main seal is slightly larger than a stock GMC. I have heard to cut approximatly 1/8" off of each end and place material behind it (I've heard a ty-rap is the right thickness) and put it together as a normal split rubber main seal. I have one of these but yet to try it.
I have also heard a 225 Mopar Slant 6 seal will work. I have purchase one of these too but yet to play with it.
Others may have more to add.
I'm going over to the Fergusons this week to measure one of there record breaking motors. I believe they use the 360 seal and I'll ask them about it....Good Luck
216.158 MPH 12-Port 302 GMC on 70% 171.0 MPH 302 stock head on gasoline 7 years later
|
|
|
|
|
Joined: Dec 2001
Posts: 48
Active BB Member
|
|
OP
Active BB Member
Joined: Dec 2001
Posts: 48 |
John, Actually, I installed the latest seal precisely in accordance with Best's very detailed instructions. They provide a shim and cutoff tool to in fact leave the ends proud of the cap. The ends were NOT trimmed flush with the top of the cap. I carefully inspected the NOS rope seal ends as this is where one would obviously expect the seal to first let oil slip by. Remember that this is splash oil not pressure oil. The NOS Rope seal showed no signs of oil sneaking by the ends at all. Both the top and bottom were very carefully installed, and the cap was removed after installation multiple times to ensure that the ends were not jammed under the cap. The Best Seal is not one which lends itself to trimming in the way you describe and I am a bit baffeled by your approach as I've now been horsing with this particular seal extensively and trying to trim a smashed seal is like trying to trim your beard with a chainsaw! It's too difficult once the seal ends are mashed. In fact, Best's instructions state specifically to NOT do what you suggest, but at this point I'll try anything. I will say that each round of the seal dance consumes on entire day, so this is not an insignificant event. By the time you get the truck up and the chassis components that are in the way of pan removal removed and then pan off and the gasket surfaces cleaned, you've lost a good 4 hours. Then a few more on the install side. I had two guys at my shop today who collectively have over 60 years of inline engine experience; one as a mechanic and one an engine shop owner and rebuilder. They are both stumped as well. 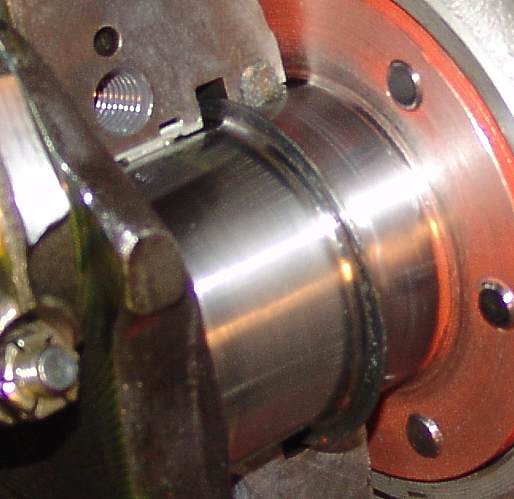 John, here's what the crank looks like with the upper half asbestos rope seal installed, and as you can see it sits just a whisker proud of the surface in the "relaxed" position. I was VERY careful in my inspection of the cap upon removal and I am 99% certain that oil is not sneaking by the ends of the seal - any seal - and I'm pretty confident on the end surfaces being tight. There wasn't a lick of oil anywhere on that portion of the cap or the block on removal. If it was leaking there, I'd think that you'd see some oil on that surface. I dunno. I'm lost. The next rounds will all be done on an engine stand as this sucker is coming out because that's the only way to deal with this I think.  ------------------ JimmySix: Excellent suggestions and I'm with you on the runout issue. I will be putting a good dial indicator on this sucker and finding out exactly what I have. Packing those rope seals into the pocket is pretty difficult, and Mike (the engine shop owner) had mentioned that he's had seals that he has used a variety of types and thicknesses of shims in similar circumstances under the seal cup/retainer to help them raise the seals up and tighten the seal. We also talked about machining the block and cap to accept a small block neoprene seal. I dunno but sure appreciate everyone's ideas!
Rob English
II Member #2141
|
|
|
|
|
Joined: Dec 2000
Posts: 3,332
1000 Post Club
|
|
1000 Post Club
Joined: Dec 2000
Posts: 3,332 |
Dear Rob;
I'm not sure what the "best" seal is etc.
The method I described is how It's done on all inline Chevy 6 engines from 37-62. GMC is the same basic 'rope' seal as they are.
The "trim" is easly done on the cap with a single edge razor blade. The block side is recessed (after the crush).
This method is as close to 'foolproof' as it gets. The only time it doesn't work well is with a new seal on the cap and an old (stiff/hard) seal in the block with an old loose bearing.
Pic #3 is the seal sticking out of the block??
John M., I.I. #3370
"There are no shortcuts to any place worth going". -Anon
|
|
|
|
|
Joined: Dec 2001
Posts: 48
Active BB Member
|
|
OP
Active BB Member
Joined: Dec 2001
Posts: 48 |
Originally posted by John H. Meredith:
Dear Rob;
I'm not sure what the "best" seal is etc. John: Here's the Best Brand gasket setup I used: http://www.oldGMCtrucks.com/photos/gmcforum/302/BestGasketRearMain.jpg The NOS rope seal is about 4 thouandths proud, but no more. And there is black RTV on either side of the cap by and around the seal ends to further seal it. I am again very confident that no oil is getting by the ends on the top between the mating surfaces. This problem appears to be scrubbing the seal itself and runout continues to be high on the list of suspects. Check out that Best Gasket setup. These guys have a pretty good product design, and many of our oldGMCtrucks.com forums members are running these successfully in their 270's and 302's with no leaks. This engine is just a nasty bugger that wants to drive me nutso; and so far it's been doing a bang-up job! 
Rob English
II Member #2141
|
|
|
|
|
Joined: Aug 2006
Posts: 289
Contributor
|
|
Contributor
Joined: Aug 2006
Posts: 289 |
Rob, from your last picture I see the area where the seal rides is smooth. All my factory cranks have a crosshatched finish and I request all my crank grinders leave it that way.. It just works for me..Good Luck
216.158 MPH 12-Port 302 GMC on 70% 171.0 MPH 302 stock head on gasoline 7 years later
|
|
|
|
|
Joined: Apr 2000
Posts: 540
Major Contributor
|
|
Major Contributor
Joined: Apr 2000
Posts: 540 |
Me and OldcarKook know each other well,soo,here goes.And I know his mechanic friend is top notch.
I have the Best Gasket rear main seal in a modified 302,after a few long road trips and many trips to redline,it doesn't leak at all.
The only difference I see is my engine's crank has those closely spaced angles little grooves cut into the seal area of the crank.This supposedly throws the oil away from the seal.
Your photo's of the bearings;remember when the cam in my 302 failed after about 1500 miles and I had to disassemble the engine to clean out the cam debris? My engine's main bearings didn't look as "marked" as yours,they hardly looked used.No longer available Clevitie 77 brand in my case,but that shouldn't matter.My bearing clearances are also a little loose,like .0028 as actually measured,so lots of oil is being thrown off .
Now maybe the photos make the wear look excessive,but are you absolutely sure there isn't a misalignment with the rear main cap or the block itself? The original factory machining on my 302,it was all standard size,was bad.Not the block crank journals,but the block deck and rods.
Maybe ya got a bad block? Just a thought.
70 Triumph 650 cc ECTA current record holder
|
|
|
|
|
Joined: Dec 2001
Posts: 48
Active BB Member
|
|
OP
Active BB Member
Joined: Dec 2001
Posts: 48 |
Originally posted by jimmy six #35:
Rob, from your last picture I see the area where the seal rides is smooth. All my factory cranks have a crosshatched finish and I request all my crank grinders leave it that way.. It just works for me..Good Luck I have also heard that some cranks (mopar?) have a "barber shop pole" knurled finish that "pumps" oil away from the seal. I think at this point I will apply all of the suggestions here on final attempt to stop this nusiance leak and am still looking for any additional ideas. I wrote to Best Seals for their input as well. That is really a novel seal that they make and I hope to find a way to make it work for my situation.
Rob English
II Member #2141
|
|
|
|
|
Joined: Dec 2000
Posts: 3,332
1000 Post Club
|
|
1000 Post Club
Joined: Dec 2000
Posts: 3,332 |
R; The seal MUST be pushed against the crank, no matter what brand you use. This is done by the method I explained. It's just not tight enough around it, is all. I first learned this from an "old time" mechanic that worked mainly on the 216 in the 30 & 40s in about 1959 when I was a 'teenager'. Later on, the crank was machined (as mentioned) to assist in oil control for the "Hi pressure" engines (216 was 15#). The only other thing (to cause leak) is the bearing clearence which I'm sure you've checked. The crank grinder would have checked (run out) in the grinding process. Packing the seal in (as mentioned) is okay too. I have seen only one engine with the offset seal installed (as Walt mentioned), but don't know how this is done. It may have been a (in frame) replacement. Check with Beck's and see what they say etc. Good luck.
John M., I.I. #3370
"There are no shortcuts to any place worth going". -Anon
|
|
|
|
|
Joined: Jul 2000
Posts: 1,613
1000 Post Club
|
|
1000 Post Club
Joined: Jul 2000
Posts: 1,613 |
Resolve the runout issue and make sure the seal surface is perfect. Also use a very very small amount of sealant between the main cap and the block. Of course, there is no guaranty that this will stop it from leaking...
I.I. #3174
|
|
|
|
|
Joined: Dec 2001
Posts: 48
Active BB Member
|
|
OP
Active BB Member
Joined: Dec 2001
Posts: 48 |
Had a conference this morning following up on your suggestions as well as some others and I am now thinking (of the opinion) that we need to REALLY pack the daylights out of the seal on installation such that we drive as much pressure as can be brought to bear into the ends of the rope seal to make the rope bulge and fatten up such that it will be very tight. I am now coming around to suspect that with each seal, we simply repeated our errors of not packing the ends down hard enough prior to install. We will use a GM seal installation tool and a small dowel to push that seal into the pocket very aggressively on the next attempt. Your comments are great and VERY helpful. Now take away all the sharp objects in my home and give a few days to drink my frustration under the table and I'll be fine! 
Rob English
II Member #2141
|
|
|
|
|
Joined: Apr 2000
Posts: 540
Major Contributor
|
|
Major Contributor
Joined: Apr 2000
Posts: 540 |
Since I'm the guy with the leak proof Best Gasket rear main seal,let me tell ya what I did.Nothing at all really,the square section seal sits kind of loose in the block or main cap as compared to a traditional rope seal.I didn't overly pack in the seal,just followed the Mfg's direction sheet.This seal is loosely woven,I'm thinking it designed that way for a pupose and packing it too tighly will cause problems.
70 Triumph 650 cc ECTA current record holder
|
|
|
|
|
Joined: Aug 2006
Posts: 289
Contributor
|
|
Contributor
Joined: Aug 2006
Posts: 289 |
Talked to Don Ferguson and his fix is time consuming. He does the work when building the engine. He did not remember which seal but it may have been a 460 Ford. He copies the seal seat of the bottom of the main cap then machines another complete one. Then machines out the GMC area and places the aluminum one in he has machined.
In other words he make an insert of the 460 seal. Then fits it to the machined opening in the GMC.
Works for him. Good luck
216.158 MPH 12-Port 302 GMC on 70% 171.0 MPH 302 stock head on gasoline 7 years later
|
|
|
|
|
Joined: Dec 2000
Posts: 3,332
1000 Post Club
|
|
1000 Post Club
Joined: Dec 2000
Posts: 3,332 |
Beck's Machine Shop has a similar method for the early Chev. engines too.
I guess we'll all have to wait & see how the next seal works for him etc.
The rope design always worked if "all else" was okay, which makes me think the bearing clearence is 'off' somehow as it shows a lot of wear.
John M., I.I. #3370
"There are no shortcuts to any place worth going". -Anon
|
|
|
|
|
Joined: Dec 2001
Posts: 48
Active BB Member
|
|
OP
Active BB Member
Joined: Dec 2001
Posts: 48 |
Just a quick update that the final answer is not yet known, but that the folks over at "BEST" are appropriately named. They responded to my email and a lengthy discussion with the engine shop owner ensued. A few "experimental" items are en-route and a great deal of knowledge has been obtained. I hope to have a follow up post on this topic that will benefit all rope seal installers, but until we get success and can prove it, I'll hang back. Again, you guys have been extremely helpful and I am anxious to get through the next phase so I can report the final results! Thanks.
Rob English
II Member #2141
|
|
|
|
|
Joined: Dec 2001
Posts: 48
Active BB Member
|
|
OP
Active BB Member
Joined: Dec 2001
Posts: 48 |
EUREKA! Today, after six months and five engine breakdowns, we have finally sealed the rear main! I am going to copy my post on the oldGMCtrucks.com boards to make it a little easier for me, so realize that references to others are members of the oldGMC boards where we have a close circle of buddies. ---------------------------------------------
Nothing is as easy as it looks!
As many of you know, the Huckster/302 project has been plagued all summer with a pesky rear main leak. We've had the engine apart FIVE times (counting today) in an attempt to seal up this leak. We've used every seal known to man including NOS asbestos rope seal; all without success until today.
I emailed Best Gaskets, and got a nice response from the owner who asked that I call to discuss the problem. I decided it would be best to have Mike Aldrich talk to Best Gaskets instead of me since Mike was familiar with the problem in more engines than mine, and, he knows what he's doing and I don't!
After a few calls back and forth, Best sent along some different gasket material to try. We did that a couple months ago and unfortunately the leak continued unabated. Back to the drawing board.
Mike has had a running dialog with Best since mid summer and a few weeks ago they sent some new gasket material, and, a few other secret tricks which I am unable to reveal at this time.
What I can tell you is that the new gasket material has, for the first time, totally sealed up the back end of my 302! Yippee!!!!
Bill is like some contender in the Iron Chef, only he's the Iron Mechanic! Fast, efficient, and very knowledgeable, watching Bill attack a job is like watching a lion bring down a gazelle. He knows exactly what he's doing all the way. Couple him up with 40 years of experince in building engines in MikeA, and you have the ultimate dream team.
I had done most of the hard work when they got started: I had removed the oil plug and drained the crankcase. So they only had a little disassembly to do.
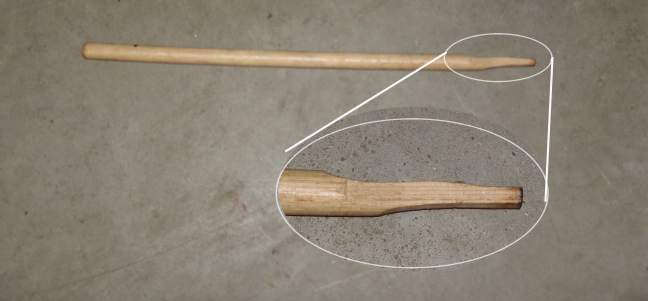
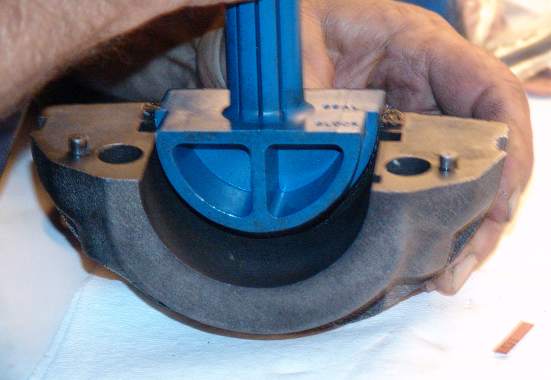
First, with the rear main cap removed, Mike asked me to make a push stick for him to coax the NOS asbestos rope seal that was in there out. I tried cutting down a toothbrush handle, but it broke and as I was headed back into my basement woodshop to find something else, I passed my son's drumset and saw 100 or so busted drumsticks in pile. EUREKA! I took a drum stick to my band saw and carved down to match the rear main seal pocket size:
Now armed with the pusher and MikeA's rope seal remover tool, a corkscrew, he successfully attacked and removed the original NOS rope seal.
That was the easy part.
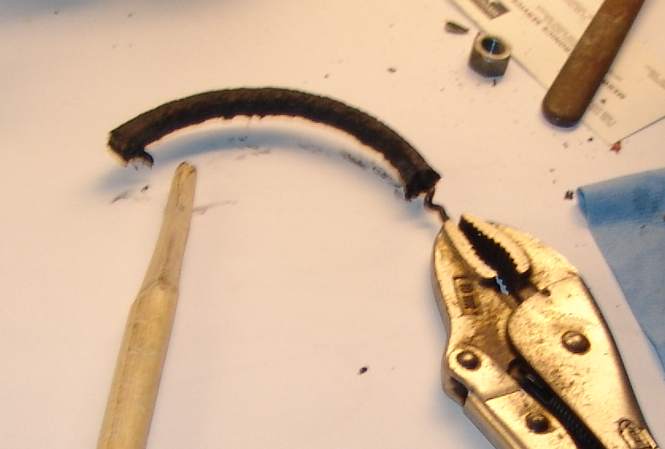
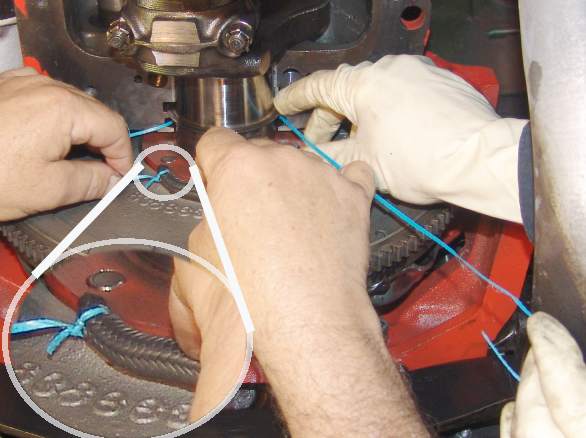
We thought we'd try to "sneak" the top half of this newer, thicker, denser, teflon/graphite rope seal up and over the main by fashioning a slip knot on a strong piece of nylon but after a great number of tries and loosening up ALL of the main caps, we could still not get it in. Getting the larger replacement seal in place on the top proved to be a much more difficult task. We tried a number of different approaches to feed it in, up, and over the crank but all just resulted in total frustration.
In the end, we pulled the driveshaft and tranny and then with all four main caps loosened a bit, the crank fell down a little and allowed us to finally feed the new seal in, up and over. The photo below shows the first (failed) attempt using a thick piece of plastic strapping. We ended up using double dental floss which was just strong enough to lasso the end of the seal, and while Bill's gloved hand tugged on the line, MikeA fed it carefully to the slot with a small flat screwdriver while I turned the the engine over from the top by the fan belt/fan blade. This was absolutely a three man operation. NOT EASY!
With the top seal now in place, MikeA & Bill spent a long time trying to carefully trim the ends of the rope to get it just right. Using the drumstick/pusher, they kept mashing the proud ends of the seal into the pocket alternating on each side and with it now mashed in there as much as possible, they tightened up the bearing caps and Mike trimmed it up to his satisfaction. Now the focus shifted to the lower seal half in the bearing cap.
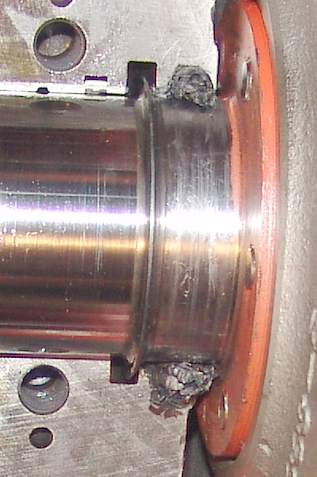
Mike used the tools that come with the BEST kit which include a small shim spacer that leaves "just the right amount" of seal showing AFTER he used his original GM rope seal tools to set the seal in the pocket and get it compressed and mashed in place with the drumstick and round GM seal tool which duplicates the radius and diameter of the crankshaft surface that the seal will ride on.

The cap is now ready to be installed:

Mike was careful to put just enough BlackRTV Gasket seal on the bearing surface and seal ends to give a little sealing of any irregularities, but not so much as to squirt out all over the place in end up in my oil system. He installed, then removed the cap to inspect both surfaces carefully before installing it a final time and torquing down the bearing caps to the specified 95 ft/lbs.
Reassembly went quickly, but that is ONLY because of Bill's speed and experience. I'm telling you, watching Bill on a job is like watching one of these iron chef competitions! One hour flat and the meal is done!
I will spare you the details of the reassembly, and the embarressment of Bill's discovery that I was just a tad low on tranny oil (1+ quart) but suffice it to say it went well for me watching the masters in action.
The proof as they say, is in the pudding. After a half hour HIGH SPEED flogging, I returned and parked in the driveway. Normally at this time, in all of the previous four attempts, a large oil spot appeared nearly immediately.
After 1 hour of sitting, it looked like this under the truck:
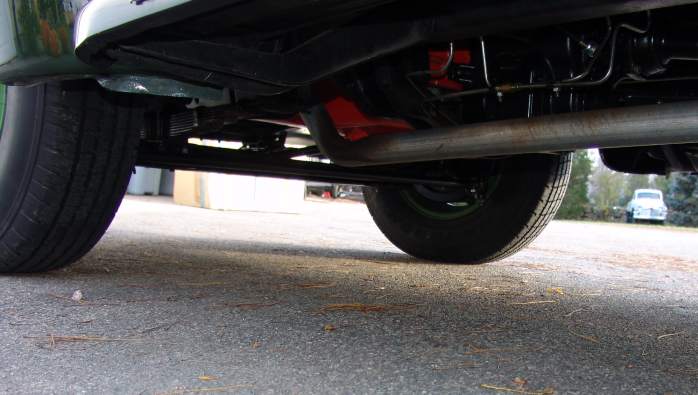
FINALLY! We have met the enemy, and after four months, five seals, and much blood and crankcase oil, WE HAVE WON!
-----------------------------------------------
Rob English
II Member #2141
|
|
|
|
|
Joined: Dec 2000
Posts: 3,332
1000 Post Club
|
|
1000 Post Club
Joined: Dec 2000
Posts: 3,332 |
Dear Rob; Outstanding!! Glad to hear it. The 'law of adverages' says: "You have to win sometines".
John M., I.I. #3370
"There are no shortcuts to any place worth going". -Anon
|
|
|
|
|
Joined: Apr 2003
Posts: 229
Contributor
|
|
Contributor
Joined: Apr 2003
Posts: 229 |
Originally posted by OldCarKook: EUREKA! Today, after six months and five engine breakdowns, we have finally sealed the rear main!
I am going to copy my post on the oldGMCtrucks.com boards to make it a little easier for me, so realize that references to others are members of the oldGMC boards where we have a close circle of buddies.
---------------------------------------------
Nothing is as easy as it looks!
As many of you know, the Huckster/302 project has been plagued all summer with a pesky rear main leak. We've had the engine apart FIVE times (counting today) in an attempt to seal up this leak. We've used every seal known to man including NOS asbestos rope seal; all without success until today.
I emailed Best Gaskets, and got a nice response from the owner who asked that I call to discuss the problem. I decided it would be best to have Mike Aldrich talk to Best Gaskets instead of me since Mike was familiar with the problem in more engines than mine, and, he knows what he's doing and I don't!
After a few calls back and forth, Best sent along some different gasket material to try. We did that a couple months ago and unfortunately the leak continued unabated. Back to the drawing board.
Mike has had a running dialog with Best since mid summer and a few weeks ago they sent some new gasket material, and, a few other secret tricks which I am unable to reveal at this time.
What I can tell you is that the new gasket material has, for the first time, totally sealed up the back end of my 302! Yippee!!!!
Bill is like some contender in the Iron Chef, only he's the Iron Mechanic! Fast, efficient, and very knowledgeable, watching Bill attack a job is like watching a lion bring down a gazelle. He knows exactly what he's doing all the way. Couple him up with 40 years of experince in building engines in MikeA, and you have the ultimate dream team.
I had done most of the hard work when they got started: I had removed the oil plug and drained the crankcase. So they only had a little disassembly to do.
First, with the rear main cap removed, Mike asked me to make a push stick for him to coax the NOS asbestos rope seal that was in there out. I tried cutting down a toothbrush handle, but it broke and as I was headed back into my basement woodshop to find something else, I passed my son's drumset and saw 100 or so busted drumsticks in pile. EUREKA! I took a drum stick to my band saw and carved down to match the rear main seal pocket size:
Now armed with the pusher and MikeA's rope seal remover tool, a corkscrew, he successfully attacked and removed the original NOS rope seal.
That was the easy part.
We thought we'd try to "sneak" the top half of this newer, thicker, denser, teflon/graphite rope seal up and over the main by fashioning a slip knot on a strong piece of nylon but after a great number of tries and loosening up ALL of the main caps, we could still not get it in. Getting the larger replacement seal in place on the top proved to be a much more difficult task. We tried a number of different approaches to feed it in, up, and over the crank but all just resulted in total frustration.
In the end, we pulled the driveshaft and tranny and then with all four main caps loosened a bit, the crank fell down a little and allowed us to finally feed the new seal in, up and over. The photo below shows the first (failed) attempt using a thick piece of plastic strapping. We ended up using double dental floss which was just strong enough to lasso the end of the seal, and while Bill's gloved hand tugged on the line, MikeA fed it carefully to the slot with a small flat screwdriver while I turned the the engine over from the top by the fan belt/fan blade. This was absolutely a three man operation. NOT EASY!
With the top seal now in place, MikeA & Bill spent a long time trying to carefully trim the ends of the rope to get it just right. Using the drumstick/pusher, they kept mashing the proud ends of the seal into the pocket alternating on each side and with it now mashed in there as much as possible, they tightened up the bearing caps and Mike trimmed it up to his satisfaction. Now the focus shifted to the lower seal half in the bearing cap.
Mike used the tools that come with the BEST kit which include a small shim spacer that leaves "just the right amount" of seal showing AFTER he used his original GM rope seal tools to set the seal in the pocket and get it compressed and mashed in place with the drumstick and round GM seal tool which duplicates the radius and diameter of the crankshaft surface that the seal will ride on.
The cap is now ready to be installed:
Mike was careful to put just enough BlackRTV Gasket seal on the bearing surface and seal ends to give a little sealing of any irregularities, but not so much as to squirt out all over the place in end up in my oil system. He installed, then removed the cap to inspect both surfaces carefully before installing it a final time and torquing down the bearing caps to the specified 95 ft/lbs.
Reassembly went quickly, but that is ONLY because of Bill's speed and experience. I'm telling you, watching Bill on a job is like watching one of these iron chef competitions! One hour flat and the meal is done!
I will spare you the details of the reassembly, and the embarressment of Bill's discovery that I was just a tad low on tranny oil (1+ quart) but suffice it to say it went well for me watching the masters in action.
The proof as they say, is in the pudding. After a half hour HIGH SPEED flogging, I returned and parked in the driveway. Normally at this time, in all of the previous four attempts, a large oil spot appeared nearly immediately.
After 1 hour of sitting, it looked like this under the truck:
FINALLY! We have met the enemy, and after four months, five seals, and much blood and crankcase oil, WE HAVE WON!
----------------------------------------------- So,Rob, how much mat'l did you leave sticking out for crush as you tightened up the cap? What part no. would we order from Best?
|
|
|
|
|
Joined: Dec 2001
Posts: 48
Active BB Member
|
|
OP
Active BB Member
Joined: Dec 2001
Posts: 48 |
We left exactly what Best recommends and provides for with the tool kit. I'd guess 60 thousandths but I don't know really. The kit number is 5144. Also, Best makes an EXCELLENT pan gasket and I highly recommend that too. Much better than the FelPro pan gasket. 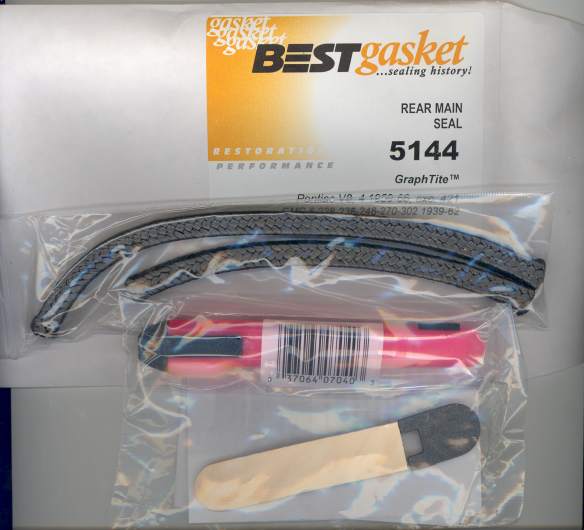 If you look in the photo above, you'll see a wooden "thumb protector" for trimming the seal ends and it is shown in my post "in use". Under the knife blade (included in the kit) is the black shim which is also shown as a round end on one end and recess on the other. The recess is fitted over the seal end while lying flat on the block or bearing cap, then the wooden thumb protector is used to cut against. The trimmed seal is shown in the final shot of the bearing cap. 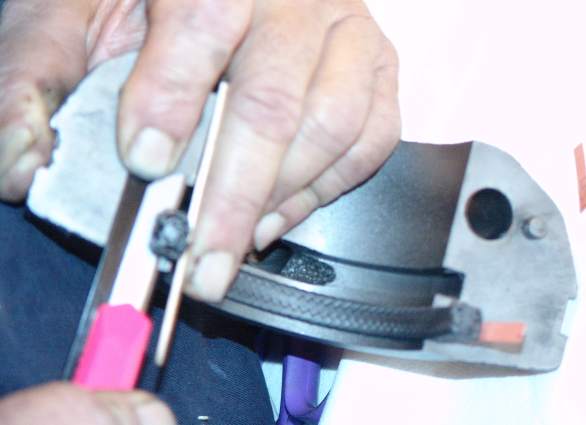
Rob English
II Member #2141
|
|
|
|
|
Joined: Dec 2001
Posts: 48
Active BB Member
|
|
OP
Active BB Member
Joined: Dec 2001
Posts: 48 |
How was it that Yogi Berra put it: "It ain't over until it's over."? While my 302 rear main seal continues to be dry, another motor proved a little problematic and we cooked up a modification that I think others might benefit from so I'm sharing it here. In this case, the Best Gaskets rope seal was in a 270 and shims were used (like my final job on the 302) but it appears in the autopsy that the shims actually provided a slip sheet for the seal to spin and leak. Hard to say exactly what the cause was, but the seal had spun in the pocket and the pocket showed more polished surface that expected indicating the seal was moving. I have seen this in other motors with the old asbestos rope seals, so this is not a new problem in the rear mains. In this case, a small hole was drilled in the bearing cap and then a cut down 5 penny nail was epoxied and driven into the hole with the point sticking up. This grabs the rope so it can't move at all, but is still far enough out of the way that it is not in play with the crank. Another modification to consider... 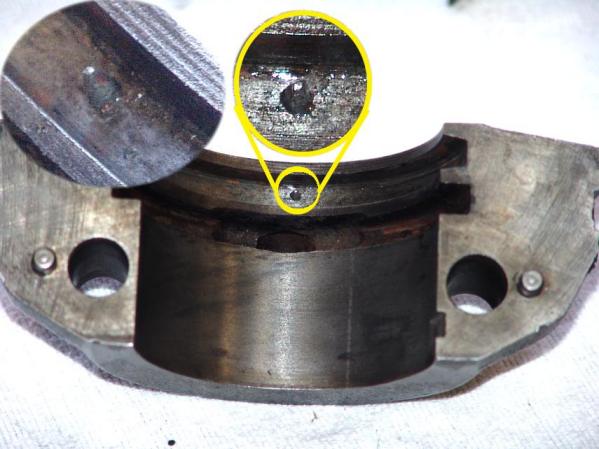 Also in this case, 250 lb. braided "tuna" fishing line was used to pull the seal up and over the crank since this engine was still in the truck. Took a few tries to get the right knot (blood knot) but it worked like a charm. 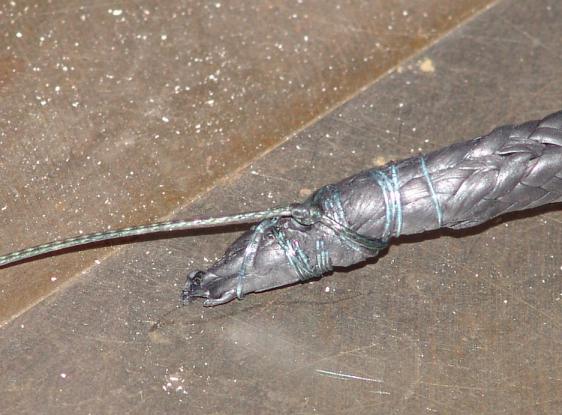
Rob English
II Member #2141
|
|
|
|
|
Joined: Aug 2006
Posts: 289
Contributor
|
|
Contributor
Joined: Aug 2006
Posts: 289 |
Great pics and info. I have always pinned the seal to keep it from spining or moving. My method is described previously. It's just another thing you learn about these engines. I still like the rope. Good Luck...J.D.
216.158 MPH 12-Port 302 GMC on 70% 171.0 MPH 302 stock head on gasoline 7 years later
|
|
|
|
|
Joined: Dec 2001
Posts: 48
Active BB Member
|
|
OP
Active BB Member
Joined: Dec 2001
Posts: 48 |
Originally posted by jimmy six #35:
I have always pinned the seal to keep it from spining or moving. My method is described previously. I TOTALLY missed this in your earlier post! Thanks for pointing the way to a great innovation - wish I'd paid closer attention to your post! As you said, the biggest key I think is packing that rope in there as much as possible. When they are pulled they narrow because of the braid and then need to be fattened back up again. These newer teflon/graphite seals are as slippery as a piece of oily spaghetti to handle, and when they do leak, they leave a very distinctive black goo trail so that you know it's them that's leaking and not the pan gasket. Don't ask me why I know this so well. I figure by the time I get to my 35th rear main seal job, I'll have this all figured out. EXPERIENCE IS THE COMB THAT MOTHER NATURE GIVES TO US WHEN WE ARE BALD
Rob English
II Member #2141
|
|
|
|
|
Joined: Jan 2007
Posts: 16
Active BB Member
|
|
Active BB Member
Joined: Jan 2007
Posts: 16 |
I've followed this thread with a lot of interest having had rope seal oil leaks in engines of my own over the years. Having said that perhaps some readers may see this as a handy tool to have on hand ,at times you mind find it to be in the "priceless" catagory.I'm sure many of yas are familiar with this one >>
KD Tools 492 Sneaky Pete Oil Seal Remover/Installer
492
Oil Seal Remover and Installer
Removes and installs upper rear main oil seals with engine and crankshaft in place. Works on both wick and neoprene type seals. "Chinese Finger" type grip won't slip from seal during installation. Set includes wick seal remover, installer, guide funnels, pusher, offset trimmer, and neoprene seal punches.
nortin
|
|
|
|
|
Joined: Dec 2022
Posts: 2
Newcomer
|
|
Newcomer
Joined: Dec 2022
Posts: 2 |
I have a 1956 GMC 270 in a 1949 100 truck. I'm glad you guy's spent the time and effort to post what you have done trying to fix your rear main seal problems. This will be the 3rd time I have tried to seal up my engine. The last two seals were the best brand. The first time I decided I didn't need to drill and put the 1/16 roll pin in the rear main cap like they suggest to do. ( every time I have tried to fix the leak was on the engine stand). The seal turned in the groove causing a major oil leak. The 2nd time I followed heir instructions to the T. I thought I would be making it better by putting Permatex ultra black under the seal on both the cap and block. ( WRONG ) The seal turned out of the grove 1/2 inch causing another major leak. I have the engine tron down again and all cleaned up ready to try again. This time my engine Machinist who has been doing this for 36 years said here use the Felpro rear main seal and put it in dry, pack it in the cap and block real good and leave approximately .010 sticking out from both ends. Don't put anything on the ends of the seals or under them. Put some engine lube on the seals and put the crank in. If this doesn't work I don't know what to do next. Just an extra note for anybody out there that is having seal issues. I thought I would be smart and put one qt of Lucas engine oil leak in with the oil. Well the leak got less until the Lucas caused restriction of the oil in the rocker arm assembly causing the intake valve on #2 cylinder to seize up in the guide breaking off the end of the pushrod and causing a major issue. All of the valves have excessive ware on them along with the guides. Ordered all new valves, pushrods, installing new brass valve guides and gaskets. When cleaning up all the parts the Lucas was like honey and hard as hell to clean up. one last thing. I got an email from Permatex and they say to put the Permatex high tack gasket adhesive under the rear main seals to keep them from turning? That do you guy's think? Thanks
|
|
|
|
0 members (),
315
guests, and
31
robots. |
|
Key:
Admin,
Global Mod,
Mod
|
|
|
|