|
|
Joined: Jul 2008
Posts: 183
Contributor
|
OP

Contributor
Joined: Jul 2008
Posts: 183 |
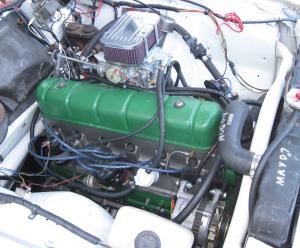
Hi all, I'm about to go through a Rambler 195.6 OHV inline 6 and need a bit of help on a problem area. This will be a full rebuild/freshen, and while my budget is small, I won't be cheaping out on anything that matters. My goal is enhanced reliability and a few mods for performance. It's in a 1963 Rambler American hardtop, Twin Stick (3spd + OD on the floor). Last year I began vintage rallying, and to everyone's surprise, especially mine, the car actually handles well and 130hp is fine in a 2600 lb car. I drive my old cars hard, no abuse, but hard. I stay away from the redline (4500 here) but I make it work. I commute 100 miles/day on the infamous 405 freeway here in Los Angeles, some 15,000 miles/year, and it does pretty good and keeps me on my toes! Pics of the head here: http://wps.com/AMC/1963-Rambler-American/Nash-195.6OHV-engine/heads.htmlAnyways -- head sealing. I've personally examined 4 or 5 of these things and in their very old age, what always does them in is head sealing issues: combustion chamber to water jacket leaks, always involving the headgasket. One of them showed signs of *two* overhauls; and all of them had been overbored at least once, so these are not pampered wilting flowers, but old motors run hard and long. This is an OLD! motor. It's Nash lineage back to the 1930's. Very robust, well developed, heavy, unpowerful. It's very, very short, important in this tiny car. Crank and rods are all forged. Long stroke, and really long rods. Huge bearings, decent oil supply (and I'm modifying the pump for full filtration). I'll run synthetic oil, great success with that in other motors. The factory manual says "check torque" every 4000 miles and "retorque head" every 8000. "Nobody" does this on an old daily transport, so eventually the head leaks water, runs low and gets hot. Owners top off the radiator (this goes on for months or years) and eventually it runs dry and the head cracks. You can tell it's gone on a loooong time from the amount of rust spray and the fact that there's nothing but clear water in the cooling system! The headbolts are very small, and relatively few. They're 7/16-14 thread, only about 5/8" engagement into the block. 15 bolts, and spacing is a bit erratic at the ends. I sliced a junk head up into many pieces, and I can say with some authority there's no room to add any more headbolts, and even drilling them out for 1/2" would leave things close to cylinders or the edge of the casting. Here's pics of the sliced up head: http://wps.com/AMC/1963-Rambler-American/Nash-195.6OHV-engine/Head-examined/index.htmlSo the problem at hand -- headgaskets on old motors in the 21st century. I will have the block deck milled FLAT AND SMOOTH and the head surface too, one "NORS" shortblock I bought, all new parts, had a crap block top surface. I think that is/was common. I will do better. Recommendations here on what a good sealing surface treatment would be? (Compression is low and it's mech. adjustable rockers so I can take off a few .010's without worry.) The blue-type self-sealing headgaskets are not available for this motor -- only the old fashioned steel composite jobs. I've been using spray Permatex, but is there something better these days? This isn't a place for me to get cheap. It was suggested I try studs instead of bolts. When I pull the motor from the car I will check that I have clearance to install/remove a head with stubs. I assume the advantage is I can Loctite the studs into the head, and deal with torque and thrust etc at the nut on the head instead of deep in the block. Everything I work out goes here http://wps.com/AMC/ since there's so little info on this cars. Thanks in advance for any help you might have, and I apologize for the long post!
|
|
|
|
|
Joined: Jul 2004
Posts: 239
Contributor
|
|
Contributor
Joined: Jul 2004
Posts: 239 |
Tom: Great story. Keep it up. I enjoy hearing about others out here breaking trail on old motors / cars. Also your information on the transmission and overdrive is great..Wish I had discovered it about a year ago...  Sincerely: Paul...aka xerxes
|
|
|
|
|
Joined: Jan 2005
Posts: 2,123 Likes: 3
1000 Post Club
|
|
1000 Post Club
Joined: Jan 2005
Posts: 2,123 Likes: 3 |
If you increased the thread depth, what would it hit - water? It's been done using various sealers.
Adding 1/2" would be nice because you'd have more engagement for a stud, which is usually 7/16-14 NC bottom + 7/16-20 for the top, using a flanged net or a thick washer.
|
|
|
|
|
Joined: Jul 2008
Posts: 183
Contributor
|
|
OP
Contributor
Joined: Jul 2008
Posts: 183 |
If you increased the thread depth, what would it hit - water? It's been done using various sealers. I'll have to check on that, I don't have pics of the block or notes on it, but in my head for some reason is 'can't drill more' but hey I'll check again. What bugs me most is the 'why' of retorquing. Do the bolts back out? Stretch? Shift from metal expansion? It's certainly not stressed by the 8.4:1 compression. (Though I should take that back -- it's a very odd wedge shape so who knows, there could be small pockets of high pressure that work weak parts of the gasket area or something. Thinner gaskets will have less area less susceptible to such forces.) I guess I'll switch to studs if I can get the head on and off in the car (what a PITA it will be though! I guess I'll use the hoist). I'll make two of them 1/4" or 1/2" taller to make 'on' easier. Any idea what an optimum surface would be for maximum sealing? Or what sealant to use, beyond old fashioned Permatex?
|
|
|
|
|
Joined: Jun 2007
Posts: 1,411
1000 Post Club
|
|
1000 Post Club
Joined: Jun 2007
Posts: 1,411 |
Here's a wild suggestion for you, how about 12mm head studs? Before you say no, here's how I got there 7/16 = .4375" * 25.4 = 11.1125 mm 1/2 = .500" * 25.4 = 12.7 mm and 12mm / 25.4 = .4724" FWIW there is a dissertation on why studs are better on Pg 36 pf their catalog. Their Catalog Here If you don't buy that how about just the beter quality metal that's usally in a "performance" fastener (better than grade 8 and better quality control). I used to race liquid cooled VWs, we couldn't keep head gaskets in those without head studs either (early non cross flow cooling). Just a suggestion so take it for what it's worth. Hope it helps.
My, what a steep learning curve. Erik II#5155
|
|
|
|
|
Joined: Jul 2008
Posts: 183
Contributor
|
|
OP
Contributor
Joined: Jul 2008
Posts: 183 |
Here's a wild suggestion for you, how about 12mm head studs? I'm fine with metric studs, the problem is that I'd have to drill out the existing threads to install them, then they'd have to be bigger than 12mm/7/16ths. Another choice would be to drill for 1/2", or for helicoils to fit 7/16" studs, that would actually grip more block metal. FWIW there is a dissertation on why studs are better on Pg 36 pf their catalog. Yeah, as I suspected. This would be my first motor with head studs. I'm convinced. I hope I can afford ARP stuff! I hope they have stuff that fits. I made a web page for the head bolt issue (I put details like this on the web, then I can get to it from work, home or a friends house). http://wps.com/AMC/1963-Rambler-American/Nash-195.6OHV-engine/Head-bolts/Thanks for the tips! I'm gonna call ARP tomorrow and get the bad news :-)
|
|
|
|
|
Joined: Jan 2005
Posts: 2,123 Likes: 3
1000 Post Club
|
|
1000 Post Club
Joined: Jan 2005
Posts: 2,123 Likes: 3 |
12mm looks pretty good - less metal removal than 1/2-20 but can withstand more torque (+16.6% more X-area).
12mm × 1.25mm pitch is a common size, and by happy coincidence works out to 20.3 tpi, so very little material will be trashed from the existing threads - they'll just be deeper.
Remember that if you use fine nuts reduce the torque, since it's inverse to the pitch.
|
|
|
|
|
Joined: Jul 2008
Posts: 183
Contributor
|
|
OP
Contributor
Joined: Jul 2008
Posts: 183 |
Well, I called ARP today. I bought studs for the existing 7/16-14 holes in the block. Stupidly cheap, directly from ARP. They don't have a "kit", but the tech found bulk parts. The six along the intake trough cover will have .68" tall washers. Eh. Total cost around $80. Torque will be 75 ft/lbs (factory sez 60). I'll let you know about fit when they arrive, I have a clean dry block and head in the lab for testing. As a bonus, 12-point nuts that take a 1/2" socket. This means you can actually get a socket on clear and straight on the one rear PITA stud. And yes, you can get the head on and off with the motor in the car. I eyeballed it. The only thing even close is the heater box. Should clear, but worst case, I'll have to remove that. My plan so far is: GOOD, CORRECT!, FLAT! block deck and head surfaces. A quality sealant, studs, one of those crappy composite headgaskets. That should be sufficient overkill for under $100. (For grins, I've asked about a custom copper gasket, but I assume it will be too pricey, even with those flat .004" O-rings instead of machine work.) Remember that if you use fine nuts reduce the torque, since it's inverse to the pitch. Hmm... good point! The APR tech said these studs want 75 ft/lbs to get them stretched. She also said that torque should be no problem for the block threads. Certainly the stretch (from 75 ft/lbs) on 1" of 7/16-14 will not overstress the threaded hole. The head is tall and thick, so I doubt the increased force will cause the head to bow between bolts. The behavior of the headgasket is the question. Unlike racers, I'm not trying to prevent leaks from high cylinder pressures, but from shifting, stretching, whatever happens, from age. Hell, the problems might simply be from re-using old head bolts. To be honest I never really considered that before. Not much is available for this motor so it could be all the bolts are crap.
|
|
|
|
|
Joined: Jun 2007
Posts: 1,411
1000 Post Club
|
|
1000 Post Club
Joined: Jun 2007
Posts: 1,411 |
If you have more time than money (lately I have neither) you can cut your own head gasket. I've used annealed copper flashing for gasket material for turbochergers, kind of a more severe aplication than a head gasket. Less intricate though. I got mine from a local building contractor, they had it in a couple thicknesses and it came with plastic on both faces (to keep it from scratching, it's decorative for them after all). Glad to hear you got your studs ordered. Hope they do all you want them to. 
My, what a steep learning curve. Erik II#5155
|
|
|
|
|
Joined: May 2009
Posts: 493
Contributor
|
|
Contributor
Joined: May 2009
Posts: 493 |
"reduce the torque, inverse to pitch"
Suggest you do some research on this one. The fraction of torque actually translated into tension is quite small. By quite small I mean 10-15% The balance is under head and thread friction which is the same regardless of thread pitch.
So- 14 TPI versus 20 tpi only changes the 10-15% number, not the total torque so the difference in torque will only be 2-3% or so of the total.
This is why thread lubricants are so important, to control the thread and underhead friction which is 85-90% of the total.
If you really want to dial in the fastener tension you need to test or measure stretch.
|
|
|
|
|
Joined: Dec 2000
Posts: 3,332
1000 Post Club
|
|
1000 Post Club
Joined: Dec 2000
Posts: 3,332 |
Gentlemen;
Someone here has done extensive
work on this situation on the 250.
I think they ended up using 5 studs
and the rest were stock bolts.
I'm guesing they were at the ends,
with one in the center.
Have you looked over Leo's book, on
this concept??
Good luck.
John M., I.I. #3370
"There are no shortcuts to any place worth going". -Anon
|
|
|
|
|
Joined: Sep 2008
Posts: 3,669 Likes: 42
1000 Post Club
|
|
1000 Post Club
Joined: Sep 2008
Posts: 3,669 Likes: 42 |
That was done because he has a morphed head, and not an OEM style 4 bolt head/cyl.
Class III CNC Machinist/Programmer
|
|
|
|
|
Joined: Aug 2003
Posts: 13
Active BB Member
|
|
Active BB Member
Joined: Aug 2003
Posts: 13 |
Any idea what an optimum surface would be for maximum sealing?
Or what sealant to use, beyond old fashioned Permatex?
[/quote]
Seems to me the Brits have this same sealing issue on their I.L. 4's and when I owned one it was recommended to me by a reputable mechanic/specialist of British cars, to spray both sides of the head gasket with "aluminum paint". I can't recall what brand he was using, but I'm certain an inquiry on one of the Brit car forums might yield an answer. Hope this helps.
Gary
|
|
|
|
|
Joined: Jan 2005
Posts: 2,123 Likes: 3
1000 Post Club
|
|
1000 Post Club
Joined: Jan 2005
Posts: 2,123 Likes: 3 |
Suggest you do some research on this one
So, finer pitch requires more torque?
|
|
|
|
|
Joined: May 2009
Posts: 493
Contributor
|
|
Contributor
Joined: May 2009
Posts: 493 |
If the increased area of fine pitch versus coarse pitch is greater than the increased leverage due to thread pitch then yes, fine pitch will require more torque to reach desired stretch. Remember the fine pitch increased leverage only amounts to 2-3% of the total applied torque.
All other factors equal that is, which they never are. Test it if you really want to know.
|
|
|
|
|
Joined: Aug 2003
Posts: 13
Active BB Member
|
|
Active BB Member
Joined: Aug 2003
Posts: 13 |
[quote=panic]Suggest you do some research on this one Ref: Pg. 127 http://books.google.com/books?id=gsgQMTs...20paint&f=false I suppose the type & brand of gasket will determine yay or nay as mentioned in the above info. Permatorque by FelPro recommends no sealer as it is included in the manufacturing process. To assemble a bare metal gasket and rely on the pressure and friction between the assembled pieces to continually seal after many heat cycles is a gamble at best. I'm not saying it can't be done, but why take the chance when a low cost item like a can of spray sealer or VHT aluminum paint would certainly be cheap insurance. A lot of folks who build engines for a living swear by it. I guess you know where I'd place my bet.
Gary
|
|
|
|
|
Joined: Jan 2005
Posts: 2,123 Likes: 3
1000 Post Club
|
|
1000 Post Club
Joined: Jan 2005
Posts: 2,123 Likes: 3 |
Very interesting - the rule is based on the exceptions.
Of course, this means discarding almost all of the recommended torque values in every service manual, hardware manufacturer's application charts, engineering guidelines, etc. in which higher values are invariably shown for 1/4-20 vs. 1/4-28, 1/2-13 vs. 12/-20, etc.
Too bad they didn't ask you before they did all that work.
|
|
|
|
|
Joined: Aug 2003
Posts: 13
Active BB Member
|
|
Active BB Member
Joined: Aug 2003
Posts: 13 |
Very interesting - the rule is based on the exceptions.
Of course, this means discarding almost all of the recommended torque values in every service manual, hardware manufacturer's application charts, engineering guidelines, etc. in which higher values are invariably shown for 1/4-20 vs. 1/4-28, 1/2-13 vs. 12/-20, etc.
Too bad they didn't ask you before they did all that work. I believe you have me confused with another contributor to this thread. My contribution was in regards to the use of an additional sealant with the head gasket or not using a sealant. A choice that remains with the person doing the assembling of course. It had nothing to do with torque values for any of the fasteners you mentioned nor any of the fasteners involved in the original posters project. You might want to reread the posts and direct your sarcasm to the party intended.
Gary
|
|
|
|
|
Joined: Jan 2005
Posts: 2,123 Likes: 3
1000 Post Club
|
|
1000 Post Club
Joined: Jan 2005
Posts: 2,123 Likes: 3 |
There are psychiatric terms for people who find themselves insulted by things that never happened.
Let me explain how a board works.
Unless you specify otherwise, the NEXT comment made is shown as a response to the LAST comment.
Or, you could have READ my remark, and tried to detect to which prior comment it might be related.
|
|
|
|
|
Joined: Aug 2003
Posts: 13
Active BB Member
|
|
Active BB Member
Joined: Aug 2003
Posts: 13 |
So your comment after my comment is referring to a comment prior to my comment. I get it now. Thanks for the help.
Gary
|
|
|
|
|
Joined: Jul 2008
Posts: 183
Contributor
|
|
OP
Contributor
Joined: Jul 2008
Posts: 183 |
"reduce the torque, inverse to pitch" Suggest you do some research on this one. I'm going with ARP's advice, presumably they did the research :-)
|
|
|
|
|
Joined: Jul 2008
Posts: 183
Contributor
|
|
OP
Contributor
Joined: Jul 2008
Posts: 183 |
re: torque and fasteners
ARP's catalog has really good information on fastener tech, well beyond their products. It's worth a read. I admit I'd forgotten or not paying enough attention to fasteners, but this little episode has reminded me to pay more attention. I'm not sloppy or anything, but it seems likely that what I thought was "good practice" in this instance wasn't.
I underestimated the effect of lubricants on torque (and therefore stretch); plus the block deck was a very old surface, and I now do not trust my torque wrench. I'll either just buy a new one, or rig up a calibration setup for 75 ft/lbs to check it.
The block surface doesn't matter; the supplied matching washers make for the friction surface (I guess assumes that the head casting is not slick and the washers rotate there :-)
|
|
|
|
|
Joined: Jul 2008
Posts: 183
Contributor
|
|
OP
Contributor
Joined: Jul 2008
Posts: 183 |
[quote=panic]I suppose the type & brand of gasket will determine yay or nay as mentioned in the above info. Permatorque by FelPro recommends no sealer as it is included in the manufacturing process. ... Modern and/or popular engines get good gaskets or some choice; I have no choice whatsoever. For sure it will be one of those steel-edged composites, either ancient NOS or more-recent manufacture. Probably I'll call Kanters who can at least give me solid info on their source. Worst-case, I'll use aerosol Permatex copper coat. I might go with one of the modern sealers, but I'll call the manufacturer or dealer before I do. Both sides, thin coats, dry tacky, etc. FYI, there's two AMC "early" sixes, of the same displacement! Both 195.6: flathead and OHV. (Why doesn't everyone just call it a 196? I can't tell you.) The flathead is easier to deal with. The OHV was made *from* the L-head, and retains the side valve covers! Only there's nothing but pushrods under there!
Last edited by tom jennings; 02/02/10 03:49 AM.
|
|
|
|
|
Joined: May 2009
Posts: 493
Contributor
|
|
Contributor
Joined: May 2009
Posts: 493 |
Some good bolted joint information here: http://www.boltscience.com/pages/info.htmBest bet is to follow the fastener manufacturers recommendation. If you don't have it, or it's in conflict with another spec, or you just want a better understanding of what's going on, the above website can help.
|
|
|
|
|
Joined: Jul 2008
Posts: 183
Contributor
|
|
OP
Contributor
Joined: Jul 2008
Posts: 183 |
StrokerSix, I owe you a beer or poison of your choice! Because of your clue above, I think I figured out the WHY of this motor's head leak issue... Thermal expansion. The head is what, 30" long? (Don't have one here at work...!). It rises 140F in normal operation (60F to 200F, say, and that's assuming no overheating and impossibly even heating). The coefficient of expansion for cast iron is 5.8 microinches per inch, per degree F. That's .024" increase in head length! It cycles cold, hot, cold, hot, ... every time you drive the car. We know for fact that on this motor the head gets hot (warms up) VERY FAST. The combustion chamber is over an inch deep in the head, with a lot of surface area (that oddball wedge). The exhaust passageways through the head are long. Read this and watch the video: http://www.boltscience.com/pages/vibloose.htm Plus, the head is heat-insulated from the block with the composite gasket (a copper gasket would be nice!). Therefore, the head grows more and faster than the block, by a big margin. All this simply walks the bolts out. Because they are bolts [factory], they have a lot of torsional stress left on them; they are therefore predisposed to untwist to begin with. Add to that slowly crushing gaskets, too much or wrong lube (probably my problem) heat-softened, age- and overtightening-worn old bolts (probably my problem) just makes it easier and more likely to happen in 2010 than it did in 1963. The head sealant goos simply lubricate the sliding. * Head studs and the right lube will help a lot. * Increased torque for ARP fasteners will help a little more. * Extreme attention paid to head cooling issues!! PRECISE LOCATING DOWELS. I'm gonna ask around about dowels. The differing head vs. block growth rates though means the head will try to shear them off the block. That obviously won't do.
|
|
|
|
|
Joined: Jul 2008
Posts: 183
Contributor
|
|
OP
Contributor
Joined: Jul 2008
Posts: 183 |
Just a followup FYI:
I've decided to go with the ARP head studs (bought and fitted), a careful deck and head surface treatment, a Felpro old-style composite gasket, and some cooling mods to the head. I ruled out copper gasket as too many variables and complexity introduced (I have a friend with a water cutting machine and a scanner so it wouldn't even be that expensive.)
From studying and measurements, I found a couple of head cooling problems that are easily fixed. One is curious; the thermostat is in a cast iron pod 3" outside and in front of #1 cyl. With the thermostat closed, as the engine warms up, no hot water passes near the thermostat; it has to sort of "waft" over or heat up via conduction. Head temperature spikes when the engine is cold -- I noticed this earlier but didn't put 2 + 2 together until this incident. The fix is to tap the pod for a 3/8" or so hose and tee it into the water pump heater intake to draw warming water past the thermostat. (The later six has the thermostat in the block, parallel to #1, so it gets #1's hot water).
The whole engine project is getting a web page I'll post that here later.
Thanks again everyone, and StrokerSix especially, for the hints and tips. It's led me to what i think are solutions.
|
|
|
|
|
Joined: May 2009
Posts: 493
Contributor
|
|
Contributor
Joined: May 2009
Posts: 493 |
Happy to help and glad you figured out your problem.
Mike
|
|
|
|
0 members (),
364
guests, and
17
robots. |
|
Key:
Admin,
Global Mod,
Mod
|
|
|
|