|
|
Joined: Dec 2007
Posts: 16
Active BB Member
|
OP

Active BB Member
Joined: Dec 2007
Posts: 16 |
I'm in the planning phase (still) for the motor in my era-correct stock car project (1950 Plymouth), and, after some discussion with Cory (Moparsled on the HAMB) I decided to take a good look at how to optimize my little flatty. I'm basically stuck with having to run a stock bore x stroke (max 0.030" overbore), cam, valves, valve springs, manifolds, head, and carb (per the 1950/51 NASCAR rulebook). The rules specify that the word "stock" is to be understood as factory cataloged parts appropriate for the year/model/type of car. Rules further specify that the flywheel and camshaft cannot be altered in any way...this provides a hair of 'wiggle room' to modify some of the internals, as long as they are appropriate factory cataloged parts for the year/model/type, so I'll be looking into port work, head milling, decking, carb tuning/jetting &c. Preliminary measurements of my bone-stock 1950 block show a deck clearance of 0.016" (piston is in the hole 0.016"). I am under the impression that all head gaskets for these motors measure in at around 1/16 (0.0625) compressed height, giving a quench distance in stock configuration of about 0.0785" (0.016 + 0.0625). Which seems rather excessive. Please forgive me if my terminology is not up to snuff...the learning curve is steep  I estimate that my deck thickness is somewhere in the vicinity of 0.3125", so I'm not quite sure how much I could safely deck the block to improve the quench distance. George Asche seems to think 0.020 should be safe although he remembers a conversation with NASCAR legend Cotton Owens in which Mr. Owens revealed that they had gone as far as 0.040. Can anyone give some insight into how far I could go on the deck and still expect a high degree of reliability? I believe the tappets will adjust to a deck at least 0.040" lower, but am unsure how to handle the valve seat area after making such a cut...(I'd like to go 0.020-0.030 if possible). On the subject of head milling, I'm looking at going somewhere around 0.060", which should yield a combustion chamber size of 72cc (give or take). My stock chambers measure right at 85cc. This, of course, depends on where I set my quench distance and how that affects the static compression ratio...I'd like to be able to run on premium fuel (92-93 octane in my area) at an elevation of less than 1,000 ft. Mr. Asche also stated that an old circle track trick with these motors was to retard the cam by 2-3* to bump up mid-high RPM power...I hope to be able to run this motor reliably at upwards of 4000-4200 RPM for fairly long periods (20-30 min at a time), although that may be a pipe dream...does anyone have a suggestion on retarding the cam & how I might consider going about this? Thanks in advance...I'm looking forward to your insights! Gary
|
|
|
|
|
Joined: Jan 2005
Posts: 2,123 Likes: 3
1000 Post Club
|
|
1000 Post Club
Joined: Jan 2005
Posts: 2,123 Likes: 3 |
This is a 23" 218 or 230, yes?
seems rather excessive
Yes. I'd shoot for .035" to .040" total, remember that this is with the head gasket compressed so you may find a used gasket better for measurement. The deck should still be quite safe with a small mill.
You didn't say "stock pistons", are they required, and can you afford to use custom? If yes, a much lighter piston with higher CD and a pop-up dome (for a relieved chamber) or "stuffer" (for the stock chamber) dome will increase CR and add RPM, plus potentially both save the mill expense and keep the deck thickness.
Don't recess the seats any more than you need after a mill.
The valves should be back-cut at the shallowest angle to just intersect the stem-to-head radius. If stock size is the rule (rather than the actual stock valve) I'd go to a 7mm stem for the intake and sleeve the guides.
Can the head be welded internally?
Seats 30° intake, .060" wide should be enough.
You want more valve spring - are they tested by pounds, by wire thickness, by length? If they've really got to be stock you have to shim them as much as your nerves permit, and get every gram off the valve train (aluminum or titanium collars, drill out the tappet bodies, remove any extra adjuster length and threads). SI can make you hollow exhaust valves in stock size.
Intake manifold has to be stock externally? Does it have to be in stock position? Spacing it out from the head helps.
It can be sawed in half horizontally and ported, then re-attached with weld and sandblasted to restore the appearance.
Carb has to be the stock part number, or do they also measure the venturi size? You see where I'm going here...
In any case, remove all casting flash, misalignment steps, blend any transitions, dowel the base to align the bore with the manifold.
Header permitted? Dual exhaust?
|
|
|
|
|
Joined: Jan 2005
Posts: 2,123 Likes: 3
1000 Post Club
|
|
1000 Post Club
Joined: Jan 2005
Posts: 2,123 Likes: 3 |
Are you allowed cold air ducting to the car? Make an air box with a big radiused velo stack to the entry, snorkel goes to radiator support opening.
Stock oil pan required? Baffle it, scraper, windage tray. If you have the room and ground clearance, drop the sump and pick-up 2-4" and lower the oil level (re-calibrate your dipstick!). If not, add a kick-out on the right side for both windage and more case volume to reduce pressure.
There may be some advantage to putting some water directly to the last 2 cylinders, using the core plugs.
Cam is gear driven? Use an offset key for either cam or crank to retard.
|
|
|
|
|
Joined: Jan 2005
Posts: 2,123 Likes: 3
1000 Post Club
|
|
1000 Post Club
Joined: Jan 2005
Posts: 2,123 Likes: 3 |
Stock flywheel? There are probably differences between flywheels as to both weight and diameter (truck and industrial may be 1" larger), the 230 may be lighter than the 218. It's not the scale weight that matters most, it's how much weight is at the rim. I've heard of removing the starter ring gear completely or just grind off the teeth (definitely helps) if push start is OK, but it may be illegal as "part of the flywheel". If DQ, your objection is that it's a separately serviceable part.
Take some weight off the clutch disc and pressure plate, especially close to the rim.
If the race is run without many gear changes, use the smallest diameter clutch an pressure plate that fits the flywheel and increase the spring tension.
Clutch fan with shroud, seal the radiator support so all air must pass through the fins.
|
|
|
|
|
Joined: Dec 2004
Posts: 226 Likes: 1
Contributor
|
|
Contributor
Joined: Dec 2004
Posts: 226 Likes: 1 |
Keep us imformed!! I love this past circle track stuff. 1 OL REDNECK
DARRELL KRAFT I.I.#113
|
|
|
|
|
Joined: Sep 2004
Posts: 5,839 Likes: 1
1000 Post Club
|
|
1000 Post Club
Joined: Sep 2004
Posts: 5,839 Likes: 1 |
Not being familar with these engines.
But,,,does the head just copy the bore & piston area?
Is there any areas that will create a squish band?
MBHD
12 port SDS EFI 
|
|
|
|
|
Joined: Dec 2007
Posts: 16
Active BB Member
|
|
OP
Active BB Member
Joined: Dec 2007
Posts: 16 |
Wow...tons of ideas here, Smokey Yunick would be proud! (I also think I'm in way over my head here, so please bear with me)
Motor is a 218, transmission & clutch are stock. Gear ratio is stock factory cataloged 3.73 (I have the option of running 3.9 and 4.1, as those were factory options)
Flywheel must be a stock cataloged item for year/model/type of car, so a 230 flywheel is out. Rules specify that the flywheel cannot be altered in any way. Vehicle must also be self-starting.
Rules say; "Carburetor must be listed for make and model car but jets may be of any size". I'm interested in the possibility of honing it, as I believe this would be a 'gray area,' but honestly wouldn't know where to start.
Air cleaner must be stock as well.
The rules do not address pistons per-se...it simply says "complete motors must be in chassis and body for which they are cataloged." That being said, I inclined to think that some modifications would be allowed (unless otherwise specified, as in the case of the camshaft & flywheel), provided that the parts are properly cataloged factory parts and retain factory appearance - The April 1951 issue of Speed Age details the fact that Johnny Mantz's 'Southern 500' winning Plymouth was outfitted with Grant piston rings and Smokey Yunick recalled watching a young Richard Petty polishing the ports on 'papa' Lee's flathead. George Asche tells me that one of Cotton Owens' flathead speed tricks was to deck the block 0.040", so some modifications of the factory parts was allowed (or overlooked). I suspect that pistons would have been stock or stock replacement; I do not know if 'high performance' aftermarket pistons were produced during this period, although lightening stockers may have been standard operating procedure. Ditto on the rods.
Rules for valves & valvetrain simply says 'stock'...I'm sure any modifications would have been limited to a performance-oriented valve job, maybe shimming the springs as you suggest. I know next to nothing about valve jobs/reshaping, so I might need to do a bit of reading to fully understand the valve modifications you suggest.
Rules say nothing about the oiling system, so I don't see why a baffle/windage tray/scraper would not be permitted. Here again, I have limited experience with these type of modifications, so I'm open to suggestions.
NASCAR rules were pretty strange in the early days...it is pretty common knowledge among folks that were 'there' that NASCAR DQ'ed some drivers for minor 'gray area' infringements, while others were able to get by with blatantly illegal modifications. There is still much controversy over whether or not Lee Petty used an illegal camshaft in his '49 Plymouth during the 50-51 seasons.
I guess my bottom line is to recreate as faithfully as possible the low-budget 'thrill' of early stock car racing. I've gone to great lengths to insure that the suspension/body/interior of the car is 100% period correct, conforms to rulebook specifications, and matches extant originals and period photographs - so I'd like to do the same with the drivetrain. I'm not looking for super-high HP numbers, as it would simply not be consistent with the historical record...the fastest qualifying speed recorded by a Plymouth in 1951 was a 'blazing' 81.09 mph...but I'd like to build it to be somewhat on the conservative side of the 'gray area' as far as internal modifications go. Hope that helps give some insight into how I'm approaching this.
Thanks again for your time...any guidance is appreciated!
Gary
|
|
|
|
|
Joined: Dec 2007
Posts: 16
Active BB Member
|
|
OP
Active BB Member
Joined: Dec 2007
Posts: 16 |
Panic, on the subject of quench...to obtain a 0.040" quench, I'd have to mill the deck 0.038-0.040". My old used stock head gasket measures around 0.070 in thickness and I'm told that most flatty gaskets compress to 1/16" (0.0625). That seems like an awful lot of material to remove...at what point should I begin to worry about deck thickness? Is there such a thing as 'ideal' deck thickness on these motors? You also suggest not recessing the seats any more than I have to after milling...I'm pretty new to these motors, so I'm not exactly sure what this means (I assume keeping the valves proud of the block will keep them unshrouded, but I'm honestly in the dark about this). Are there any special considerations I need to be aware of with regard to the valve seats & deck milling? George Asche seemed a little concerned about cutting too far into the exhaust seat, so I'm not sure which direction to go. Popper 6, the old roundy-round stuff is cool! Here's a photo of the car I'm in the process of replicating (from the 1952 NASCAR Yearbook); 
|
|
|
|
|
Joined: Jan 2005
Posts: 2,123 Likes: 3
1000 Post Club
|
|
1000 Post Club
Joined: Jan 2005
Posts: 2,123 Likes: 3 |
possibility of honing it
The venturi can be enlarged slightly by hand if you have a good eye. The minimum point is increased by 1/16" or so, and the cut re-tapered back into the shape above and below. If they use a go/no-go gauge for venturi size, they'll catch you. If they just do a visual and check the throttle size and part number you may get away with it.
Stock air cleaner, meaning the exterior can? Add a velo stack inside aligned to the air-horn. Do you have to use the stock element, or the stock size element? If the exterior can't have any attachment, make a heat shield to mask it from hot air off the manifold.
"Illegal camshaft" was almost universally used, based on the only test was the base circle and the lift (to catch re-grinds). A whole new shape can be used with those same figures, even with the stock timing figures - all it takes is money.
There were no good piston at the time, and saving weight on the original is not something I feel confident in doing.
For quench, you may have to make a gasket because quench is absolutely necessary.
In my opinion, removing metal from an original part was generally OK (as opposed to replacing it), but whether they do anything about it doesn't entirely depend on the actual rules (sorry, my own experience). The "gray area" is your personal relationship with the tech people. If you win, and the other guy is the sponsor's brother-in-law, you're toast. If he wins, and you protest, they won't listen.
The ideal deck thickness is stock, the question is how much will wreck the gasket seal. IMHO -.040" is fine, use studs instead of bolts.
I wouldn't try to lighten the rods at all - they're really small on the pin end where it matter.
Depending on your seat condition, a deck cut may remove part of the seat. Don't re-cut it any deeper than you have to, to get the same width as the valve head. The valve seats should join the chamber similar to a Ford V8, except the Ford has "tilted" stems.
The head's open (non-quench) area can generally be improved, but this means filling with brass or weld. Volume can be reduced by milling (but doesn't change the quench clearance unless you have positive deck pistons). The pocket behind the valve can be filled in and re-contoured to a better shape.
Have you got pictures of the deck surface and chambers?
|
|
|
|
|
Joined: Dec 2007
Posts: 16
Active BB Member
|
|
OP
Active BB Member
Joined: Dec 2007
Posts: 16 |
Excellent info once again Panic, thanks for the insight - although it will take me a while to fully digest it all, so please forgive me if I continue to ask absurd questions. I've considered doing an air cleaner mod with an early style Hellings oiled horse hair filter, which was available at the time. I've also heard that oiled copper wool was also used as a filtering media in certain applications during the period, so I'll be looking into that as well. I have a suspicion that some of the guys probably gutted the stock oil bath air cleaners and ran with no filtering media whatsoever, but this is just a hunch (and not something I'd be willing to consider). I agree that the stock quench distance leaves much to be desired. I'd love to go as far as 0.040" on the deck, but am worried about having a good sealing surface (I'd settle for 0.025-0.030" if I must...anything to bring that quench distance DOWN). Would you recommend something like a sonic-test to double check deck thickness? Unfortunately, my finances will not allow me to tear this thing down every few months, so I need it to be pretty dependable. I will be using NOS head studs off an early 40's Dodge military truck, and my one modern compromise will be the use of ARP bolts for the mains & rods (I am told Ford FE rod bolts work). I can tell you that some of the valve seats show a little pitting as this motor sat outside for a long time before being 'rescued'...will get the best photos I can of the valve seats tonight (I have not removed the valves yet). I would guess that the exhaust seats are recessed something on the order of 0.010" into the deck surface, so if I go any more than that on the deck I'm into the seat. I'll get photos of the deck surface and chambers this evening...they're plenty crusty so I'll see what I can do about cleaning them up a little first. Thanks again!
|
|
|
|
|
Joined: Dec 2007
Posts: 16
Active BB Member
|
|
OP
Active BB Member
Joined: Dec 2007
Posts: 16 |
Photo time! Combustion chamber;  Deck;  Deck thickness @ water passage;  No. 1 valve;  Valve seat (no flash);  Light pitting on deck surface;  Let me know if you'd like to see anything else!
|
|
|
|
|
Joined: Jan 2005
Posts: 2,123 Likes: 3
1000 Post Club
|
|
1000 Post Club
Joined: Jan 2005
Posts: 2,123 Likes: 3 |
Doesn't look bad at all. The head shape is better than I expected.
|
|
|
|
|
Joined: Dec 2007
Posts: 16
Active BB Member
|
|
OP
Active BB Member
Joined: Dec 2007
Posts: 16 |
Only issue I noticed is that my old head gasket (Victor 1059c) doesn't quite align perfectly around the bore and might potentially overlap it slightly after even a modest overbore. Obviously this will cause interference if the piston top stands proud of the deck. I'll order a fel-pro gasket and see if that makes a difference.
I may also see about the possibility of ordering a custom gasket with a 0.040 thickness...what are the advantages/disadvantages of a solid copper gasket? I wouldn't think o-rings would be necessary with the relatively low (8.5:1 or so) compression ratio I'm aiming for...
Last edited by HalfdollarMayflower; 06/21/10 01:49 AM.
|
|
|
|
|
Joined: Sep 2001
Posts: 510
Major Contributor
|
|
Major Contributor
Joined: Sep 2001
Posts: 510 |
In the 1950s i used to watch my father static balancing pistons and rods on a gram scale, finding the lightest one and making all the others match it by grinding, carefully.
Working with "stock" parts within a rulebook of this kind is painstaking labor, but given the limitations every tenth of a second gained on the track is an achievement worthy of notice. Attention to every detail is the difference between winning and losing, fairly and honestly within the rulebook.
Does the rulebook mention the oil pump, water pump, radiator, fuel pump, and other parts that might help performance but surely will affect reliability on the track, especially for a flathead? Are there rules about "lightening" the body and chassis? What about wheels and tires?
This kind of project is a great way to learn things we'll never forget, even if we never wanted to know them.
God's Peace to you.
d
Inliner #1450
|
|
|
|
|
Joined: Jun 2005
Posts: 599
Major Contributor
|
|
Major Contributor
Joined: Jun 2005
Posts: 599 |
On the subeject of the flywheel, the 230 and 218 flywheels don't interchange anyway. The 218 is 4-bolt (with dowelling around the bolts, IIRC) and the 230 is 8-bolt.
But for roundy-roundy cars I wouldn't have thought flywheel weight was important. At least for performance, maybe for reliability, and maybe for harmonics.
Think about gearing too... is there any advantage to running an overdrive?
Personally, I don't think deck thickness is an issue at all. These were pretty heavy blocks.
|
|
|
|
|
Joined: Dec 2007
Posts: 16
Active BB Member
|
|
OP
Active BB Member
Joined: Dec 2007
Posts: 16 |
Can't run an overdrive...wasn't offered on Plymouths in 1950.
Someone asked about the cooling system...rules say that cooling system must be stock, but water pump impellers may be altered.
Gearing options are 3.73, 3.90, and 4.1...there may have been a heavy-duty option for 4.56, but I'm still trying to confirm that.
Wheels & tires may be of any size...period photos show the use of 670 and 710x15 tires, slightly larger than the 6.40's that came stock on the Deluxe models.
Body must remain stock, complete with hood, bumpers, doors, fenders, etc. Rear seat cushion is to be removed. Photographic evidence suggests that many cars had stripped out door panels, headliners & floor mats. Others had complete interiors and were actually registered and driven from race to race.
Last edited by HalfdollarMayflower; 06/21/10 11:56 PM.
|
|
|
|
|
Joined: Jun 2005
Posts: 599
Major Contributor
|
|
Major Contributor
Joined: Jun 2005
Posts: 599 |
You can do something with shocks, I'm sure...
Do you want a contact at Koni USA? He actually owns a Devin sports car built on an early fifties Mopar chassis, so he'll be empathetic to your cause.
Last edited by Ray Bell; 06/22/10 09:11 AM.
|
|
|
|
|
Joined: Dec 2007
Posts: 16
Active BB Member
|
|
OP
Active BB Member
Joined: Dec 2007
Posts: 16 |
Ray, thanks for weighing in here! Rulebook states that shocks must be OE design, but can be re-valved. Springs must be OE and unmodified, but heavy duty springs are allowed if they were a factory option. Wheels/hubs/spindles/steering components may be strengthened in any manner. Yes, I'd love for you to pass along your contact at Koni...I'm willing to compromise on the shocks somewhat, I'll just paint them black to look OE Thanks!
|
|
|
|
|
Joined: Jan 2005
Posts: 2,123 Likes: 3
1000 Post Club
|
|
1000 Post Club
Joined: Jan 2005
Posts: 2,123 Likes: 3 |
OE design means no gas charged, the Koni 7610 is detectable by the adjusters.
Your center link may be a bit skinny, you can stiffen it for low cost with a simple sleeve around the center or a short piece of angle iron.
"Springs unmodified" sounds like you can remove the rubber donuts, which will lower the car.
Does it have a roll bar? If yes, replace the rubber with polyurethane. If not, is it legal?
|
|
|
|
|
Joined: Dec 2007
Posts: 16
Active BB Member
|
|
OP
Active BB Member
Joined: Dec 2007
Posts: 16 |
Sway/roll bars were optional equipment on Plymouths in 1950, so I can run one...they're rare as hen's teeth though.
Good point on the shocks, didn't think of that.
|
|
|
|
|
Joined: Jan 2005
Posts: 2,123 Likes: 3
1000 Post Club
|
|
1000 Post Club
Joined: Jan 2005
Posts: 2,123 Likes: 3 |
Is a "functional replacement" (same mounting points, same leverage, same diameter) legal? I would think so, since it's no advantage.
Except for chassis clearance (oil pan, center link, tie rods), the only variables for the bar itself are:
1. diameter.
2. width across the arms (should be close to the width across the lower shock mount, etc.).
3. arm length, from center to link, you can lengthen the arms with a sleeve or cut them off.
Some more modern car has to be pretty close, the center width has to be pretty close (within a few inches).
The link brackets look like shock mounts, attach anywhere with a clear path. The links are fairly generic.
The center brackets generally go under the front radiator support or cross-member, with the arms pointing back (doesn't have to be right under the axle center), they're just big U clamps with bushings.
Just a guess: 1" OD has to be safe, and a big improvement over none at all. Each 1/16" can be felt, 1-1/8" is a huge change. 1-1/4" may be too big.
Once you find a suitable donor car, there are probably at least 2 different sizes used for wagon, performance etc., common flea market cleaning-out-the-garage $10. item.
|
|
|
|
|
Joined: Jan 2005
Posts: 2,123 Likes: 3
1000 Post Club
|
|
1000 Post Club
Joined: Jan 2005
Posts: 2,123 Likes: 3 |
Got a picture of the original bar in place?
|
|
|
|
|
Joined: Jan 2005
Posts: 2,123 Likes: 3
1000 Post Club
|
|
1000 Post Club
Joined: Jan 2005
Posts: 2,123 Likes: 3 |
Here's a home-made relief on a Ply-Do block, with my comments 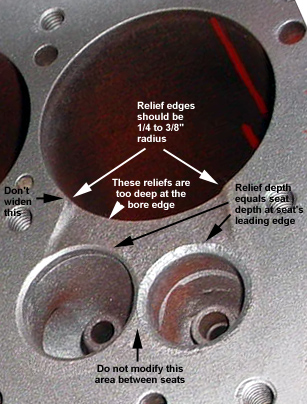
|
|
|
|
|
Joined: Jan 2005
Posts: 2,123 Likes: 3
1000 Post Club
|
|
1000 Post Club
Joined: Jan 2005
Posts: 2,123 Likes: 3 |
Your chamber with a few mods, my comments 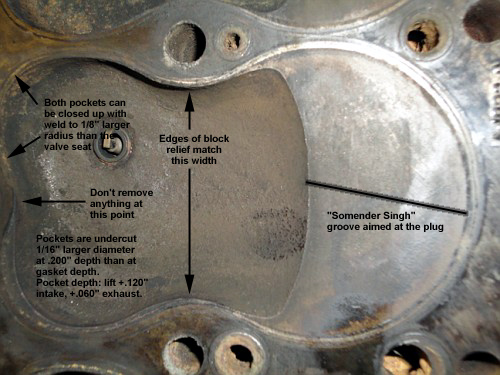
|
|
|
|
|
Joined: Dec 2007
Posts: 16
Active BB Member
|
|
OP
Active BB Member
Joined: Dec 2007
Posts: 16 |
Wow! Phenomenal information here! This is really great.
If I can get away with zero decking the block (which would require the removal of only 0.016" off the deck surface) and using an 0.040 (or approx 1mm) thick gasket, I'd be much more comfortable with relieving the block.
Based on your CC redesign, I'm assuming that the gasket would need to match the footprint of the chamber fairly precisely...shouldn't be a problem if I go with a custom gasket. Will need to double check on the Somender Singh groove to make sure I won't end up cutting into a water passage. George Asche has milled 0.090" off an identical '50 Plymouth head, and I'm shooting for an 0.060 mill-job so I know I could safely go to an 0.030" depth on the groove, but that's less than 1mm. Perhaps I'll just find another 50 Ply head and cut it in half to determine how far I can go...What depth/width would you recommend on said groove?
I do have photos of the undercarriage of an original 1950 Plymouth stock car, complete with sway bar. I wish I would have thought to have measured the sway bar...I assumed it was stock. My 1950 Chrysler "passenger car parts list" shows only one sway bar cataloged for the Plymouth. Was standard on the wagon and optional as part of a 'severe duty' package on other models.
I'll upload those photos as soon as I get back to my home computer (a few days).
|
|
|
|
|
Joined: Jun 2005
Posts: 599
Major Contributor
|
|
Major Contributor
Joined: Jun 2005
Posts: 599 |
Regular Konis would have no external adjuster, though they are adjustable...
They would just about be a special build for that model, but nothing that a good Koni man can't fix. I'll bet Lee has them on his Devin's chassis.
I've sent him an e.mail
|
|
|
|
|
Joined: Dec 2007
Posts: 16
Active BB Member
|
|
OP
Active BB Member
Joined: Dec 2007
Posts: 16 |
Very cool Ray, thanks for doing that! If nothing else, I can use those for running on the street, and swap to OE shocks for the vintage meets.
If your contact a Koni needs any specs, let me know.
|
|
|
|
|
Joined: Dec 2007
Posts: 16
Active BB Member
|
|
OP
Active BB Member
Joined: Dec 2007
Posts: 16 |
Got a picture of the original bar in
place? Here's the best photo I've got of the front suspension of the Johnny Mantz-driven '50 Plymouth that won the inaugural 'Southern 500'. Frame & suspension are original, the car was re-bodied for restoration & donation to the Joe Weatherly Stock Car Museum in Darlington. 
Last edited by HalfdollarMayflower; 06/27/10 03:03 PM.
|
|
|
|
|
Joined: Jan 2005
Posts: 10
Active BB Member
|
|
Active BB Member
Joined: Jan 2005
Posts: 10 |
looks like the stock one on my '50 Wayfarer. They were optional on Plymouth huh?
|
|
|
|
|
Joined: Oct 2010
Posts: 4
Newcomer
|
|
Newcomer
Joined: Oct 2010
Posts: 4 |
There is only one real area of weakness in racing these Mopar flat head sixes. That is the oiling system. Here are some opinions from a life time of engine building. In the beginning, the oil pick up tube is a loose fit in the connection to the feed elbow. If you put a neopreme o-ring or two on the pipe before inserting it into the elbow, you will get a lot better feed of oil and less cavitation from air being sucked into the oil pump at this connection. Next make sure you use the later model geo-rotor oil pump. No oil pump is a good pump unless it is a brand new pump. When the block is toren down, remove all oil galley plugs and polish all oil passages. Do the same on the cooling system areas as best you can. I use a gun cleaning kit with a drill motor and the brass brushes of different calibors. Be sure to flush and blow clean after polishing. Include the crankshaft oil holes from mains to rods as well. The cam bearings only need a small amount of oil but have large oil feed holes. Federal-Mogul amd TRW used to sell oil flow restrictors for the four oil gallies going to the cam bearings. You can do the same thing by drilling and smoothing a 1/16 Dia, hole in the bearing and turning the bearing in the block so that the new 1/16 hole lines up with the oil galley in the block. There is a lot of oil pressure lost with the large original holes in the bearing. Also just lightly polish the bearing mounting holes in the block with a brake cly. hone and clean before installing the cam bearings. Caution: DO NOT OVER DO THIS. If you see bright, shiney metal after you are done you went too far. It only takes about one or two seconds of honing with cleaning solvent to clean this hole. Do this before you flush and clean the oil galleys. Next use full groove main bearings. Most suppliers sell these now as stock replacement bearings. The original main bearings only allowed oil to the rod bearings on the bottom side of the rod journal rotation. Block off the oil squirt holes in the con rods. These supply oil to the cylinders but with the full groove main bearings, you will get plenty of oil throw off from the side clearance of the rod bearings to oil the cylinders and cam lobes. Some times, you can just install the rod bearing upside down in the rod to block off this hole. This oil hole supplies an oil leak from the bearing to crankshaft area at TDC, just when you need the oil to protect the bearing. Difinitely replace the piston pin bushings and recon all the con rods. If possible, have this done by someone who can bore all six rods center to center the same. If you are only racing this engine, remove and block off the oil filter and feed lines. The filter is only a partical-flow and as so , it only filters a small amout of oil that is returned to the sump. Eliminating this internal oil leak insures more oil to the engine. Note: If you do this, change your oil often while it is HOT. Using your gasket as a guide, make sure the intake and exhaust passeges line up between the maniflod and block. Blend these with a light grinding if nessecary. Be sure to replace the water distribution tube that is in the block behind the water pump. Have your block and cly. head surfaced on a rotory broach machine. ( Strom-Vulcan Block Master ) This creates a rough surface that helps hold the head gasket in place and improves the sealing ability. You may already know some of this and I encourage you to consult your machinest/mechanic before doing any of these things. I have built these engines for many different applications and have never had any of them go bad but to each his own. Good Mopar Luck to you. Garry
|
|
|
|
0 members (),
276
guests, and
44
robots. |
|
Key:
Admin,
Global Mod,
Mod
|
|
|
|


