|
|
Joined: May 2002
Posts: 49
Active BB Member
|
OP

Active BB Member
Joined: May 2002
Posts: 49 |
I have just torn down a 292 and have measured the bore @ 3.9080"
Rod journals @ 2.0875"
I don't seem to have any books on this beast , there's no cylinder ridge whatsoever so if possible I'd like to use it as is , is this Std. bore & crank ? .
The casting # is 3851659 , '63 ~ '79 Chevy. date code is KI74 , my alleged mind no longer remembers how to decode this production date .
Any thoughts , help etc. ? .
TIA ,
-Nate
-Nate
|
|
|
|
|
Joined: Sep 2008
Posts: 3,669 Likes: 42
1000 Post Club
|
|
1000 Post Club
Joined: Sep 2008
Posts: 3,669 Likes: 42 |
The bore is going to be .030" over, but on the loose side. The crank is .010" under, but with wear. Might have to turn the crank. What did you measure the bore with?
Class III CNC Machinist/Programmer
|
|
|
|
|
Joined: May 2002
Posts: 49
Active BB Member
|
|
OP
Active BB Member
Joined: May 2002
Posts: 49 |
Thank you ! .
I'd wondered as there was NO RIDGE in the cylinders and they and the crank journals looked suspiciously clean & fresh as did the sump & etc. .
I used some electronic calipers as I don't have and Micrometers that big .
I need to remove the damper then the main bearing caps and check the mains too .
This engine was removed running from a '66 C/30 truck for a V-8 Hot Rod project that was abandoned as soon as it was drivable , the old owner then abandoned the engine in his buddy's AC shop where it sat for years before I found it .
I just want to freshen it up with a light overhaul , new pistons , " gapless " piston rings , re size and balance the rods , replace all the bearings and prolly a new cam , tappets & gears too ,for my daily driver '69 Chevy Shop Truck .
How do I remove the wrist pins ? they have no clips nor pinch bolts .
THANK YOU for your rapid response , any more comments / questions ? .
-Nate
|
|
|
|
|
Joined: Sep 2008
Posts: 3,669 Likes: 42
1000 Post Club
|
|
1000 Post Club
Joined: Sep 2008
Posts: 3,669 Likes: 42 |
The wrist pins are a press fit, so you'll need a press to remove them.
Class III CNC Machinist/Programmer
|
|
|
|
|
Joined: Nov 2012
Posts: 551
Major Contributor
|
|
Major Contributor
Joined: Nov 2012
Posts: 551 |
What do you guys think about gapless rings?
Sounds like you have an awesome story building feel free to post pictures:)
Josh
72 gmc lwb air ride 5 speed (soon) turbo 292 II# 6102
|
|
|
|
|
Joined: May 2011
Posts: 378
Contributor
|
|
Contributor
Joined: May 2011
Posts: 378 |
I have used Total Seal gapless rings on other engines before, with awesome results. I just put them on my 230 but it is not together yet. They work well in applications where cylinder pressures are more or less in the normal range, may not be good for turbo/superchargers. I used them in a high compression high revving engine and could not be happier. On piston wrist pin removal: if you don't have a press, you can make a wrist pin puller tool: 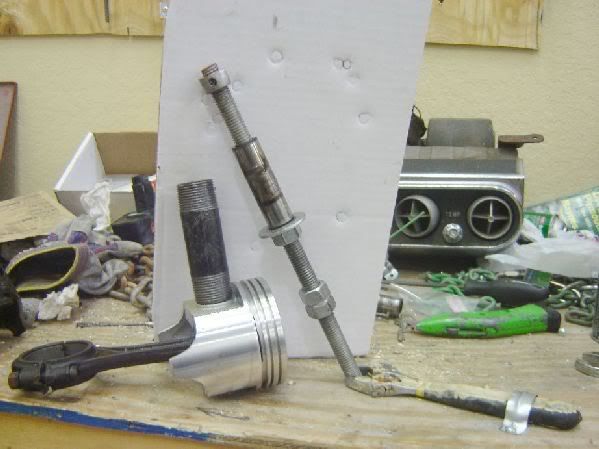 I made the "receiver" pipe out of PVC pipe, worked just as good. On pistons where the wrist pin hole is on the curved side, you just shape the end of the receiver pipe to follow the shape of the piston. Same tool removes and installs the pin.
|
|
|
|
|
Joined: Oct 2007
Posts: 411
Contributor
|
|
Contributor
Joined: Oct 2007
Posts: 411 |
WOW, I,VE NEVER SEEN WRIST PINS REMOVED IN THIS MANNER..... LET A MACHINE SHOP DO IT,YOU,LL BE GLAD YOU DID. MEASURE THE FRONT 2 HOLES REALLY GOOD AS THEY WILL BE WORN THE MOST AND IF IT COMES IN SPEC YOU CAN GET .040 OVER CAST OR MOLY RINGS AT A FRACTION OF THE COST OR GAPLESS AND THEY WILL DO 99% OF THE JOB THE HI-DOLLAR RINGS WILL DO. ITS JUST A MILD 6 YOUR NOT TRYING TO SQUEEZE EVERY SPEC OF POWER FOR A RACE ENGINE OUT OF IT.
JMO
BOB
I BELIEVE IN " JOHN 3:16 "
|
|
|
|
|
Joined: May 2002
Posts: 49
Active BB Member
|
|
OP
Active BB Member
Joined: May 2002
Posts: 49 |
THANK YOU for the replies ! . My next question was going to be about the wrist pins , I already have a home made wrist pin press just like what you pictured , I used PVC so it'd not damage the pistons . I plan to scrap the pistons anyway but I like to practice my craft on eveything ,even junk . Two cylinders have some pitting , enough to where I'm sure it'll need boring . I got somewire wheels on sale @ Harbor Freight and only needed one to clean up the rust , I'm sure it's too deep to hone clean . I was cleaning and cleaning to - day , the last boob in there slapped a new pan gasket on over the old ones remains , squeezed on /2tube ofRTV & called it a day , the pan's bolt holes are of course all bent in to beat the band , it'll take me awhile to dress them correct again with the ball pein hammer . There's also a pan bolt snapped off in the block , I'll remove it later . I'm old and experianced enough to know this is a long stroke engine so if it's Hot Rodded , life will be short . I hope this will be mylast Shop Truck as I'm due to retire in 2016 ,I just want a nice cruiser I can drive anywhere in America /Canada at the drop of a hat (duh , why I'm a BOW TIE GUY not a Ford lover  . I already had the pre smog cylinder head rebuilt and up graded to hardened seats , bronze valve guides and solid valves . I'm still looking at two more old 292's and may buy another to cherry pick the best of the parts for mytruck then assemble one to sell and part out the left overs . Keep those helpfull hints coming ! 
-Nate
|
|
|
|
|
Joined: May 2002
Posts: 49
Active BB Member
|
|
OP
Active BB Member
Joined: May 2002
Posts: 49 |
I love them ~ they make a HUGE improvement by stopping blow by dead , this not only increases power and fuel economy but , it makes the engine last far longer too .
Sadly , most folks do not install nor break them in correctly ~ it is criticl to assemble the piston and cylinder dry then upon initial startup , immediately rev. the engine to 3,000 RPM and HOLD it there while you count off 60 seconds with a watch , time will sem to slow down but the full 60 seconds is critical to affect proper breakin and 100 % bedding in of the piston rings .
Once you try these , nothing else will do , not even on your old weed whacker engine .
-Nate
|
|
|
|
|
Joined: May 2002
Posts: 49
Active BB Member
|
|
OP
Active BB Member
Joined: May 2002
Posts: 49 |
If I remember correctly , the date code of K174 means the first week of November 1974 ? .
Yes / no ? .
-Nate
|
|
|
|
|
Joined: Sep 2008
Posts: 3,669 Likes: 42
1000 Post Club
|
|
1000 Post Club
Joined: Sep 2008
Posts: 3,669 Likes: 42 |
Not sure where you got your info on gapless ring break-in, but it is very bad advice, and you shouldn't be giving on a public forum. That is how many urban legends are created and usually end up with people causing damage to their engines.
Class III CNC Machinist/Programmer
|
|
|
|
|
Joined: Sep 2004
Posts: 5,839 Likes: 1
1000 Post Club
|
|
1000 Post Club
Joined: Sep 2004
Posts: 5,839 Likes: 1 |
Sadly , most folks do not install nor break them in correctly ~ it is criticl to assemble the piston and cylinder dry then upon initial startup , immediately rev. the engine to 3,000 RPM and HOLD it there while you count off 60 seconds with a watch , time will sem to slow down but the full 60 seconds is critical to affect proper breakin and 100 % bedding in of the piston rings .
Once you try these , nothing else will do , not even on your old weed whacker engine .
Do not, I repeat, do not follow these directions. Two cents thrown. MBHD
12 port SDS EFI 
|
|
|
|
|
Joined: May 2002
Posts: 49
Active BB Member
|
|
OP
Active BB Member
Joined: May 2002
Posts: 49 |
From the gapless ring manufaturer of course . I though you alls were Mechanics and this is basic stuff , used in all High Dollar air craft and Automobile engine assembly and breakin . If you don't know that';s fine but slamming the correct advice without even botheing to check up on it , is remiss on your part . Hundres of engines built by me, not one failure yet . C.A.R.T.Racing engines , Hondas million dollar engines ,Bell Textron / Lycoming Aircraft , BMW , Mercedes on and on.... Really guys . -Nate Not sure where you got your info on gapless ring break-in, but it is very bad advice, and you shouldn't be giving on a public forum. That is how many urban legends are created and usually end up with people causing damage to their engines.
|
|
|
|
|
Joined: Sep 2008
Posts: 3,669 Likes: 42
1000 Post Club
|
|
1000 Post Club
Joined: Sep 2008
Posts: 3,669 Likes: 42 |
Ok, let me rephrase it, which ring manufacturer gave you this bogus info. Because all the "top shelf" manufacturers have instructions and techniques that completely contradict what you posted. There are also many accomplished engine builders here of many levels as well, from the casual record holder to the professional engine builders that also have many years of diverse experience in many different racing genres, and again, what you posted also contradicts what is known and proven by them. So hate to tell you/they, but you are wrong.
Class III CNC Machinist/Programmer
|
|
|
|
|
Joined: Dec 2005
Posts: 452
Contributor
|
|
Contributor
Joined: Dec 2005
Posts: 452 |
CNC, how would you install and break in any rings, I also install all my oil rings dry, with just a little taste on the comp. rings and piston skirts. has always worked for me.
Last edited by Turbo-6; 07/21/13 04:11 PM.
Turbo-6
|
|
|
|
|
Joined: May 2011
Posts: 378
Contributor
|
|
Contributor
Joined: May 2011
Posts: 378 |
http://www.totalseal.com/TechPage.aspxThey don't seem to say anything about oiling them prior to assembly. I could swear my instruction sheet from last year said to oil lightly but I could be wrong. Could have sworn I saw a warning of not using too much oil or the rings might not seat. Now I can't find the paperwork. I install them with just a light wipe of motor oil on the cylinder wall and piston, as well as rings. And I never let the engine idle at first start up. I let some oil get in the ring grooves to make sure the rings don't seize in the groove, then I move the rings around so much of the oil squeezes out and then I wipe off what came out. I don't install anything dry. So far so good, after 27 years of building various 2 and 4 stroke engines... only minor mishaps Too much oil is bad.
|
|
|
|
|
Joined: Sep 2004
Posts: 5,839 Likes: 1
1000 Post Club
|
|
1000 Post Club
Joined: Sep 2004
Posts: 5,839 Likes: 1 |
Unfortunately, pressure oiling does not lubricate cylinders, pistons, and rings. Therefore, ECi recommends that spark plugs be removed and the cylinders themselves should be oiled before start‐up. http://www.google.com/url?sa=t&rct=j&q=&...KQY9gjw6gzLHCUA
12 port SDS EFI
|
|
|
|
|
Joined: Sep 2004
Posts: 5,839 Likes: 1
1000 Post Club
|
|
1000 Post Club
Joined: Sep 2004
Posts: 5,839 Likes: 1 |
I took engine recycling courses in college & the instructor had us submerge the piston & ring assy's in engine oil, wipe off the excess then install the pistons into the engine block. He has had many years of doing this w/out any failures.
I am sure there are different ways to break in an engine. But to not use any lube/oil on the cylinder walls, , sorry, don't sound right, metal to metal contact is a no no.
MBHD
12 port SDS EFI
|
|
|
|
|
Joined: May 2011
Posts: 378
Contributor
|
|
Contributor
Joined: May 2011
Posts: 378 |
|
|
|
|
|
Joined: Jul 2013
Posts: 16
Active BB Member
|
|
Active BB Member
Joined: Jul 2013
Posts: 16 |
Thanks for finding that link, I had seen it also and read it on others instructions. Million ways to do things.
|
|
|
|
|
Joined: Jul 2013
Posts: 16
Active BB Member
|
|
Active BB Member
Joined: Jul 2013
Posts: 16 |
Not sure where you got your info on gapless ring break-in, but it is very bad advice, and you shouldn't be giving on a public forum. That is how many urban legends are created and usually end up with people causing damage to their engines. CNC-Dude, Can you post where you get your figures from please?
Last edited by Charles H; 07/21/13 06:27 PM.
|
|
|
|
|
Joined: Jul 2013
Posts: 16
Active BB Member
|
|
Active BB Member
Joined: Jul 2013
Posts: 16 |
Just another way to break in an engine, the old fashion way. 4th photo down http://vintagetractors.com/Oliver60Ind.html
Last edited by Charles H; 07/21/13 06:55 PM.
|
|
|
|
|
Joined: May 2011
Posts: 378
Contributor
|
|
Contributor
Joined: May 2011
Posts: 378 |
hmm I'd rather run it under it's own power..... thermal expansion would help make the pistons and cylinders round and seat the rings while they are at their normal operating temperature and shape... and you also need combustion pressure to push the rings out against the cylinder wall for proper seating/break-in. But that's just me 
|
|
|
|
|
Joined: Sep 2008
Posts: 3,669 Likes: 42
1000 Post Club
|
|
1000 Post Club
Joined: Sep 2008
Posts: 3,669 Likes: 42 |
Well like Hank mentioned, you don't have immediate oiling to the cylinders, and yes a light coating of some type of lube is required or you'll wipe out the hone job and defeat the purpose of why your building an engine to begin with, or scuff some piston skirts and have a galling issue or many other possible mishaps. Charles H, my source for this info comes from actual hands on working for over 15 years with one of the most highly respected and winningest inline Chevy 6 engine builders of all times. Having built engines for many top racers in drag racing, circle track(dirt and asphalt), Winston Cup, about 500 engines per year went out our doors, we also worked closely with most all manufacturers in the industry and even conducted R&D programs for numerous cam companies. I also have many years of personal experience(both prior to and since my experience with) in machining, racing and building many different types of Forced induction engines with nitrous and blowers/superchargers where gapless type rings are standard equipment. But to say that you install the rings and pistons completely dry is a quick recipe for disaster.
Class III CNC Machinist/Programmer
|
|
|
|
|
Joined: Dec 2005
Posts: 452
Contributor
|
|
Contributor
Joined: Dec 2005
Posts: 452 |
The main reason to install the rings dry is the oil ring, if it is installed wet as in dripping, the engine will always pump oil into the combustion chamber. The top rings need very little oil and for sure not synthetic oil, best is non detergent to seat quickly. The reason to rev. the engine is to oil everything under the ring package on start up.
Turbo-6
|
|
|
|
|
Joined: Jul 2013
Posts: 16
Active BB Member
|
|
Active BB Member
Joined: Jul 2013
Posts: 16 |
hmm I'd rather run it under it's own power..... thermal expansion would help make the pistons and cylinders round and seat the rings while they are at their normal operating temperature and shape... and you also need combustion pressure to push the rings out against the cylinder wall for proper seating/break-in. But that's just me Just another old fashion way of getting a tight engine moving. Beats had cranking it.
|
|
|
|
|
Joined: Jul 2013
Posts: 16
Active BB Member
|
|
Active BB Member
Joined: Jul 2013
Posts: 16 |
Well like Hank mentioned, you don't have immediate oiling to the cylinders, and yes a light coating of some type of lube is required or you'll wipe out the hone job and defeat the purpose of why your building an engine to begin with, or scuff some piston skirts and have a galling issue or many other possible mishaps. Charles H, my source for this info comes from actual hands on working for over 15 years with one of the most highly respected and winningest inline Chevy 6 engine builders of all times. Having built engines for many top racers in drag racing, circle track(dirt and asphalt), Winston Cup, about 500 engines per year went out our doors, we also worked closely with most all manufacturers in the industry and even conducted R&D programs for numerous cam companies. I also have many years of personal experience(both prior to and since my experience with) in machining, racing and building many different types of Forced induction engines with nitrous and blowers/superchargers where gapless type rings are standard equipment. But to say that you install the rings and pistons completely dry is a quick recipe for disaster. Thanks, we all have our own ways of doing things I was always taught to hot seat the rings in and have never had a problem on my stuff. Had problems when the oil pump failed soon after starting. When I have/had problems on my stuff is when I started having to pay others to do the work for me and that is still happening today. Thanks Charles
|
|
|
|
|
Joined: May 2002
Posts: 49
Active BB Member
|
|
OP
Active BB Member
Joined: May 2002
Posts: 49 |
" Unfortunately, pressure oiling does not lubricate cylinders, pistons, and rings. "
Wrong again ~
The pressure oiling from the sides of the bearing journals provides most of the cylinder lubrication , this is clearly illustrated in most factory shop manuals .
FWIW ; after proper (dry piston & ring assembly) I *do* pre oil every engine by operating the oil pump and or cranking the engine sans spark plugs until the entire oiling system is circulating .
I know this sounds strange and contrary but it really is how the best works are done ~ when they tried to teach me this , I resisted it for almost two years as a catastrophic engine failure means $ lost but after seeing so many engines built & broken in this way that ran perfectly and had [/u]zero[u] blow by and no problems ever , I decided to try it once and Lo ! it worked .
The pressure created against the rings by revving the engine , is what forced them to ' bite ' the cylinders walls and bed in quickly and properly , unlike the old way of gentle operation for 100 miles or so .
Yes , those old engine ran fine but they always had blow by and used oil .
Don't be afraid to learn new things , a Journeyman Mechanic should know better .
-Nate
|
|
|
|
|
Joined: Dec 2005
Posts: 452
Contributor
|
|
Contributor
Joined: Dec 2005
Posts: 452 |
Nate, revving the engine with a dry ring set does make sense to seat the rings, thanks.
Turbo-6
|
|
|
|
|
Joined: Jul 2013
Posts: 16
Active BB Member
|
|
Active BB Member
Joined: Jul 2013
Posts: 16 |
The main reason to install the rings dry is the oil ring, if it is installed wet as in dripping, the engine will always pump oil into the combustion chamber. The top rings need very little oil and for sure not synthetic oil, best is non detergent to seat quickly. The reason to rev. the engine is to oil everything under the ring package on start up. Thanks for post this,it explains why my 9N tractor smokes today. The guy who rebuilt the engine stated he used plenty on on the cylinders when he put it together, I questioned him about it then and he was going to redo it but later passed on while a month after that. Thanks again.
|
|
|
|
|
Joined: Jul 2013
Posts: 16
Active BB Member
|
|
Active BB Member
Joined: Jul 2013
Posts: 16 |
I have just torn down a 292 and have measured the bore @ 3.9080"
Rod journals @ 2.0875"
I don't seem to have any books on this beast , there's no cylinder ridge whatsoever so if possible I'd like to use it as is , is this Std. bore & crank ? .
The casting # is 3851659 , '63 ~ '79 Chevy. date code is KI74 , my alleged mind no longer remembers how to decode this production date .
Any thoughts , help etc. ? .
TIA ,
-Nate Did the question asked about the casting and date #'s decoding ever get answered? Thanks
|
|
|
|
|
Joined: Dec 2005
Posts: 452
Contributor
|
|
Contributor
Joined: Dec 2005
Posts: 452 |
According to Leo's book, the casting number is 64 to 66 but the k174 means k= Nov. 17= day 4=year so Nov. 17th 1964
Everyone should have Leo's book it's a treasure of info.
Last edited by Turbo-6; 07/22/13 01:55 PM.
Turbo-6
|
|
|
|
|
Joined: May 2002
Posts: 49
Active BB Member
|
|
OP
Active BB Member
Joined: May 2002
Posts: 49 |
THANK YOU ! -Nate According to Leo's book, the casting number is 64 to 66 but the k174 means k= Nov. 17= day 4=year so Nov. 17th 1964
Everyone should have Leo's book it's a treasure of info.
-Nate
|
|
|
|
|
Joined: May 2002
Posts: 49
Active BB Member
|
|
OP
Active BB Member
Joined: May 2002
Posts: 49 |
I know it sounds counter intuitive but , I'm not an Engieer , just a Journeyman Mechanic who's always trying to learn the craft better so I listened when the same folks who make the things , speak . Nate, revving the engine with a dry ring set does make sense to seat the rings, thanks.
-Nate
|
|
|
|
|
Joined: May 2002
Posts: 49
Active BB Member
|
|
OP
Active BB Member
Joined: May 2002
Posts: 49 |
Hm ; How do I attach photos of my bore ? . I have them stored on my desktop but clicking on the ' enter an image ' button doesn't have the usual ' browse ' button....  .
-Nate
|
|
|
|
|
Joined: Sep 2008
Posts: 3,669 Likes: 42
1000 Post Club
|
|
1000 Post Club
Joined: Sep 2008
Posts: 3,669 Likes: 42 |
You'll need to put them in your My Documents folder or My Pictures and link to it from there with a Photobucket or Imageshack account to be able to post pics.
Class III CNC Machinist/Programmer
|
|
|
|
0 members (),
383
guests, and
16
robots. |
|
Key:
Admin,
Global Mod,
Mod
|
|
|
|