|
|
Joined: Nov 2004
Posts: 1,805 Likes: 1
1000 Post Club
|

1000 Post Club
Joined: Nov 2004
Posts: 1,805 Likes: 1 |
Bet you that the converter is in the same place on the I6 and V8 models so that z28 duals would bolt up ..
Just for fun price it out on rockauto
51 GMC 4.2 turbo
Can't solved today's problems using the same technology/thinking that created them
|
|
|
|
|
Joined: Feb 2014
Posts: 505
Major Contributor
|
|
OP
Major Contributor
Joined: Feb 2014
Posts: 505 |
The '75 and later 2nd gens all have the same space added to the passenger floor pan for the catalytic converter, so they are all in the same general location. Looking at the 350/305 intermediate pipe and tail pipe, they are the same part number as the 250 L6. However the Z28 has no parts in common with either, and the 2.25" exhaust pipes and the different catalytic converter number probably mean the Z28 cat-back would not fit the L6 catalytic converter and 2" head pipe. But if a Nova or Camaro owner fabricated a header pipe and used a larger Z28 cat (or eliminated it) they could use the stock Z28 system on back.
The parts for the L6 are:
44676 2" header pipe - NA
50012 catalytic converter - $91.79 (or 50013 $98.79?)
45757 2" intermediate pipe - $33.99
35336 2.25" clamp - $1.31
35183 muffler hanger - $5.62
21807 muffler - $58.79
35408 2" clamp - $0.93
43502 2" tailpipe - $20.79
Total $223.42 (w/ catalytic converter, but w/out header pipe)
Since my header pipe is already cut short, a replacement header pipe is unavailable, my catalytic converter is missing, and my shop has said they can give me a 2.5" single exhaust for less then $200; I'd rather just have my shop make up a 2.5" over trying to fabricate a connection between the stock header pipe and the stock cat-back.
Last edited by Lifeguard; 03/27/14 08:40 PM.
|
|
|
|
|
Joined: Nov 2013
Posts: 482
Contributor
|
|
Contributor
Joined: Nov 2013
Posts: 482 |
Did a little research on Z28 exhaust:
42566 y pipe 67.99
21598 muffler 42.99 each.
43744 and 43745 are 24.79 each
43662 39.79
43663 33.99
There are other pipes listed for "earler" versions of this system at about the same price. The 21907 muffler that you have posted about is the stock 1 pipe in and 2 pipe out for Camaros and Novas of that era. When the Z28 came back out in 1977, I bought one. ( I was only 2 yrs old at the time) This exhaust system was the only real change to the engine, the rest of the engine was stock LM1. The exhaust added ~20 hp over the system that you posted parts for. At the time I took 2 stock exhaust pipes from a Chevelle and ran them from the manifolds to the mufflers,getting rid of both y pipes and the converter. Believe it or not they fit perfectly and I ended up with a true dual exhaust system. I would recomend that you buy the Z28 system starting at the y pipe and have the shop make you a 1 piece 2 1/2 pipe to crossover and hook up to the y pipe. The shop may even be able to get the pipes cheaper than you can. At the very least get the y pipe and go from there. I have been told that the 292 manifold outlet is in the same place as our 1bbl intergrated head. If someone could verify this (TLowe?) then everything would bolt up when the head was changed to non intergrated. Jay 6155
|
|
|
|
|
Joined: Feb 2014
Posts: 505
Major Contributor
|
|
OP
Major Contributor
Joined: Feb 2014
Posts: 505 |
The parts diagram listed that muffler for the single outlet L6 engine exhaust. The V8s had the dual outlet in the late '70s, so maybe they just don't carry the L6 muffler in favor of the V8 muffler.
I can ask my shop on the Z28 parts, but I'm pretty sure a single 2.5" exhaust is cheaper then getting fancy with faux 2.25" dual exhaust in the back. Actually I think the $200 quote was based on his confusion at thinking I had a V8 and he was putting together a dual exhaust, so I think that was on the high side.
I'm the one who pointed out the 2.25" outlet for the integrated 1bbl 250 head was located between cylinders 4 and 5, which is about the same spot as the 2.5" HD outlet for the non-integrated 2bbl 292 head. And they both have a three stud bracket. So an exhaust set up for the integrated 250 should be pretty close to hooking up to 292 manifold in a top end swap to a non-integraded head and manifold. The 250 1bbl non-integraded 2" exhaust outlet is located directly below the carb and has a 2 stud flange.
|
|
|
|
|
Joined: Nov 2013
Posts: 482
Contributor
|
|
Contributor
Joined: Nov 2013
Posts: 482 |
Now I remeber it was you that said that the outlet for the exhaust is the same. I guess thats what happens when you buy a new car at age 2! I would still like to see someone that has both manifolds put the 2 side by side to be sure. After all the 2 might be close,just off enough not to work OR be a perfect match. One nice thing about the Z28 parts is that they just bolt together very easly. It could be that a single 2.5 inch system would be cheaper than the Z28 parts. I did some reaserch a little while ago about the walker 1in and 2out mufflers( Too bad I can't find it now.)for my Nova. There are only about 4 or 5 that will come close to fitting in the stock sideways location. Keep in mind that these are stock mufflers and are fairly quiet. One is for a78 Camaro/Nova that we have allready mentioned. Another is for a 79 El camino with a 350, then there are the mid 90s Camaros both Z28 and not IIRC. There is also a muffler for a Buick Grand National but it is 2in and 2 out. What I am talking about is a OEM high quality part. If you wanted to go single tailpipe then maybe a 454 truck muffler would be right. We put one on my Daughters Trailblazer and it sounded nice. For myself I am trying to make an adapter plate that will let me run the 2bbl dual outlet manifold on the 1bbl head. That way I can have the exhaust system done before I put in the 2bbl engine. It just depends on what kind of sound that is desired. Keep in mind that a low restriction exhaust will make more hp and give better gas mileage than stock. Are you going to put a converter back on? I would think that the car is old enough to be exempt from any possible inspection that your area might have. Please keep us informed as I own a "sister" car and am always looking for ideas. Jay 6155
|
|
|
|
|
Joined: Feb 2014
Posts: 505
Major Contributor
|
|
OP
Major Contributor
Joined: Feb 2014
Posts: 505 |
The 292 HD exhaust manifold and 250 integrated exhaust manifold may not be precisely in the same position, but they are going to be pretty close, probably a fraction of an inch in any direction. So I can get an exhaust for my integrated exhaust, and when I finally can afford to swap the entire top end out, the exhaust pipe will be close enough to be wriggled into place and bolted up. At least enough to get it back to the shop and have them make some mods to fit exactly. I can't do that with the Langdon manifolds or Clifford shorty headers, and I'm not sure they flow significantly better than the 292 HD manifold. Being on an extremely tight budget; with the 292 manifold $169.95, Langdon manifolds for $277 with $30 for manifold heat, and the Clifford shorty headers for $359; you can't beat the 292 manifold.
My shop said if it comes in without a converter, they don't need to put one on. Since I'm doing this on an extreme budget, I can't justify adding a catalytic converter when I can just put a straight exhaust on it. So no converter.
Looking at the exhaust charts for both the regular 350/305 and Z28 350/305 head pipes are both 40471, which is a 2" pipe. The Z28 Y pipe part 42537 appears to be 2" on the resonator end, but I don't know if it is bigger than 2" on the catalytic converter end. Given it is a 2" pipe going into the converter, It's probably 2" coming out of the cat. So the Z28 exhaust will fit both the standard V8s and might fit the L6 catalytic converters as a bolt on. It looks like from the parts chart that the Z28 is only 2.25" on the tailpipes from the resonators on back.
|
|
|
|
|
Joined: Nov 2013
Posts: 482
Contributor
|
|
Contributor
Joined: Nov 2013
Posts: 482 |
The Z28 y pipe is bigger on the converter end than 2". IIRC it's 2.5". The 40471 y pipe is 2" until they merge together into a bigger pipe before the converter. Coming out of the converter is also bigger than 2" I think it's 2.5 also. The y pipe that goes to the 2 "mufflers" splits into 2 2" pipes. The part number that I am talking about is 42566. Where did you find part number 42537? Can you post a link please? I can also tell you for sure that the factory pipe from the engine to the cat on my nova is 2.25. Coming out of the cat is also 2.25 that runs to the muffler. I think when they went to the intergrated head the exhaust side was improved. The camshaft has more lift and duration and the exhaust pipe is bigger. Look at pipes munber 45426 and 45537. They are both 2". The 75 to 79 is 2.25 inch. I know what you mean by a tight budget, I think that the 292 manifold is the way to go in this case. I also agree that there might be enough movement in the exhaust system to bolt up to the 292 manifold when the time comes. I am now thinking of a possible Z28 type system for my Nova thanks to you. Do some research here I think that a member here got the best power out of a 305 by using a short piece of 2" pipe than stepping up to 2.5". Look at posts by Deuce Coupe to start. You could save $$ by buying the Z28 parts starting at the y pipe in front of the mufflers, hang it yourself then have the shop hook it up to what you have left of the old head pipe and make a new head pipe up when the head swap is done later. Just an Idea. Jay 6155
|
|
|
|
|
Joined: Feb 2014
Posts: 505
Major Contributor
|
|
OP
Major Contributor
Joined: Feb 2014
Posts: 505 |
Part numbers are off the NAPA diagrams at NastyZ28.com: http://www.nastyz28.com/2gcog/exhaust.htmlThe NAPA numbers may be different from the Walker part numbers on the RockAuto.com diagrams.
|
|
|
|
|
Joined: Feb 2014
Posts: 505
Major Contributor
|
|
OP
Major Contributor
Joined: Feb 2014
Posts: 505 |
I haven't taken a set of calipers to measure my head pipe, but it does look pretty stout. The common thought on pipe size is Chevy put 2" on their non-performance engines and 2.25" on the performance motors. But this rule probably only applies to the pre-1975 systems. When Chevy added the catalytic converter and L6 integrated head, they probably swapped everything to a 2.25" header pipe which is why the 250 1bbl integrated head had a 2.25" outlet on the exhaust. Looking at the diagram for the L6 & low-perf V8 exhaust, there is a 2.25" clamp on the cat end of the muffler, while the tailpipe end is a 2" clamp. This might mean the intermediate pipe between the cat and muffler is 2.25" too.
The Z28 head pipe is the same as the L6 and low-perf V8s, so the Z28 catalytic converter probably has the same inlet size of 2.25". But if it has a 2.5" outlet to the Y-pipe, it is probably not the same cat from the L6 and low-perf V8s, which the Walker part numbers being different seems to support that. So the Z28 exhaust starts with the cat on back.
So if you have a '75 to '79 1bbl 250 L6, you could swap everything after the header pipe on back with Z28 parts. Or you could delete the cat with a custom 2.25" to 2.5" pipe and hook it up to the cat back of the Z28. Then later if you swapped the integrated head to a non-integrated head with a 292 HD exhaust manifold and just hook the 2.25" header pipe to the new manifold so you can drive it down to the exhaust shop to fabricate a new 2.5" header pipe that can hook up to the Z28 cat-back. The setup would be identical to the '77-'81 305/350 Z28 setup with the same size L6 header pipe bend at the same angles, but it would be even more free flowing for the smaller L6 than the V8.
I could possible set this system up myself on my Camaro as the header pipe is cut with a turbo muffler stuck on the end of it, by adding a 2.25" straight pipe to the end of the muffler and cutting it off where it meets the Y-pipe. But I'm not sure how to connect up a regular 2.25" pipe to one with a 2.5" fitting for a catalytic converter?
The stock 2.25" L6 header pipe is not a great design, as it goes straight down and then under the oil pan at a 90 degree bend and then around the starter back to the catalytic converter. A much better design would be 2.5" pipe going back under the manual linkage and then crossing under the transmission to the Y-pipe if that is possible.
Last edited by Lifeguard; 03/29/14 06:47 PM.
|
|
|
|
|
Joined: Feb 2014
Posts: 505
Major Contributor
|
|
OP
Major Contributor
Joined: Feb 2014
Posts: 505 |
BTW, I noticed that Walker does not have a part number for the intermediate Y-pipe and Rockauto.com doesn't list it. Anyone know where you get the Y-pipe from these days?
|
|
|
|
|
Joined: Nov 2013
Posts: 482
Contributor
|
|
Contributor
Joined: Nov 2013
Posts: 482 |
I agree with you about the L6 head pipe design. How much of the stock pipe from the engine to the cat is left on the car? Are there any of the flanges used for the converter left? If the muffler thats on there now is where the cat used to be than all the muffler shop has to do is make up a pipe with a flange on one end to fit the new y pipe with bolts and slip over the piece of head pipe left after the current muffler is removed. You could even drive the car over to the shop with the Z28 exhaust allready installed by yourself,having them make the new pipe, remove the current muffler, and hook it up. Or you could just bring them the pieces and have them put it all on which will cost more $$$. I would not recomend having them make a new pipe and you put it on because it can be so hard to get the measurements right. Jay 6155
|
|
|
|
|
Joined: Feb 2014
Posts: 505
Major Contributor
|
|
OP
Major Contributor
Joined: Feb 2014
Posts: 505 |
BTW, I noticed that Walker does not have a part number for the intermediate Y-pipe and Rockauto.com doesn't list it. Anyone know where you get the Y-pipe from these days? Oh wait, never mind I saw the part number in the list above and found it on Amazon: http://www.amazon.com/Walker-42566-Exhau...IN%3DB0017LY2OGWhich is really cheap?
Last edited by Lifeguard; 03/29/14 07:08 PM.
|
|
|
|
|
Joined: Feb 2014
Posts: 505
Major Contributor
|
|
OP
Major Contributor
Joined: Feb 2014
Posts: 505 |
I agree with you about the L6 head pipe design. How much of the stock pipe from the engine to the cat is left on the car? Are there any of the flanges used for the converter left? If the muffler thats on there now is where the cat used to be than all the muffler shop has to do is make up a pipe with a flange on one end to fit the new y pipe with bolts and slip over the piece of head pipe left after the current muffler is removed. You could even drive the car over to the shop with the Z28 exhaust allready installed by yourself,having them make the new pipe, remove the current muffler, and hook it up. Or you could just bring them the pieces and have them put it all on which will cost more $$$. I would not recomend having them make a new pipe and you put it on because it can be so hard to get the measurements right. Jay 6155 Looks like it was sawzalled right before the cat bracket. No flanges left, just exhaust pipe. Pipe is in great condition. The muffler fits right in the indentation of the floor pan for the cat. No pipe attached on the other end of the muffler.
Last edited by Lifeguard; 03/29/14 07:19 PM.
|
|
|
|
|
Joined: Feb 2014
Posts: 505
Major Contributor
|
|
OP
Major Contributor
Joined: Feb 2014
Posts: 505 |
I finished indexing my gaped plugs, then set the timing to 6 degrees before adjusting the solenoid to 800 rpm curb idle. But when I followed the tune up decal directions to use the allen wrench to adjust the base idle, the engine dies when the solenoid's electrical lead is disconnected an I can't seem to set the base idle to 425 rpm. I may have to skip that step and move on to adjust the fast idle linkage tomorrow, then change the oil and coolant. I don't have enough left over after annual registration and replacing the battery, to have the exhaust done. Maybe another paycheck or two. While I was working on it I snapped a pic of the state of my exhaust from the driver's side: 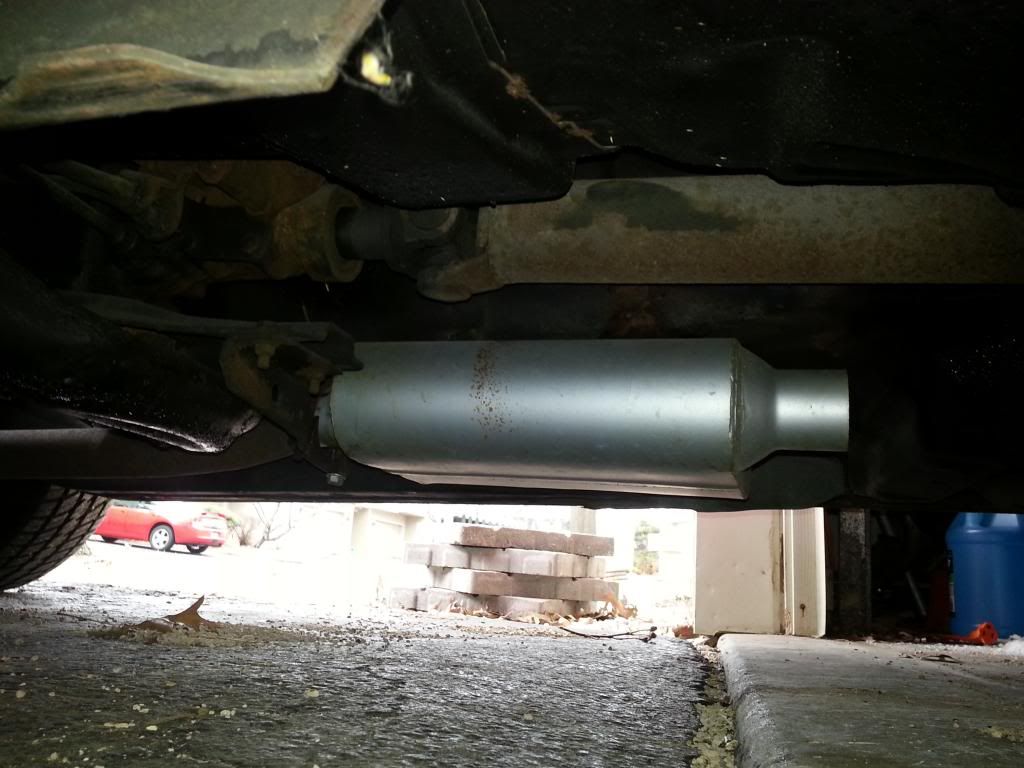
|
|
|
|
|
Joined: May 2011
Posts: 378
Contributor
|
|
Contributor
Joined: May 2011
Posts: 378 |
I haven't followed the whole story here, just happened to see you mention the idle solenoid. If it's anything like mine, sounds like it's working as it should, shutting off the idle fuel feed as soon as power is disconnected. It is to prevent dieseling after you turn the engine off.
The solenoid should get power whenever ignition is on, to enable idle fuel feed. So you adjust idle speed with the solenoid energized. It's supposed to kill the engine when power goes away. It's not a high/low idle speed solenoid.
|
|
|
|
|
Joined: Feb 2014
Posts: 505
Major Contributor
|
|
OP
Major Contributor
Joined: Feb 2014
Posts: 505 |
I haven't followed the whole story here, just happened to see you mention the idle solenoid. If it's anything like mine, sounds like it's working as it should, shutting off the idle fuel feed as soon as power is disconnected. It is to prevent dieseling after you turn the engine off.
The solenoid should get power whenever ignition is on, to enable idle fuel feed. So you adjust idle speed with the solenoid energized. It's supposed to kill the engine when power goes away. It's not a high/low idle speed solenoid. Yeah, the factory tune up decal says to disconnect it and then adjust the base idle to 425 rpm with the 1/8" hex screw in the end of the solenoid. I'm not sure how to accomplish that. Here's the instructions: "1 Disconnect and plug vacuum hose at distributor. Set ignition timing as specified engine speed (6 degrees @ 800 rpm). Unplug and reconnect vacuum hose to distributor." "2 Disconnect and plug vacuum hose at EGR valve and canister purge hose at canister. Turn carburetor solenoid to obtain specified curb idle speed (800 rpm in N)." "3 Disconnect electrical lead at solenoid. Adjust base idle speed to specification (425 rpm in N) by turning 1/8 hex. screw located in end of solenoid body. Reconnect electrical lead." "4 With Transmission in park or neutral, bend fast idle cam follower to obtain specified fast idle speed (2000 rpm in N) on high step of cam. Unplug and reconnect vacuum hose to EGR valve and canister purge hose to canister." I've done steps 1 and 2, but step 3 does not seem possible. I'm not sure what I'm doing wrong?
|
|
|
|
|
Joined: Feb 2014
Posts: 505
Major Contributor
|
|
OP
Major Contributor
Joined: Feb 2014
Posts: 505 |
Here's an old pic I took of my monojet from the passenger side. The solenoid is below the choke, but the vacuum hose is blocking the view of the hex screw in the top and the electrical connection. The 9/16 fitting that you turn with a wrench to adjust curb idle is partially visible. You can also see the follower to the fast idle cam can be see on the backside of the carb to the left right behind the choke in the pic. 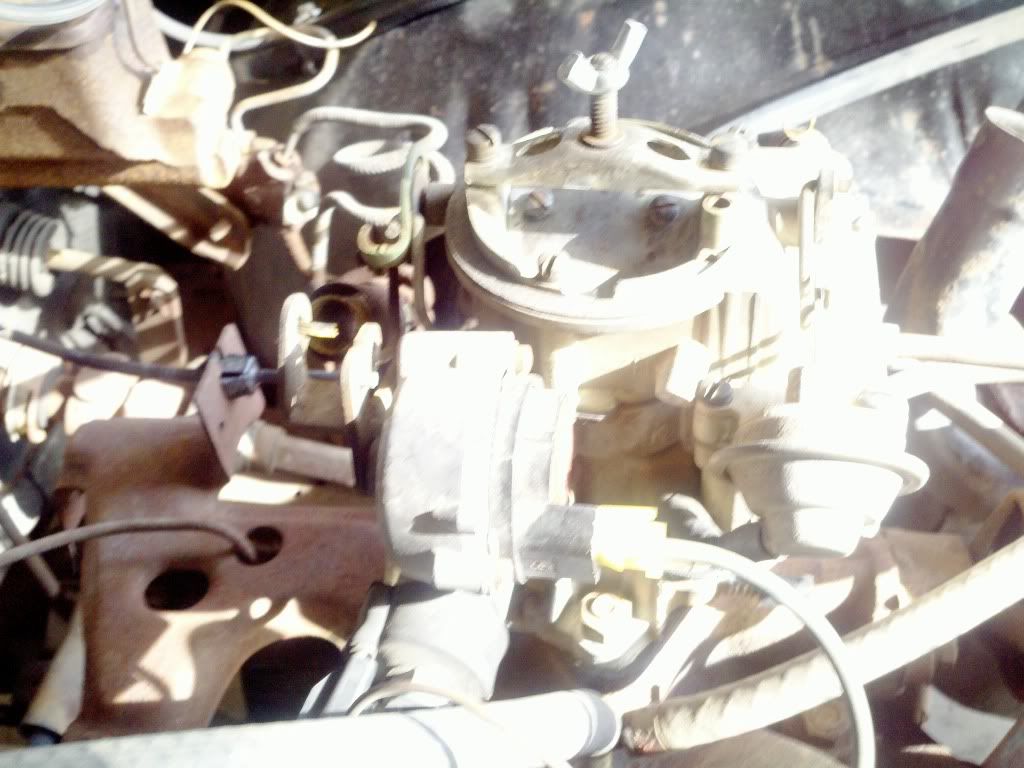
|
|
|
|
|
Joined: Feb 2014
Posts: 505
Major Contributor
|
|
OP
Major Contributor
Joined: Feb 2014
Posts: 505 |
There's also the idle mixture screw in the front of the carb to the left of the fuel line inlet below. But there is not instruction on the tune up decal on adjusting it. 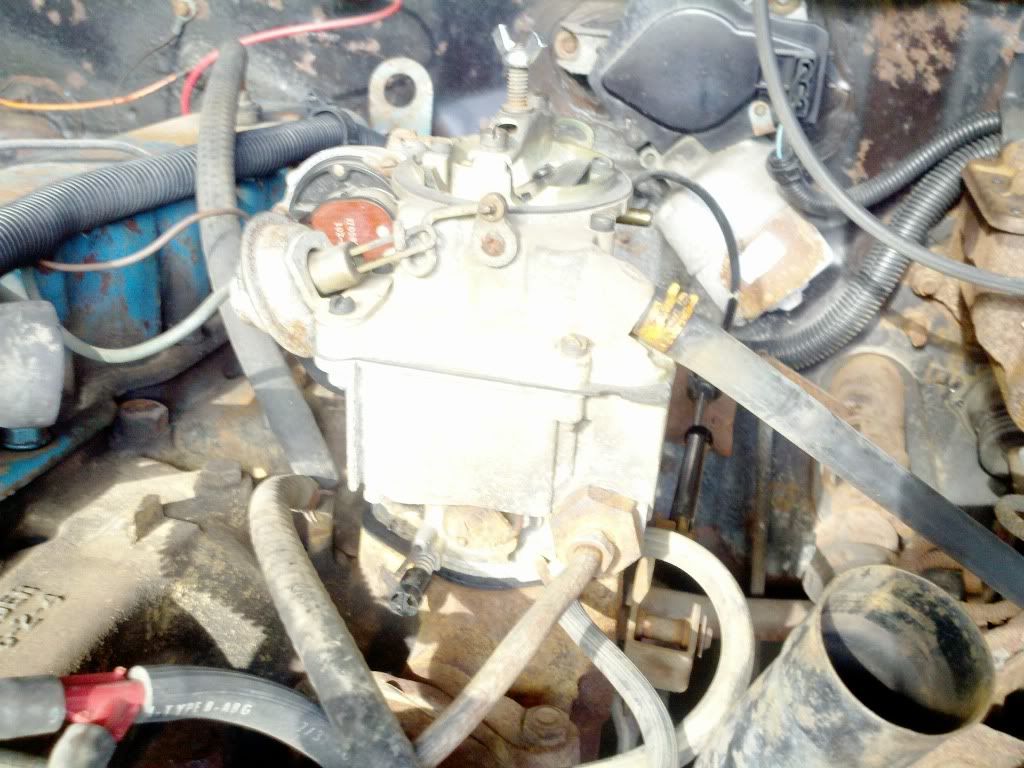
|
|
|
|
|
Joined: May 2011
Posts: 378
Contributor
|
|
Contributor
Joined: May 2011
Posts: 378 |
Thanks,
your solenoid must work differently from mine. Mine is just an on/off switch for idle fuel. Nothing controls it other than ignition key, there is no "slow idle" vs. "high idle" setting to the solenoid. The solenoid on mine is always energized 100% when the engine is running. Different idle speeds (Throttle openings) come from the cam plate the solenoid tip rests against. I suppose I *could* set it to have a high and low idle, but because there is nothing controlling it, it would just stay at high idle all the time, until the engine is turned off, and then it would allow fuel to be drawn in through the idle passage after shutdown and you risk dieseling the engine.
As for idle mixture adjustment: Almost every carb is adjusted with the same principle: idle mixture screw is turned OUT in 1/2 turn increments or so, until idle speed no longer increases. Find the last 1/2 turn that did not cause idle speed to go up, and then go back IN to the previous 1/2 setting and you're done. Close enough for most needs, the rest is 1/4 turn fine tuning. The idea is to find the highest steady idle, but no more.
Idle mixture adjustments affect only idle rpms and slightly off idle throttle, like cruising speeds.
Carb adjustment should be done LAST, after everything else is in good working condition and adjusted right. Point gap, dwell, valve clearances, ignition timing, vacuum leak elimination etc. all come first.
Anyone know better please correct me.
|
|
|
|
|
Joined: May 2011
Posts: 378
Contributor
|
|
Contributor
Joined: May 2011
Posts: 378 |
Also, I have no EGR. Don't know how that changes things.
|
|
|
|
|
Joined: Nov 2013
Posts: 482
Contributor
|
|
Contributor
Joined: Nov 2013
Posts: 482 |
The EGR valve does not open at idle speed so there is no difference in adjusting idle speed. The manual says to disconnect the line to the EGR and the vapor canister. When I worked on these cars at the Chevy garage we never disconected either line.Not just me but no one that worked there. Never had a problem. AS to the low idle 70 Nova has it right, the solonid is "on" any time the key is on run. (some cars are only on when the A/C is turned on) There is a low idle setting so the car will run if the gas pedal is not touched when starting. On my own car the engine won't run at "low" idle. I haven't really tried to set it yet to see what would happen. Jay 6155
|
|
|
|
|
Joined: May 2011
Posts: 378
Contributor
|
|
Contributor
Joined: May 2011
Posts: 378 |
On "other" cars from the same era (dare I say "foreign"), the solenoid is called idle shut off solenoid. Sole purpose being to prevent *any* fuel being drawn in the engine after shutdown, so it wouldn't self ignite after a hard run in the hot combustion chamber. On old american iron, I don't know for sure. What is the purpose of having two idle speeds?
I did check in my old Chilton book and it has a short section on adjusting my '70 230/250. It mentions setting high idle first to 600rpm and finish off with solenoid wire disconnect to set the idle to 400rpm.
Heck I might as well quote the whole section:
With air cleaner in place and engine fully warmed up, "fuel tank" line disconnected from the vapor canister (EEC). Distributor vacuum line disconnected.
a. turn in the mixture screw until it gently seats, then back out the screw FOUR turns.
b. Adjust the solenoid screw to obtain 830rpm for manual transmissions (in neutral) or 630rpm for automatics (In Drive).
c. Adjust the mixture screw to obtain 750rpm for manual transmission (In neutral) or 600rpm for automatics (in Drive).
d. Disconnect the solenoid wire and set the idle speed to 400rpm, then reconnect the wire.
e. reconnect the distributor vacuum line.
I have no vapor canister, thus no fuel tank line to disconnect from it.
Glad I checked, now I know. Still, I can't see why I need two idle speeds and potential dieseling. I use the solenoid to prevent dieseling as I explained above. Yes it won't start or idle unless I tap on the gas pedal once after ignition is turned on. The solenoid is not strong enough to open the throttle from closed position when energized.
|
|
|
|
|
Joined: Feb 2014
Posts: 505
Major Contributor
|
|
OP
Major Contributor
Joined: Feb 2014
Posts: 505 |
Sorry, my laptop and smartphone both died within 24 hours of each other and I've been working on replacing the HD and recovering the OS, so I missed several posts. I can't seem to figure out how to set base idle with the hex screw on the inside of the end of the solenoid. Here's a pic of it: 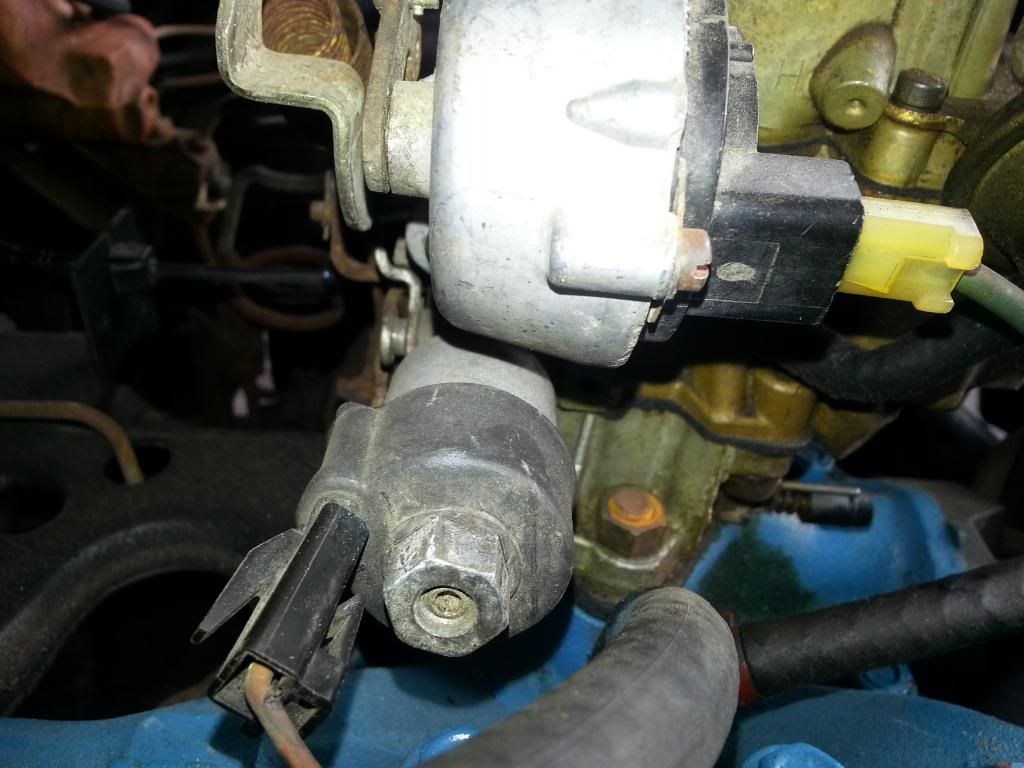 So I skipped that step and just went on to setting the fast idle follower at 2000rpm, after I set the timing for 6 degrees at 800rpm and idle at 800rpm. Then I set the Changed out some 10W-30 synthetic and a filter. And just finished up flushing the cooling and added 50/50. Then I put a 2.25" short straight pipe on the end of muffler and that really helped quiet it down a bit. Just needs a bath and a little more underhood detailing and it runs almost like a real car. Here's what I've done so far of what I call Phase 0: * replaced stock steel/brass radiator with lighter replacement plastic/aluminum (already done when I bought it) *run synthetic energy saver oil * gap and indexed spark plugs * added inline fuel filter before fuel pump * K&N air filter * opened up driver side turn signal to create ram air scoop And my list of updates for the rest of Phase 0 as I get the funds: * replace plug wires with 8mm * replace cap and rotor on HEI * replace vacuum advance on HEI with adjustable Accel * replace coil with Accel supercoil * replace exhaust (probably 2.25" single system, but looking at other options) * replace pulley fan with electric fan * install a cool can in the fuel line I will probably check on my fuel mileage in city as I drive it the next few weeks. I need to invest in a vacuum gauge and an adapter for my compression gauge so it will fit my spark plug threads. In the future phase 1 will be the top end swap, phase 2 a cam swap, and eventually phase 3 will be a short block rebuild with flat tops. Again, as funds allow.
Last edited by Lifeguard; 04/03/14 09:25 PM.
|
|
|
|
|
Joined: Feb 2014
Posts: 505
Major Contributor
|
|
OP
Major Contributor
Joined: Feb 2014
Posts: 505 |
Took some shots of my exhaust: My integrated head exhaust manifold 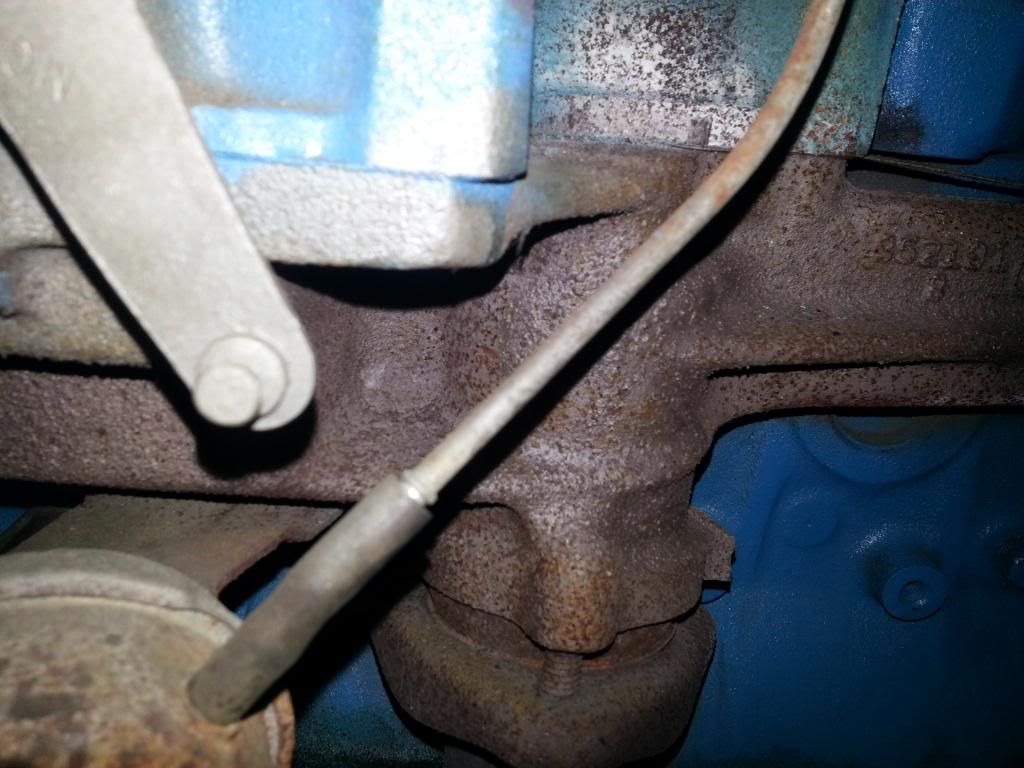 From underneath: 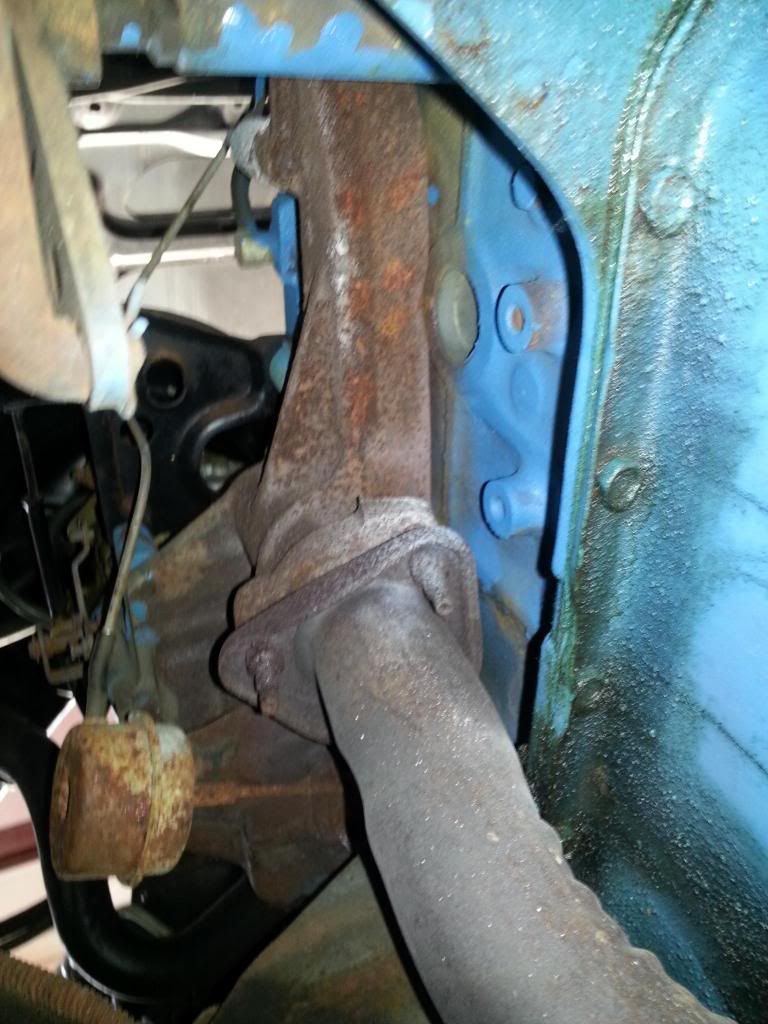 Around the oil pan to the passenger's side: 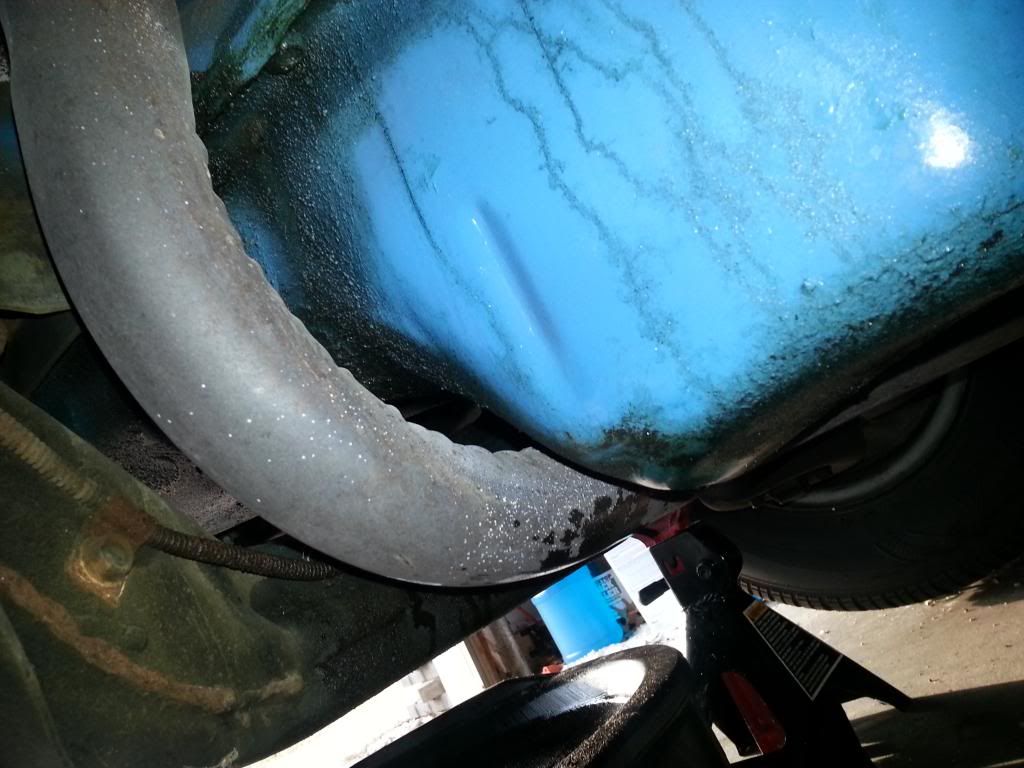 And to the muffler, which is where the catalytic converter would have been: 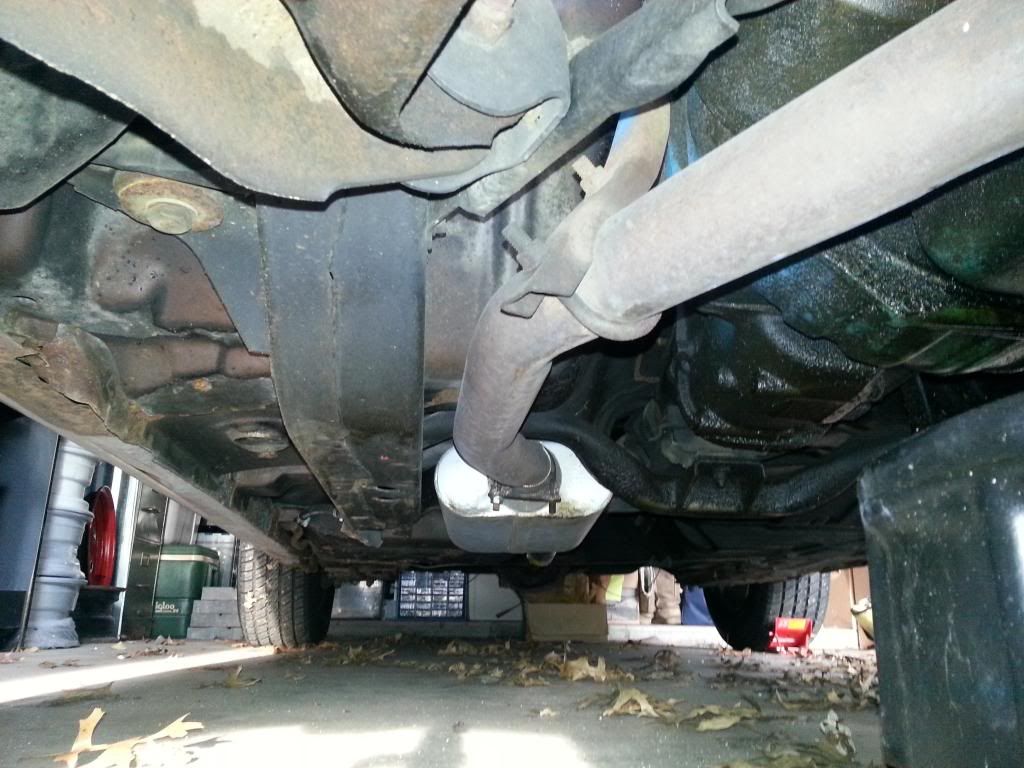
Last edited by Lifeguard; 04/03/14 11:53 PM.
|
|
|
|
|
Joined: Feb 2014
Posts: 505
Major Contributor
|
|
OP
Major Contributor
Joined: Feb 2014
Posts: 505 |
Crap, in the process of flushing the cooling system my water pump started leaking. I guess it's time to replace that too. The pulleys were wobbling and noisy, so that was probably why. The pump is a little different from a small block pump, but it looks like 4 bolts hold it in. Hopefully they'll come out OK. While I have the fan and pulley off, I might take the opportunity to replace it with an electric fan to make it quieter and free up some HP and fuel economy.
|
|
|
|
|
Joined: Nov 2013
Posts: 482
Contributor
|
|
Contributor
Joined: Nov 2013
Posts: 482 |
My Grandson and I had to replace the water pump also. The fan blade would move over an inch when wiggeled and the pump was noisy. I could not believe that it did not leak! We also changed to a 3 blade clutch fan from a 350 chevy truck. The car is much more quiet without that 4 blade fan roaring and sucking up horsepower. You should change fan type for sure. If you go with a factory clutch fan make sure it turns the correct direction. Jay 6155
|
|
|
|
|
Joined: Sep 2008
Posts: 3,669 Likes: 42
1000 Post Club
|
|
1000 Post Club
Joined: Sep 2008
Posts: 3,669 Likes: 42 |
I built a killer 440 Chrysler for a guy one time. He complained it was running hotter than it did before, and kept on and on about it. Finally, he called me soon after that and told me he found out why. He said he went to the parts store and his aftermarket electric fan kicked on as he was walking in front of the car and it blew his skirt up....DOH! He didn't realize he mounted it on the wrong side of the radiator.It was a pusher instead of a puller. It happens a lot i'm sure.
Class III CNC Machinist/Programmer
|
|
|
|
|
Joined: May 2011
Posts: 378
Contributor
|
|
Contributor
Joined: May 2011
Posts: 378 |
..blew his skirt up?  Anyhoo, I found one like that once too, never expected that. Took a while to figure it out, and even then it was sheer luck. I just installed an electric fan in front of my new radiator, and the instructions said it could be run either way. Had to quadruple check to make sure I got it right 3-row radiator replacing a stock 2-row, no room for stock fan.
|
|
|
|
|
Joined: Feb 2014
Posts: 505
Major Contributor
|
|
OP
Major Contributor
Joined: Feb 2014
Posts: 505 |
..blew his skirt up? Anyhoo, I found one like that once too, never expected that. Took a while to figure it out, and even then it was sheer luck. I just installed an electric fan in front of my new radiator, and the instructions said it could be run either way. Had to quadruple check to make sure I got it right 3-row radiator replacing a stock 2-row, no room for stock fan. It's a kilt, and if you call it a skirt you'll get kill't!!! Picked up my 16" Imperial electric fan and wiring relay kit from Advanced Auto Parts (my cousin is a regional manager for them). It should be puller right out of the package, otherwise there's a slip connector on the fan axle you pull and turn the blades around. Pretty straight forward, wiring is only somewhat more challenging. I need to figure out what to hook the ignition on wire to still, but the rest of the wires are pretty straight forward. Here's my parts: 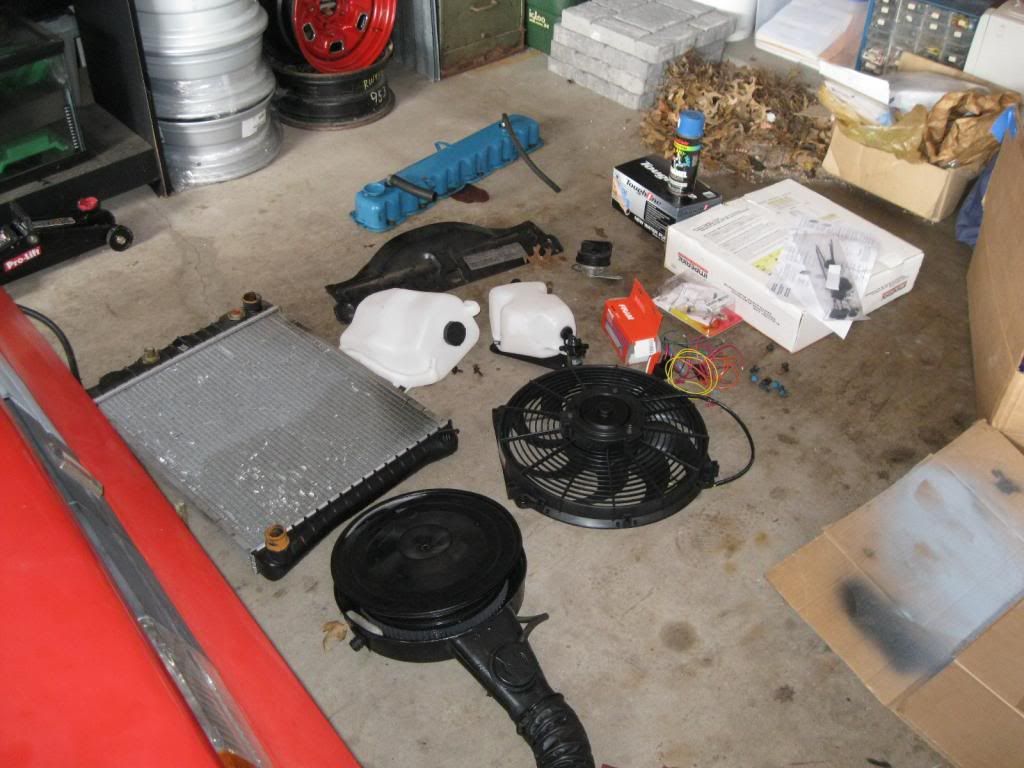 I took the spark plugs out and did a compression test on all cylinders. They all pulled 190 on at least one of the the three bumps I gave each of them. 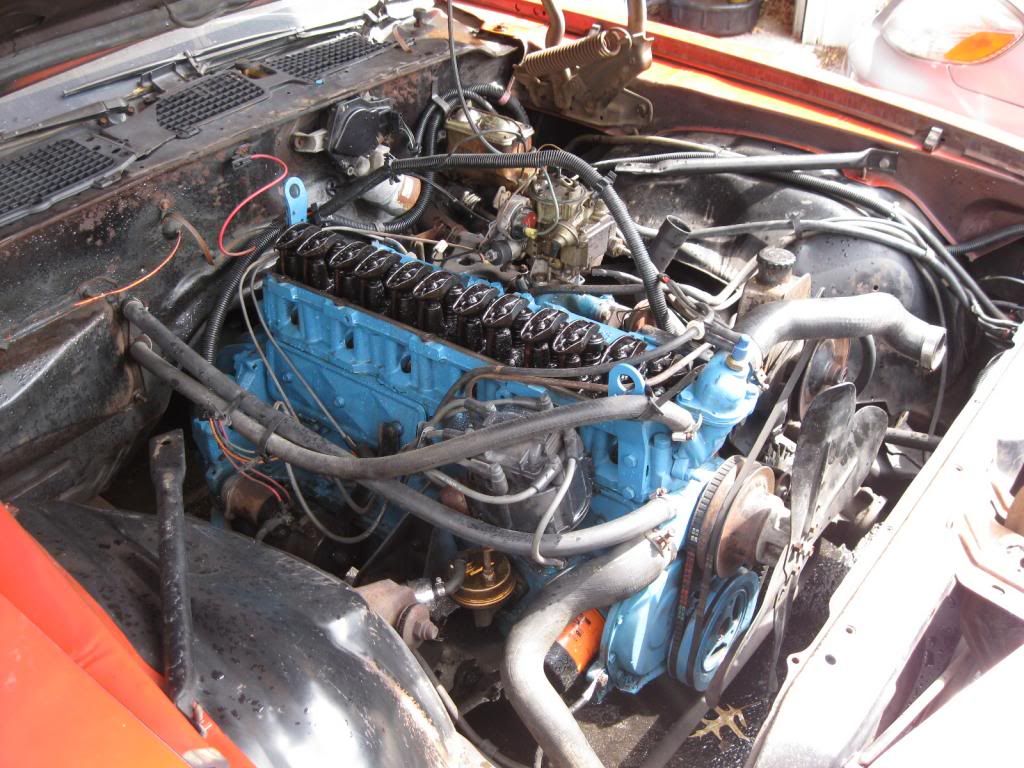 I've got the radiator out, washer/coolant bottles off, spark plugs and valve cover off so far. I'm checking the cam opening and closing points, before I pull the water pump and fan off and don't have the fan to turn the crank over with anymore. I got my feeler gauges to check to see when the intake and exhaust open and close, but can't find the specs on what the stem to rocker clearance should be. I'm also detailing the hard to get to areas while the parts are off so I can clean and paint before putting the parts back on. 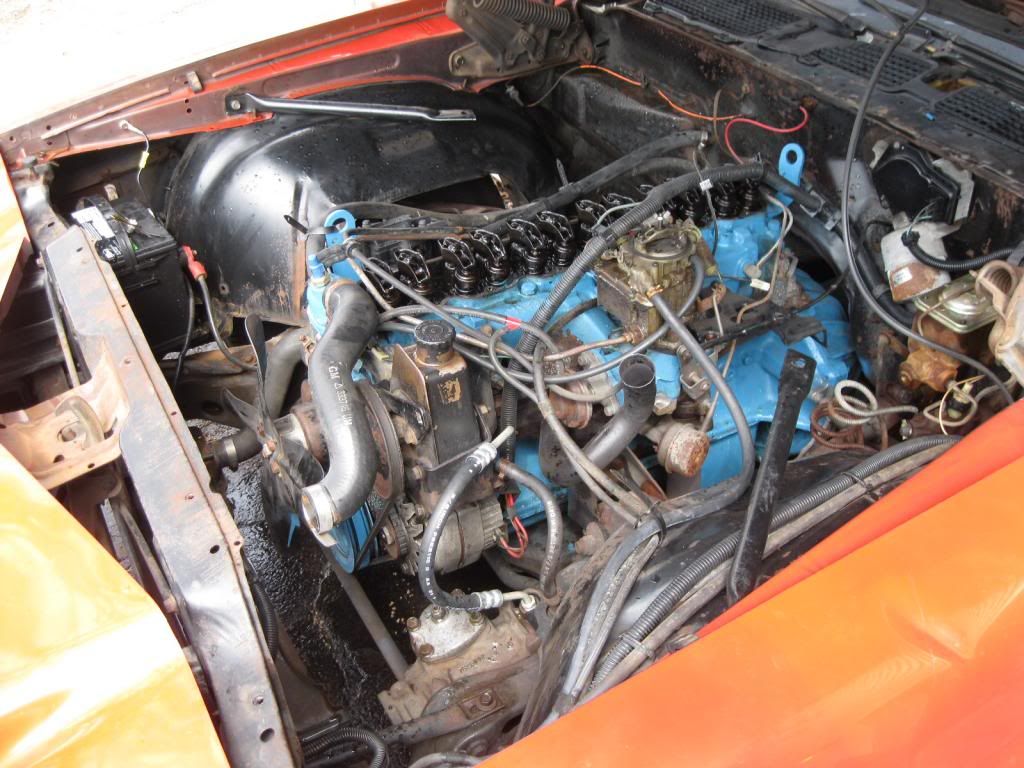
|
|
|
|
|
Joined: Nov 2013
Posts: 482
Contributor
|
|
Contributor
Joined: Nov 2013
Posts: 482 |
Stem to rocker clearanc is 0. Car has hyd. cam. Looks nice under the hood. Please post pics of the fan when it's done. Thanks Jay 6155
|
|
|
|
|
Joined: Feb 2014
Posts: 505
Major Contributor
|
|
OP
Major Contributor
Joined: Feb 2014
Posts: 505 |
Stem to rocker clearanc is 0. Car has hyd. cam. Looks nice under the hood. Please post pics of the fan when it's done. Thanks Jay 6155 OK, that explains why I couldn't fit even a 0.01 feeler gauge in between the rocker and valve stem. I was trying to detect movement of the rockers by using a feeler gauge, but that wasn't working so I just eyeballed the rockers on the #1 cylinder. I made marks every 5 degrees on the flywheel and used the timing pointer to read the marks as I saw the valve open or close. This is not exact, but after spinning the engine over a few dozen times I got these numbers off the stock cam: intake open: 15 degrees intake close: 75 degrees exhaust open: 265 degrees exhaust close: 350 degrees 180 degrees is one turn of the balancer/flywheel, two turns for a full 360. Now I need to figure out how to convert these to ATDC, BBDC, BTDC, and ABDC. The inliner cam chart list the specs for the integrated head cam as: duration @ 0.050": 172 / 188 degrees lift: 0.389" / 0.406" lobe sep: 102 degrees
|
|
|
|
|
Joined: Feb 2014
Posts: 505
Major Contributor
|
|
OP
Major Contributor
Joined: Feb 2014
Posts: 505 |
I've been playing around with these numbers for awhile now trying to convert them into proper valve timing on the camshaft, but so far they make no sense? The intake valve should start to open before TDC, but I observed it 30 degrees of flywheel (or about 15 degrees of cam) after TDC. The same thing is true of the exhaust closing which was 20 degrees of flywheel (10 degrees of cam) before TDC instead of after. Now there is probably some degree of exhaust closing and intake opening between those points that I can't see with my bare eye but probably would show up on a dial caliper, and that should be added on. And maybe the slow turning of the crankshaft is causing the hydraulic lifters to absorb some of the lift on the opening and closing, restricting the opening and closing I can observe. I'm not sure how many degrees to add to the timing of each event to get the proper cam timing numbers?
Also I mentioned above that I hooked up my compression gauge to each cylinder, and they all delivered between 180 and 190 psi on multiple turn overs each. My concern with swapping to a non-integrated head is the thick .040" replacement head gasket that is the only commonly available option. Without a lot of chamber reduction from decking, and/or advancing the stock cam, the cylinder pressure is going to really drop.
Last edited by Lifeguard; 04/16/14 01:52 PM.
|
|
|
|
|
Joined: Sep 2008
Posts: 3,669 Likes: 42
1000 Post Club
|
|
1000 Post Club
Joined: Sep 2008
Posts: 3,669 Likes: 42 |
You'll have to use a degree wheel and a dial indicator to do this correctly and accurately. As you pointed out, the initial opening and closing events are happening quicker than your eye can detect. And the lifters being preloaded is also causing errors in your readings. You also have to have light tension checking springs in place of the valve springs as well or you'll never get there.
Class III CNC Machinist/Programmer
|
|
|
|
|
Joined: Feb 2014
Posts: 505
Major Contributor
|
|
OP
Major Contributor
Joined: Feb 2014
Posts: 505 |
You'll have to use a degree wheel and a dial indicator to do this correctly and accurately. As you pointed out, the initial opening and closing events are happening quicker than your eye can detect. And the lifters being preloaded is also causing errors in your readings. You also have to have light tension checking springs in place of the valve springs as well or you'll never get there. So I really can't read the stock cam until I do a head swap on it and can swap out the check springs during an initial install of the head (using ARP head studs), and can check the cylinder pressure and cam timing then. At that point I can disassemble it and advance the cam if I need to, and put the stock springs back in for final install of the head/intake/carb/exhaust.
|
|
|
|
|
Joined: Sep 2008
Posts: 3,669 Likes: 42
1000 Post Club
|
|
1000 Post Club
Joined: Sep 2008
Posts: 3,669 Likes: 42 |
You can read it at an time, but you will end up doing a lot of back and forth swapping of incidental parts to do it. Just wait until you swap heads then you can only do it once and make the necessary adjustments as needed.
Class III CNC Machinist/Programmer
|
|
|
|
|
Joined: Feb 2014
Posts: 505
Major Contributor
|
|
OP
Major Contributor
Joined: Feb 2014
Posts: 505 |
You can read it at an time, but you will end up doing a lot of back and forth swapping of incidental parts to do it. Just wait until you swap heads then you can only do it once and make the necessary adjustments as needed. Yeah, that was my thought. If I gotta swap out springs, that's a lot tougher with the head on. And putting a degree wheel on it will require taking other parts off too. Just easier to do all at once with the top end swap. I'll also be able to inspect the original head gasket at that time and see how thick it is from the factory, and the deck clearance on the pistons too. The bottom end is pretty solid and low mileage, and I'm on a shoestring budget. So I'm not touching the pistons, zero deck and rebuilding the short block until I have to.
Last edited by Lifeguard; 04/16/14 04:35 PM.
|
|
|
|
|
Joined: Nov 2013
Posts: 482
Contributor
|
|
Contributor
Joined: Nov 2013
Posts: 482 |
Ok you got to me. I adjusted the carb on the Nova for low and high idle speed. Turning the allen head screw in speeds up the engine when the wire to the solonid is unplugged. Mine was so loose that I am surprised that it didn't fall out. All is good now,just bump the key (when the engine is warmed up) and it starts easily without touching the pedal. May I suggest milling the "new" head for a compression increase with the stock bottom end. Also consider replacing the stock cam at the same time with something a little hotter. Jay 6155
|
|
|
|
|
Joined: Feb 2014
Posts: 505
Major Contributor
|
|
OP
Major Contributor
Joined: Feb 2014
Posts: 505 |
Ok you got to me. I adjusted the carb on the Nova for low and high idle speed. Turning the allen head screw in speeds up the engine when the wire to the solonid is unplugged. Mine was so loose that I am surprised that it didn't fall out. All is good now,just bump the key (when the engine is warmed up) and it starts easily without touching the pedal. May I suggest milling the "new" head for a compression increase with the stock bottom end. Also consider replacing the stock cam at the same time with something a little hotter. Jay 6155 OK, I'm not sure how you got it to do that? When I unplug my solenoid, the engine stops dead. Were you starting it after unplugging? Mine is cold starting hard and bogging until warmed up, so I would like to be able to adjust this. Yeah, milling the head is required, but doing the math it seems that even milling the head down to 70cc won't make up for the compression lost to the 0.040" replacement gasket. So my piddly 8.1:1 CR will drop even further. Of course I won't know for sure the stock ratio or effect of changes, until I crack open the top end and can CC the integrated head and pistons, measure gasket thickness and check the closing point of the intake valve on the cam. I presume the intake ABDC closing point of the stock integrated cam is going to be the earliest of all possible cam swaps. Comp Cams' two mildest cams 240XE and 252XE both have an intake closing of 48 degrees ABDC, so I'm assuming the stock cam is less than 48 degrees. And if the static compression ratio decreases, a hotter cam is just going to decrease the dynamic compression ratio even less than keeping the stock cam or advancing the stock cam. I'm also assuming that after I invest near $1000 in a replacement head, manifold, carb, and 2.5" 292 HD exhaust manifold; I'm not going to have the funds for a new cam at the same time. Cam swap would probably need to be a stage 2 upgrade by itself, or part of the eventual bottom end rebuild when it can be matched to the final static CR when flat tops are installed and block zero decked. If I match a cam up for best DCR with stock bottom and modified top, it probably will be too little cam when the bottom end is upgraded and will need to be swapped again at that point. But again, I'll have a better idea of how that will work when I pop the top off and do all the measurements. Right now is just guesswork. Also the 180psi to 190psi I'm getting off the cylinders leaves me a little more confident that the stock CR is a little higher than advertised, and will make the stage 1 swap power gain possible without having to swap the cam.
Last edited by Lifeguard; 04/17/14 12:21 PM.
|
|
|
|
|
Joined: Feb 2014
Posts: 505
Major Contributor
|
|
OP
Major Contributor
Joined: Feb 2014
Posts: 505 |
I had to replace my valve cover gasket again once the valve cover was off. The cork came apart while trying to remove it. I bought a new one, but opened it up and found it had 7 bolt holes instead of 11: http://shop.advanceautoparts.com/p/felpr...ve+cover+gasketThe only other gasket with the correct number of holes has a weird bit of extra gasket sticking out on the intake side: http://shop.advanceautoparts.com/p/felpr...ve+cover+gasketThe gasket will work if you cut off the extra side bits, but I don't know what they are for? There's nothing on that side of the valve cover to utilize them? I went back and looked at pictures of non-integrated heads and counted the valve cover holes and saw the non-integrated were 7 bolts for the valve covers. So I guess I have to get another valve cover when I get a non-integrated head, as the integrated head valve cover is different.
|
|
|
|
|
Joined: Nov 2013
Posts: 482
Contributor
|
|
Contributor
Joined: Nov 2013
Posts: 482 |
To keep the engine from stalling when you pull the wire off the carb turn in the allen head screw first before unplugging the wire. Start with about 1 full turn in from where it is now. Yes there are more bolts on our valve cover than the non intergrated head. That "extra" gasket is for 75-76 heads that use a wider valve cover. Just cut it off. Jay 6155
|
|
|
|
0 members (),
335
guests, and
21
robots. |
|
Key:
Admin,
Global Mod,
Mod
|
|
|
|


