|
|
Joined: Jul 2000
Posts: 4,585 Likes: 19
1000 Post Club
|

1000 Post Club
Joined: Jul 2000
Posts: 4,585 Likes: 19 |
Snowman PM sent But this is the Kit I was talking about.  And it only takes a small dimple to the cover. Vary different then what PES used to sell and Much thinner.
Larry/Twisted6 [oooooo]  Adding CFM adds boost  God doesn't like ugly.
|
|
|
|
|
Joined: Mar 2010
Posts: 623
Major Contributor
|
|
Major Contributor
Joined: Mar 2010
Posts: 623 |
So I got some work in today. Pretty exciting stuff. Got the crank, main and rod journals measured, got the bearings in, got the mains plastigauged, and worked on the shaft endplay. All mains plastiguaged to about .0018"-.0020"(ish). The shop said they were honed to .0025" but I think they look good.  Problems started with the thrust endplay. I started out by just going through the spiral torque sequence and I checked out the endplay... It's supposed to be like .0040" but I could only get about 0.0006". What the hell right? I then seated the thrust bearings correctly (loosen thrust cap, hit crank forward and backward, pry crank forward while tightening thrust cap) and that got me a few more tenths to about .0010" but that's was still pretty far off. I took off the cap off and measured the endplay. Ended up getting about .0046". Damn near perfect. So tightening down the cap was causing it to tighten up. I took out the thrust bearing in the cap and set it on the crank where it would be if it was sitting in the cap.  Took a feeler gauge and tried to see how much space was between the bearing and thrust surface and I could barely get a .0015" in there. So then I measure the bottom one where I get the good thrust endplay  and I could fit the .0040" in there pretty easily and the .0050" was a little tight. So that means the top half of the thrust bearing must be a little too big. I then got some 1000 grit and WD40 and worked the side of the thrust exposed while in the cap in a figure 8 to open up the thrust on the cap side. Worked it in slow increments and it increased to .0018" end play and then I'm at about .0030" end play. I then go back and check the same way with feelers to see how much space I have and oddly enough, now I can fit a 0.0060" feeler in the cap half of the bearing that I had been working. Seems like I would've gotten that .0046" from the bottom half if there was that extra space on the cap side. Any thoughts? I'm close since I have about .0030" of endplay as it stands but I don't want to keep on opening up the top one if I don't have to. And yes, .0030" is with seating the thrust correctly. And I'm probably going to proceed with the parts I have now and the cam as it stands because of time constraints. I still have quite a bit left to do on this engine without getting hung up on the very beginning of assembly
69 Buick Special Deluxe. Intercooled Turbo Chevy 250 @ 15psi on a stock long block. It's kinda fast.
|
|
|
|
|
Joined: Sep 2004
Posts: 5,839 Likes: 1
1000 Post Club
|
|
OP
1000 Post Club
Joined: Sep 2004
Posts: 5,839 Likes: 1 |
For increasing thrust end play I usually just use a smooth cut file & file off of the thrust bearing until I get the desired end play.
Keep it up, you will be done in no time & post pics as you go.
MBHD
12 port SDS EFI 
|
|
|
|
|
Joined: Sep 2008
Posts: 3,669 Likes: 42
1000 Post Club
|
|
1000 Post Club
Joined: Sep 2008
Posts: 3,669 Likes: 42 |
It's not uncommon to have to sand the thrust bearings on a precision flat plate or piece of glass to get the desired endplay. The hard part if you haven't done it much is keeping the surface of the bearing flat and not getting it tapered or crooked when you sand it.
Class III CNC Machinist/Programmer
|
|
|
|
|
Joined: Mar 2010
Posts: 623
Major Contributor
|
|
Major Contributor
Joined: Mar 2010
Posts: 623 |
Yup. I just had to keep at it a little bit more on the sanding. The feeler gauges I could fit in the cap's bearing were pointless because it wasn't on the actual cap so it didn't account for how much the bearing cap would push out the thrust surface. When I put the thrust bearing cap on, it was still pretty darn tight and defiantly not >.0060". EDIT: I did sand it on a piece of glass to keep everything straight and kept it flat. After a little more filing and fitting, I got it almost perfect at .0042" when measured dry. (Looks like .0043 in the pic)  So now that I got the crank's end play correct, I began the last teardown and cleaning so that I could reassemble everything with assembly lube.    After that, I torqued everything down in the spiral sequence. Set the thrust surface. Re-checked the end play which ended up being .0035" or .0036" which made sense with the viscous assembly lube reducing the clearance some. Everything turned smoothly by hand. Next up, cam and pistons!
Last edited by snowman4839; 12/16/14 02:30 AM.
69 Buick Special Deluxe. Intercooled Turbo Chevy 250 @ 15psi on a stock long block. It's kinda fast.
|
|
|
|
|
Joined: Mar 2010
Posts: 623
Major Contributor
|
|
Major Contributor
Joined: Mar 2010
Posts: 623 |
Also. I wanted some input on where the final compression ratio should land. As it stands now, it's at 9.47:1. But I think there's enough material in the combustion chamber to get down to 9.0:1. I feel like 9.47:1 is kinda high but I'm also not very familiar with anything but the 8.5:1 and 8.0:1 I've run.
69 Buick Special Deluxe. Intercooled Turbo Chevy 250 @ 15psi on a stock long block. It's kinda fast.
|
|
|
|
|
Joined: Sep 2008
Posts: 3,669 Likes: 42
1000 Post Club
|
|
1000 Post Club
Joined: Sep 2008
Posts: 3,669 Likes: 42 |
I think 9:1 even is a good target to shoot for.
Class III CNC Machinist/Programmer
|
|
|
|
|
Joined: Mar 2010
Posts: 623
Major Contributor
|
|
Major Contributor
Joined: Mar 2010
Posts: 623 |
Got some more work done today. Mostly just the cam installation. Got the cam out, cleaned with brake cleaner. Blew it off with the air gun. Looked great  except for a bit of surface rust on the far bearing journal. Wiped it down with laquer thinner and I couldn't feel it with my fingers so I wasn't concerned about it.  It's ready to go in  Easy as 1,2,3    With nicely greased lobes  But then the other news would be that I started to work on the rings. I put them in the #1 cylinder to check all of their gaps. The tops came out to .0021"-.0022" and bottoms came out to .0017"-.0018". I was concerned that one of the tops was .0017" but it turns out that the shop put one of the bottom rings in the top ring bag. Was freaking out and getting mad at the shop when I noticed I had 7 rings in the top ring bag and 5 in the bottom ring bag haha. I'm calling the day a little early because I'm going to order some Quickset ( http://www.summitracing.com/parts/tsr-qs) and some ring pliers to put it together. I had forgotten to mention yesterday that the crank TURNS OVER LIKE BUTTER!!!! soooo smooth. Even with the cam in, I can turn everything over by hand. It's awesome. Never been able to do that with an engine I had put together. Correctly machined parts make all the difference. PLEASE CONTINUE HELPING ME WITH THAT FINAL COMPRESSION RATIO CHOICE. I have one vote for 9.0:1.
69 Buick Special Deluxe. Intercooled Turbo Chevy 250 @ 15psi on a stock long block. It's kinda fast.
|
|
|
|
|
Joined: Sep 2004
Posts: 5,839 Likes: 1
1000 Post Club
|
|
OP
1000 Post Club
Joined: Sep 2004
Posts: 5,839 Likes: 1 |
Keep it up.
If there is anymore stains or minor corrosion like your camshaft.
Just use some green or burgundy colored scotch brite pads.
I say anywhere from 9.0- 9.25 compression ratio. Should give you better off boost response, quicker to get into boost, better drivability, better mileage.
Make sure your methanol injection (when you get it) is working if you are going to boost it high, anything over 10 PSI
Who is going to open up your chambers on your cyl head?
MBHD
12 port SDS EFI
|
|
|
|
|
Joined: Apr 2004
Posts: 3,556 Likes: 35
1000 Post Club
|
|
1000 Post Club
Joined: Apr 2004
Posts: 3,556 Likes: 35 |
I have the head practically done. Presently the chambers are 73CC. Before decking, they checked around 72. I took .005 from the deck just to true it. Then worked on opening the chamber some.
Is the piston/ block zero decked?
Inliner Member 1716 65 Chevelle Wagon and 41 Hudson Pickup Information and parts www.12bolt.com
|
|
|
|
|
Joined: Sep 2004
Posts: 5,839 Likes: 1
1000 Post Club
|
|
OP
1000 Post Club
Joined: Sep 2004
Posts: 5,839 Likes: 1 |
What valves are going in it?
Are they tulip shaped or flat straight across the head?
Tulip shaped valves will drop the compression some.
MBHD
12 port SDS EFI
|
|
|
|
|
Joined: Mar 2010
Posts: 623
Major Contributor
|
|
Major Contributor
Joined: Mar 2010
Posts: 623 |
Yeah I guess I'll try to get it down some more. I figured that opening the chambers up to get the CR I want would be the last thing that Tom would do before I get it back. 77cc would get it down to 9.08:1 so that sounds good to me.
Yes Tom, it was zero-decked.
69 Buick Special Deluxe. Intercooled Turbo Chevy 250 @ 15psi on a stock long block. It's kinda fast.
|
|
|
|
|
Joined: Apr 2004
Posts: 3,556 Likes: 35
1000 Post Club
|
|
1000 Post Club
Joined: Apr 2004
Posts: 3,556 Likes: 35 |
Hank,
The valves I use do have a dish shape.
This head was one that started as a 72CC whereas most heads are 74CC. It is just the casting, it has never been decked.
I will see about opening it up a bit more.
Inliner Member 1716 65 Chevelle Wagon and 41 Hudson Pickup Information and parts www.12bolt.com
|
|
|
|
|
Joined: Sep 2004
Posts: 5,839 Likes: 1
1000 Post Club
|
|
OP
1000 Post Club
Joined: Sep 2004
Posts: 5,839 Likes: 1 |
Not sure if it is possible, but see if you can try & lay back the chamber wall on the spark plug side on the long turn radius side to help improve airflow. If you have any junk heads to play a round with. It helped on my 12 port head, I know, different animal, but worth experimenting with. Before a little tweaking.  After some massaging.  MBHD
12 port SDS EFI
|
|
|
|
|
Joined: Mar 2010
Posts: 623
Major Contributor
|
|
Major Contributor
Joined: Mar 2010
Posts: 623 |
I also had a question for when I install the pistons. Which way does the piston go? These pistons are flat top and don't have an indicating mark on the piston for which sides goes to the front. They were all numbered and this was my best guess for their orientation  This is in the same orientation, and here's the tab on the rod cap.  The only markings on the piston are on the bottom and it's just a number etching  Nothing identifying on the face of the piston 
69 Buick Special Deluxe. Intercooled Turbo Chevy 250 @ 15psi on a stock long block. It's kinda fast.
|
|
|
|
|
Joined: Dec 2010
Posts: 535
Major Contributor
|
|
Major Contributor
Joined: Dec 2010
Posts: 535 |
What do the bottom of the rod caps look like? There are usually little bumps that indicate which way they are supposed to face (double check the service manual!). Looking at my Pontiac pictures, mine face forward. On my Pontiac 250 engine, the oil spurting hole there is facing the passenger side of the engine, which is the cam side of your engine. From what I read, this was to help lubricate the cam, and in my engine's case the distributor gear drive and fuel pump lobe.
Last edited by TheSilverBuick; 12/18/14 04:53 PM.
|
|
|
|
|
Joined: Mar 2010
Posts: 623
Major Contributor
|
|
Major Contributor
Joined: Mar 2010
Posts: 623 |
What do the bottom of the rod caps look like? There are usually little bumps that indicate which way they are supposed to face (double check the service manual!). Looking at my Pontiac pictures, mine face forward.
On my Pontiac 250 engine, the oil spurting hole there is facing the passenger side of the engine, which is the cam side of your engine. From what I read, this was to help lubricate the cam, and in my engine's case the distributor gear drive and fuel pump lobe.
That would make a lot of sense actually to lube the cam lobes. And the bottom of the rod caps were ground for balancing. There's nothing indicating on them.
Last edited by snowman4839; 12/18/14 05:57 PM.
69 Buick Special Deluxe. Intercooled Turbo Chevy 250 @ 15psi on a stock long block. It's kinda fast.
|
|
|
|
|
Joined: Apr 2004
Posts: 3,556 Likes: 35
1000 Post Club
|
|
1000 Post Club
Joined: Apr 2004
Posts: 3,556 Likes: 35 |
Silver Buick is correct. Squirter holes on the rods go toward the cam.
Inliner Member 1716 65 Chevelle Wagon and 41 Hudson Pickup Information and parts www.12bolt.com
|
|
|
|
|
Joined: Sep 2004
Posts: 5,839 Likes: 1
1000 Post Club
|
|
OP
1000 Post Club
Joined: Sep 2004
Posts: 5,839 Likes: 1 |
I see the rods are not polished or shot peened.
I thought you were going to have that done?
MBHD
12 port SDS EFI
|
|
|
|
|
Joined: Sep 2008
Posts: 3,669 Likes: 42
1000 Post Club
|
|
1000 Post Club
Joined: Sep 2008
Posts: 3,669 Likes: 42 |
Snowman, are the wrist pins offset in the pistons. That can help determine if the pistons are on the rods correctly also.
Class III CNC Machinist/Programmer
|
|
|
|
|
Joined: Mar 2010
Posts: 623
Major Contributor
|
|
Major Contributor
Joined: Mar 2010
Posts: 623 |
Had a productive day. Got all the rings measured and on the pistons. Got all the cylinders cleaned up. Got all the pistons in. I started the day realizing that I hadn't put in the rear main seal. After kicking myself, I took off the main caps, was able to lift the crank up just a hair, and rotate in the rear main seal.  Then put everything back together.  and retorqued everything and reseated the thrust surface. Still got .042" of thrust clearance. EDIT: Actually looking back... I think I installed that rear main seal backwards. UGHHHHHH *facepalm*. DOUBLE EDIT: Do y'all put silicone sealer under the rear main seal cap right next to the rear main seal? Like under the cap at the edge of the block? Like how they do on small block chevys like this  After the first two pistons in    Then 4...  Then plastigauge the rods...   The rods were between .0016"-.0020" oil clearance. Then I started looking at the oil squirting hole on the fourth rod... and trying to get the orientation down... and looking at the bearing... and noticed something odd... Old bearing on the left, new on the right.  They don't have any split in the bearing to supply oil to the oiling hole! I could've sworn I ordered another set of what I had before but nosiree! So I might just run that old set considering it's never been in a running engine. At least swapping out rod bearings isn't that hard. MBHD - no. the rods weren't polished or shot peened. The engine shop made a good point that if something were to fail on this engine, it would likely be a bearing, cam, or piston problem before I had a problem with my rods. So I just told them to forgo it. CNC-Dude - no the pins were not offset. But I'm fairly confident on the orientation based on the oiling hole.
Last edited by snowman4839; 12/19/14 02:42 AM.
69 Buick Special Deluxe. Intercooled Turbo Chevy 250 @ 15psi on a stock long block. It's kinda fast.
|
|
|
|
|
Joined: Sep 2004
Posts: 5,839 Likes: 1
1000 Post Club
|
|
OP
1000 Post Club
Joined: Sep 2004
Posts: 5,839 Likes: 1 |
Yep, the silicone goes where you marked it.
Was wondering if those guys @ the shop knew that you are going to be turbocharged & will be running above 20+ psi of boost pressure & spinning it above 6000+ RPM's?
The rods are the weakest link in your new assembly.
Hope they can stay together.
Did you have the rods x-rayed, or some other for to check & see if they have cracks?
Mag checked is not the best method to check for cracks.
Cracks can be below the surface where a simple mag check will not see any defects.
MBHD
12 port SDS EFI
|
|
|
|
|
Joined: Apr 2004
Posts: 3,556 Likes: 35
1000 Post Club
|
|
1000 Post Club
Joined: Apr 2004
Posts: 3,556 Likes: 35 |
If the RPM's are kept in check, those reworked rods should be fine.
For the oiler holes. Your new bearings look like GM V8 style. It should be fine, there is a bunch of oil that goes out the side of the rod bearings and sprays everything while running.
Inliner Member 1716 65 Chevelle Wagon and 41 Hudson Pickup Information and parts www.12bolt.com
|
|
|
|
|
Joined: Dec 2010
Posts: 535
Major Contributor
|
|
Major Contributor
Joined: Dec 2010
Posts: 535 |
Glad you noticed the rear main installed backwards! I've done the EXACT same thing, d'oh!
Also in my reading, it was said the oil spurting holes were later determined to be un-needed, so no worries about the bearings.
x2 on the rods being fine as long as the rpm's are kept in check. Plus, those pistons are probably lighter than the OE ones, which is added buffer.
|
|
|
|
|
Joined: Sep 2004
Posts: 5,839 Likes: 1
1000 Post Club
|
|
OP
1000 Post Club
Joined: Sep 2004
Posts: 5,839 Likes: 1 |
I never weighed what a stock piston weighs. Cast pistons are not too heavy, they do have metal in the sides, forged pistons will weigh more if they are the same dimensions, cast is porous as compared to a forged piston. Anyone ever weigh a stock piston? What do those Ross forged pistons weigh Tlowe? Telling a guy to keep his RPMs in check, remember, this is the same guy that was supposed to keep his boost levels in check, watch for detonation & run premium gas. First time out, 20+ PSi 87 octane, no intercooler, no boost referenced fuel pressure regulator. Original 5/16 fuel line. All on a used stock cast piston long block.  Did everything I had told him not to do. Relax, Snowman,,, just making fun.  I am sure the 3rd time around you will be more careful. MBHD
12 port SDS EFI
|
|
|
|
|
Joined: Mar 2010
Posts: 623
Major Contributor
|
|
Major Contributor
Joined: Mar 2010
Posts: 623 |
Anyone ever weigh a stock piston? What do those Ross forged pistons weigh Tlowe? Telling a guy to keep his RPMs in check, remember, this is the same guy that was supposed to keep his boost levels in check, watch for detonation & run premium gas. First time out, 20+ PSi 87 octane, no intercooler, no boost referenced fuel pressure regulator. Original 5/16 fuel line. All on a used stock cast piston long block. I believe the Ross pistons were ~480g IIRC but I'll check again later. Good one Hank... to be fair, I thought I had it set on like 6psi but didn't realize there was supposed to be a boost hose on top of the wastegate. Also, it wasn't 20psi, it was 15 or so. But now I have almost as much money in the engine as I paid for the car. I'm probably just going to get the engine running and go take it to a dyno tuning shop to have them tune it so it takes the guesswork out and I can get the best performance. $200 to swap a block is a lot less work than building another one of these blocks up. What do y'all think about keeping that 6AN to the front? Would that be sufficient for my endgame (600hp+ or more) or would I need to get a different regulator and use 8AN to the carb? Anyway, I'm going to probably get around to fixing the rear main seal and rod bearings tomorrow. The machine shop got .0019-.0021" on the rod bearing clearances when they measured them so they should give me more breathing room with those few extra tenths in addition to having the oiling holes correct even if they are superfluous. Only other bottom end part is the oil pump which I'll just clean out and throw back on. I also just got my lifters in the mail. So that means that after the rods get installed, next up will be valvetrain measurements and whatnot. Probably gonna buy that roller rocker set that Tom has.
Last edited by snowman4839; 12/20/14 03:21 AM.
69 Buick Special Deluxe. Intercooled Turbo Chevy 250 @ 15psi on a stock long block. It's kinda fast.
|
|
|
|
|
Joined: Sep 2004
Posts: 5,839 Likes: 1
1000 Post Club
|
|
OP
1000 Post Club
Joined: Sep 2004
Posts: 5,839 Likes: 1 |
Snowman, was wondering if you checked to see if you have a zero deck? Having a zero deck will decrease the chance on detonation, it will run better period. "Proper quench creates turbulence in the combustion chamber, theoretically pushing the mixture toward the spark plug and reducing the possibility of unburned gases at the completion of the combustion cycle, which can play a significant role in reducing detonation and even exhaust emissions. Quench should be as tight as possible without the piston actually contacting the head. This, in turn, is largely dependent on the type of connecting rods and the engines peak rpm. A good rule of thumb is that you can run as little as 0.038 to 0.043 inch with steel connecting rods. Steel-rod street engines that dont see the far side of 6,000 rpm may even be able to shave this to as close as 0.032 inch." A 3/8 fuel line is fine. If you really want 600 + HP, step up to a 1/2" What fuel pump are you using & what psi does it put out? Need a quick run down of what regulator , pump you are using or going to use. http://www.superchevy.com/how-to/engines-drivetrain/94138-piston-head-clearance-guide/MBHD
12 port SDS EFI
|
|
|
|
|
Joined: Mar 2010
Posts: 623
Major Contributor
|
|
Major Contributor
Joined: Mar 2010
Posts: 623 |
Just got done swapping the rear main seal and getting all the new rod bearings out without the oiling hole. Was going to swap in the old rod bearings but the first set I was about to put in was nicked up so I just went ahead and ordered a fresh set along with a pushrod length checker for when I get the head and valvetrain.
Turns out the Sealed Power 2020CP bearings were the ones without the oiling holes and the King CR624AM were what I bought before and do have the oiling holes.
MBHD - Well I hadn't had the rotating assembly finished yet so I hadn't even really looked at how the pistons come up to the deck, but I had the pistons, crank, and block at the machine shop and told the to zero deck it so it had better be zero decked.
The compressed thickness of my head gasket and quench should be 0.041".
I have a Walbro 255lph pump. That's about 67gph. 60psi pump. I've read that should support about 600hp too. I have a Mallory carb regulator with a 1:1 rising rate. 8AN inlet and return. 6AN outlet to carb.
When I get the dyno tuning time, I might just double that Walbro 255LPH up and run both 8AN fuel pump outlets into a single 10AN inlet on an Aeromotive A2000 regulator with a 10AN return with an 8AN to the carb. That should future proof me quite a bit and not be THAT terrible expensive but that'll come later.
69 Buick Special Deluxe. Intercooled Turbo Chevy 250 @ 15psi on a stock long block. It's kinda fast.
|
|
|
|
|
Joined: Mar 2010
Posts: 623
Major Contributor
|
|
Major Contributor
Joined: Mar 2010
Posts: 623 |
Finally got the rotating assembly done yesterday! Put in those new King bearings in the rods. Plastigauged everything and got .0016-.0020" so that's all good. Everything turns over smoothly and looks great. 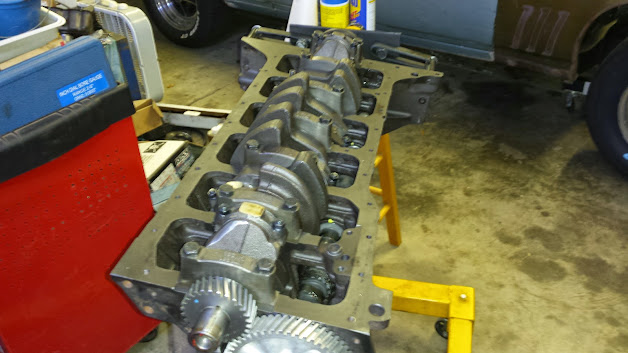  Pretty darn sure it is zero decked. This is it at the top of the stroke.   And I put a straightedge over the the piston on the deck and it didn't touch while rotating the assembly. Next up is the head when I get that back from Tom. Anyone know what this hole is right here? It's on the driver's side right below and toward the rear of the freeze plug. Coolant or oil?  Also anyone know what these are? I'm pretty sure they're ARP head studs because the bottom thread fits the head and top says ARP haha. The machine shop gave me back 3 with my pistons and I'm not sure why.  
69 Buick Special Deluxe. Intercooled Turbo Chevy 250 @ 15psi on a stock long block. It's kinda fast.
|
|
|
|
|
Joined: Jul 2000
Posts: 4,585 Likes: 19
1000 Post Club
|
|
1000 Post Club
Joined: Jul 2000
Posts: 4,585 Likes: 19 |
water drain and yes head Bolts if you have the lumps in the head.
Larry/Twisted6 [oooooo] Adding CFM adds boost God doesn't like ugly.
|
|
|
|
|
Joined: Sep 2004
Posts: 5,839 Likes: 1
1000 Post Club
|
|
OP
1000 Post Club
Joined: Sep 2004
Posts: 5,839 Likes: 1 |
Looking good! I install a petcock drain, http://www.4wd.com/Heating-Cooling/Repla...CFYZbfgod6J8AeA so it is easy to drain the block of coolant. IIRC, the compressed head gasket should be about .038"? How did you install the compression rings, 180* apart? After you get the head back from Tlowe, when do you think you will get it fired up? MBHD
12 port SDS EFI
|
|
|
|
|
Joined: Feb 2010
Posts: 136
Contributor
|
|
Contributor
Joined: Feb 2010
Posts: 136 |
Looking good!
One thing that came up with my build in terms of the ARP head studs was clearance with my water pump. I luckily checked rotation of my water pump after installation. At first the impeller on the pump was hitting the bottom of the head stud. So, I backed the stud out until clearance was sufficient and re-torqued the nut down. It could have been a disaster easily if I didn't check the clearance.
Good luck and keep us posted. Very exciting time for you, at least it was for me!
Boucher'
|
|
|
|
|
Joined: Mar 2010
Posts: 623
Major Contributor
|
|
Major Contributor
Joined: Mar 2010
Posts: 623 |
Thanks y'all. MBHD - nope. Here's the head gasket. It's compressed thickness is 0.041" I followed the recommended ring orientation from the documentation that came with the rings. If the wrist pin is at 12 and 6 o'clock, the top compression ring is at 3, the bottom compression ring at 9, the top oil ring at 11, the bottom oil ring at 7, and the oil ring at 3. But yes, the compression rings were 180 apart. I'm not sure on the ETA for getting it running. Gonna buy that nice turbo and redo the turbo uppipe so that requires a lot of money and time respectively. Gonna get a welder I know do to TIG the new uppipe so that should help it look better and maybe improve flow. Other than that, it's mostly buy and bolt for the rest of the parts. Clean and use the offy manifold, buy a 600cfm holley 4bbl and do the blow through mod on it, clean and use the chevy 292 manifold, original oil pump, that oil pan with the return line inlet I already put in, buy roller rockers and pushrods to match, obviously getting the head back from tom, gonna get ARP head studs most likely, gonna probably buy Tom's new valve cover to fit the new rockers, new flywheel, larger/better clutch, probably a muncie 4 speed with overdrive, new stronger and balanced driveshaft. I'll leave the rear end alone for now. Anyone have any reason to not use the stock water pump? The turbos I'm looking at are the GT4202R and the GTX4294R. They're 74mm and 70mm turbos respectively. I did the math for their compressor maps and it puts them right in the optimum range for 450hp and even more so for 700hp for the future. They're water cooled so I'd have to find where to plumb that coolant to and from. Any ideas? Would that place you suggested the petcock work? Boucher - do you have a picture or something to describe he interference you're talking about? I'm a bit confused but I'll make sure to pay special attention to the clearances. Lastly, I drew up my new fuel system. It's pretty much just a copy of my current fuel system which would add a second Walbro 255 pump. Tie them together into a 10AN line to an Aeromotive A2000 carb regulator with a 10AN return and 8AN to the carb. Here's the drawing. I tried to label everything. 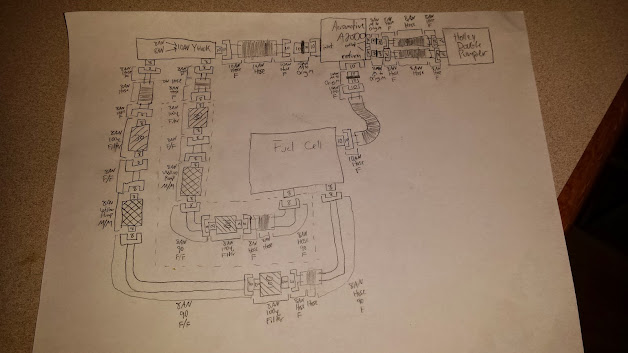 Wow just realized how useless that picture is but you guys get the idea
69 Buick Special Deluxe. Intercooled Turbo Chevy 250 @ 15psi on a stock long block. It's kinda fast.
|
|
|
|
|
Joined: Feb 2010
Posts: 136
Contributor
|
|
Contributor
Joined: Feb 2010
Posts: 136 |
Snowman,
I realized after I typed the message that I didn't describe location. The interference was on the drivers side, nearest the front bumper. Just check depth when installing the water pump. When you get to that step you will see exactly what I'm talking about.
|
|
|
|
|
Joined: Sep 2004
Posts: 5,839 Likes: 1
1000 Post Club
|
|
OP
1000 Post Club
Joined: Sep 2004
Posts: 5,839 Likes: 1 |
Anyone have any reason to not use the stock water pump? The turbos I'm looking at are the GT4202R and the GTX4294R. They're 74mm and 70mm turbos respectively. I did the math for their compressor maps and it puts them right in the optimum range for 450hp and even more so for 700hp for the future. They're water cooled so I'd have to find where to plumb that coolant to and from. Any ideas? Would that place you suggested the petcock work? I am not sure what the best water pump to use is. I know the original old style cast iron impeller ones worked pretty good, the stamped steal impellers, I never really have good luck w/those as far as cooling the best. Anyone? Suggestions? That GT4202R turbo is about the same size I want to get. Might be a bit much for your app, but if you are ready for that size of a turbo, I say go for it. I do not think you can get a small A/R for the turbine housing so there is going to be turbo lag. I did not know Muncie trans can have an OD? The water drain hole I suggested for a petcock will work for a water cooling a turbo. I thought you were going to use you current turbo. Those Garrett turbos are pricey, about $2000 or so, unless you are looking for a knock off one? http://www.ebay.com/itm/Genuine-Garrett-...3e3&vxp=mtrKnock off http://www.ebay.com/itm/GT42-turbocharge...248&vxp=mtrMBHD
12 port SDS EFI
|
|
|
|
|
Joined: Mar 2010
Posts: 623
Major Contributor
|
|
Major Contributor
Joined: Mar 2010
Posts: 623 |
Boucher - I'll be sure to give it a look. MBHD - Well I don't think that size turbo is too ambitious for all the extra supporting mods I'm doing to the engine. It's between getting a Muncie with overdrive (the M21Y model) which is an aftermarket gear set for a Muncie or getting a gear vendors overdrive unit which is significantly more expensive but much easier to put on and manage. I was looking into getting a used Garrett or Turbonetics for around $1500 or a new Comp Turbo CT43 for $1300. I've read some great things about them. I'd need to call them because they don't have compressor maps on their site but the CT43 series is similar to those two Garretts I linked to. I don't know if I mentioned it on this thread but I have been pretty set on getting a name brand turbo for awhile. I figured a 56mm turbo would become a choke point pretty soon anyway and that I should just go ahead and get it.
69 Buick Special Deluxe. Intercooled Turbo Chevy 250 @ 15psi on a stock long block. It's kinda fast.
|
|
|
|
|
Joined: Sep 2004
Posts: 5,839 Likes: 1
1000 Post Club
|
|
OP
1000 Post Club
Joined: Sep 2004
Posts: 5,839 Likes: 1 |
Snowman, I have seen that OD Muncie website, just had forgotten about it. The 1st gear ratio is pretty steep & your car will not take off good with that ratio. First gear ratio = 2.199 When I ran a close ratio Muncie w/a first gear ratio of 2.20 I absolutely hated it for the launch & in general just taking off normally was a chore. And I have 4:10 gear ratio for the rear axle. You have a much taller rear axle (308-323"?) ratio than 4:10's so it would be horrendous to drive & let alone take off quickly & easily. The gear vendors unit will hold up to what ever you throw at it, you are correct a bit pricey though. If you want to go fast & have better more consistent & lower ET's, an auto trans is the way to go. I do know it is fun to drive manual transmissions as I used to run 3, 4, & 5 speeds in my Camaro. Auto trans are easier on parts also. Those Comp turbos are probably going to be pricey as well, but @ least they offer more A/R's for there turbine housings. I emailed them for pricing. Billet center sections are going to cost more to produce, but cool  & lighter weight. Kinda cool they offer oil less center section as an upgrade, if it really works @ lasts? I think the turbo you currently have can make about 400 HP to the wheels, which is pretty good. Good for pretty quick ET's as well. I still think that is quite a big turbo GT42, but, the choice is yours. MBHD
12 port SDS EFI
|
|
|
|
|
Joined: Sep 2004
Posts: 5,839 Likes: 1
1000 Post Club
|
|
OP
1000 Post Club
Joined: Sep 2004
Posts: 5,839 Likes: 1 |
Got a price on the billet & standard compressor ball bearing turbos.
"Price for either unit is $ 1649.00 plus 500 for oil-less upgrade."
That was for these turbos, the CT43X6465 & the CT43X 6767
MBHD
12 port SDS EFI
|
|
|
|
|
Joined: Mar 2010
Posts: 623
Major Contributor
|
|
Major Contributor
Joined: Mar 2010
Posts: 623 |
I did a bit more research on drivetrain options. I think I decided on a borg warner Super T-10 with a 2.73 or a 3.08 posi.
That makes my ratios come out perfect because it gives me the option of having a tall rear end but short gears in the tranny to even it out.
My first gear in my 3 speed saginaw was great with the turbo with my stock 3.23 rear end. My final ratios with my original 3 speed and a 3.23 are...
3 speed saginaw w/ 3.23 - 9.20 5.43 3.23
But they make a short geared BW super t-10 which has a 3.42 first gear so with a 2.73 that would make...
4 speed super t-10 w/ 2.73 - 9.34 7.80 3.99 2.73
Which gives me a great first gear, a good split of the second gear on the 3 speed, and a 4th gear which is basically overdrive.
So that's better than the muncie OD even with a 3.53 which would make...
4 speed muncie OD with 3.53 - 7.76 5.32 3.53 3.03
Which gives me a terrible first gear, not much of an overdrive, and 3rd and 4th gears which are too close IMO.
So the super T10 with 2.73 would give me everything I'm looking for plus, from I've heard, a beefier trans than a muncie. Plus that 2.73 final puts my 70mph on 29.1" tires (bfg t/a radial 255/70R15) at ~2250rpm which is perfect for highway driving.
I've found super T10s like this with this ratio for $800-1200 so it's doable and cheaper than a new muncie OD too. Also that means I don't have to find $3000 for the gearvendors.
Thanks for the prices. That's still cheaper than garret and turbonetics new so I'm not complaining. I'll go ahead and buy the normal turbo with oil because it's already plumbed for it anyway. Save myself $500 in the process.
Lastly about that auto swap... I just can't do it. I will keep this car a column shift until I die. It's too unique and permanent to switch to an auto. And nothing gives me a bigger smile than banging gears in a turbo car!
69 Buick Special Deluxe. Intercooled Turbo Chevy 250 @ 15psi on a stock long block. It's kinda fast.
|
|
|
|
|
Joined: Sep 2004
Posts: 5,839 Likes: 1
1000 Post Club
|
|
OP
1000 Post Club
Joined: Sep 2004
Posts: 5,839 Likes: 1 |
Glad I was able to sway you away from that OD Muncie. I am still going to try & convince you to get an auto trans though HA! Quicker ET's, more consistent, easier on parts, no more clutch changes & most of all,,,(easier to boost launch!) Or at least sway you away from that column shift BS, & put it on the floor where it belongs & will improve for quicker shifting, I've seen your videos shifting the column, SLOW,  but hey if you like it, stay in that configuration. Just suggesting, don't take offence. MBHD
12 port SDS EFI
|
|
|
|
1 members (stock49),
296
guests, and
20
robots. |
|
Key:
Admin,
Global Mod,
Mod
|
|
|
|