|
|
Joined: Dec 2014
Posts: 335
Contributor
|
OP

Contributor
Joined: Dec 2014
Posts: 335 |
Hi, My existing carburetor is so awful, I decided I'd take a first step into the engine upgrade and have some questions to start. Offy 5416 Holley carb 0-8007 model 4160C 390CFM - Who's done this conversion with this intake and carb? - Did you have to bend the throttle tab to prevent hitting the intake manifold? - On the right side of the manifold are two very large drilled out holes. What are these for and how did you seal them up? - How did you seal up the emission controls tubes? Just a bolt and RTV? - What's the little grey aluminum block that attaches to the intake and the exhaust lines? Some sort of recirculation? Just seal that up with a bolt and RTV? Thanks!! Mark A dry run on the bench, the throttle has a tab bent low, too low, runs into the intake. Original carb. Note airlines from emissions pump. 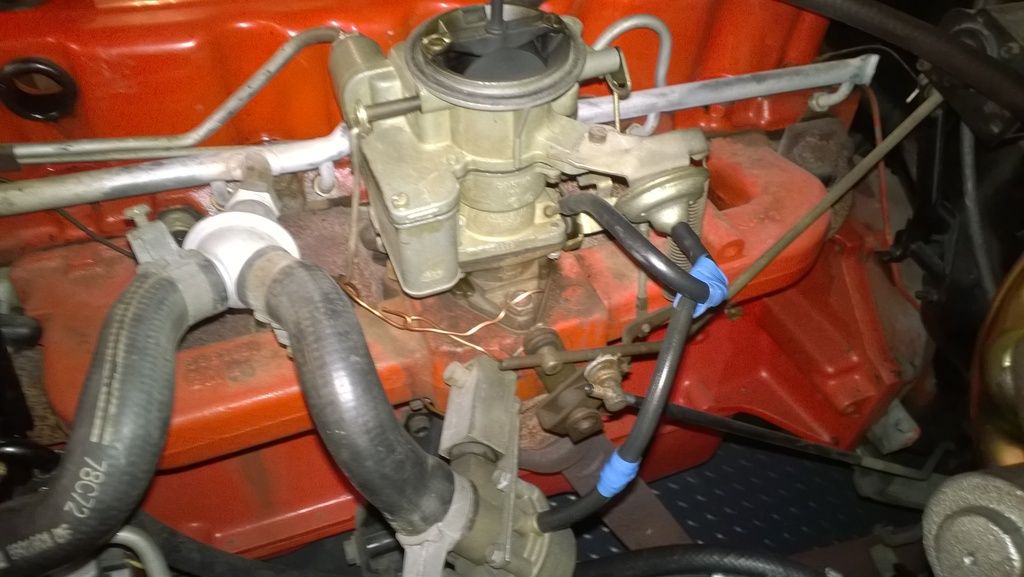 Picture of installation directions, showing throttle on front of manifold 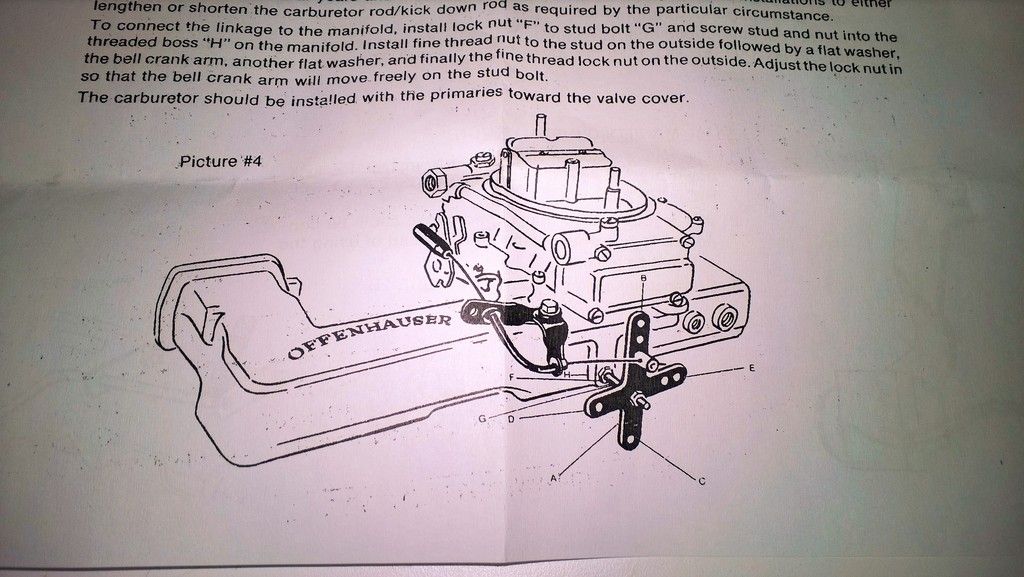 Below is a fuzzy picture of the throttle tab on the manifold, preventing the carb from sitting flat. 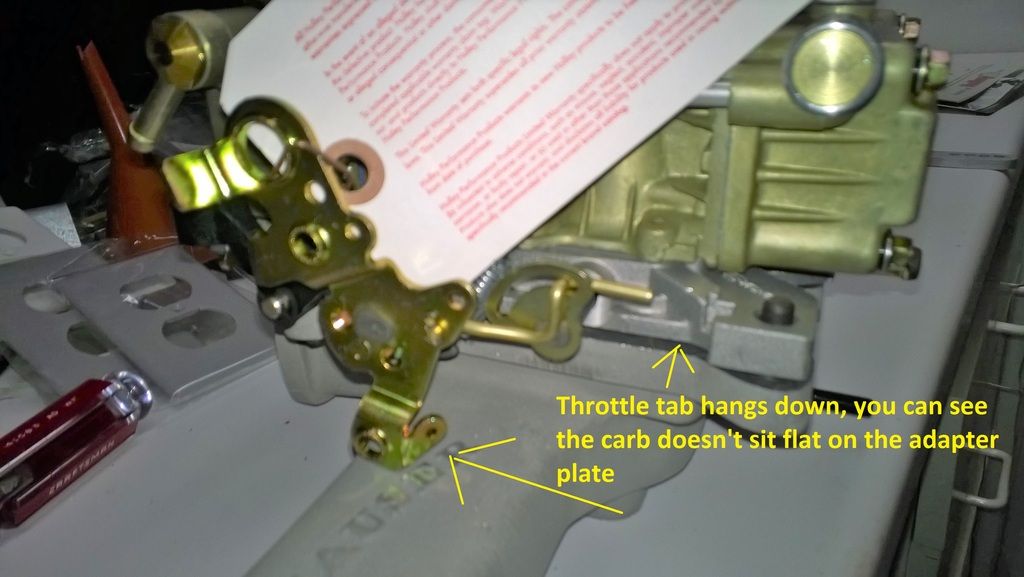
Mark
'67 Camaro L6-250
|
|
|
|
|
Joined: May 2000
Posts: 1,464
1000 Post Club
|
|
1000 Post Club
Joined: May 2000
Posts: 1,464 |
You could add a spacer under the carb, or just zip that part off with a cut off wheel. Save the cut off piece - the next person to own that carb may want to weld it back on.
FORD 300 inline six - THE BEST KEPT SECRET IN DRAG RACING!
|
|
|
|
|
Joined: Jan 2015
Posts: 376
Contributor
|
|
Contributor
Joined: Jan 2015
Posts: 376 |
A 1 inch spacer would fix that problem. What large holes are you talking about?
|
|
|
|
|
Joined: Aug 2014
Posts: 821
Major Contributor
|
|
Major Contributor
Joined: Aug 2014
Posts: 821 |
I used a spacer.  I also re-used my old throttle linkage, cut up a piece of the Offy linkage, added it to the old linkage and used it. I did this because I'm running an auto and needed to hook up the kick down linkage. As to sealing up the plugs in the bottom: I used epoxy then painted my intake to match my engine. I also used a file to file off the logo so it stands out. Came out nice. For heat:   I tee-d off at the firewall using brass fittings from Lowes. Tried plastic and they broke. Couldn't get a good seal. The brass lets you crank down hard. Upskirt shot:  (note my handy firing order diagram in sharpie on my bench...) You asked about the two holes. One is for the bracket that holds the throttle cable. Re-used your old one. The other hole is for the brake booster. If you don't have one plug it. For the heat plate I took a 1/4" steel plate, cut it up, drilled my holes, tapped it, put the brass fittings in, cut them off on the back side so they clear the guts of the intake, then used a piece of rubber to make a gasket to seal it all up. I also RTV'd both side of the rubber. Without the rubber it wouldn't seal.
Last edited by gbauer; 05/21/15 02:25 PM.
|
|
|
|
|
Joined: Sep 2004
Posts: 5,839 Likes: 1
1000 Post Club
|
|
1000 Post Club
Joined: Sep 2004
Posts: 5,839 Likes: 1 |
Another option, you do not need to have that carb in that position either.
You can mount it like a normal V-8 install.
The adaptor plate can be modified so the carb can sit in any position.
That way you do not have to make a 90 degree tube bend where the cable will eventually wear through the tube & cause the throttle to get stuck, bad design IMO.
MBHD
12 port SDS EFI 
|
|
|
|
|
Joined: Aug 2014
Posts: 821
Major Contributor
|
|
Major Contributor
Joined: Aug 2014
Posts: 821 |
Another option, you do not need to have that carb in that position either.
You can mount it like a normal V-8 install.
The adaptor plate can be modified so the carb can sit in any position.
That way you do not have to make a 90 degree tube bend where the cable will eventually wear through the tube & cause the throttle to get stuck, bad design IMO.
MBHD Yes but... How many miles will that take? Anyway... I also greased up the inside of the tube to make the 90. And I used the hard tube, not the soft one.
|
|
|
|
|
Joined: Sep 2004
Posts: 5,839 Likes: 1
1000 Post Club
|
|
1000 Post Club
Joined: Sep 2004
Posts: 5,839 Likes: 1 |
[quote=gbauer
Yes but... How many miles will that take?
Anyway... I also greased up the inside of the tube to make the 90. And I used the hard tube, not the soft one. [/quote]
Why risk it, temping faith sort to speak.
Just look @ how it works, metal to metal contact, not good by any means, grease helps, but still not the answer to an improperly designed throttle system.
Not that many miles, from what I know now that I did not know then, I would never use it.
Just my two cents.
An aftermarket cable assembly with a Teflon liner is the answer.
Bolts right up, straight shot to the throttle arm, just need a simple bracket to make or buy.
My main point here is not to make a system that Offy has designed, or something that is similar in design & advertise here on the BB/forum here like it is a good way to go for a throttle system, not good, I just to make a point here so everyone can be safe while out driving.
I had this same set-up & the throttle got stuck at W.O.T. (wide open throttle), luckily I reacted quickly & killed the engine before I plowed into the back of a car in front of me.
MBHD
12 port SDS EFI
|
|
|
|
|
Joined: Aug 2014
Posts: 821
Major Contributor
|
|
Major Contributor
Joined: Aug 2014
Posts: 821 |
Well on mine it only has to last another 3,000 miles or so before I go EFI then everything changes.
|
|
|
|
|
Joined: Sep 2004
Posts: 5,839 Likes: 1
1000 Post Club
|
|
1000 Post Club
Joined: Sep 2004
Posts: 5,839 Likes: 1 |
Mine probably wore out quicker also because of having a manual transmission?
The pervious owner of my car probably had too heavy of a throttle return spring, I'm sure that was another thing contributing for wearing through the metal tube.
So if you are going with that linkage, use minimum tension spring for the throttle return.
Still, not a good design.
MBHD
12 port SDS EFI
|
|
|
|
|
Joined: Dec 2014
Posts: 335
Contributor
|
|
OP
Contributor
Joined: Dec 2014
Posts: 335 |
A 1 inch spacer would fix that problem. What large holes are you talking about? Do you know where to purchase a spacer? Build your own? I kind of like rotating the carb 90 degrees, but requires mounting holes in slightly different place, problem. Thanks everyone for the suggestions so far! Need to dig in tonight to really grok it all... Mark
Mark
'67 Camaro L6-250
|
|
|
|
|
Joined: Aug 2014
Posts: 821
Major Contributor
|
|
Major Contributor
Joined: Aug 2014
Posts: 821 |
Nice Heinlein reference.
You can get a 1" spacer at most parts stores. Look for one with a bore that matches the carb. They're pretty cheap.
|
|
|
|
|
Joined: Jul 2000
Posts: 4,585 Likes: 19
1000 Post Club
|
|
1000 Post Club
Joined: Jul 2000
Posts: 4,585 Likes: 19 |
Larry/Twisted6 [oooooo]  Adding CFM adds boost  God doesn't like ugly.
|
|
|
|
|
Joined: Dec 2014
Posts: 335
Contributor
|
|
OP
Contributor
Joined: Dec 2014
Posts: 335 |
Thanks a heap everybody! A bunch of replies and more questions...
The Frenchtown Flyer: I'm nervous about cutting it off or bending. It's too expensive just in case it needs a warranty return. I plan to keep it for decades...
gbauer: Wow, great pictures and explanations! I'm not doing the water heating yet. I'll do the full engine and headers in the fall so sticking with the stock manifold. Just hope the heat riser isn't broken. I didn't realize "grok" was Heinlein's. We use it a lot at work (yes, i'm a techhie).
gbauer/MBHD/Twisted6: I've got a throttle rod currently, no cable. Also have automatic transmission which also has a rod. The new carb has what appears to be a vacuum line for the power brakes, so I'll end up plugging both holes. Your picture helped a bunch.
I'm going to take my time on this. This weekend, i'll finish dismantling the emissions pump, removing the tubes going into the head and manifold and plugging the holes. I'll also mock up the carburetor with cable and pushrod if rotated. I really like the idea of rotating it. Need to look over the clearances to the valve covers, how well the mechanism all works.
Does anybody want an airpump??? I've got some 195/70R14 tires with wheels for sale too, only 2500 miles. (can't post to swap meet yet)
More questions coming this weekend!
Mark
Mark
'67 Camaro L6-250
|
|
|
|
|
Joined: Sep 2004
Posts: 5,839 Likes: 1
1000 Post Club
|
|
1000 Post Club
Joined: Sep 2004
Posts: 5,839 Likes: 1 |
12 port SDS EFI
|
|
|
|
|
Joined: Apr 2006
Posts: 534
Major Contributor
|
|
Major Contributor
Joined: Apr 2006
Posts: 534 |
Probably a few swap meets left up there, always tons of spacers there, maybe even a 1/2" spacer would do it. $5-$10 is typical, sometimes less.
I mounted my 4bbl sideways but the other way, so the primaries are furthest from the head to give a little longer/more equal runner lengths. Jammed a big tall post up next to the head so that's where the hard linkage makes the 90 turn, no cables.
The 390 Holley has SO much better manners than the Rochester Monojet you will be very happy when done.
|
|
|
|
|
Joined: Dec 2014
Posts: 335
Contributor
|
|
OP
Contributor
Joined: Dec 2014
Posts: 335 |
I was on the bench experimenting with 1/2" nuts to emulate spacers. 1/2" is fine, don't need full 1". Because of the transmission kick-down and the hard linkages, I've decided to figure out how to keep the original hard linkage. The original linkage results in pulling down on the side closest to the firewall. I'm sure I can make it work with a longer cable, but if I rotate the carb to the rear maybe there's another way. The suggestion to rotate the carb is still intriguing, but it will require cutting out the manifold in addition to new holes on the adapter. Hmmmmm, probably too much work, but I've got homework to do. Hey, I pulled off the pollution control tubes from the head. None of my bolts on the bench worked. So I took them into NAPA, we found that it only fit into the metric 16mm fine thread. Weird, so I bought six metric bolts. Get them home and they're too big. Anybody know the appropriate size? Also for aluminum block on the intake manifold? Thanks! Mark 
Mark
'67 Camaro L6-250
|
|
|
|
|
Joined: Oct 2008
Posts: 75
Active BB Member
|
|
Active BB Member
Joined: Oct 2008
Posts: 75 |
Here is the setup I came up with to connect a motorcraft 2 barrel to the stock throttle setup. I used a 1 inch phenolic adapter plate to adapt the 2 barrel to the 4 barrel Offy manifold I tapped a hole in the spacer for the nylon pulley and made a nice ball pivot on the throttle arm, super polished and treated with titanium disulphide for friction free movement. Just pulling down on the cable activates the throttle. I make no promises :-) 
|
|
|
|
|
Joined: Dec 2014
Posts: 335
Contributor
|
|
OP
Contributor
Joined: Dec 2014
Posts: 335 |
Here is the setup I came up with to connect a motorcraft 2 barrel to the stock throttle setup. I used a 1 inch phenolic adapter plate to adapt the 2 barrel to the 4 barrel Offy manifold
I tapped a hole in the spacer for the nylon pulley and made a nice ball pivot on the throttle arm, super polished and treated with titanium disulphide for friction free movement. Just pulling down on the cable activates the throttle.
I make no promises :-)
Thanks, Vman, I like your solution for the throttle on the rear of the manifold. Mine was on the front and found another solution, not quite as clean, but it works. Kind of hard to see, but I used existing throttle and transmission linkage, converted to cable to bring around to the front side. Mark 
Mark
'67 Camaro L6-250
|
|
|
|
|
Joined: Aug 2014
Posts: 821
Major Contributor
|
|
Major Contributor
Joined: Aug 2014
Posts: 821 |
I still don't see how you're handling the kick-down linkage.
|
|
|
|
|
Joined: Dec 2014
Posts: 335
Contributor
|
|
OP
Contributor
Joined: Dec 2014
Posts: 335 |
I still don't see how you're handling the kick-down linkage. Hi Gbauer, I think you can see better with this picture. The rod that attaches to the top is the throttle. When you depress the pedal, the direction is to pull the top towards the firewall. The other rod to the right is the kick-down linkage rod. When the throttle goes forward, it's kind of a squared cup on the bottom that hits the bottom of the kick-down to push it forward. The kick-down has a spring built in the middle. I don't know if that's clear, so I put another zoomed in picture. And boy, that zoomed big-time. Mark 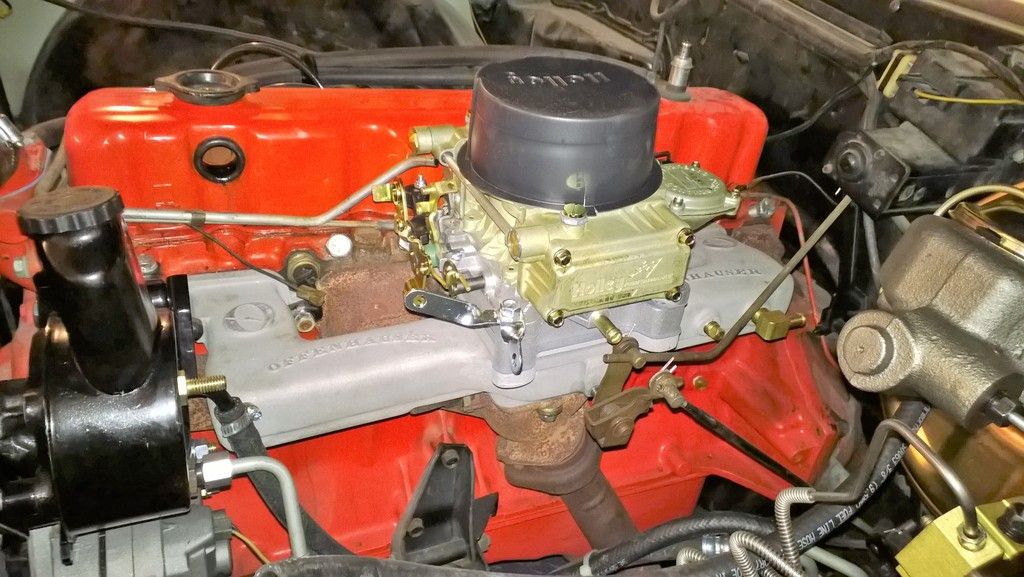 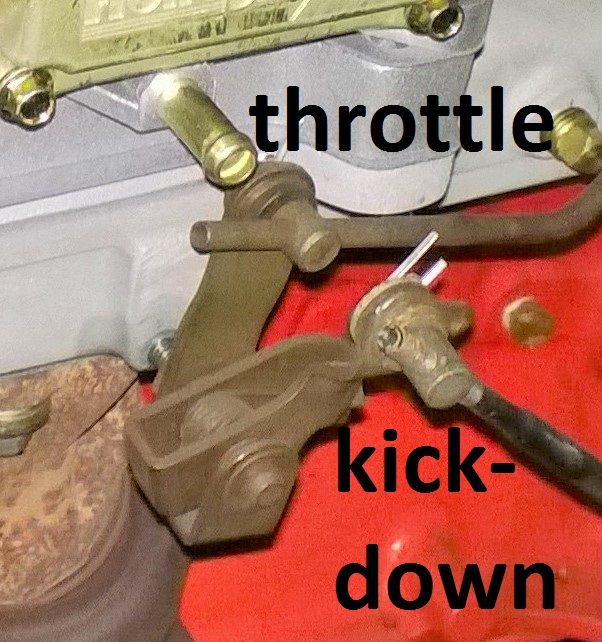
Mark
'67 Camaro L6-250
|
|
|
|
0 members (),
325
guests, and
48
robots. |
|
Key:
Admin,
Global Mod,
Mod
|
|
|
|


