|
|
Joined: Dec 2014
Posts: 335
Contributor
|
OP

Contributor
Joined: Dec 2014
Posts: 335 |
Took the intake off tonight, and what did I find but enough oil in the intakes to make me think I'm running a 2-stroke! 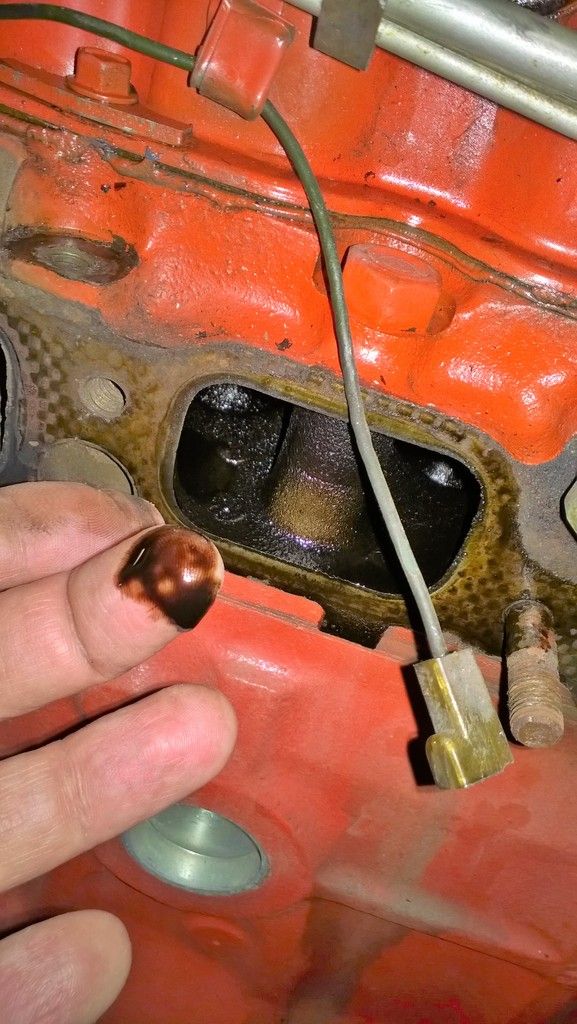 Look at all the black soot on the side of the engine. Hmmmm, when the car was painted, the engine was removed and painted as well. It looks like the manifolds weren't torqued properly. The nuts/bolts came loose very easily. Under the intake was also covered with soot. 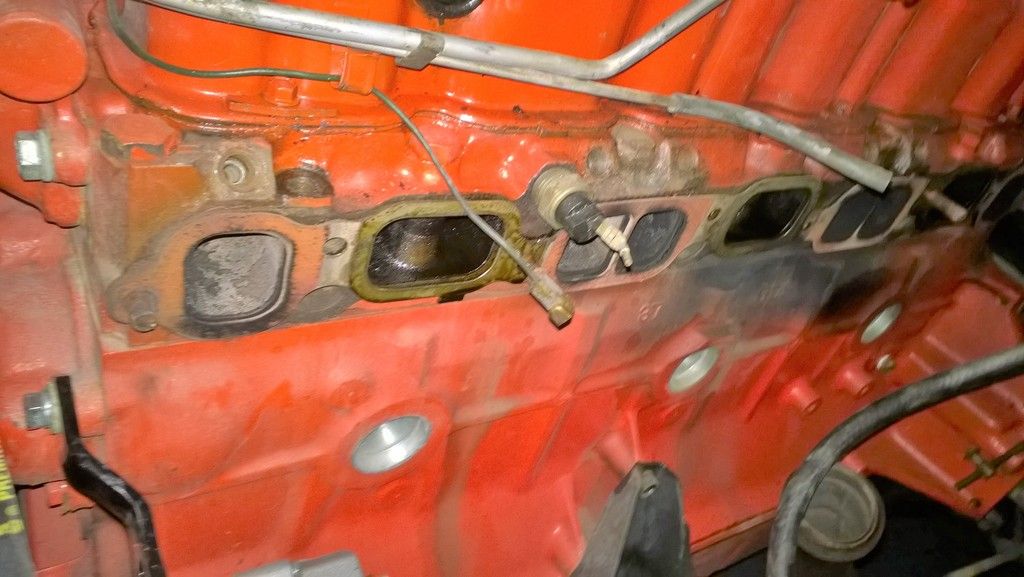 Front to back, here are the intakes and cylinders. Does anybody see anything odd? Thanks! Mark Cylinders 1,2, and half of 3  Cylinders half of 3, 4, half of 5 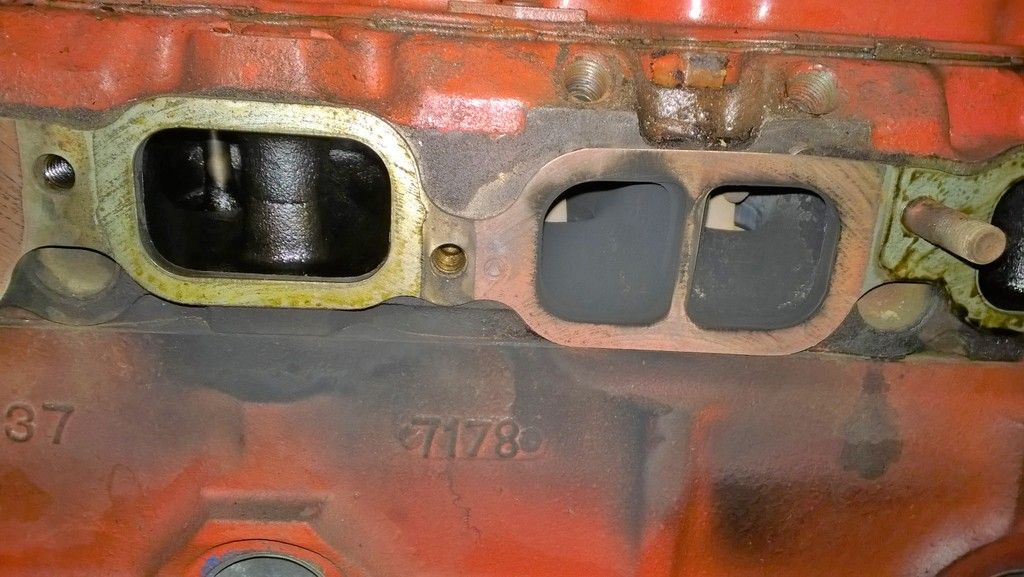 Cylinders half of 5, 6 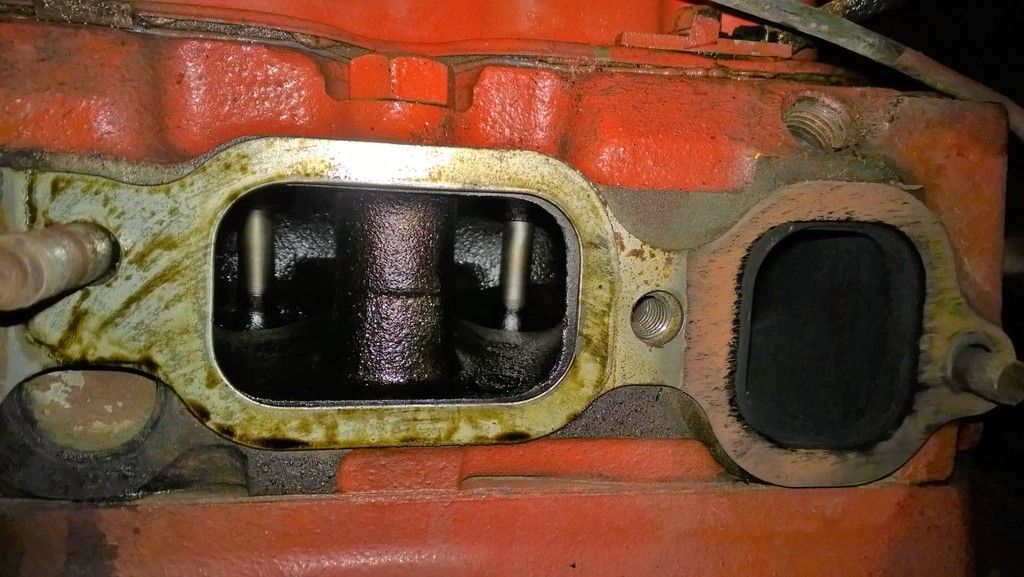
Mark
'67 Camaro L6-250
|
|
|
|
|
Joined: May 2000
Posts: 1,464
1000 Post Club
|
|
1000 Post Club
Joined: May 2000
Posts: 1,464 |
I would check the flatness and alignment of your manifolds and resurface as necessary.
FORD 300 inline six - THE BEST KEPT SECRET IN DRAG RACING!
|
|
|
|
|
Joined: Apr 2004
Posts: 3,556 Likes: 35
1000 Post Club
|
|
1000 Post Club
Joined: Apr 2004
Posts: 3,556 Likes: 35 |
I agree with Frenchtown. The manifolds need surfaced before installation.
The oil on the intake side is from the poor sealing on the valve guides GM used.
A cheap fix is to install umbrella seals on the valve stems. This will require spring/ keeper disassembly while on the engine. Basically, apply air pressure to the cylinder with the valves closed and then compress the springs and remove the keepers allowing you to install the seals.
The best repair is to machine the head for positive seals. I use Viton seals. But this is removing the head for machine work.
Inliner Member 1716 65 Chevelle Wagon and 41 Hudson Pickup Information and parts www.12bolt.com
|
|
|
|
|
Joined: Dec 2014
Posts: 335
Contributor
|
|
OP
Contributor
Joined: Dec 2014
Posts: 335 |
I would check the flatness and alignment of your manifolds and resurface as necessary. thanks Tom and Frenchtown Flyer. I'll check the flatness with a straight-edge. My goal and intent is to just get on the road for now. I'm going to overhaul the engine this fall/winter, can't do it now. The nuts/bolts were not hardly torqued at all, they came off really easy. I'm crossing my fingers the new intake/exhaust combo is close enough... Questions: 1) when I assemble the intake/exhaust manifold, should I use a gasket or just ring it with ATV? 2) On the new Offy intake, I need to put a vacuum port for power brakes in one of the holes. I plan to haul the intake into Napa to see if they have something. Any tips? Thanks! Mark
Mark
'67 Camaro L6-250
|
|
|
|
|
Joined: Jan 2015
Posts: 376
Contributor
|
|
Contributor
Joined: Jan 2015
Posts: 376 |
Clifford Performance has intake/exhaust gaskets that seal up Really nice. I got one along with my intake and header from them and Never had sealing issues. Beat the metal gasket from felpro anyday because this one is a hard gasket material. I'd do that for better sealing. Far as the brake booster goes....the carb(if your running an edelbrock) will have a port where you can put a connection to run a hose to the booster, or on that manifold there should be a vacuum port with a plug that unscrews...just put a connection and run a hose from there. Many engines used manifold vacuum for brake boosters anyhow.
|
|
|
|
|
Joined: Sep 2004
Posts: 5,839 Likes: 1
1000 Post Club
|
|
1000 Post Club
Joined: Sep 2004
Posts: 5,839 Likes: 1 |
As long as your manifolds are straight, the Felpro gasket is just fine.
Never had a problem with those.
Running just a soft gasket tends to hard, get brittle, then blows out, that is the reason for a nice metal stacked gasket such as Felpro's.
MBHD
12 port SDS EFI 
|
|
|
|
|
Joined: Nov 2004
Posts: 420
Contributor
|
|
Contributor
Joined: Nov 2004
Posts: 420 |
Metal gaskets work best for me..I always replace the gasket between the intake/exhaust and leave the bolt somewhat loose untill i finish up the flange bolts then tighten them last. This seems to help... I agree with Tom on the quick fix of the oil sucking down the valve guides.
Jerry Davis II#4711
ol Smokey said "one test is worth a thousand expert opinions."
|
|
|
|
|
Joined: Dec 2014
Posts: 335
Contributor
|
|
OP
Contributor
Joined: Dec 2014
Posts: 335 |
Thanks for the tips! The exhaust manifold could use some machining, but it wasn't so bad. I'll be putting headers on in the fall when it's rebuilt, so not messing with it. I think it will hold. The exhaust manifold is really restrictive, wow, headers will make a huge difference. The gasket between the intake and exhaust looked to be original and was disintegrating. Scrapiron's tip was great to set the manifolds to the head before final tightening of the flange. when I first set the manifolds together on the bench, they were far from even. The exhaust is a problem, held on with only one bolt. The second bolt had all of the bottom threads stripped out years ago. There were hardly any threads left to catch, I can't see how the person before me got them to catch. But it only needs to hold until fall... Carb is on for a fit-out, working through the throttle cable. I bought another 3-foot cable, high quality (thanks for the tips on the one that comes with the kit!), that can be cut to shorter lengths. There's restrictions on the original throttle linkage to the base of the carb, but I think with adjustment it'll work. I've got an idea... Questions: 1) Recommendations on where to tap into 12V for the choke? Gbauer, where did you tap off? 2) Vacuum lines, which one to where... - Small line from carb, tee off to distributor and transmission? - Big one to the power brake - Big manifold line to PVC valve 3) I cut the gas line with a nice tool. Should I do the tried and true, but warned against in the instruction manual, flush the line with 4-5 cranks and a hose into a bucket? 4) Only filter on the car is original style porous stone. I bought an inline filter and was thinking of putting it inline going into the carb intake. Any issues? 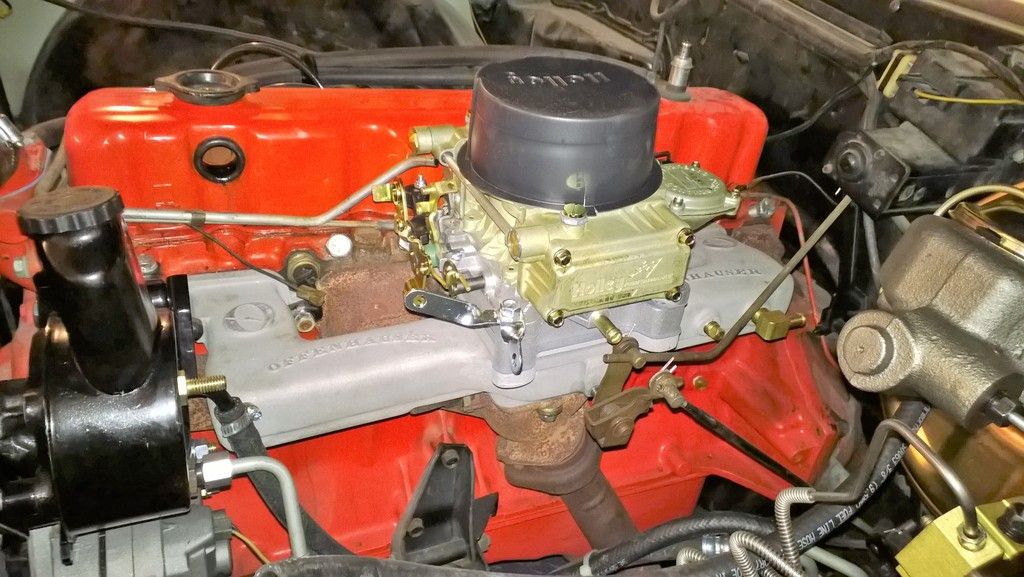
Mark
'67 Camaro L6-250
|
|
|
|
|
Joined: Jan 2015
Posts: 376
Contributor
|
|
Contributor
Joined: Jan 2015
Posts: 376 |
As long as your manifolds are straight, the Felpro gasket is just fine.
Never had a problem with those.
Running just a soft gasket tends to hard, get brittle, then blows out, that is the reason for a nice metal stacked gasket such as Felpro's.
MBHD I've tried several felpro metal gaskets and they never sealed. Never tried that "copper sealant" stuff I've heard of though. lol
|
|
|
|
|
Joined: Aug 2014
Posts: 821
Major Contributor
|
|
Major Contributor
Joined: Aug 2014
Posts: 821 |
1) For the electric choke I used the same wire that powered your fast idle on the old carb. It's a reddish wire (never 100% sure of the color of the wires on my car...) that went to a solenoid looking thing with an adjustment bolt on the old carb. That bolt head contacted a part of the throttle linkage for fast idle. It's hot when running and has (so far) worked well for me. 2) Vac lines: I tapped into the manifold near the booster for the booster vac (you have a brass connection there already). The trans kick down is now on the lowest vac connection on the carb. It's hidden on the bottom flange near the valve cover and points at a 45 degree angle back. The upper vac connection is on the back of the carb above the electric choke. I used that for vac advance. You can reverse them if you find your car works better that way. Mine runs and shifts best how it is now. PCV is on the carb near the top back. 3) Flushing can't hurt but I didn't do it. I run my car often and didnt feel the need. 4) I used an inline filter between the hard line and fuel pump. I wanted the pump to be filtered as well as the carb. No reason to hasten it's demise... I don't know if this helps any or not but:  Add grease into the hard bend for the cable to slide through easier. Also MAKE SURE there are no binds. Mine bound up and nearly threw me into a pole... Broke both motor mounts with that one. I put a return spring on it where you see in the pic. It's not heavy duty; just enough to pull it back should a cable break on me. I also found attaching the new cable to the stock linkage didn't quite work so I fab'd up a little extension using the Offy linkage (which wouldn't mate up to the power glide kick down linkage). If you were in MD I'd come by tonight and get your car on the road in an hour. You're really, really close.
Last edited by gbauer; 06/01/15 11:45 AM.
|
|
|
|
|
Joined: Aug 2014
Posts: 821
Major Contributor
|
|
Major Contributor
Joined: Aug 2014
Posts: 821 |
One other thing: I see you have a plug just forward of the fitting for the brake booster on the intake. I used that as the mount for the throttle cable bracket.
|
|
|
|
|
Joined: Sep 2004
Posts: 5,839 Likes: 1
1000 Post Club
|
|
1000 Post Club
Joined: Sep 2004
Posts: 5,839 Likes: 1 |
I think you must had other problems?
The Felpro gasket works.
Warped manifolds, head surface bad?
Hardware not correct, manifold thicker mating surface than the header/exhaust manifold?
Did you check with a true straight edge?
I had checked 2 brand new Clifford side draft manifolds I got from them, first one was .060" warped, second was not much better, so instead of sending back for a third time, I just had the manifold resurfaced.
I never use any sealant on the Felpro gasket, it does not need it , as long as everything is clean, straight.
I am a big fan of Hylomar though.
I used the Felpro gasket when my 250 was supercharged, no leaks, I plan using Felpro when it will be turbocharged next.
I have even reused, used Felpro intake/exhaust gaskets with no problems.
MBHD
[quote=TJ's Chevy
I've tried several felpro metal gaskets and they never sealed. Never tried that "copper sealant" stuff I've heard of though. lol [/quote]
12 port SDS EFI
|
|
|
|
|
Joined: Jan 2015
Posts: 376
Contributor
|
|
Contributor
Joined: Jan 2015
Posts: 376 |
Yeah, I checked with a straight edge and I had exhaust leaks mainly. My manifold was 47 years old so who knows, but I couldn't see any signs of warping and the head looked straight as well. When I converted the old engine to headers and the new intake I used the gasket clifford offered and never had any leaks since. One point to be sure of...the felpro metal gasket will Not work with clifford headers to do the interesting flange design. lol I tried the metal gasket on the headers for the heck of it and I could feel exhaust puffs between the gasket and flange...like said...do to that weird flange design. And I did properly tighten everything to and retightened after a heating and cooling cycle. But if others have better luck with the gasket I won't be against it. lol
|
|
|
|
|
Joined: Sep 2004
Posts: 5,839 Likes: 1
1000 Post Club
|
|
1000 Post Club
Joined: Sep 2004
Posts: 5,839 Likes: 1 |
Before I bought my Camaro from my friend, he installed Clifford headers, & an Offy intake manifold.
The Felpro gasket was on the car then with no leaks.
When I switched around intake manifolds I always used Felpro gaskets with the same Clifford headers, no leaks.
We did remove the alignment dowels & used bolts for the headers on the ends of the cyl head.
MBHD
12 port SDS EFI
|
|
|
|
|
Joined: Dec 2014
Posts: 335
Contributor
|
|
OP
Contributor
Joined: Dec 2014
Posts: 335 |
She runs! She runs! Well, at least she starts in the garage! Started up just fine about three times. Running smooth, it didn't make the garage smell putrid, although my wife claims she was smelling it. The idle is a bit high. Need to fix the choke and exhaust. Thanks everybody for your help! Too many replies to quote, they're all appreciated. On the exhaust, the threads on one bolt are completely gone on the lower end. I hooked up just one bolt, but it's leaking like a sieve and won't cut it. What I need is a thin donut. The new felpro that came with the kit is thicker than the original which makes it even worse. Maybe I should retap the threads just thinner than the original bolt. Well, the previous owner got it onto the bolt with stripped threads, I should be able to as well. I need some sort of crank case breather too. gbauer, great tips, and thanks for the offer to help. I found some posts on the Camaro site on 12V taps. My old carb didn't have any wires to it, but I found a 12V wire nearby to the windshield wiper motor. Hooked it up and it draws the power down to 4V, so back to finding another convenient tap. I may move the throttle linkage in the fall when I do the engine. Thanks! Mark 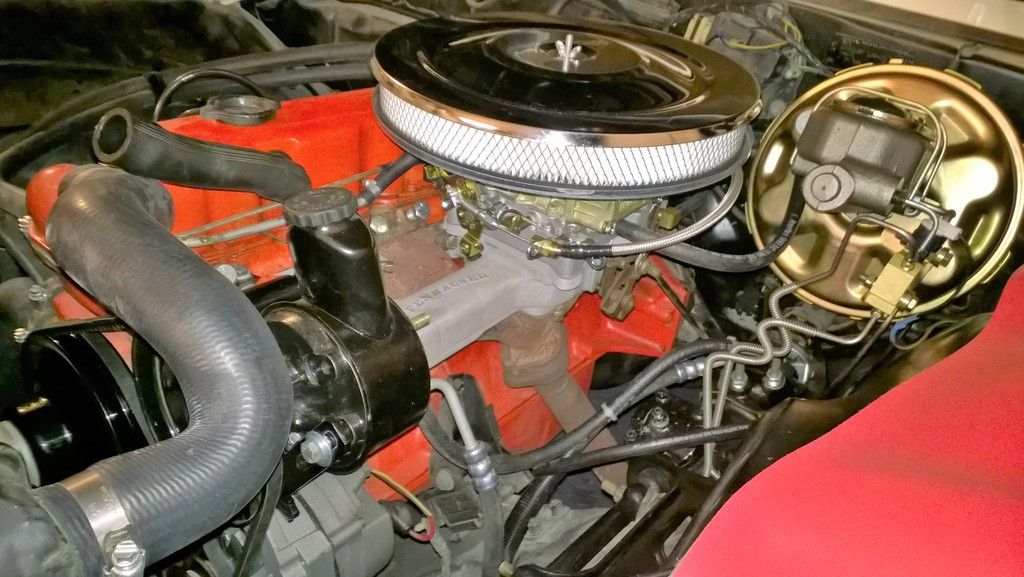
Mark
'67 Camaro L6-250
|
|
|
|
|
Joined: Jan 2015
Posts: 376
Contributor
|
|
Contributor
Joined: Jan 2015
Posts: 376 |
Awesome that its running good! Just do straight pipes and you won't have to worry about the exhaust leak! 
|
|
|
|
|
Joined: Aug 2014
Posts: 821
Major Contributor
|
|
Major Contributor
Joined: Aug 2014
Posts: 821 |
Glad to hear it's running!
How are you going to connect the kick down? Any ideas?
I forgot to chime in on how I sealed it up.
The flanges for the intake and exhaust were different thicknesses. I had to grind one side of each bridge to get things tight.
Worked like a charm.
Last edited by gbauer; 06/03/15 10:14 PM.
|
|
|
|
|
Joined: Apr 2004
Posts: 3,556 Likes: 35
1000 Post Club
|
|
1000 Post Club
Joined: Apr 2004
Posts: 3,556 Likes: 35 |
Mshaw,
Sounds like you just need to replace that worn out exh flange stud. The best time to do it is when the manifold is out of car. Head the manifold red hot around the stud and the stud will usually spin out with vise grips.
Inliner Member 1716 65 Chevelle Wagon and 41 Hudson Pickup Information and parts www.12bolt.com
|
|
|
|
|
Joined: Dec 2014
Posts: 335
Contributor
|
|
OP
Contributor
Joined: Dec 2014
Posts: 335 |
Awesome that its running good! Just do straight pipes and you won't have to worry about the exhaust leak! Thanks! Straight pipes.... well the throaty sound was nice, but we'll stick with quiet. :-) Glad to hear it's running!
How are you going to connect the kick down? Any ideas?
I forgot to chime in on how I sealed it up.
The flanges for the intake and exhaust were different thicknesses. I had to grind one side of each bridge to get things tight.
Worked like a charm. Hey, the biggest reason for reusing the existing h/w was that the kick-down is on the original mounting. It comes complete with a spring, so it's just right for the carb that doesn't come with automatic transmission hardware by default. It's all metal rods, no cables to that point. It may require a little adjustment, but all is good for now. If you click on the picture and zoom in, it's pretty clear to see. I think I lucked out the threads were the same and it barely works. The hardware hits but it appears to take it to full throttle. I found the original intake to be thinner than the exhaust and there was already a bit ground down on one side of the bridge. I'm still hoping the leaking exhaust is the donut and not the exhaust flange. Mshaw,
Sounds like you just need to replace that worn out exh flange stud. The best time to do it is when the manifold is out of car. Head the manifold red hot around the stud and the stud will usually spin out with vise grips. Doh! too late now. :-) I'm going to try one last frantic attempt to get that nut on otherwise i'm cutting the threads on the stripped out part. maybe if I put my bottle jack up on the flange, I can get it to stay in place so I can get those threads going. It's just really hard to get to pushing that...
Mark
'67 Camaro L6-250
|
|
|
|
|
Joined: Dec 2014
Posts: 335
Contributor
|
|
OP
Contributor
Joined: Dec 2014
Posts: 335 |
Ok, we're on the road... Exhaust attached, 12V run from fuse box to choke. Starts beautifully, no black smoke out the back, no gassy smell when done running.
Now for the bad news, the backfiring is worse than ever. I got some in the driveway with the filter off and tall flames coming up. It seems to come and go, get worse when it's hot. The temp light came on after coming up the big hill and sitting at the light on top. I need a shorter spring for throttle return so it doesn't go quite to full idle sometimes.
When you give it small throttle, it backfires, sputters and a few times stalled. When it does backfire, it misses really badly and takes a while to clear up. Once cleared up, the backfires are gone for a while.
It ran fine in the driveway for my testing. Of course, but I think that's just due to cooling down. :-)
I checked the vacuum in different spots. 20 lbs steady at idle from the manifold. I connected to the hose that normally is attached to the vacuum advance, steady, but I think lbs lower as expected. When reconnected, you can see the vacuum advance kick in and the RPMs go up. The transmission is connected to the upper vacuum off the carb, 0 lbs at idle, but you get vacuum when the throttle is open.
It's either fire or valves. Reading through posts on Camaro website, it could be condenser or something else. Murphy says it's the valves. No time yet today to look at it.
Here's a simple summary: When it gets hot, it backfires on modest acceleration. After the backfires, the car misses terribly and clears up after 3-5 seconds.
(sinking feeling) Yeah, I know, it's a problem with the valves. Before I bought the car, it had a lot of quality garage time with little running. I replaced the fuel pump and it's got good gas. But heat could also point to an electrical issue. It just seems odd that it would clear up over time...
Questions:
1) Is this OK for the transmission to only get vacuum when the throttle is opened up part way? Should I tap into the dist advance and plug this vacuum?
2) Experience with HEI distributors Langdon's sells? Big advantage to the mini or the round coil outside aesthetics? I was going to put one of these on anyway, might just do it now to cut one more problem out of the equation.
Thanks!
Mark
Mark
'67 Camaro L6-250
|
|
|
|
|
Joined: Aug 2014
Posts: 821
Major Contributor
|
|
Major Contributor
Joined: Aug 2014
Posts: 821 |
You probably have a vacuum leak.
|
|
|
|
|
Joined: Dec 2014
Posts: 335
Contributor
|
|
OP
Contributor
Joined: Dec 2014
Posts: 335 |
Today's experiments (not much time to spend):
- Pulled the valve cover, was able to turn the springs with effort when the rocker arms were loose, but with effort. Nothing seems broken. Steady vacuum speaks to that. Lots of hissing when I turn the crank by hand, FWIW. Oh, there was some orange paint on the valves and the cover seemed glued on almost (RTV?). Man, now it'll leak for sure since I didn't replace the gasket.
- Dwell 32degrees, manual says 31-34. RPM about 700.
- Timing 2BTDC, so adjusted to 4 BTDC as manual says.
- plugged PVC and automatic transmission vacuum lines, took it for a drive. Had a few minor pops and a bit of hesitation on acceleration. Curious about potential rust holes in the metal line reason for plugging those lines. The vent from the valve cover was breathing tons of smoke, lots of blow-by without that PVC connected to help clean it up. I've got to do something better than just let that vent...
- plugged vacuum advance (yes, I know, it won't run well). I got lots of backfires, sputtering, and almost a stall. *just like it was behaving before*.
Now, I know that I didn't give the pre-vacuum advance that full of a test drive, but it really misbehaved without it. But I always thought too much advance causes backfire through the carb and too much retard causes backfire through the exhaust. With good vacuum on the manifold, it seems to be pointing to the ignition.
gbauer, with all the lines removed and plugged and good consistent vacuum, it doesn't seem that there would be a leak, would it?
It's seems to be pointing to the ignition, what do you think?
Mark
Mark
'67 Camaro L6-250
|
|
|
|
|
Joined: Apr 2004
Posts: 3,556 Likes: 35
1000 Post Club
|
|
1000 Post Club
Joined: Apr 2004
Posts: 3,556 Likes: 35 |
When setting the timing, was the vacuum line unhooked? It needed to be. I would jump the timing up to 6-8.
When the engine is turned off. Watch down the throat of carb while you pump throttle by hand. Does it squirt fuel down the throats?
Have you adjusted the idle mixture screws?
Inliner Member 1716 65 Chevelle Wagon and 41 Hudson Pickup Information and parts www.12bolt.com
|
|
|
|
|
Joined: Aug 2014
Posts: 821
Major Contributor
|
|
Major Contributor
Joined: Aug 2014
Posts: 821 |
What squirters and jets are you running? Power valve? Secondary spring?
Mine are 54 jets, 28 squirters, and the second to the weakest spring. Power valve is a 6.5
|
|
|
|
|
Joined: Aug 2014
Posts: 821
Major Contributor
|
|
Major Contributor
Joined: Aug 2014
Posts: 821 |
Well... did you get it adjusted and did it run better?
|
|
|
|
|
Joined: Dec 2014
Posts: 335
Contributor
|
|
OP
Contributor
Joined: Dec 2014
Posts: 335 |
Well... did you get it adjusted and did it run better? Unfortunately I had to work last night and will be working tonight too. Cross your fingers I'll get to it tomorrow night. So close, it's killing me to have to wait!  Mark
Mark
'67 Camaro L6-250
|
|
|
|
|
Joined: Dec 2014
Posts: 335
Contributor
|
|
OP
Contributor
Joined: Dec 2014
Posts: 335 |
Success! For the most part, she feels "good enough" to make it through the summer until the overhaul. Now the details... Timing: now 8 degrees BTDC with the vacuum line removed. plug in the vacuum and the RPMs go up. Adjusting the carb Directions say to start with the screws at 1-1/2 turns, adjust the screws to get best vacuum (when warm, in drive). I don't see any difference in vacuum from 1 to 2 turns. I didn't go beyond 2 turns. I left them set at 2 turns out. I still get hesitation at very light throttle. The squirters work just fine. I did get two small backfires early on, but am learning how to drive with the fickleness of avoiding that throttle position. Don't know about the jets, the sheet didn't say what they were, only that they were "correct" for this engine. I took it out for 0-60 MPH run. It's now averaging under 21. Big improvement from 26. I did three runs, on the third, I stopped in a pullout and was getting ready only to see the blue and red in my rear view mirror. Sheesh, what did I do wrong now? Fortunately our finest blew on past me to the emergency up the road. Driving up the big hill, speed still dropped to about 35. I think the engine is just plan tired. It was 60F out, versus 85F the other day. The tiny two core radiator is still of concern, time to replace that with nice brushed aluminum. It needs all the help it can get. I hope to also put in the Langdon HEI this summer. I hear good things about that and it'll completely eliminate worn parts from the equation. I like keeping the look closer to original, so will stick with the mini. The only thing I really need to do is to deal with the crankcase ventilation. In the below picture, see the green painted tube. The new air filter has a place and hardware to connect the tube, but it appears that it would hit the carburetor or the throttle linkage depending on where I put it. Any suggestions? Thanks! Mark 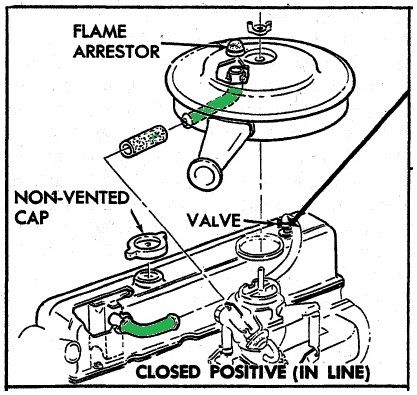
Mark
'67 Camaro L6-250
|
|
|
|
|
Joined: Sep 2004
Posts: 5,839 Likes: 1
1000 Post Club
|
|
1000 Post Club
Joined: Sep 2004
Posts: 5,839 Likes: 1 |
Sounds good.
The slight hesitation will probably be from being a tad lean, you could go larger on the main jets, but then mileage suffers.
Accelerator Cam adjustment, ,squirter size increase, air bleed jets, different options to get it tuned just right, so it will not get a hesitation or back fire.
Back fire through the carb? If so, usually a lean condition.
0-60 MPH 21 seconds? If so, that engine is worn out.
My moms stock 73 4 dr Nova, 3.08 rear gears, powerglide ran 21 seconds in the 1/4 mile 3000 FT altitude track.
Adjusted the timing, got it down to 19 seconds in the 1/4.
Non of the two 6 cyl cars I had used a flame arrester. 73 Nova, 69 Camaro.
They used a filter just on the inside edge of the air cleaner assy.
MBHD
12 port SDS EFI
|
|
|
|
|
Joined: Dec 2014
Posts: 335
Contributor
|
|
OP
Contributor
Joined: Dec 2014
Posts: 335 |
0-60 MPH 21 seconds? If so, that engine is worn out.
My moms stock 73 4 dr Nova, 3.08 rear gears, powerglide ran 21 seconds in the 1/4 mile 3000 FT altitude track.
Adjusted the timing, got it down to 19 seconds in the 1/4.
Non of the two 6 cyl cars I had used a flame arrester. 73 Nova, 69 Camaro.
They used a filter just on the inside edge of the air cleaner assy.
MBHD
The old carb was 26 seconds, so I'm 5 seconds faster. With this carb and the retarded timing (2 btdc) leaner mixture was also 26 seconds. Maybe if I go 10 btdc, it'll drop to 20. For the breather, the original intake has a metal screen. I see Tom Lowe's offy valve cover with a couple of breathers venting to engine compartment. Thoughts? Mark
Mark
'67 Camaro L6-250
|
|
|
|
|
Joined: Apr 2006
Posts: 534
Major Contributor
|
|
Major Contributor
Joined: Apr 2006
Posts: 534 |
mshaw,
I thought of that like MBHD, 26 sec or 21 sec 0-60 are kinda slow. But, your speedometer could be wrong or just "lagging" when accelerating, that is common with the old ones. So what you think is 0-60 might really be 0-70mph. But at least if you do it the same each time you can measure the improvement.
I took a crack at your car in the Gonkulator, that is tuned to match my own runs with a 63 Nova, stock 250cid 4bbl, 3.08 powerglide. That car ran 0-60mph in 11 sec give or take depending on the carb and timing. Your car is probably 200lb or so heavier, and has 10% less engine so should be slower, but the Gonkulator said about 13-14 sec for 0-60mph for your car when tuned right and if the engine is not too tired. Again, you may be measureing 0-70mph for all we know!
Timing of 2 BTC seems kinda doggy, but you should also check the whole mechanical curve - unplug the vac advance, degree your damper, and check timing vs RPM up to say 3000. Mine liked about 6-10 initial, and 32-36 total mechanical at 3000-3500. Anything close to that would run pretty good. From the hesitating and backfiring I am guessing your timing maybe retarded.
The stopwatch thing is a great idea, been doing that since the 1970s (my old-tech stopwatch from 1974 still works!) but mostly use the GTECH now. Or, the iPhone has a cheap app called Dynolicious that is not perfect but might be helpful for what you're doing so far.
Good luck and keep at it!
FYI, even if that 21-sec 0-60 time is accurate, you could still put the hurt to plenty of cars, including most stock 1953 Fords, and just about any early 144 Falcon or 170 Comet Fordomatic. Well, maybe we need to improve things a little...
|
|
|
|
|
Joined: Sep 2004
Posts: 5,839 Likes: 1
1000 Post Club
|
|
1000 Post Club
Joined: Sep 2004
Posts: 5,839 Likes: 1 |
[quote=mshaw230 The old carb was 26 seconds, so I'm 5 seconds faster. With this carb and the retarded timing (2 btdc) leaner mixture was also 26 seconds. Maybe if I go 10 btdc, it'll drop to 20. For the breather, the original intake has a metal screen. I see Tom Lowe's offy valve cover with a couple of breathers venting to engine compartment. Thoughts? Mark [/quote] On my moms 73 Nova, I would adjust the timing with as much advance as the engine could take, just as long as it would not detonate.
That adjustment alone made the biggest improvement on acceleration & much better mileage.
We used to take my moms cars to garage/maintenance shops for tune ups, all they would do is set the timing to factory specs, change plugs, rotor, cap, plug wires.
This 73 Nova used to be our family travel car.
Best mileage it ever got was 16 MPG.
After I started working on the Nova, (being 16 & it was the car I was going to drive, wanted a bit more power) adjusting the timing by advance it, the mileage went to 18 MPG, just by the timing adjustment alone.
Don't try & set the timing to factory settings, those settings were made so the car can pass emissions, lower timing burns more of the unburned gas increases combustion chamber temps.
Make sure the mechanical advance is working, @ least install a spring kit into the distributer. It helps.
I always hated hooking up the valve cover breather into the air cleaner assy, the blow by would prematurely get the air filter dirty.
Toms breather assy's look like they should work. They have a labyrinth inside to reduce the chance oil from escaping.
MBHD
12 port SDS EFI
|
|
|
|
|
Joined: Dec 2014
Posts: 335
Contributor
|
|
OP
Contributor
Joined: Dec 2014
Posts: 335 |
mshaw,
I thought of that like MBHD, 26 sec or 21 sec 0-60 are kinda slow. But, your speedometer could be wrong or just "lagging" when accelerating, that is common with the old ones. So what you think is 0-60 might really be 0-70mph. But at least if you do it the same each time you can measure the improvement.
I took a crack at your car in the Gonkulator, that is tuned to match my own runs with a 63 Nova, stock 250cid 4bbl, 3.08 powerglide. That car ran 0-60mph in 11 sec give or take depending on the carb and timing. Your car is probably 200lb or so heavier, and has 10% less engine so should be slower, but the Gonkulator said about 13-14 sec for 0-60mph for your car when tuned right and if the engine is not too tired. Again, you may be measureing 0-70mph for all we know!
Thanks for the Gonkulator estimate and the background! One thing it does is confirm that the overhaul this fall will get the car to where I want it. Upgrade the crank/pistons to 250 CID, a moderate CAM, port the head and headers should do the trick. I was thinking for the engine as-is, if I were down to 15 sec and if it could hold 45MPH up the 10% grade hill, I'd be good. Neither goal is met yet, though it steadies out 35MPH up the hill. But at least she's running. On my trip last year, I determined the odometer was dead on, but the speedometer was about 10% low. So roughly 55MPH reading was 60MPH. I've got slightly bigger wheels on it now, so think 54MPH is about 60MPH. I stop the watch at 54MPH. The slowest part is when it shifts to 2nd gear. The acceleration nearly stops.
Timing of 2 BTC seems kinda doggy, but you should also check the whole mechanical curve - unplug the vac advance, degree your damper, and check timing vs RPM up to say 3000. Mine liked about 6-10 initial, and 32-36 total mechanical at 3000-3500. Anything close to that would run pretty good. From the hesitating and backfiring I am guessing your timing maybe retarded.
The stopwatch thing is a great idea, been doing that since the 1970s (my old-tech stopwatch from 1974 still works!) but mostly use the GTECH now. Or, the iPhone has a cheap app called Dynolicious that is not perfect but might be helpful for what you're doing so far.
Good luck and keep at it!
FYI, even if that 21-sec 0-60 time is accurate, you could still put the hurt to plenty of cars, including most stock 1953 Fords, and just about any early 144 Falcon or 170 Comet Fordomatic. Well, maybe we need to improve things a little...
MBHD I'm going out now to try 10 or 12 BTDC to see how it does. I like your experiments. I always put premium in this baby, so maybe I'll just try 12 to start. BTW Windows Phone rock! Except Dynolicious isn't available... Thanks!! Mark
Mark
'67 Camaro L6-250
|
|
|
|
|
Joined: Dec 2014
Posts: 335
Contributor
|
|
OP
Contributor
Joined: Dec 2014
Posts: 335 |
Hi, yesterday, I bumped it up to 12 DBTDC. Revved the engine (don't know RPM), but saw about 30 degrees mechanical advance. Not as much as DeuceCoupe's. Maybe I'll try more since no detonation.
I took the kids to the pool (10 miles each way, city traffic). I only had two backfires, one of which resulted in a stall after sitting at a long traffic light. It was 78F out, but I didn't get the "Temp" light turning on at all, which was the norm for sitting at stoplight in the sun (I used to put it in neutral and bump the RPMs to get the water flowing). Timing is definitely helping. I'll likely also put in the HEI sometime this summer.
I believe that I won't be driving it again for a couple or three weeks, so will get back to it in July.
Signed up for the big All Camaro show 7/19 in Issaquah. I feel confident it's ready to make the trip.
Thanks again for all your help!!!
Mark
Mark
'67 Camaro L6-250
|
|
|
|
|
Joined: Sep 2004
Posts: 5,839 Likes: 1
1000 Post Club
|
|
1000 Post Club
Joined: Sep 2004
Posts: 5,839 Likes: 1 |
30 degrees total? = Too low.
You need a distributer advance curve kit, SBC works. More performance, better mileage.
When you say a back fire,,, out of the carb?
Accelerator squirt not doing it's job ?
MBHD
12 port SDS EFI
|
|
|
|
|
Joined: Dec 2014
Posts: 335
Contributor
|
|
OP
Contributor
Joined: Dec 2014
Posts: 335 |
30 degrees total? = Too low.
You need a distributer advance curve kit, SBC works. More performance, better mileage.
When you say a back fire,,, out of the carb?
Accelerator squirt not doing it's job ?
MBHD
Soooo, what you're telling me is I need new HEI? Twist my arm. 30 degrees was all mechanical, no vacuum, but it's lower than what others get. Maybe I didn't rev it high enough. But it could just be 48 years old and tired... Yes, the backfire sounds through the carb. I'm pretty sure it still is, it was definite before I started taking the timing forward (witnessed the flames). I don't know much about carbs, but am learning. The accelerator pump seems to work just fine. It seems that the problem I have is with just slight throttle. If I press harder, get to the point where the squirters do their job, no problems. It could be as simple as too much carb (390 CFM) for a stock 230. When I'm driving along, 45-55 MPH, it seems I hardly have to hit the gas at all to maintain. But there's no torque or staying power. The hesitation was getting annoying the other day. I might open the idle adjustment screws a bit to see if that helps. I'm not going to change the jets before the overhaul. Mark
Mark
'67 Camaro L6-250
|
|
|
|
|
Joined: Apr 2006
Posts: 534
Major Contributor
|
|
Major Contributor
Joined: Apr 2006
Posts: 534 |
mshaw,
For me, I don't think U need HEI yet - all my tests so far have used the old 1960s single-point distrib, no problems yet.
You might need to use a weaker spring in place of the stronger one down below in the distrib - but first need a tach to see what your timing curve is for sure. 30 total is getting close though, if you just try 12 initial for 32 total you'd be basically "there".
As far as tired, I find that tired engines actually run FASTER if anything, just cuz they're "looser". Unless of course the valve or ring seals are giving up. Not sure if you did a compression test next but that for me is the best "tired" indicator.
Here is what I got from the 250cid that ran all the carb "shootouts" a couple years back:
135
155
142
130
145
138
I consider this a "tired" engine, not the greatest results even on compression but it still ran good and gave decent times in the shootout - after all the car ran "high 10s" (0-60mph that is!!!)
I would definitely do these steps before you tear into the engine, that way you will have a before & after. Also find out where the big Powerglide is shifting - mine was shifting about 4500 or so, probably a little lower than the 4bbl wanted but I didn't want to abuse it so left it there - I was looking for improvements and comparisons, not the last tenth by revving the old six higher.
Thanks for all the photos you are posting it makes for some interesting threads!
|
|
|
|
|
Joined: Apr 2006
Posts: 534
Major Contributor
|
|
Major Contributor
Joined: Apr 2006
Posts: 534 |
Carbs:
If your 8007 is jetted stock, its about 1 number leaner than mine, but that is REALLY fine tuning and likely not whats causing the bog or backfires.
The accel squirter should squirt in though even when you just bump the throttle - right away. If it doesn't, the lever is set wrong or somethings not right.
Also make sure the float levels are right up there, gas should dribble out if you just bump the car.
And for sure try the mix screws richer, see if that solves it.
I was able to just "stomp" on my 390 Holley right at the line with either the 250cid or 292cid, no hesitation at all, the 390 Holley is really great for that.
Last edited by DeuceCoupe; 06/16/15 09:07 AM.
|
|
|
|
|
Joined: Aug 2014
Posts: 821
Major Contributor
|
|
Major Contributor
Joined: Aug 2014
Posts: 821 |
I thought I saw a pic somewhere else where you had your PCV hooked into the intake and brake booster into the carb. Reverse that. Don't bother with the closed PCV line between the valve cover and the air filter. Use a filter on the valve cover. The PCV should pull vacuum from the carb to the cover. The filter is to allow air in. If it's going the other way something is wrong (bad PCV valve? Cheap...) Your times are doggedly slow. My 1bbl, stock set up was faster than that. You should be MUCH faster with a 4bbl. Check for vacuum leaks. Start by pinching hoses with the car running. If you notice a difference in RPM you found your leak. There are 3 vacuum connections on the carb. The big one goes to the PCV valve. The top one goes to the vac advance. The bottom one goes to the trans (if needed. If not needed plug it). Is the intake manifold sealing properly? Spray carb cleaner at the mating surfaces to find out. Hesitation: Adjust your accelerator pump cam. It should be set so when the throttle is wide open the arm is almost fully compressing the plunger. Is your electric choke working properly? Staying connected? Check float level. Somethings I had that screwed with me: 1) The vac line to the trans was bad at the trans. There's a hard line that runs down to the top of the output shaft on the powerglide and ends with a short rubber hose and into the trans. That hose was toast. 2) The accellerator pump BB is held in place with a brass bar. That bar fell out and the BB was rolling around in the rubber plunger. I found that one with pure luck. Put it back in, used a punch to stamp the ends of the bar to secure it and put it all back together. Magic happened. 3) Secondary spring: Put in the second to the lightest one. That'll open the secondaries a bit sooner and help that time. They don't tend to open very soon with the 250's. Not enough air flowing through to draw it open. 4) Had a bad float. Well the float was OK but the back arm was broken. Couldn't find it until I removed the float and found this:  My set up: Offy intake, Holley 390, Langdon headers, 2.5" single exhaust, HEI. Initial timing at 12, 30+ all in (don't recall) Primary jets: 54 Squirter: 28 Secondary spring: Second to the lightest Pics if it'll help:  (I've changed stuff since then but this'll get you in the right direction) Duece said you don't need HEI yet but I beg to differ. If your distributor is worn you might as well do it. http://www.ebay.com/itm/CHEVY-INLINE-6-C...fb5&vxp=mtr$60. Cheap and works well. The vac advance is adjustable with this one. You use an allen wrench in the vac line hole in the canister and you can change it. I played with mine to get it right. Don't recall the settings. Regardless going this route made a HUGE difference in how mine idles. Smoothed it out a lot. After all that I also had to go to mid grade gas to keep from pinging.
Last edited by gbauer; 06/16/15 10:37 AM.
|
|
|
|
|
Joined: Apr 2006
Posts: 534
Major Contributor
|
|
Major Contributor
Joined: Apr 2006
Posts: 534 |
I thought I saw a pic somewhere else where you had your PCV hooked into the intake and brake booster into the carb. Reverse that.
Your times are doggedly slow. My 1bbl, stock set up was faster than that. You should be MUCH faster with a 4bbl.
gbauer, Per the above, did you maybe stopwatch or GTECH your Camaro at some point? (Stock and as now with 4bbl, Langdons)? Recall last fall I had predicted what it would do with the Gonkulator: https://www.inliners.org/ubbthreads/ubbthreads.php?ubb=showflat&Number=81951&page=allBut, I don't have any actual times in my database so wondered if I missed any actual testing you did (always interesting to compare to the predictions!) My 0-60mph predictions for your car were 11.9 sec 153hp, bone stock 10.4 sec 174hp, 4bbl & Langdons
|
|
|
|
0 members (),
378
guests, and
43
robots. |
|
Key:
Admin,
Global Mod,
Mod
|
|
|
|