logo
12 Port News - Features
12 Port History
Casting Numbers
Online Store
Tech Tips
Become a Member
Previous Thread
Next Thread
Print Thread
Rate Thread
#89750 05/17/16 08:07 PM
Joined: Nov 2012
Posts: 98
J
Active BB Member
OP Offline
Active BB Member
J
Joined: Nov 2012
Posts: 98
As I wait for CSU to finish my carb blow thru mod, I look back to what I thought was an easy choice a couple years ago..... The timing and ignition piece.

- MSD6BTM, Blaster Coil and HEI distributor

Now after looking at all the other builds, I see everything from locking out the timing, to mod vacuum cans....knock sensors...... I don't know which way to go. I know it will be $1000 to go the BTM, HEI, and Blaster coil route. But do I NEED all that (spend all that cash)

I decided to install the intercooler, so that is done. I never planned to go above 8psi, just a little more kick. Do I really need to pull timing?

I'm open to suggestions......thanks in advance.


cool


'71 Chevy Shortbox 250ci
'99 Jeep TJ 242ci
Inliner #5787
Joined: Sep 2008
Posts: 3,669
Likes: 42
1000 Post Club
****
Offline
1000 Post Club
****
Joined: Sep 2008
Posts: 3,669
Likes: 42
Yes, you absolutely need to pull timing out! The best method is to use an MSD Timing Retard Module. I have used many of these back in my 5.0 Mustang Outlaw Street Car racing days with both nitrous and supercharged engine builds. There is really nothing better for the money.


Class III CNC Machinist/Programmer
Joined: Dec 2010
Posts: 535
T
Major Contributor
Offline
Major Contributor
T
Joined: Dec 2010
Posts: 535
$365 for an assembled megasquirt 1 that will do full timing control with what ever distributor and ignition coil you already have and a few other things. Like datalogging boost, AFR, intake air temp(s) etc. Will also do standard and 2-step rev limiting if you like. I've known multiple people that have used MS just to control timing, leaving the carb in place.

The MS1 panel, the MS2&3 offer A LOT more, but it only matters if you plan on using the other options. But here are the basics for spark, rev limiter, 2-step launch control (set hard cut for spark instead of fuel), and over boost protection.


Here is a generic spark map, everything over 100 kPa is in boost. The ign advance goes from 26º down to 19º as boost goes up.

Last edited by TheSilverBuick; 05/18/16 01:33 PM.
Joined: Nov 2012
Posts: 98
J
Active BB Member
OP Offline
Active BB Member
J
Joined: Nov 2012
Posts: 98
I like the sound of that, tell me more.

************

Okay I went to the website. Wow there are alot of different versions of this setup.

Last edited by JStewart; 05/20/16 01:17 PM. Reason: found out more

'71 Chevy Shortbox 250ci
'99 Jeep TJ 242ci
Inliner #5787
Joined: Aug 2010
Posts: 170
Contributor
***
Offline
Contributor
***
Joined: Aug 2010
Posts: 170
I've been researching this as well, and have compiled this info. I'd like to know if anyone has any other thoughts on these methods for ignition/boost retard? Also, is there any cheaper/alternative devices that accomplish this?

MSD-6 Boost Timing Master - $450
HEI Distributor - $60+
Blaster Coil (optional) - $50

Well known device designed specifically for ignition and timing control. Very User friendly but not as powerful as a Megasquirt system. Can be used with aftermarket coils but they're known to fail so Blaster coil is recommended. Will not work with points distributor (without more $).

or

--Un/Assembled Megasquirt1 v2.2PCB - $169/$269 (bottom dollar option)
--Un/Assembled Megasquirt2 v3 - $279/$435 (cheapest future-proof option)
Stimulator - $59
Intake Air Sensor + bung (for boost reference) - $31.25
Tuning Cable - $5.50
USB Adapter (only if laptop doesn't have serial port) - $22.50
Wiring harness (optional) - $67

Cheaper cost results in user having to assemble unit and have ability to use laptop and follow/understand more complicated instructions. Has fuel control features making it a standalone engine management system. Can be used to monitor wideband, exhaust temp and knock (extra $). Several internal combinations available (MS1/2/3 and PCB v2.2/3/3.57) which will increase feature set and/or processing power. Works with any distributor.

or

J&S Safeguard Universal Ver - $595
Knock Sensor (optional) - $50

Knock based timing control sensor capable of reading boost and retarding individual cylinders in real time. Probably the best knock-based device but is limited in other features provided by MSD/MS. Can do timig retard without knock sensor but device is limited without it. Works with any distributor.

or

Specific 5 Pin GM HEI Module +
Pressure sensor and various parts - $100
(Instructions here)

Assuming you have or can find the correct module and don't mind a full DIY approach, this is the cheapest way to solve boost timing retard. Does not provide any other benefits offered by above units.


67' Camaro - Performance 250 build - www.TurboCamaro.ca
Joined: Dec 2010
Posts: 535
T
Major Contributor
Offline
Major Contributor
T
Joined: Dec 2010
Posts: 535
Originally Posted By: TurboCamaro

--Un/Assembled Megasquirt1 v2.2PCB - $169/$269 (bottom dollar option)
--Un/Assembled Megasquirt2 v3 - $279/$435 (cheapest future-proof option)
Stimulator - $59
Intake Air Sensor + bung (for boost reference) - $31.25
Tuning Cable - $5.50
USB Adapter (only if laptop doesn't have serial port) - $22.50
Wiring harness (optional) - $67

Cheaper cost results in user having to assemble unit and have ability to use laptop and follow/understand more complicated instructions. Has fuel control features making it a standalone engine management system. Can be used to monitor wideband, exhaust temp and knock (extra $). Several internal combinations available (MS1/2/3 and PCB v2.2/3/3.57) which will increase feature set and/or processing power. Works with any distributor.


To speak to this one a bit more, if you purchase an assembled MS, you do not need to purchase the Stimulator. If you are looking to possibly more in the future, start with a 3.0 or 3.57 board. You can still use an MS1 chip in it for a bit of cost savings now, but the 3.0/3.57 boards are upgradable with just a processor and one jumper wire change to MS2 and MS3. My Skylark started as a MS2, and I just bought the MS3 chip, expander card and the larger ECU case to upgrade. I'm now going to use my "old" MS2 chip with a old 3.0 board to control a 4L60e when I get around to installing it in the Firebird.

Joined: Nov 2012
Posts: 98
J
Active BB Member
OP Offline
Active BB Member
J
Joined: Nov 2012
Posts: 98
Thanks for all the info. I think I am safest with the BTM, HEI and Blaster coil.


'71 Chevy Shortbox 250ci
'99 Jeep TJ 242ci
Inliner #5787
Joined: Nov 2012
Posts: 98
J
Active BB Member
OP Offline
Active BB Member
J
Joined: Nov 2012
Posts: 98
If you are looking for a new HEI distributor, go check out Skip Whites

http://www.skipwhiteperformance.com/detail.aspx?Item=6523-BK

I just ordered one! They are having a pricing war with a competitor. I got a new HEI and a set of wires shipped for $100


'71 Chevy Shortbox 250ci
'99 Jeep TJ 242ci
Inliner #5787
Joined: Nov 2004
Posts: 1,805
Likes: 1
E
1000 Post Club
*****
Offline
1000 Post Club
*****
E
Joined: Nov 2004
Posts: 1,805
Likes: 1
Originally Posted By: JStewart
Thanks for all the info. I think I am safest with the BTM, HEI and Blaster coil.


Boost is addictive.. for the money I'd suggest that you go the MS route.

Its possible to use the MS to run a water/methanol system that is proportional to boost. The parts to build the water/methanol system can be sourced at the wreckers.

Yes you have to learn something new - but there a 1000's of MS users now and good chance there is someone nearby to help you get going.

You can still use that new HEI dist. with the MS. I did for years.

Last edited by efi-diy; 06/03/16 10:24 PM.

51 GMC 4.2 turbo
Can't solved today's problems using the same technology/thinking that created them
Joined: Nov 2012
Posts: 98
J
Active BB Member
OP Offline
Active BB Member
J
Joined: Nov 2012
Posts: 98
I got this back from diy autotune when I sent in my inquiry:

For your project I am going to recommend the MS2 v3.0 assembled unit.
This unit will allow for direct coil control on a single coil distributor setup and basic trigger setup.

https://www.diyautotune.com/product/megasquirt-ii-engine-management-system-w-pcb3-assembled-unit/

For your installation I am also going to recommend the MS-Relay board which is perfect for carb installations where no factory relays are available.
$99.00 MSRelay-C: Assembled relay board
$85.00 MSRelayCable: Megasquirt to relay board cable
$46.00 LG-Wirebund: 10' wire bundle for relay board to engine
$17.75 CLTIATwPiggy: Coolant temperature sensor
$22.25 IATwPiggy: Intake Air Temperature Sensor
$9.00 38NPT-Bung_A: Aluminum bung for IAT sensor (Also available in stainless steel)
$5.50 TuneCable: 6' DB9 tuning cable
$22.50 USB-2920: (Only needed if your laptop doesn’t have a true DB9 port)

This option is roughly $820. The BTM is $450 and I wouldnt need to buy the MSD coil.....the HEI I just got has the coil in the cap.

Back to MS....it does seem like a pretty solid controller that can do MANY MANY different things...... Depending on how much of that other stuff I really need, it would help me make my final decision. It's $435 for the assembled unit.... I looked at the BYO version of the MS2 and know I am not at that level to bet the cost of the unit on my assembly skills............

Maybe someone has upgraded and wants to sell an old unit? I don't know how common that may be.....

I just want to pull timing where I need to. MS could do it with a knock sensor. I could use a water/methanol injection system as a countermeasure, but want to also have a method to pull out the timing when knock was detected. If I pull it out preset with a BTM, I still would only be applying a countermeasure. Id rather run it advanced until it's pulled back by a management device just like id rather have a better budget! Haaahahahahaaa! I need a second job.

I got this from FedEx this morning. Pretty impressive side by side.


'71 Chevy Shortbox 250ci
'99 Jeep TJ 242ci
Inliner #5787
Joined: Nov 2004
Posts: 1,805
Likes: 1
E
1000 Post Club
*****
Offline
1000 Post Club
*****
E
Joined: Nov 2004
Posts: 1,805
Likes: 1
$99.00 MSRelay-C: Assembled relay board
$85.00 MSRelayCable: Megasquirt to relay board cable

Not needed - it will take an extra 4 hours to do the wiring without the relay board.

The main reason for the relay board is it has the fuel pump relay and terminal strips - makes wiring a bit easier.

For your application - you can wire direct from the MS3.0 board. You will need a good pair of uninsulated terminal crimpers though.


Last edited by efi-diy; 06/05/16 09:47 PM.

51 GMC 4.2 turbo
Can't solved today's problems using the same technology/thinking that created them
Joined: Nov 2004
Posts: 1,805
Likes: 1
E
1000 Post Club
*****
Offline
1000 Post Club
*****
E
Joined: Nov 2004
Posts: 1,805
Likes: 1
Also if you wanted to try TBI EFI later - MS can do that.

Add a wideband O2 sensor (AEM smile ) and you now have a full engine data logger...

Last edited by efi-diy; 06/05/16 09:51 PM.

51 GMC 4.2 turbo
Can't solved today's problems using the same technology/thinking that created them
Joined: Nov 2012
Posts: 98
J
Active BB Member
OP Offline
Active BB Member
J
Joined: Nov 2012
Posts: 98
Funny you say that, I have an AEM uego. So I dont need the relay board and cable. Also I think I wouldnt need the 10' wire bundle for the relay board to engine. How would that cause me to have an extra 4 hours of wiring?

BTW, you are drawing me closer into this MS......


'71 Chevy Shortbox 250ci
'99 Jeep TJ 242ci
Inliner #5787
Joined: Dec 2010
Posts: 535
T
Major Contributor
Offline
Major Contributor
T
Joined: Dec 2010
Posts: 535
You are replacing this:
$99.00 MSRelay-C: Assembled relay board
$85.00 MSRelayCable: Megasquirt to relay board cable
$46.00 LG-Wirebund: 10' wire bundle for relay board to engine

With this:
$79 harness. https://www.diyautotune.com/product/10-39-megasquirt-wiring-harness-ms1-ms2-ms3-ready/

If you are willing to junkyard it some, the sensors and pigtails are easy easy to find off any GM vehicle. The only one you really should consider is the intake air temperature sensor so it can pull timing if intake air temps start climbing as well. For spark only, you really don't need a coolant temp sensor (nor a TPS sensor). Again, it'll control timing and provide datalogging of your boost, rpm, O2 sensor (if you have one?) and if you ever decide to go TBI or such it'll run that too. Spending your money, getting an assembled 3.0 or 3.57 board, MS1, would be the way I'd go. You can always upgrade the processor on it to a MS2 or MS3 down the road if you get the bug.

Joined: Nov 2012
Posts: 98
J
Active BB Member
OP Offline
Active BB Member
J
Joined: Nov 2012
Posts: 98
I'm good with junkyard diving. It's been too long. Since I am MS ignorant, please explain how exactly how MS will manage spark for me.


'71 Chevy Shortbox 250ci
'99 Jeep TJ 242ci
Inliner #5787
Joined: Dec 2010
Posts: 535
T
Major Contributor
Offline
Major Contributor
T
Joined: Dec 2010
Posts: 535
The DIYautotune wires come nicely labeled with pin number and function (as well as being color coded).

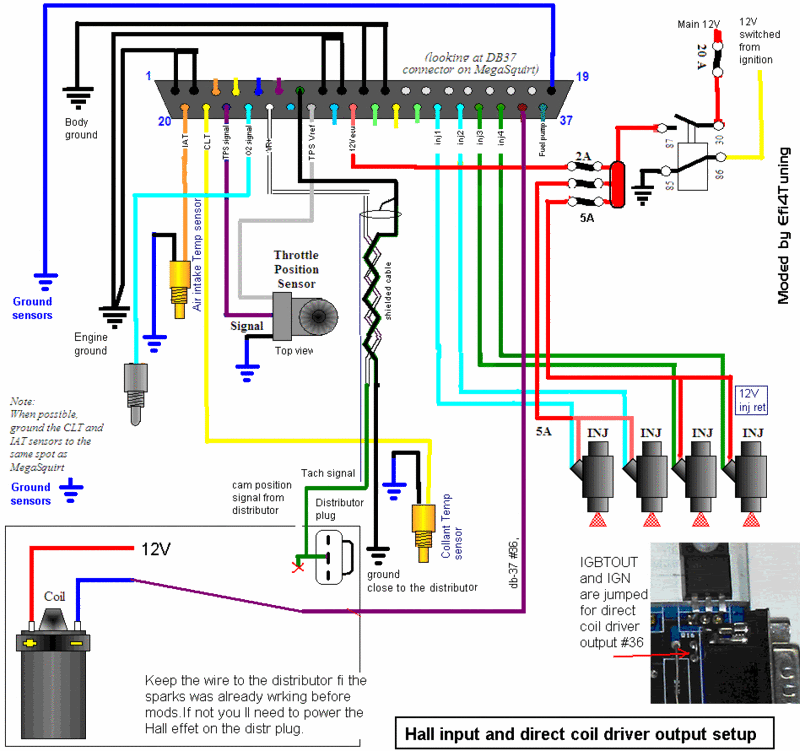
Basically switched (fused) power to pin 28, ground most the grounds straight to the battery (1,2,8-11).

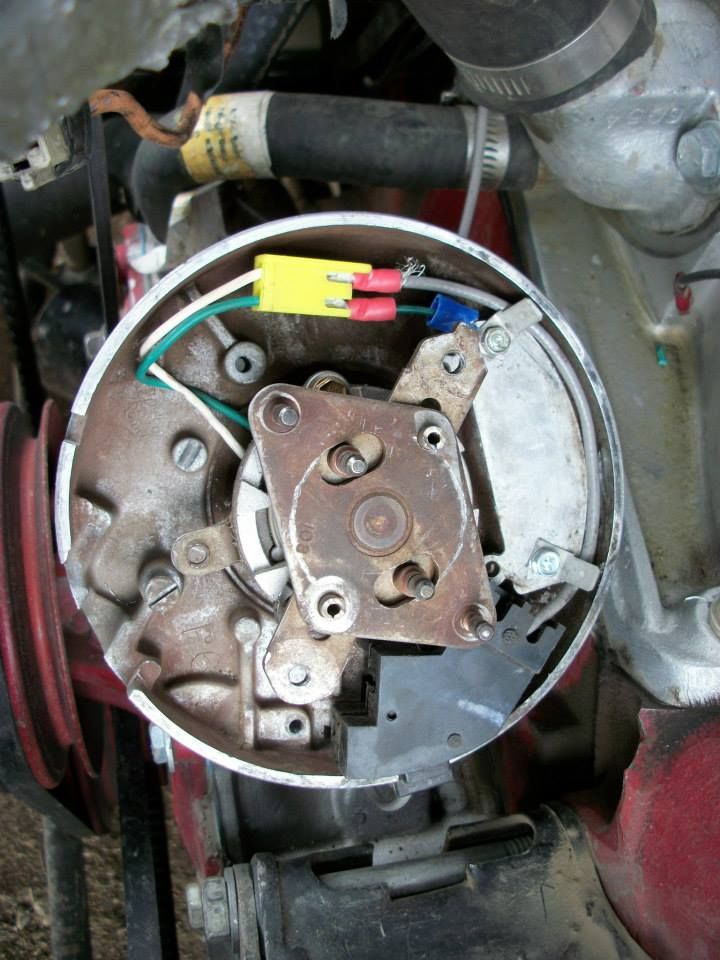
Tach In wire, Pin 24, will go to your HEI pickup coil like in my photo below. I grounded the signal locally in the distributor, which is also how the diagram shows it. If that causes issues then change the ground to one of the wires going to the battery (just move the wire).

To control spark, you will still need +12v connected to the "+" of the HEI cap. Probably link this to the fuel pump relay(or relay controlled by the Fuel Pump output, Pin 37, so it only has +12v while the engine shows rpm. It will save you from burning up your coil down the road from having the key on, engine off. The ground side will need to be connected to Pin 36, this is the wire the controls the timing. Again, these wires are labeled right on the wire as such in the harness (Pin#, and Function).

You will need to lock the HEI's mechanical advance in place. Easiest way to do this is either ziptie or wire tie the advance mechanism by the posts that have springs so they cannot move. Then simply leave the vacuum advance disconnected.

Then set the megasquirt settings to the number of cylinders, and set your coil dwell (I'd have to look it up for HEI single coils, probably ~3.0ms). Then open the timing table and set the whole table to like 15º to start. Your engine should start at this point. From here it's tuning. Set your rpm and manifold pressure bins to what you think the engine will run to. Aka, you don't need the rpm side to go to 8,000 rpm unless you plan on running it that high. 500 to 6500 is probably appropriate. Kpa wise, you need to see how much vacuum the engine is pulling, but likely 25kPa to 200kPa (~15psi boost). You can tighten up these numbers as part of the tuning process later. You'll realize it's really easy after you make a few changes.

Coolant and Temp sensors are wired in the same way, one side goes to the appropriate Pin (20,21), the harness is labeled for each sensor, and the other wire for those sensors go to a common "sensor" ground, which is Pin #19. Only ground sensors to Pin 19.

O2 sensors are easy, if using say a common LC-1 or LC-2, it has two outputs, one output wire goes to Pin 23. The other can be used on an external gauge or left disconnected. I've not used any other brand O2 sensor, but all should have an ECU out wire.


This is a very generic wiring diagram. The DIYautotune harness uses most these colors, but you can go by the pin number as well.

This is how I ran the HEI in my Skylark from 2009 to 2011 (then I went to a crank trigger and ran this way as a cam sensor). It's the 7-pin small plug pickup coil, but the 4-pin pickup coil works the same, just a bigger plug. The grey wire (from DIYautotune) goes to Pin 24, and the other side I simply grounded there. It's generally not very picky which wire connects to which since it's reading a wave, but if you seem to have trigger issues, simply swap the two wires and start it back up and see if the issues go away. I drilled and roll pinned my mechanical advance, I don't recommend that, simply tie those posts together some how.

Moderated by  stock49, Twisted6, will6er 

Link Copied to Clipboard
Who's Online Now
0 members (), 295 guests, and 49 robots.
Key: Admin, Global Mod, Mod
Newest Members
trustedmedications20, Jsmay101, Paul Mahony, KeithB, Steve83
6,783 Registered Users
Sponsored Advertisement
This Space is Available
Powered by UBB.threads™ PHP Forum Software 7.7.5