Greetings . . .
I have been working heads down trying to get my car on the road this month . . . but I keep running into issues that seem hell bent on keeping me in the garage . . . ugh!
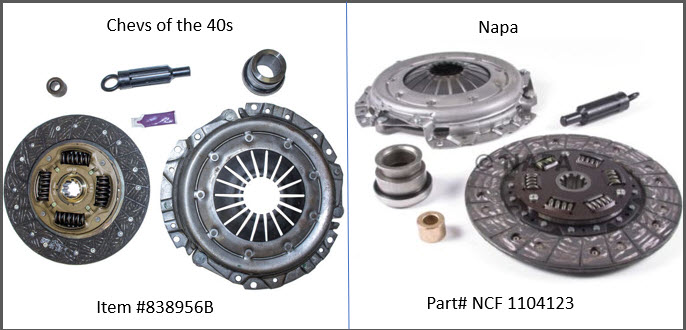
One such bugaboo was the clutch throw-out. When I installed the engine and trans I fitted a brand new clutch kit from NAPA. The kit included the pressure plate, throw-out bearing and clutch disk. I visually compared the new parts to the old ones and forged ahead. I set up the free-play in the clutch pedal to shop manual specs and called it done . . . There is so much travel in this design it seemed (at the time) that the adjustments would just fine tune how close to the floor actual throw-out would occur I figured I would deal with it later . . .
Well this month when I put the car back down on its wheels for a test drive I was surprised to find that the clutch didnt release AT ALL. I crawled underneath and played with the linkage eventually running the adjustment nuts all-way-out till there were no more threads! The result was just enough throw-out (at max pedal travel) to change gears on a COLD fly-wheel . . . with no clearance whatsoever between the clutch fingers and the throw-out bearing. The TOB was preloaded and spinning all the time. WTF?
Some internet searches lead to several threads discussing this very same issue. Some were the result of mixing and matching NOS parts. Others the result of using the wrong TOB:

apparently the short ones made the scene in 55 with the v8s . . .
But I'm not mixing and matching parts I am working with a complete kit from a reputable source. More internet searches revealed that I am not the first to encounter this issue. Some of the older posts talked about shimming the stud-ball that the throw-out fork rides on but theres no way that would have cured things on my car. Another post suggested that the offset rod from a Truck was longer and could be used to take up the slack.
Eventually I came across this post:
Chevy Talk: More Clutch Adjustment One guy extended the threads on the offset rod with an all threads union and cut-off section from a ½-20 bolt another guy shortened the link that attaches the clutch pedal to the offset rod.
Replacement truck parts can still be purchased from Chevs of the 40s so I ordered a set to compare/contrast . . . and to formulate a plan:
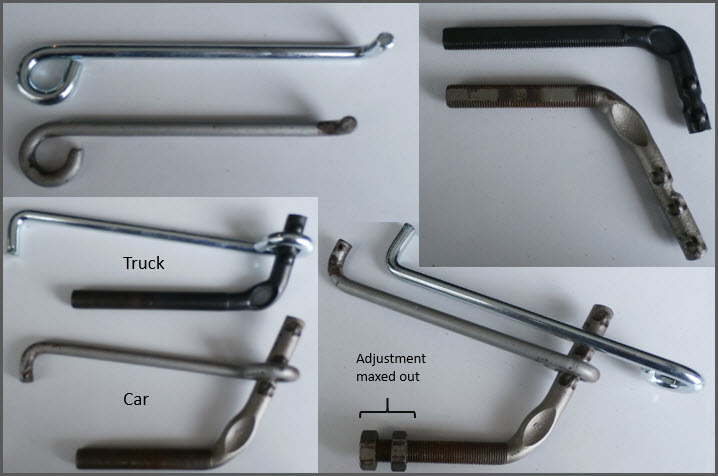
The truck pedals sit further back (north-south) but closer to the bell house (east-west) then in the car layout. The result is a longer link and shorter footed offset rod with a near right angle. The truck offset rod can be forced into the car (using the cars shorter link). The result is a binding fit with heavy free play and an even heavier throw-out feel. Moreover, there was no clutch holding relief zone the clutch pedal felt heavy throughout the entire travel.
So I went to work on fabricating a shorter clutch link using the new repair part from Chevs of the 40s. The guy in the chevytalk post went really short on the link not sure why. When I looked at the original parts installed with maxed out adjustment it seemed that I needed just 1 inch:
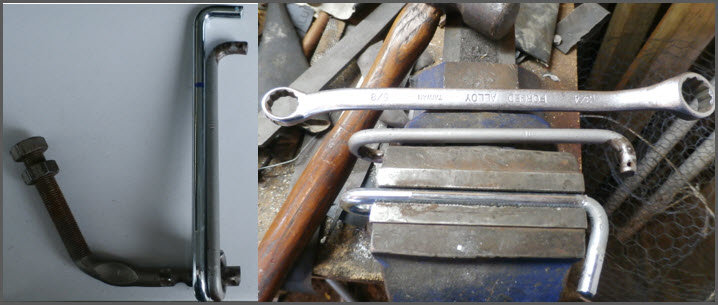
I heated the link with a propane torch and started the bend with a long box wrench. By clamping the link in a vice well beyond the ultimate bend point I was able to extend the angle past 90 degrees finishing it with a hammer:

With a 1 shorter link the clutch is now setup with factory spec free-play in the pedal with enough travel to fully release the clutch disk from both the flywheel and the pressure plate well before max travel.
Leading to the question: Why was this necessary?
1) Thinner clutch disk then original
2) More compact pressure plate/spring package
3) Different angle of attack in the clutch throw out fingers.
4) Combination of the above.
Regards,
Stock49