|
|
Joined: Dec 2014
Posts: 335
Contributor
|
OP

Contributor
Joined: Dec 2014
Posts: 335 |
Hi, I've got Tom Lowe's most excellent aluminum valve cover on my Chevy 250. I had the engine builder install it. Seems he was light on the torque and it looks to have leaked. I tightened it up but don't have ability to do proper torque at this time. Need a new tool since it's an allen wrench style. I suspect it's still leaking, I'll find out definitively tomorrow.
Napa's got a cork and a rubber gasket. What's your preference? I'd prefer not to goop it all up with silicon. It's got a cork gasket on it now. What torque do you use?
I also bought some dye and a UV flashlight from Napa. Will put that in to really check it out and ensure there's no other leaks. Experience with that?
Thanks!
Mark
'67 Camaro L6-250
|
|
|
|
|
Joined: Aug 2014
Posts: 821
Major Contributor
|
|
Major Contributor
Joined: Aug 2014
Posts: 821 |
I don't use cork. I couldn't get them to seal and once you use them they're done. The rubber type is good for 3-4 installations.
Just use a little RTV. Don't need to slather it on. Just enough to hold it in place, particularly on the engine side.
I put a skim of it on the valve cover, a skim on the head, put the gasket on the valve cover, put the valve cover on the head, put the bolts in until they just barely start to thread, let it sit overnight, then torque down to about what I would guess to be 10 ft-lbs or so. Heat cycle it and go back to 10 ft-lbs.
Any more than that and you'll break the gasket. It doesn't need to be real tight to seal properly but I doubt you'll ever get a good seal without RTV.
|
|
|
|
|
Joined: Sep 2008
Posts: 3,669 Likes: 42
1000 Post Club
|
|
1000 Post Club
Joined: Sep 2008
Posts: 3,669 Likes: 42 |
The problem more times than not is the gasket surface on the head itself. It isn't flat and straight like many assume and is, if you lay a straight edge on it length-wise, you will see it is arched most of the time making it difficult for a gasket to seal. And this is the cause of most valve cover leakage on these heads. This isn't too much of a big deal for a sheetmetal valve cover that can bend and flex some unless they get to warped and distorted, but for a more rigid valve cover that can't conform to the arch of the gasket surface as easily it is.
Class III CNC Machinist/Programmer
|
|
|
|
|
Joined: Apr 2004
Posts: 3,556 Likes: 35
1000 Post Club
|
|
1000 Post Club
Joined: Apr 2004
Posts: 3,556 Likes: 35 |
One other thing to check. I supply the VC with 7/8" long bolts. I have found on some heads that the bolts will bottom out in the hole before tightening the VC down. If that is the case, get some 3/4" length bolts.
Scott is correct, the gasket sealing area on many of these heads is as cast and not machined flat. On the worst heads, 2 gaskets will allow them to seal.
Inliner Member 1716 65 Chevelle Wagon and 41 Hudson Pickup Information and parts www.12bolt.com
|
|
|
|
|
Joined: Aug 2014
Posts: 821
Major Contributor
|
|
Major Contributor
Joined: Aug 2014
Posts: 821 |
|
|
|
|
|
Joined: Sep 2008
Posts: 3,669 Likes: 42
1000 Post Club
|
|
1000 Post Club
Joined: Sep 2008
Posts: 3,669 Likes: 42 |
I like the RTV on the valve cover side of the gasket. I use thick grease on the head side in case I need to remove the cover a few times so it won't stick to the head and tear. Once i'm ready for a more permanent seal i'll use a clear silicone sealer. Others may have a good recipe themselves that work good also. Of course, you don't want to crank down on Tom's valve cover too tightly or it could crack it. So take caution once you start tightening the bolts so that its just snug and not unevenly tightened. Tom may have further advice on installing his valve cover and sealers he uses.
Class III CNC Machinist/Programmer
|
|
|
|
|
Joined: Apr 2004
Posts: 3,556 Likes: 35
1000 Post Club
|
|
1000 Post Club
Joined: Apr 2004
Posts: 3,556 Likes: 35 |
I don't use anything on a VC gasket. If I don't want something to leak. Use ultra black rtv.
Inliner Member 1716 65 Chevelle Wagon and 41 Hudson Pickup Information and parts www.12bolt.com
|
|
|
|
|
Joined: Apr 2003
Posts: 1,537 Likes: 15
1000 Post Club
|

1000 Post Club
Joined: Apr 2003
Posts: 1,537 Likes: 15 |
Hi, I've got Tom Lowe's most excellent aluminum valve cover on my Chevy 250. I had the engine builder install it. Seems he was light on the torque and it looks to have leaked. . . You might also check your crankcase venting - if you are building pressure it can push oil through a weak section that would otherwise hold just fine.
|
|
|
|
|
Joined: Nov 2013
Posts: 482
Contributor
|
|
Contributor
Joined: Nov 2013
Posts: 482 |
I have had the buildup of crankcase pressure cause leaks also. Prefer to use rubber over cork for reuse ability. Jay
|
|
|
|
|
Joined: Dec 2014
Posts: 335
Contributor
|
|
OP
Contributor
Joined: Dec 2014
Posts: 335 |
I fear the problem is not the valve gasket. I'd tightened the valve cover, but it's still leaking. I drove 45 minutes to the header shop today to adjust the exhaust (hit the new cross member). Lots of oil coming out. UP on the lift, you could see some RTV that had come out of the very front of the pan. There was oil drips coming from the front pulley, which would be really hard to get there from the valve cover. After you look at the pictures, what do you think? Easiest way to fix that? raise the engine and drop the pan? Remove the balancer and cover from front? Squeeze a glob of RTV in the seam and hope for the best? Here's the RTV that's come out of the front. 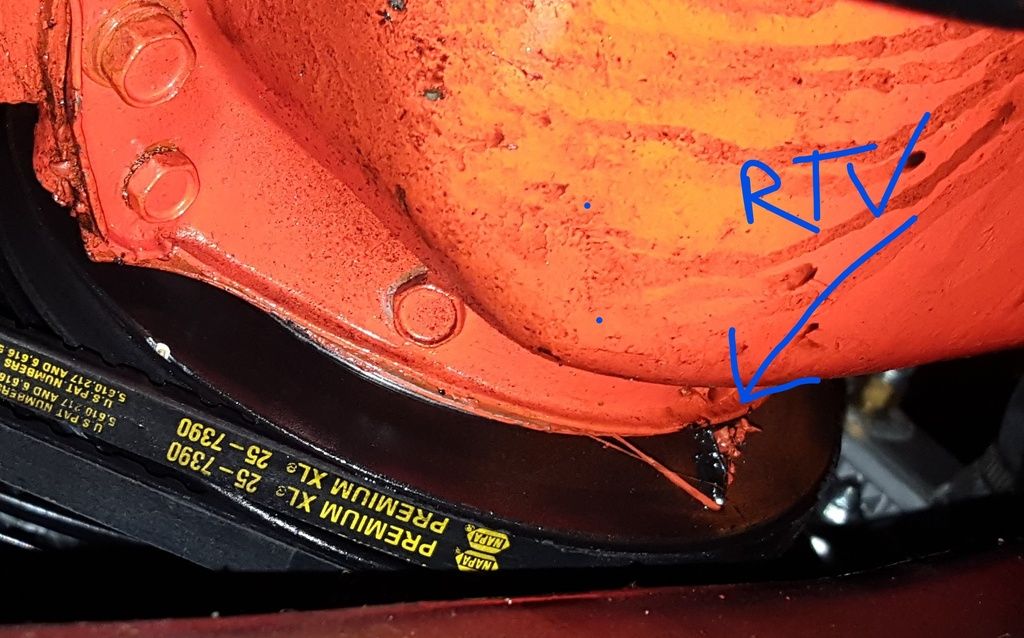 Here's from the front, you can see the line of RTV that was used. 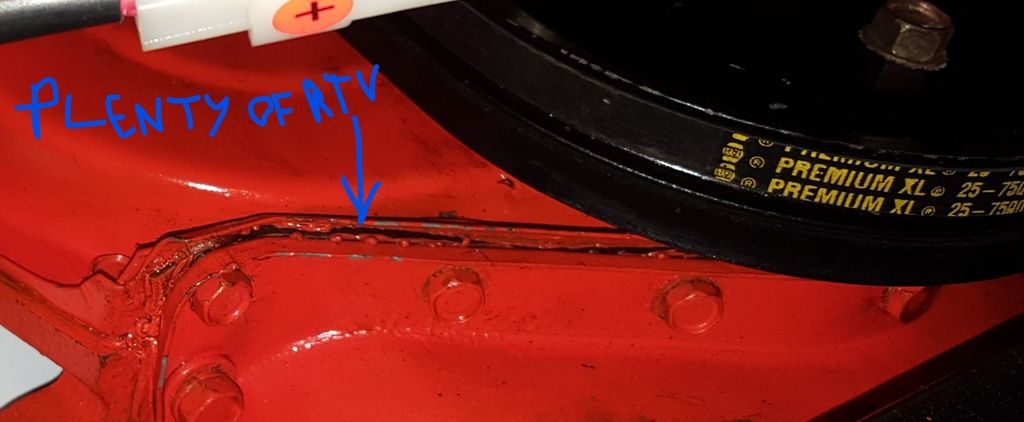 Finally is a quick video of below the car. https://youtu.be/UCBDowaBtrs
Last edited by mshaw230; 12/29/16 02:58 AM.
Mark
'67 Camaro L6-250
|
|
|
|
|
Joined: Apr 2004
Posts: 3,556 Likes: 35
1000 Post Club
|
|
1000 Post Club
Joined: Apr 2004
Posts: 3,556 Likes: 35 |
When putting on the oil pan, the gasket in that area is a flat rubber piece with molded crosshatch. I would first try tightening the bolts in that area. Yours shows the older design with the extra bolts in that flat area. Oil pans are where I use generous (not excessive) amounts of ultra black RTV.
Last edited by tlowe #1716; 12/29/16 04:06 PM.
Inliner Member 1716 65 Chevelle Wagon and 41 Hudson Pickup Information and parts www.12bolt.com
|
|
|
|
|
Joined: Aug 2014
Posts: 821
Major Contributor
|
|
Major Contributor
Joined: Aug 2014
Posts: 821 |
You can't remove the oil pan with the engine in the car. Don't even try it or you'll end up with a LOT more leaks! Been there...
The good news is you CAN remove the timing chain cover with the engine in place. You'll have to remove the harmonic balancer and, I believe, water pump to do it. When you do all that replace the gaskets (even if new) and use RTV.
As Tom said there's a thick rubber seal there that's not part of the side oil pan gaskets.
Last edited by gbauer; 12/29/16 03:12 PM.
|
|
|
|
|
Joined: Apr 2004
Posts: 3,556 Likes: 35
1000 Post Club
|
|
1000 Post Club
Joined: Apr 2004
Posts: 3,556 Likes: 35 |
That flat seal is integrated with the side corks if used correctly. Try tightening the bolts first.
Inliner Member 1716 65 Chevelle Wagon and 41 Hudson Pickup Information and parts www.12bolt.com
|
|
|
|
|
Joined: Dec 2014
Posts: 335
Contributor
|
|
OP
Contributor
Joined: Dec 2014
Posts: 335 |
Easy try to tighten the bolts. I'll then put in the oil dye and if it still leaks, should see just where the oil is coming from. I may clean it all up with brake-clean first.
Thanks for the suggestions. Hopefully I'll finish the engine in less than a year.
Mark
'67 Camaro L6-250
|
|
|
|
|
Joined: Dec 2014
Posts: 335
Contributor
|
|
OP
Contributor
Joined: Dec 2014
Posts: 335 |
Getting tired of this journey just trying to get this stupid engine done. I'm sure I'll try tightening the bolts this weekend. Looks like rain all weekend, which will hamper things a bit. Hey, it's winter in the Pacific Northwest. Rain is what we do best.
If I do have to pull the engine out again, has anybody successfully pulled one without pulling the automatic transmission? A friend did, but he said it was really hard. I really don't want to mess with the transmission again.
Mark
'67 Camaro L6-250
|
|
|
|
|
Joined: Aug 2014
Posts: 821
Major Contributor
|
|
Major Contributor
Joined: Aug 2014
Posts: 821 |
If I do have to pull the engine out again, has anybody successfully pulled one without pulling the automatic transmission? A friend did, but he said it was really hard. I really don't want to mess with the transmission again.
It can be done but it would be very difficult to get back in once done. How would you line up the transmission to the engine? I suppose you could remove the engine mount brackets from the block and try to slide it on.
Last edited by gbauer; 12/30/16 10:09 AM.
|
|
|
|
|
Joined: May 2016
Posts: 468 Likes: 4
Contributor
|
|
Contributor
Joined: May 2016
Posts: 468 Likes: 4 |
Removing the engine without the tranny is simple if it's an automatic!! Remove the radiator and fan as you normally would. Unbolt the motor mounts from the frame, but don't attempt to lift the engine yet. Remove the hood, marking the hinges so you can reinstall it correctly. Disconnect all of your electrical connections and accessory lines. Jack the car up and place it on stands. (I like to raise the entire car level, i.e. jack up the back end too). Remove the dust cover and unbolt the torque converter from the flex plate. Finally, unbolt the transmission from the engine and you can easily remove the engine from the car with the proper hoist, while using a floor jack and a block of wood to support the transmission. After the deed is done, you can use a stand or you can tie the transmission up to the firewall with mechanic's wire if you need to move the car or if you need the floor jack. Reverse the procedure for reinstallation. Be sure to bolt the bell housing back to the engine before attempting to bolt the torque converter back to the flex plate.
For a manual transmission, do it the same way, EXCEPT, unbolt the transmission from the bell housing and then lift the engine slightly and slide it forward 'til the input shaft on the transmission clears the bell housing and then lift it out of the vehicle.
NOTE!! On SOME vehicles it's easier to replace the clutch assy. in this manner.
NOTE!! If you don't have to disturb the clutch assy., don't even remove the bell housing to replace or repair your gasket issues!! If the clutch is undisturbed, it will likely slide right back into place.
NOTE!! You may find it a little easier to reinstall the engine on a manual tranny equipped vehicle by removing the engine mounts and installing them after the transmission is secured to the bell housing.
Never use a minor caliber bullet on a major caliber adversary
|
|
|
|
|
Joined: Aug 2014
Posts: 821
Major Contributor
|
|
Major Contributor
Joined: Aug 2014
Posts: 821 |
All true except it's near impossible to get to all the transmission mounts. I was just messing with mine trying to get the old TV cable out to put a newer, longer one in and couldn't get to the bolt that holds the trans dipstick. Resorted to cutting the old one and putting the new one over the dipstick since I had space to spare now.
|
|
|
|
|
Joined: Dec 2014
Posts: 335
Contributor
|
|
OP
Contributor
Joined: Dec 2014
Posts: 335 |
Heading to the garage to clean off the oil, tighten the front pan bolts. Looked up service manual. 80 in-lb to crankcase, 55 in-lb to front cover. I also looked up removal/installation. The service manual says it can be done without removing the engine. Haha. What's your opinion on this? Abbreviated version...
Removal.
1. disconnect battery
2. remove distributor cap to prevent breaking it.
3. drain radiator, disconnect lower hose, remove oil dip stick and tube
4. remove fan blade.
5. raise vehicle, then drain engine oil.
6. remove through bolts from engine front mounts. Disconnect and remove starter.
7. for auto trans, remove converter housing underpan.
8. disconnect steering rod at idler level then swing steering linkage down for oil pan clearance. This may be a pivitol instruction!
9. rotate crankshaft until timing mark on torsional damper is at 6:00 o'clock position. Also another pivitol instruction, I suspect.
10. using a suitable jack and a block of wood to prevent damaging oil pan, raise engine enough to insert 2"x4" (5-1/2" long) wood blocks under engine mounts then lower engine onto blocks. There's a picture showing the 2x4's on top of the motor mounts with the top resting on the 5.5" 2x4's. Hard to describe.
11. remove oil pan.
Mark
'67 Camaro L6-250
|
|
|
|
|
Joined: Dec 2014
Posts: 335
Contributor
|
|
OP
Contributor
Joined: Dec 2014
Posts: 335 |
Ok, great news. With a worrisome tint. I found that all of the bolts I touched were loose, maybe 1 ft-lb. My torque wrench could only be used on a few. So I practiced with it on other bolts until I got a feel for the right torque. I tightened up all of the front cover bolts and the first three crankcase bolts (can't get to the others). Leak appears to be gone! Before I did that, I cleaned it up and cut off what I thought was a gunk of RTV. It wasn't, it was part of the front gasket. Crap, how could that have happened??? As long as it holds, we're good. A friend has a lift, we'll try to get the remaining bolts tightened there. Worst case, I'd have to lift the engine, but I think that's going to be okay. That "brake clean" stuff may have wanted to take off the paint from the pan. I'll need to do a little painting work now too. 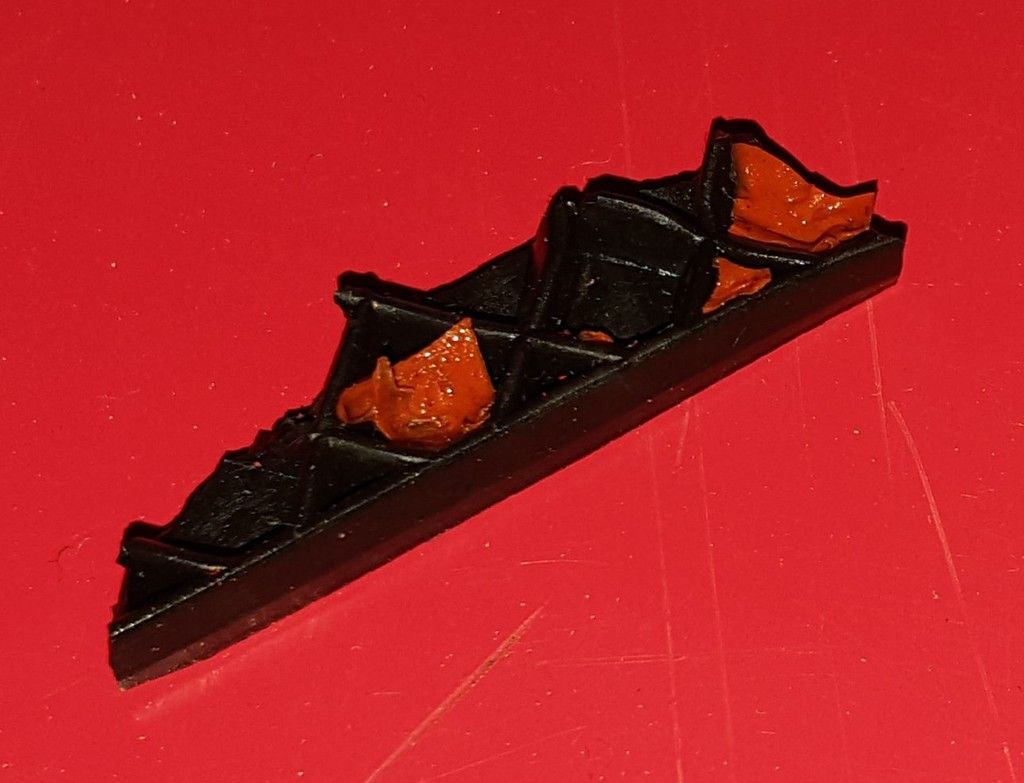 I put in the dye, let the engine run for 20 minutes, then a 10 minute loop with some high RPM runs. I didn't see any leaks, except the below. When I put the filler/PCV cap, I see it's really loose. Bummer that I started wiping it up before taking a better picture. Anybody have experience with the gasket being loose? Thanks for the tips! Tom, that looks to have saved a heap of work. 
Mark
'67 Camaro L6-250
|
|
|
|
|
Joined: May 2016
Posts: 468 Likes: 4
Contributor
|
|
Contributor
Joined: May 2016
Posts: 468 Likes: 4 |
All true except it's near impossible to get to all the transmission mounts. I was just messing with mine trying to get the old TV cable out to put a newer, longer one in and couldn't get to the bolt that holds the trans dipstick. Resorted to cutting the old one and putting the new one over the dipstick since I had space to spare now. This is a stumbling block for many who don't do this all the time. Surprisingly, the solution is odd but simple. I use a long, (30" or longer) extension and an impact style universal socket. Personally, I prefer 3/8" extension and socket, but any will generally work. The bolts all have a 9/16" head, but on occasion you'll find a stud with a 9/16" nut on it when you're dealing with automatic, longitudinal GM transmissions. And yeah!! The one on the dipstick tube is usually a little more difficult. I seldom remove it all of the way. I'll just back it out of the engine block and let it hold the dipstick tube in place!! You'll also find that on the inline 4 and 6 engines, you can often unbolt the bell housing bolts from the top, reaching behind the engine from the top.
Last edited by Blackwater; 12/30/16 09:48 PM.
Never use a minor caliber bullet on a major caliber adversary
|
|
|
|
|
Joined: Aug 2014
Posts: 821
Major Contributor
|
|
Major Contributor
Joined: Aug 2014
Posts: 821 |
8 Ok, great news. With a worrisome tint. I found that all of the bolts I touched were loose, maybe 1 ft-lb. My torque wrench could only be used on a few. So I practiced with it on other bolts until I got a feel for the right torque. I tightened up all of the front cover bolts and the first three crankcase bolts (can't get to the others). Leak appears to be gone! Before I did that, I cleaned it up and cut off what I thought was a gunk of RTV. It wasn't, it was part of the front gasket. Crap, how could that have happened??? As long as it holds, we're good. A friend has a lift, we'll try to get the remaining bolts tightened there. Worst case, I'd have to lift the engine, but I think that's going to be okay. That "brake clean" stuff may have wanted to take off the paint from the pan. I'll need to do a little painting work now too. I put in the dye, let the engine run for 20 minutes, then a 10 minute loop with some high RPM runs. I didn't see any leaks, except the below. When I put the filler/PCV cap, I see it's really loose. Bummer that I started wiping it up before taking a better picture. Anybody have experience with the gasket being loose? Thanks for the tips! Tom, that looks to have saved a heap of work. As dumb as it sounds I've uses electrical tape on my air breather neck to take up some of the slack between it and the valve cover. It's held up for a couple years that way.
|
|
|
|
|
Joined: May 2016
Posts: 468 Likes: 4
Contributor
|
|
Contributor
Joined: May 2016
Posts: 468 Likes: 4 |
Heading to the garage to clean off the oil, tighten the front pan bolts. Looked up service manual. 80 in-lb to crankcase, 55 in-lb to front cover. I also looked up removal/installation. The service manual says it can be done without removing the engine. Haha. What's your opinion on this? Abbreviated version...
Removal.
1. disconnect battery
2. remove distributor cap to prevent breaking it.
3. drain radiator, disconnect lower hose, remove oil dip stick and tube
4. remove fan blade.
5. raise vehicle, then drain engine oil.
6. remove through bolts from engine front mounts. Disconnect and remove starter.
7. for auto trans, remove converter housing underpan.
8. disconnect steering rod at idler level then swing steering linkage down for oil pan clearance. This may be a pivitol instruction!
9. rotate crankshaft until timing mark on torsional damper is at 6:00 o'clock position. Also another pivitol instruction, I suspect.
10. using a suitable jack and a block of wood to prevent damaging oil pan, raise engine enough to insert 2"x4" (5-1/2" long) wood blocks under engine mounts then lower engine onto blocks. There's a picture showing the 2x4's on top of the motor mounts with the top resting on the 5.5" 2x4's. Hard to describe.
11. remove oil pan.
That will likely work well. If you're dealing with an I6 you won't need to remove the distributor cap. I only used that method on inline six trucks. The directions as written are for a V8, which I've done numerous times in cars. Take your time and watch what's happening as you go!! Good luck if you have to do it!!
Never use a minor caliber bullet on a major caliber adversary
|
|
|
|
|
Joined: Dec 2014
Posts: 335
Contributor
|
|
OP
Contributor
Joined: Dec 2014
Posts: 335 |
After my nice drive this weekend, I've confirmed that the biggest part of the leak is gone. But it still is leaking. So I suppose it's time to try replacing the pan gasket. Track rules say you can't be leaking oil, not that I'll get to the dragstrip this year, or ever, but I'd like to try!
Maybe I'll let it leak and wait until winter. At least I'll finish getting heat back in and the new stereo installed first. Sigh.
Thanks for all the help. I think when I do it, I'll try the 2x4 method and time it. Maybe set up one of those time elapse cameras that capture pictures. Haha.
Mark
'67 Camaro L6-250
|
|
|
|
|
Joined: Aug 2014
Posts: 821
Major Contributor
|
|
Major Contributor
Joined: Aug 2014
Posts: 821 |
If it's still that front gasket on the pan leaking you can remove the cam cover and replace it while in the car and not even disconnect the motor mounts. The black rubber gasket is a separate piece. You'll cut off the tabs on the end, use a lot of RTV, and replace it. It's not overly difficult, just time consuming because you'll need to remove the water pump as well to get access on a Camaro.
...did it myself when I did my cam.
Last edited by gbauer; 04/20/17 01:53 PM.
|
|
|
|
|
Joined: Feb 2014
Posts: 505
Major Contributor
|
|
Major Contributor
Joined: Feb 2014
Posts: 505 |
If it's still that front gasket on the pan leaking you can remove the cam cover and replace it while in the car and not even disconnect the motor mounts. The black rubber gasket is a separate piece. You'll cut off the tabs on the end, use a lot of RTV, and replace it. It's not overly difficult, just time consuming because you'll need to remove the water pump as well to get access on a Camaro.
...did it myself when I did my cam. So you can remove the timing cover for a cam swap, but you have to pull or at least raise the engine to do the oil pan then?
|
|
|
|
|
Joined: Aug 2014
Posts: 821
Major Contributor
|
|
Major Contributor
Joined: Aug 2014
Posts: 821 |
[quote=gbauer]
So you can remove the timing cover for a cam swap, but you have to pull or at least raise the engine to do the oil pan then? I had to raise the engine to pull the cam out but to get to the timing gear you don't have to (at least in my Camaro). The pan won't pull out between the cross member and crank no matter how much you lift it. Just not enough room.
|
|
|
|
|
Joined: Feb 2014
Posts: 505
Major Contributor
|
|
Major Contributor
Joined: Feb 2014
Posts: 505 |
[quote=gbauer]
So you can remove the timing cover for a cam swap, but you have to pull or at least raise the engine to do the oil pan then? I had to raise the engine to pull the cam out but to get to the timing gear you don't have to (at least in my Camaro). The pan won't pull out between the cross member and crank no matter how much you lift it. Just not enough room. Raise it to get the timing gear and cam out, or just to get the timing gear off the crank?
|
|
|
|
|
Joined: Aug 2014
Posts: 821
Major Contributor
|
|
Major Contributor
Joined: Aug 2014
Posts: 821 |
Raise it to get the timing gear and cam out, or just to get the timing gear off the crank?
Just to get it out of the car. The gear I managed to pull off the crank without raising as far as I remember. I did, however, have to remove the radiator, fan, and hoses to get me big hands in there. It was a real PITA but it came out eventually. Getting it back on was worse, however. To get the cam out without pulling the engine I raised the engine as high as it would go, removed the grill and radiator, and pulled it right out the front. If you need to change the cam gear you have to pull the cam out as well as it's pressed on. My advice was just for the cover and not the whole thing. If he pulls the cover he can replace that front gasket. He'll also need to remove the crank pulley to do it (and should probably go ahead and get a new seal there too) but it's easier than pulling the entire engine. It's a Saturday job this way rather than 2 weekends.
|
|
|
|
|
Joined: Feb 2014
Posts: 505
Major Contributor
|
|
Major Contributor
Joined: Feb 2014
Posts: 505 |
Raise it to get the timing gear and cam out, or just to get the timing gear off the crank?
Just to get it out of the car. The gear I managed to pull off the crank without raising as far as I remember. I did, however, have to remove the radiator, fan, and hoses to get me big hands in there. It was a real PITA but it came out eventually. Getting it back on was worse, however. To get the cam out without pulling the engine I raised the engine as high as it would go, removed the grill and radiator, and pulled it right out the front. If you need to change the cam gear you have to pull the cam out as well as it's pressed on. My advice was just for the cover and not the whole thing. If he pulls the cover he can replace that front gasket. He'll also need to remove the crank pulley to do it (and should probably go ahead and get a new seal there too) but it's easier than pulling the entire engine. It's a Saturday job this way rather than 2 weekends. Well yeah, obviously the balancer and fan pulley needs to be removed before the cover can come off, the camshaft which is the length of the engine needs the radiator and grille removed so it can go straight out the front. I just wasn't sure why the engine needed to be raised as it seems like the cam gear doesn't appear to have any obstruction right in front of it. 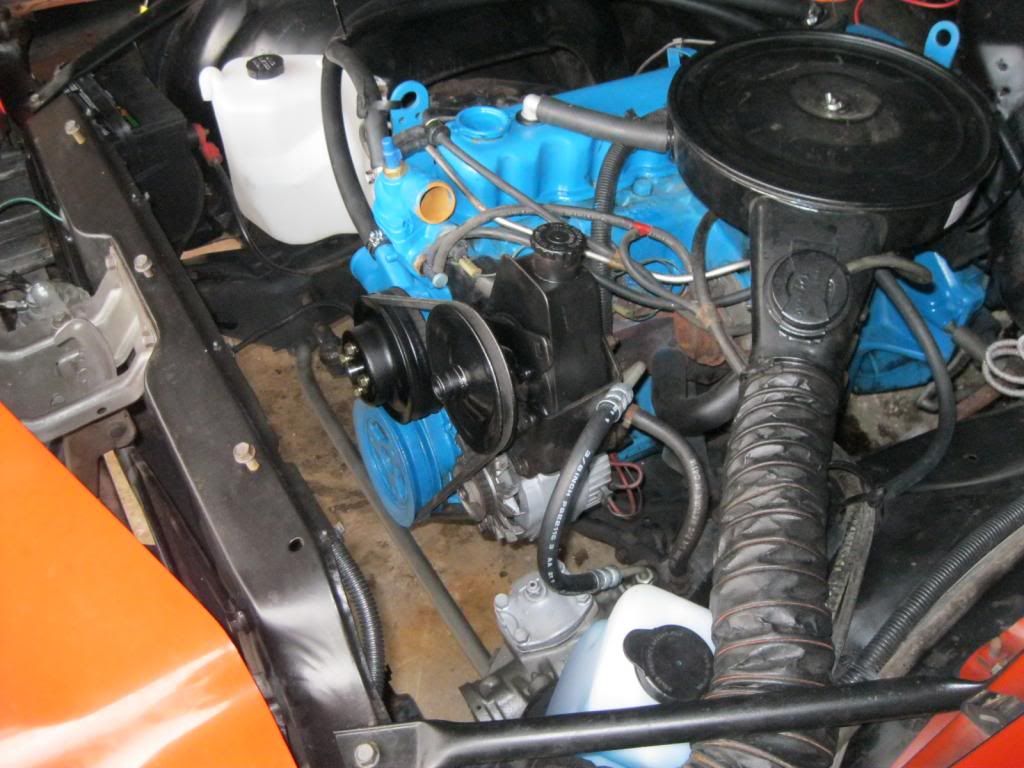 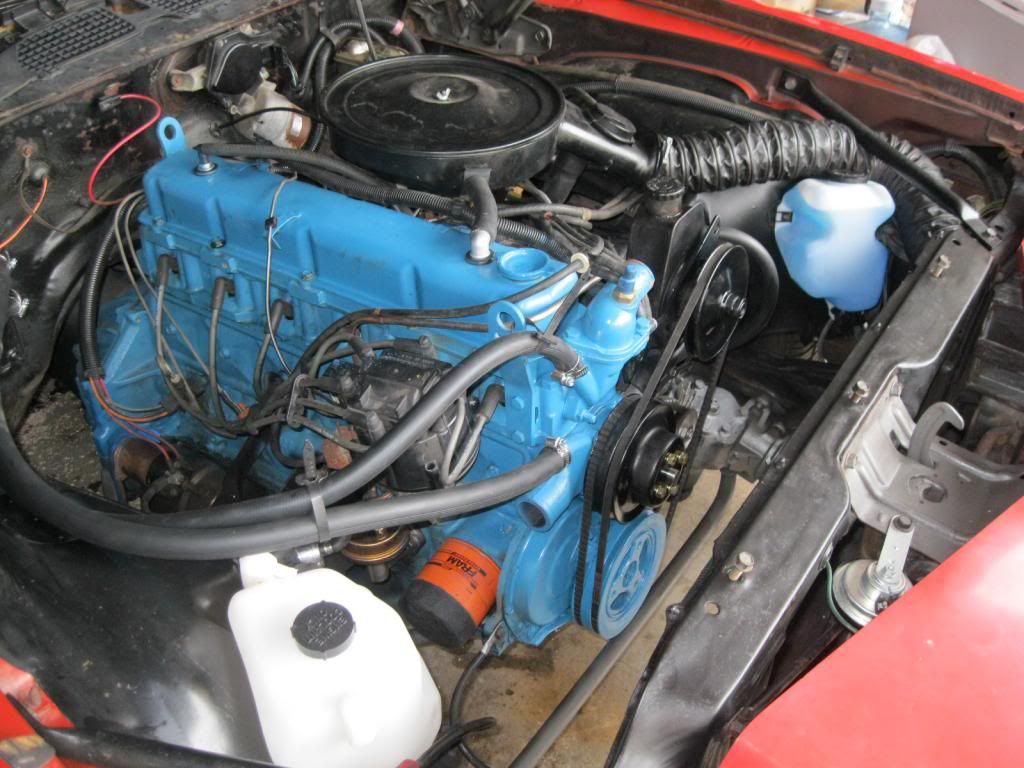 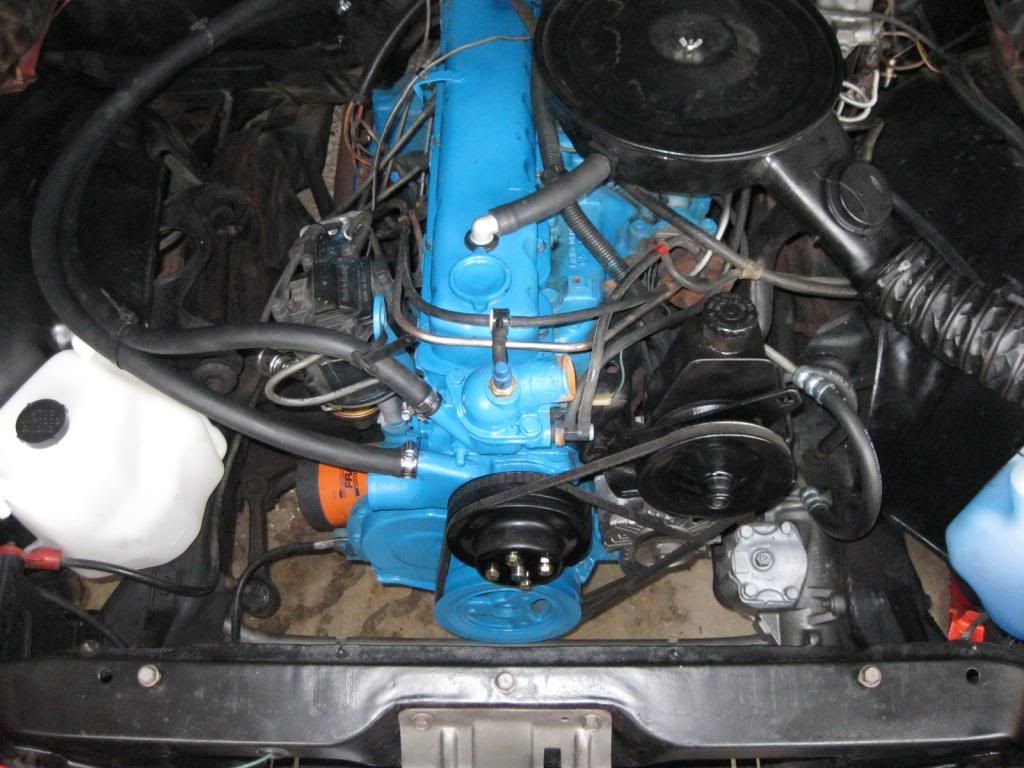
|
|
|
|
|
Joined: Aug 2014
Posts: 821
Major Contributor
|
|
Major Contributor
Joined: Aug 2014
Posts: 821 |
It sat about 2" too far down in my 68. I thought I could pull it without raising the engine until I got in there. It has to be a straight shot.
|
|
|
|
|
Joined: Feb 2014
Posts: 505
Major Contributor
|
|
Major Contributor
Joined: Feb 2014
Posts: 505 |
It sat about 2" too far down in my 68. I thought I could pull it without raising the engine until I got in there. It has to be a straight shot. Hmmmm.....wonder how that works for my '78? I have more room to the bumper point, so I might have the room to get it all the way out. I'll have to take some measurements. How long is the cam and gear?
|
|
|
|
|
Joined: Aug 2014
Posts: 821
Major Contributor
|
|
Major Contributor
Joined: Aug 2014
Posts: 821 |
It was as long as the engine. Pretty darn long!
I don't have it any more so I can't give you a measurement. You won't be able to pull it out without removing stuff in front of it. It's about 3-4'. About 1.5 times as long as a V8 cam.
|
|
|
|
|
Joined: Dec 2014
Posts: 335
Contributor
|
|
OP
Contributor
Joined: Dec 2014
Posts: 335 |
One and a half years later (and a house move and year long remodel in the middle, which is nearly done), I'll be heading to the garage today. I imagine that I take things apart today, put it back together next weekend. Two things to fix on this... 1) my offy intake manifold. my attempt at a "glue" on those little plugs on the bottom didn't work and leaked. I've got a friend who knows how to weld aluminum. Either that or i get a pipe die and put in some plugs. ***What RTV do you use on the intake? I've got black permatex in the garage.*** 2) oil pan gasket. pulling the harmonic balancer and CAM cover is also intimidating, so I plan to replace the entire gasket since it wasn't installed properly in the first place. if i have to pull the entire engine... sigh... I've got better things to do with my time but also wonder if that's the fastest path. A mechanic told me about these nice guides that come with the v8's oil pan gaskets. They're 4x plastic tube with threads to go into the block. Look at the blue things. Of course, they don't provide those with the six. I think i can buy them seperate but with shipping may be easier to buy the gasket kit local. Experience with those? http://www.northernautoparts.com/Images/ProductModelImages/ph_1597.jpgThanks!! Mark
Mark
'67 Camaro L6-250
|
|
|
|
|
Joined: Dec 2014
Posts: 335
Contributor
|
|
OP
Contributor
Joined: Dec 2014
Posts: 335 |
Well, I tried raising the engine according to the manual to get the oil pan out. Calls for cutting a 2x4 5.5" long to put under the motor mounts. My universal 200-4R transmission hits the wall and I can only raise it about 4". Needless to say, the oil pan hits the oil pump and doesn't have room to come out.
Engine pullout is in two weeks.
On another note, a friend tried welding plates on the bottom of my offenhauser intake manifold to seal the plugs for water. Couldn't get it to work. He thinks he doesn't have the right experience with welding this casting. Maybe alloys or impurities make it harder. I'll take it to a shop next weekend, hopefully they can do it. Otherwise I either buy a new intake or just live with no heat. It's hard to see from website pictures, but I don't see water and vacuum taps on 12bolt intake and vacuum on the Clifford intake. I can add a riser and drill in a vacuum trap.
Mark
'67 Camaro L6-250
|
|
|
|
|
Joined: Dec 2014
Posts: 335
Contributor
|
|
OP
Contributor
Joined: Dec 2014
Posts: 335 |
Snowmageddan is over, time to get back to the engine. I didn't take a movie of the old gasket, but the front section was trashed. See if here. https://youtu.be/4GGCJ3Sj7S4Questions and opinions solicited 1) its been suggested that I replace the Cam cover gasket while I'm at it. What if that leaks too? Thoughts? Hard to replace the crank seal? 2) several of the pan holes are somewhat deformed, suggestions on how to straighten? 3) anything else I should consider? I may paint the pan black, the orange really shows how poorly it gets beat up. The pan bolts may be hardest to change. Thanks!
Mark
'67 Camaro L6-250
|
|
|
|
|
Joined: May 2009
Posts: 493
Contributor
|
|
Contributor
Joined: May 2009
Posts: 493 |
Consider removing the engine and trans as a unit. Don't forget to plug the back of the trans so you don't lose fluid. I find this to be easier as you will spend less time under the car. Personal preference.
|
|
|
|
1 members (stock49),
336
guests, and
24
robots. |
|
Key:
Admin,
Global Mod,
Mod
|
|
|
|