|
|
Joined: Jun 2005
Posts: 590
Major Contributor
|
OP

Major Contributor
Joined: Jun 2005
Posts: 590 |
I'm finally pushing ahead with this install. I am pulling the 194 this weekend, so if I want to drive the car again, I'll have to get the 292 in there. I'll post updates to this thread as I get things done as well as update my website: 1963 Chevy II Nova 292 Conversion There are a few challenges to overcome to getting a 292 into an early Nova (a few have told me not to try). Here are a few threads on inliners that have helped me overcome the Chevy II specific issues as well as some others: Oil Pan Clearance Oil Pickup Support Valve Cover Fitment Hood Clearance
Last edited by 63ChevyII; 04/08/10 06:32 PM.
|
|
|
|
|
Joined: Apr 2004
Posts: 3,556 Likes: 35
1000 Post Club
|
|
1000 Post Club
Joined: Apr 2004
Posts: 3,556 Likes: 35 |
You need to get one of these motor mount adaptors.
It is steel and will allow bolting of a V8 standard motor ( rubber) to it and the bolt to a V8 bracket on your subframe in the standard V8 location.
Available from:
Davidson Performance Fabrication
> location: Lavaca, AR
> phone:479-221-8557
> website:davidsonperformancefabrication.com
> email: bddave@pinncom.com
>
I will get pic's. Tom
Inliner Member 1716 65 Chevelle Wagon and 41 Hudson Pickup Information and parts www.12bolt.com
|
|
|
|
|
Joined: Jun 2005
Posts: 590
Major Contributor
|
|
OP
Major Contributor
Joined: Jun 2005
Posts: 590 |
You need to get one of these motor mount adaptors.
I will get pic's. Tom
Thanks Tom. I have a plate that I was planning on using, but I'm interested in seeing what else is out there. I made some good progress last night. I had a couple of people come over to help me take the hood off. When we were done with that, one of them said 'Let's pull the engine.' Everything was already unbolted so it went quickly. After pulling the 194 out, I'm thinking that I want to remove the core support before putting the 292 in. There isn't much room in that engine bay!
|
|
|
|
|
Joined: Apr 2004
Posts: 255
Contributor
|
|
Contributor
Joined: Apr 2004
Posts: 255 |
I am so watching this...good luck mate!!
-Sam.
1967 Chevy II, 2-door post.
250, 3-OTT.
1969 GMC 1/2-ton.
307, 3-OTT.
DD.
|
|
|
|
|
Joined: Jun 2005
Posts: 590
Major Contributor
|
|
OP
Major Contributor
Joined: Jun 2005
Posts: 590 |
I made some progress yesterday: removed core support removed wiper motor dropped items off for sandblasting: core support, hood hinges, battery tray, engine mounts I also prepped part of the engine bay and got some paint on it to see how much imperfections will show up with the semi-gloss paint. I will need to spend more time sanding! engine bay
|
|
|
|
|
Joined: Mar 2006
Posts: 164
Contributor
|
|
Contributor
Joined: Mar 2006
Posts: 164 |
I prepped my 65 Nova Coupe much the same way.
You might want to pull the steering gear out of the way too, if you have not done so.
Don't stop now, once that BIg Six lands in there you will be a proud as a new Daddy.
James
James Kuenzi
Mid Missouri
64 Dodge Dart GT Convertible
225 /6 w 5speed
|
|
|
|
|
Joined: Jun 2005
Posts: 590
Major Contributor
|
|
OP
Major Contributor
Joined: Jun 2005
Posts: 590 |
I prepped my 65 Nova Coupe much the same way.
You might want to pull the steering gear out of the way too, if you have not done so.
Don't stop now, once that BIg Six lands in there you will be a proud as a new Daddy.
James
I've thought about doing that. Just trying to figure out how meticulous I want to be on the engine bay stuff. I've repainted/resanded a couple of times already b/c I haven't been happy with the result. I really want to have this thing back on the road by May 2nd.
Last edited by 63ChevyII; 04/13/10 04:05 PM.
|
|
|
|
|
Joined: Apr 2004
Posts: 3,556 Likes: 35
1000 Post Club
|
|
1000 Post Club
Joined: Apr 2004
Posts: 3,556 Likes: 35 |
Here are pics of 2 different 292 adaptors that he makes. The steel one is cheaper. All you need to do is bolt a V8 rubber motor mount to it and then to a V8 frame support. The V8 frame supports and motor mounts are much stronger than 6 cyl ones. For the drivers side use a inline bracket from a 63-70 pickup. Than a V8 mount will also fit on that side. Tom 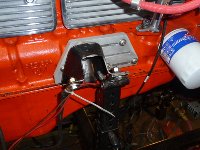 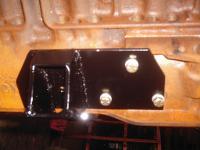
Inliner Member 1716 65 Chevelle Wagon and 41 Hudson Pickup Information and parts www.12bolt.com
|
|
|
|
|
Joined: Jun 2005
Posts: 590
Major Contributor
|
|
OP
Major Contributor
Joined: Jun 2005
Posts: 590 |
Thanks Tom. Any idea on what the cost is for those?
|
|
|
|
|
Joined: Jun 2005
Posts: 590
Major Contributor
|
|
OP
Major Contributor
Joined: Jun 2005
Posts: 590 |
made some more progress over the last few days: http://63chevyii.com/the_build/2010/january.htmI was hoping to get the 292 in the engine bay yesterday to see if my passenger side mount will work, but then realized that I need to get some flexplate bolts. The engine was previously bolted up the a sm465.
|
|
|
|
|
Joined: Jun 2005
Posts: 590
Major Contributor
|
|
OP
Major Contributor
Joined: Jun 2005
Posts: 590 |
|
|
|
|
|
Joined: Sep 2008
Posts: 3,669 Likes: 42
1000 Post Club
|
|
1000 Post Club
Joined: Sep 2008
Posts: 3,669 Likes: 42 |
Do you have any pics of where its still hitting the pan.
Class III CNC Machinist/Programmer
|
|
|
|
|
Joined: Jun 2005
Posts: 590
Major Contributor
|
|
OP
Major Contributor
Joined: Jun 2005
Posts: 590 |
Do you have any pics of where its still hitting the pan. At first it was hitting right above the draining bolt. You can see some intial pics in this gallery: 63ChevyII Pics I banged that section in, and the rubbing pt moved further out. The more I dimpled it, the further out the rubbing moved. I beat it in far enough that I now have a 1/4 - 1/2" tear for most of the width of the oil pan. I will take some pics tonight when I get home.
|
|
|
|
|
Joined: Jun 2005
Posts: 590
Major Contributor
|
|
OP
Major Contributor
Joined: Jun 2005
Posts: 590 |
there are a couple of vids in this directory. Let me know if you have problems view and I can upload a different format. oil pan interference vids The tape is where I've been thinking of cutting the pan.
|
|
|
|
|
Joined: Sep 2004
Posts: 5,839 Likes: 1
1000 Post Club
|
|
1000 Post Club
Joined: Sep 2004
Posts: 5,839 Likes: 1 |
Wow,looks like you need to just cut out a complete section for it to fit correctly.
Relocate a drain plug somewhere else.
On Twisted6's Nova, I believe he mods a 250 pan to fit the early Novas,the 292 pan is larger in many areas,hence the problem you are having.Or is it a 250 pan in the vids?
MBHD
12 port SDS EFI 
|
|
|
|
|
Joined: Jun 2005
Posts: 590
Major Contributor
|
|
OP
Major Contributor
Joined: Jun 2005
Posts: 590 |
Wow,looks like you need to just cut out a complete section for it to fit correctly.
Relocate a drain plug somewhere else.
On Twisted6's Nova, I believe he mods a 250 pan to fit the early Novas,the 292 pan is larger in many areas,hence the problem you are having.Or is it a 250 pan in the vids?
MBHD
it's a 250 pan. if I use this pan, I will put the plug on the back of the oil pan. Looking at the 292 block, I don't think there is a good spot to redrill it to use a nova oil pan. So I either have to mount the dipstick on the outside of the block, or made some major mods to the oil pan. My welding skills are marginal at best, so this is going to be tough.
Last edited by 63ChevyII; 04/26/10 10:35 PM.
|
|
|
|
|
Joined: Sep 2008
Posts: 3,669 Likes: 42
1000 Post Club
|
|
1000 Post Club
Joined: Sep 2008
Posts: 3,669 Likes: 42 |
The center link seems to be fine, but the tie rod ends are hitting now. How much more does the steering wheel need to turn before it hits the bump stops on the spindles. Check out the Moroso website and look at their V8 Chevy II oil pans. They has some good dimensions to go by for reference on the notches in their pans you can go by.
Class III CNC Machinist/Programmer
|
|
|
|
|
Joined: Apr 2004
Posts: 3,556 Likes: 35
1000 Post Club
|
|
1000 Post Club
Joined: Apr 2004
Posts: 3,556 Likes: 35 |
I like your vids. Sorry about the dilema.
By the time you finish cutting that pan out to clear the steering, not much oil sump and reservoir is going to be left.
I vote for using the chevyII pan and mount the dipstick on the pan. Be sure to brace the tube.
Let's see pics of the pass side mount. Tom
Inliner Member 1716 65 Chevelle Wagon and 41 Hudson Pickup Information and parts www.12bolt.com
|
|
|
|
|
Joined: Jun 2005
Posts: 590
Major Contributor
|
|
OP
Major Contributor
Joined: Jun 2005
Posts: 590 |
The center link seems to be fine, but the tie rod ends are hitting now. How much more does the steering wheel need to turn before it hits the bump stops on the spindles. Check out the Moroso website and look at their V8 Chevy II oil pans. They has some good dimensions to go by for reference on the notches in thier pans you can go by. cool - I'll check that out. It is hitting in the center still. I'll get another vid. I'll take a look at the bump stops too.
|
|
|
|
|
Joined: Jun 2005
Posts: 590
Major Contributor
|
|
OP
Major Contributor
Joined: Jun 2005
Posts: 590 |
I like your vids. Sorry about the dilema.
By the time you finish cutting that pan out to clear the steering, not much oil sump and reservoir is going to be left.
I vote for using the chevyII pan and mount the dipstick on the pan. Be sure to brace the tube.
Let's see pics of the pass side mount. Tom Thanks. I figured vids were better than pics. I'm thinking the same thing on the external dipstick. Also seems to be the easiest thing to do also. Here's the passenger mount - it isn't pretty but I think it will work. Another person made the plate and drilled 5/8 holes that are there. They gave up on their 292 install and gave the plate to me. 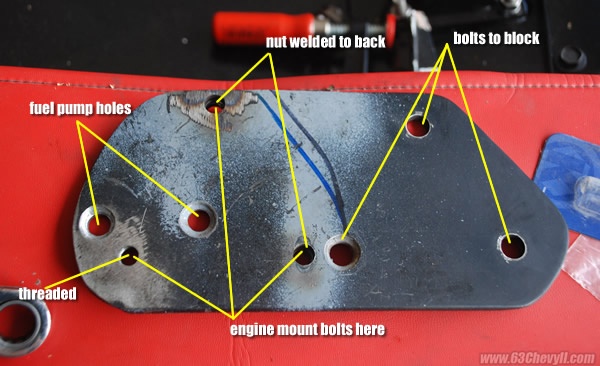 Note the diff in height between the holes that mount to the block and the holes that the engine mount bolts to. If I were to do it over, I'd leave more material around the top hole, as well as the fuel pump furthest to the left. I've traced the plate so that I decide to make another, it should be easier. When I pulled the engine out to pull the oil pan and put the flexplate on, I'll clean up the plate and paint it. I didn't come up with the idea for this plate. I got the idea from T. Griffith and have passed it on to a few others over the last couple of years: T. Griffith's Chevelle
Last edited by 63ChevyII; 04/27/10 12:34 AM.
|
|
|
|
|
Joined: Jun 2005
Posts: 590
Major Contributor
|
|
OP
Major Contributor
Joined: Jun 2005
Posts: 590 |
I like your vids. Sorry about the dilema.
here another video I made. It has nothing to do with my 292 install, but it should be more interesting:  SoCal Nova PCH North Cruise SoCal Nova PCH North Cruise
|
|
|
|
|
Joined: Jan 2010
Posts: 137
Contributor
|
|
Contributor
Joined: Jan 2010
Posts: 137 |
Vid is great. It's great to see beautifully restored cars, but I really love to see the car's that look like daily drivers. Especially seeing kids drivin' them.
If at first you don't succeed,
then read the directions and try again.
|
|
|
|
|
Joined: Jun 2005
Posts: 590
Major Contributor
|
|
OP
Major Contributor
Joined: Jun 2005
Posts: 590 |
The center link seems to be fine, but the tie rod ends are hitting now. In the videos above, if you watch the middle of the pan, above the oil pan drain and center link, you can see the pan flexing.
Last edited by 63ChevyII; 04/27/10 02:15 PM.
|
|
|
|
|
Joined: Sep 2008
Posts: 3,669 Likes: 42
1000 Post Club
|
|
1000 Post Club
Joined: Sep 2008
Posts: 3,669 Likes: 42 |
Ok, I see it now. If you look at the Moroso site, they give dimensions from the pan rail down, and from the rear of the pan forward for the Chevy II pans. You can see how close you are to meeting those #'s with your pan, and it might tell you how much more you need to go.
Class III CNC Machinist/Programmer
|
|
|
|
|
Joined: Jun 2005
Posts: 590
Major Contributor
|
|
OP
Major Contributor
Joined: Jun 2005
Posts: 590 |
thanks. this should help: 
Last edited by 63ChevyII; 04/27/10 02:36 PM.
|
|
|
|
|
Joined: May 2000
Posts: 680
Major Contributor
|
|
Major Contributor
Joined: May 2000
Posts: 680 |
Compared to most of the 292 installs I have seen, your videos show the motor is sitting an inch or two high. On my 63 with stock spindles I needed to "dimple" the rear sump pan at the curve above the drain plug and the drain plug was below the tie rod. On my 66 with dropped spindles we used a Chevy II pan and had no clearance issues are all.
If it were me, I would re-confirm all of the engine and trans mount measurements and angles are good. If you have access to a stock Chevy II that still has a six in it, check the pan rail height to the subframe and compare it to your 292 install. If everything checks out, think about going to a Chevy II pan and pick-up instead of building a custom unit.
The work you have done looks great. Before you start making major mods that others have not needed to do in a similar situation, sit back for a little while and look at your installation. Hopefully you will not find anything, but the one thing you do not want to do is start making wholesale mods and find out one minor miscalculation caused a major domino affect.
Inliner #1916
|
|
|
|
|
Joined: Jun 2005
Posts: 590
Major Contributor
|
|
OP
Major Contributor
Joined: Jun 2005
Posts: 590 |
I have stock height spindles also. drop coils shouldn't affect the steering to oil pan clearance, should they?
On your 66, what did you do regarding the oil dipstick placement?
Last night I was wondering if the engine was too far forward in the engine bay and if that's why the interference is so bad. I don't know how this is possible though - the engine is bolted to the tranny, which is bolted to the tranny crossmember. The engine is bolted to engine mounts, which are sitting where they need to be on the frame. I can take some pics of how everything is sitting in there tonight and see if I can email some people that have L6's in their novas to see if they can take some measurements for me.
Last edited by 63ChevyII; 04/27/10 04:50 PM.
|
|
|
|
|
Joined: Jun 2005
Posts: 590
Major Contributor
|
|
OP
Major Contributor
Joined: Jun 2005
Posts: 590 |
If you have access to a stock Chevy II that still has a six in it, check the pan rail height to the subframe and compare it to your 292 install. Would measuring from the crossmember up to the pan rail be a good comparison?
|
|
|
|
|
Joined: May 2000
Posts: 680
Major Contributor
|
|
Major Contributor
Joined: May 2000
Posts: 680 |
I do not remember which trans you are using, but if you are using a PG, TH350, 4spd or 3spd and the stock trans crossmember the engine is in the correct location front to back. On both of mine the stock Chevy II subframe mount, rubber mount and engine mount were reused from the 194s. The right side on the 66 used the stock motor mount with the top hole redrilled. A gusseted plate was welded to the motor mount and it mounted to the rubber mount in the stock location. The 63 uses the same set-up on the left and the right side uses the stock right side motormount and rubber mount with a new mount welded to the subframes. In both cases the engine and trans were installed with the trans and left side bolted in and the right mounts set once everything was level. One thing we tried was a generic GM urethane trans mount.
It was supposed to fit, but ended up being too tall and messed up all of the angles.
On the rear sump pan, just used the stock hole in the block and the dipstick tube I believe is an original as it has a bracket that mounts to the center bolt of the rear push rod cover. The center sump pan had a triangle shaped piece with the dipstick tube welded to the side of the pan.
Inliner #1916
|
|
|
|
|
Joined: Jun 2005
Posts: 590
Major Contributor
|
|
OP
Major Contributor
Joined: Jun 2005
Posts: 590 |
I am using a PG right now. I disconnected the engine and tranny last night unbolted the tranny from the tranny crossmember and made sure the tranny was slid back as far as it could. I may have moved it 1/8"-1/4". The edge of the tranny pan is sitting right at the edge of the crossmember. If I push the tranny back any further, the pan will be above the crossmember and the tranny bolts won't go in.
I was also going to have them measure from the cross member to the front of their oil pans. (i'll post pics to show what I mean).
I am concerned with the angle of the engine. Measuring front to back and across the carb plate, the front is lower than the back. I am wondering how much of this is due to the rake of the car, since I have shorter tires up front. If I raise the front of the engine to where the carb plate is level front to back, the holes on the engine mounts do not line up with the holes in the frame mount perches (not sure is this is the correct term). I had two other guys measure the distance from their crossmembers up to the pan rail and I believe we're all within an 1/8" of each other. So maybe the back of the engine is sitting high?
From what I am seeing, it seems that the engine is in the right spot, but things just aren't adding up. I must be missing something really simple.
Last edited by 63ChevyII; 04/28/10 12:25 PM.
|
|
|
|
|
Joined: Jun 2005
Posts: 590
Major Contributor
|
|
OP
Major Contributor
Joined: Jun 2005
Posts: 590 |
I was also going to have them measure from the cross member to the front of their oil pans. (i'll post pics to show what I mean).
 If I compare this to others, I should be able to confirm that the engine is sitting back far enough in the engine bay. This is how the engine sits when it settles in. If I take a left to right measurement of it across the top of the head, it is very close to level. Passenger side: 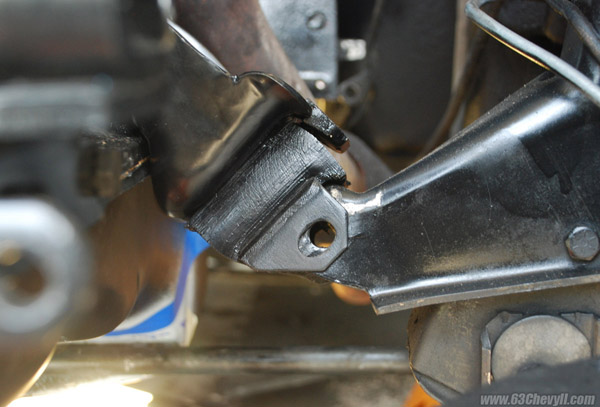 Drivers side:  This is where the tranny sat before I tried to move it back. I will get an update picture:  As you can see, there isn't much room to go back further.
Last edited by 63ChevyII; 04/28/10 06:26 PM.
|
|
|
|
|
Joined: Jun 2005
Posts: 590
Major Contributor
|
|
OP
Major Contributor
Joined: Jun 2005
Posts: 590 |
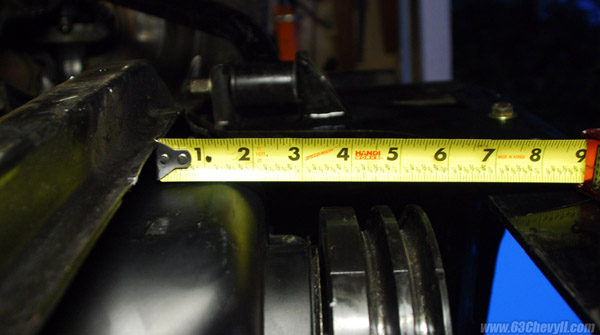
How much more does the steering wheel need to turn before it hits the bump stops on the spindles. bumps stops - is that the flat area pictured here? 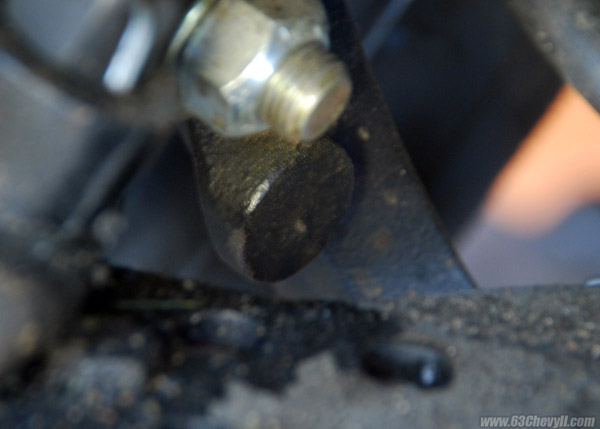 if so, I have about 1.25 inches to go. You can see how close you are to meeting those #'s with your pan, and it might tell you how much more you need to go. I was pretty close eyeballing it. I had marked out an area that I thought I'd need to cut out and using the morose numbers, I was close. The green tape shows what would need to be removed according to moroso: 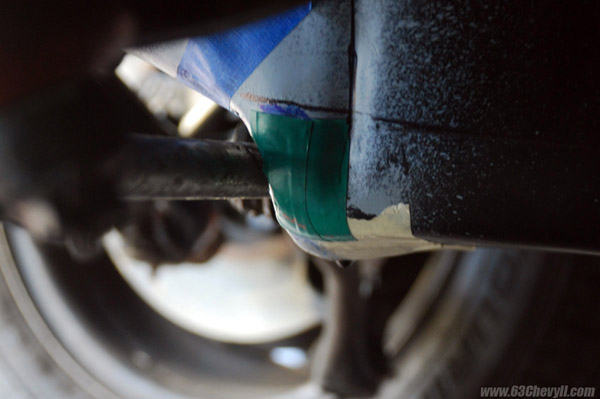 at the top edge of the green tape, you can see some blue sharpie ink on the pan peeking out from behind the tape. That's the area that I had marked out to remove.
Last edited by 63ChevyII; 04/28/10 06:31 PM.
|
|
|
|
|
Joined: Jun 2005
Posts: 590
Major Contributor
|
|
OP
Major Contributor
Joined: Jun 2005
Posts: 590 |
anyone have any thoughts on my last couple of posts?
|
|
|
|
|
Joined: Sep 2008
Posts: 3,669 Likes: 42
1000 Post Club
|
|
1000 Post Club
Joined: Sep 2008
Posts: 3,669 Likes: 42 |
Lyndon, from your video you posted of you moving the steering wheel back and forth, you could tell you were real lose to having enough clearance with the center link and tie rod ends. Maybe you could make some cardboard templates to use as a guide around the tie rods and center link so you can make sure you "nail it" on this next go round. Keep us posted on your results.
Class III CNC Machinist/Programmer
|
|
|
|
|
Joined: Jun 2005
Posts: 590
Major Contributor
|
|
OP
Major Contributor
Joined: Jun 2005
Posts: 590 |
I was thinking of doing that. I had thoughts of cutting away part of the pan while the engine is in the bay, but I don't know how I'd go about doing that without getting metal shavings/dust all over the internals.
I prob just have to pull the engine. pull the pan off. mock up with cardboard. then reinstall engine with cardboard attached to oil pan.
|
|
|
|
|
Joined: Oct 2002
Posts: 787
Major Contributor
|
|
Major Contributor
Joined: Oct 2002
Posts: 787 |
There might be away too literally chisel out the pan. You would lose about a 1/4 inch of material. If you have an air chisel (hammer)they come with a bit that looks like chisel, but has slot in it, at the end of the slot is hook that points down. It will peel 1/4 inch slot in sheet metal. I love it for exhaust pipe that doesn't want to come apart.
Larry
Ignorance can be fixed Stupidity is forever
|
|
|
|
|
Joined: Jun 2005
Posts: 590
Major Contributor
|
|
OP
Major Contributor
Joined: Jun 2005
Posts: 590 |
Last edited by 63ChevyII; 05/01/10 09:48 PM.
|
|
|
|
|
Joined: Oct 2002
Posts: 787
Major Contributor
|
|
Major Contributor
Joined: Oct 2002
Posts: 787 |
Ignorance can be fixed Stupidity is forever
|
|
|
|
|
Joined: Apr 2004
Posts: 255
Contributor
|
|
Contributor
Joined: Apr 2004
Posts: 255 |
I'm not the best resource here, but if it comes down to you pulling your engine again, would it be possible to cut the offending piece out, and weld in a piece of pipe that's cut in half length ways? Thats what I have planned on doing when the time comes for me.
Nonetheless, great job and good luck! The air chisel looks like it should work well.
1967 Chevy II, 2-door post.
250, 3-OTT.
1969 GMC 1/2-ton.
307, 3-OTT.
DD.
|
|
|
|
|
Joined: Jan 2005
Posts: 2,123 Likes: 3
1000 Post Club
|
|
1000 Post Club
Joined: Jan 2005
Posts: 2,123 Likes: 3 |
I can't help on why the clearance is tight, or any part of the car.
However, from personal pan clearance experience (Chrysler 440 in 1971 Duster) I can tell you that when you think you have enough clearance, you don't, and when you hit the brakes hard the engine shifts forward quite a bit.
Add extra room, or you'll have to do it again.
|
|
|
|
0 members (),
192
guests, and
47
robots. |
|
Key:
Admin,
Global Mod,
Mod
|
|
|
|


